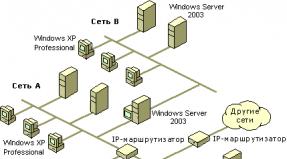
How to convert esd file to iso. What is the .ESD format and how can you convert an image in the .ESD format to the .ISO format
Which could be downloaded on the official Microsoft website a year ago, there was an image file operating system called install.wim . The install.wim file is a disk image containing operating system files in a compressed state. In progress Windows installations all files are unzipped from the install.wim image to disk (C:), by and large, this is the main stage of installing the operating system on our computer. There is also a tool called DISM , with which you can integrate drivers and updates into the install.wim file, enable and disable various operating system components, and restore integrity system files Windows, etc. But recently, in all distributions of Windows 8.1, Windows 10, instead of the install.wim file, there is an operating system image file install.esd . What kind of animal this is, we will look at in today’s article.
1. What is install.esd and install.wim file
2. How does the install.esd file differ from the install.wim file?
3. Does Microsoft have tools to convert install.esd to install.wim or should I look for third-party programs?
4. After conversion, can I use the install.wim file instead of install.esd in the Windows 10 distribution kit, or will I need to reverse convert the install.wim file to install.esd?
What is the install.esd file in install.wim
Greetings to all! The files install.esd and install.wim, located in the distribution kit (ISO image) of Windows 10, are archives in which operating system files are located in a compressed state Windows systems 8.1 or Windows 10, and DISM is a tool for working with these archives.
Archives.wim or.esd may contain one or more other archives (releases) of operating systems (Professional, Home, etc.) Archives located inside Wim or Esd files are called Images. Any Image in the archive is always assigned an index of 1, 2, 3, 4...
For example, we downloaded the Windows 10 distribution and connected it to the virtual drive (E:), go to the “sources” folder of the distribution and see the install.esd archive file,
to find out which Images are inside the archive, enter the command on the command line:
DISM /Get-WimInfo /WimFile:E:\sources\install.esd
Where E:\sources\, this is the path to the install.esd file
As you can see, in the archive install.esd is located fourWindows Image with indexes: 1, 2, 3, 4.
Image details: E:\sources\install.esd
Index: 1
Name: Windows 10 Pro
Description: Windows 10 Pro
Size (bytes): 14,244,778,516
Index: 2
Name: Windows 10 Home
Description: Windows 10 Home
Size (bytes): 14,040,329,647
Index: 3
Name: Windows 10 Home Single Language
Description: Windows 10 Home Single Language
Size (bytes): 14,047,031,800
Index: 4
Name: Windows 10 Education
Description: Windows 10 Education
Size (bytes): 13,988,924,495

What is the difference between the install.esd file and the install.wim file?
It's important to know that When creating a new archive of the Windows 8.1, 10 operating system, a WIM archive file (install.wim) is always created, an Image is created in the archive (for example Windows 10 Pro) and index 1 is assigned to it. Then, using the DISM tool, the archive other Images are added. The second image added will be assigned an index of 2, the next added image will be assigned an index of 3, and so on. Created images can have three types of compression:
/compress:none(without compression)
/compress:fast(fast compression)
/compress:maximum(maximum compression), if you do not specify the /compress parameter when creating an image, then the compression will be Fast (fast compression).
Microsoft developed another type of compression in 2014 Recovery(maximum maximum)
This type compression compresses Windows files into the archive even stronger, resulting in a file install.esd weighs30% smaller install.wim file.
Only 3 DISM parameters work with the recovery compression type:
DISM /Export-Image...... / compress:recovery
DISM /apply-image.
DISM /Get-WimInfo
To make it easier to work with archives, an archive with images compressed in Recovery is usually given the extension
ESD . It is advisable to install the esd extension, but not necessary. It is wrong to think that if the archive has esd resolution, then compression can only be recovery, and if the archive has wim resolution, then compression can only be fast, max and none, several times I came across wim files with recovery compression. Dism works not by expansion, but by compression - you can set the ESD and DISM permission when creating an image - it will create an image with “fast” compression.I made a short video on this topichttps://yadi.sk/i/B_8mfOjfxhqSkI hope you now understand the difference between the install.esd file and the install.wim file. Both files: install.esd and install.wim are archives with Windows files, and they differ in the type of compression. File archive - install.esd is more compressed and weighs less.
It is also important to know that when creating a new archive of the Windows 8.1, 10 operating system, the compression type - /compress:recovery is not supported. You can only compress it in recovery this image WIM, for example, enter the command on the command line:
DISM /Export-Image /SourceImageFile:F:\Win10\sources\install.wim /SourceIndex:1 /DestinationImageFile:F:\Win10\sources\install.esd /Compress:recovery
With this command we compress the file install.wim, located at F:\Win10\sources, into the file install.esd, located at F:\Win10\sources, using the recovery compression type. As a result, an install.esd file appears in the “sources” folder next to the install.wim file. Both files contain compressed files Windows, but the size of the install.esd file is smaller. Changing the compression type is usually called conversion.


Unfortunately, you cannot convert an ESD archive to a WIM archive using the DISM /Export-Image option.
Archive ESD must first be unzipped and then archived again to WIM file using compression fast or maximum .
When updating a Windows 10 build through the Windows update system, the installation image of the new preliminary (insider) build of Windows is downloaded to the user’s computer in a specially new image format - ESD ( ElectronicSoftwareDownload). ESD is an encrypted and compressed .WIM ( WindowsImagingFormat) Windows image.
This image distribution format was first used in Windows 8.1 for online operating system updates. Unlike a WIM file, an ESD image cannot be mounted or modified. Microsoft plans to widely use this format for system deployment. Compared to a WIM file, the size of an .ESD file is approximately 30% smaller, which is a big advantage when distributing it over the Internet.
In this article we will show how to decrypt and convert the ESD image of Windows 10 into a familiar Windows installation image, which can be burned to DVD or USB disk and use for clean install Windows 10 or performing an update.
Note. In fact, the easiest way to get a Windows 10 installation ISO image and burn it to a flash drive / DVD is to use a free one that will help you download latest version Windows image 10 directly from Microsoft servers.
How to get an ESD file with a Windows 10 image
Let's figure it out where can I get itESDfile? When you upgrade Windows 8 to Windows 8.1, the install.esd file is downloaded to background from the Microsoft repository and saved to the directory C:\Windows\SoftwareDistribution\Download\(some ID} .
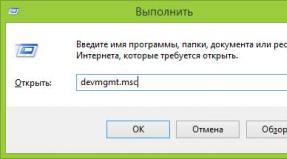
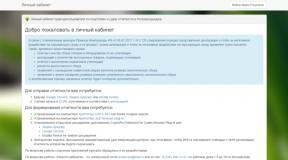
Get file Install.ESD from the last Windows build 10 can be done by going to Start -> Settings -> Updates and Security ( Start -> PC Settings -> Update and recovery -> Preview builds). If a new build is available for your Windows 10, you will be prompted to download and install the new image.

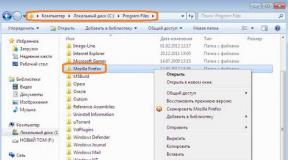
Run a system update for the new build, but do not overload your computer. In progress Windows updates will download the files necessary to perform the system version update. After the download is complete, open File Explorer and go to the directory C:\$Windows.~BT\Sources. Find the file in this directory Install.ESD(it is ) and copy it to any other directory. This is an .ESD file with a compressed image of the latest build of Windows 10.
Advice. In already installed Windows 10 Technical Preview The ESD file can be copied from the C:\RecoveryImage\Install.esd directory.

To get information about which Windows images are inside the ESD file, you can use the standard DISM utility:
DISM /Get-WimInfo /WimFile:"C:\iso\install.esd"
Deployment Image Servicing and Management tool
Version: 10.0.17134.1
Details for image: C:\iso\install.esd
Index: 1
Name: Windows 10 Home
Description: Windows 10 Home
Size: 15,439,030,656 bytes
Index: 2
Name: Windows 10 Home Single Language
Description: Windows 10 Home Single Language
Size: 15,439,078,082 bytes
Index: 3
Name: Windows 10 for Education
Description: Windows 10 for Education
Size: 15,662,641,239 bytes
Index: 4
Name:Windows 10 Pro
Description: Windows 10 Pro
Size: 15,662,520,267 bytes
The operation completed successfully.

In our example, there are several system images inside the install.esd archive. For example, Windows 10 Pro has an index of 4.
Knowing the ordinal index of the Windows image in the ESD file, you can export it to a WIM file using the command:
dism /export-image /SourceImageFile:c:\iso\install.esd /SourceIndex:4 /DestinationImageFile: c:\iso\win10pro.wim /Compress:max /CheckIntegrity

The resulting WIM file can be converted to an ISO image using third-party utilities.
ESD Decrypter utility
To convert an ESD image to an ISO file, we will use the utility command line ESDDecrypter(ESDToolKit) , which can be downloaded on GitHub: https://github.com/gus33000/ESD-Decrypter/releases/. The ESD Decrypter utility is written in PowerShell, so you can easily get acquainted with it source code(to generate ISO image The cdimage.exe utility is used from the WIM file).

Dism++ utility for converting install.esd file
To convert an ESD image to an ISO file, you can use a simple and convenient graphical utility Dism++ (https://www.chuyu.me/en/index.html), which does the same thing as the ESD Decrypter script, but has a more convenient graphical interface.

The .ESD format stands for Electronic Software Distribution. It is not a format in the usual sense of the word, but a technology that is intended for distribution. It is used to ensure that Microsoft programs are distributed electronically. Among the distributions there is also an image of the Windows 10 operating system. If the .ESD format is used for distribution, then all the programs that are presented in it will have a compressed form. If you download an image of the new operating system, it will be 35 percent larger in size than the Windows 10 file downloaded in .ESD format.
This technology is not yet widely used for the distribution of Microsoft products. For now, only those users who have access to the corporation’s internal lines can use it. Distributions in .ESD format are not designed for ordinary users. However, on official internet Microsoft has several programs in .ESD that are located in open access.
Today there are a large number of questions about this format for the reason that users cannot understand why there are programs in the public domain in the .ESD format, but they are almost impossible to download.
Initially, you need to go to the official Microsoft website and download the ESD image of the Windows 10 operating system from there. There are direct links on it. It should be noted that the OS images will be in English.
If the user already has Windows 10 downloaded, then there is no need to download its ESD image. It can be found in the system folders of the operating system. It should simply be copied from one folder and moved to another.
When the ESD image is downloaded, you need to decrypt or unpack it. It should look like an ISO image. This procedure can be carried out using programs: Decrypter, NLite, WinReducer Wim Converter. First you need to figure out how this procedure is carried out in the most easy-to-use Decrypter utility.
First you need to unpack the archive and save all its contents in the ESD-Decrypter folder.
You must also copy the Windows 10 operating system and its ESD image to this folder from the system folders.
Then you need to go to the folder and open the decrypt.cmd file there. Launch this file must be done as an administrator.
 Name
Name In the Enter your Option column you need to put the number 1.
After this, you need to press any button on the keyboard to move to the next step.
If we go to the ESD-Decrypter folder, we can notice that a file with an ISO image has appeared in it.
This file can be used to install the operating system at any time. It may also be required to create bootable flash drive, or installation disk.
If the user has computer device If you already have an operating system, you do not need to download the ESD image from the website. It is located in the C:\$Windows.~BT\Sources folder.

Would you like to install the latest builds of Windows 10 using the ISO format? This guide will help you convert install.ESD and install the latest versions of the operating system using a familiar format.
When you need to perform full installation or update Windows 10, as is the case with previous versions OS - Microsoft provides you with an installation file with an ESD (Electronic Software Delivery) extension. This new format a file image delivered to the user, usually through the Update Center.
This 3 GB file, containing all the components necessary for installation, is best known as install.ESD. By default, Update Center downloads this image to hidden folder$WINDOWS.~BT.
The advantages of Install.ESD over the Install.WIM image are that this format is encrypted and, as a result, compressed, which makes its download more secure, and installing updates does not require much time.
However, even though Microsoft is posting setup files V general access, the company completely bypasses ISO file images. However, you can use existing ESD files to create an ISO, thereby installing everything in the future necessary updates Windows 10 in the most convenient version for you.
IN this manual for Windows 10, we will tell you in detail how to convert an encrypted file image to ISO format.
How to create an ISO image from an existing Install.ESD file:
As soon as a new version of the Windows Insider build becomes available to you, do the following:
Warning: Although fully functional, this third party utility is provided at your own risk.
2. Unpack the utility into an empty folder on your desktop.
Note: If you are unable to unpack the .7z archive, use the 7zip archiver, which you can download from this link.
3. Using the keyboard shortcut “Win+I”, go to the computer settings settings.
5. Use the Update Center to check for updates and download the latest version of the operating system to your computer.

6. Once the installation process is completed and the system asks you to restart your computer to complete this procedure, open Explorer using the “Win + E” keys.
7. In the left pane, select This PC.
8. Go to the drive with installed system(usually this is drive C).
9. Open the View tab.
10. Check the box to show hidden items in the corresponding field and open the $WINDOWS.~BT folder, which contains the installed files.
11. Go to the Sources folder and copy the Install.ESD file

12. Open the folder where the ESD Decrypter utility was extracted and paste the copied file there.

13. Run the decrypt.cmd file as administrator
14. In the ESD Decrypter Script user interface, enter “2” to activate full ISO conversion mode from install.esd, then press Enter.

After the process is completed, a corresponding ISO file will appear in the folder with the utility used, the name of which will contain all the information about the presented OS assembly (for example, e.g., en_windows_10_pro_14316_x64_dvd.iso).

And now, you can use this image to install Windows 10 on virtual machine or create a boot disk.
Although there are currently many different versions ESD Decrypter tool, only version 4.7 is compatible with the latest build of Windows 10 Insider Preview. Also, on the Internet you can always find many alternative utilities, such as ESD-Decripter, which is also based on the command line.
Note: The specifics of working with encrypted files are very secure, but only as long as you use an authentic RSA decryption key. Despite the fact that this key is integrated into ESD Decrypter, Microsoft can change the Windows encryption method at any time and release an update file that is completely incompatible with the presented utility.
Updated: ESD files of the updated RTM build 17134 are already available online. We have changed the links in this post so that you can download the latest build.
Previously, there were rumors that 1803, aka Redstone 4, would start shipping on April 10, but something didn’t work out and the developers had to re-create the RTM build. Microsoft still hasn't announced an official launch date new version Windows 10 also did not say anything regarding the name of this update. Although release build 17134 is already available in Fast Ring, Slow Ring and Release Preview, the update is not yet available in the Media Creation Tool. However, stable versions of various editions are already on Microsoft servers, so all interested users can download ESD files and assemble an ISO installation file from them for a clean installation of 17134. You will need an ESD file decryptor, which can be downloaded, as well as a list all links to ESD files. It is located.
- Download and unpack the decryptor to any folder convenient for you.
- Download and extract the file with links to ESD files. Run the XML file in any browser convenient for you.
- Now you need to find the assembly you need. Click Ctrl+F and enter into the search “ ru-ru” (uk-ua for Ukrainian assemblies and en-us for American English). The browser will display a list of all editions in Russian. Navigate further by parameters Edition(Professional/Home/Education) and Architecture(x64 / x86).
- Then copy the link from the FilePath line. It should look like this: 17134.1.180410-1804.rs4_release_CLIENTCONSUMER_RET_x64FRE_en-us.esd. Paste the link into your browser's address bar and wait for the ESD file to download.
- Now place the downloaded file in the folder with the ESD decryptor and run the file dectypt.cmd on behalf of the Administrator.
- Select which edition to include (1 – all editions, 2 – one of the above, 3 – a number of editions and 4 – random edition). Press the appropriate number and then Enter.
- In the next step, select option 1 or 2. The first will create a standard ISO, and the second will create an ISO with a compressed install.esd.
- Wait for the process to complete and you will have a ready-to-use ISO file. Write it to a flash drive or disk, after which you can use the created drive to install Windows 10 Spring Creators Update. This procedure is described in more detail in the article “”.
If you don't want to play with ESD files, you can wait until Microsoft releases an updated Update Assistant and an updated Media version Creation Tool. The most impatient ones can confidently update using the method described above, since these are the builds that will be sent to users in the next few days.