How to manually remove unnecessary files from your computer. How to delete unnecessary files from your computer manually How to clear your search history in Windows
If personal computer is used by more than one person, it is worth clearing the history of Windows Explorer from time to time.

For Windows 7, for example, open your folder, say “Documents”, from the “Start” menu. By placing the arrow on “Search: Documents”, as in the picture, a list of recent search queries will appear in front of you. Move the cursor to any request, it will highlight in blue and click “Delete”. We do the same with all requests.
For Windows 8 and Windows 10, cleaning is carried out in a slightly different way. Open File Explorer and place the arrow on “Search: Quick Access Toolbar” at the top right. “Search” opens, revealing various options, among which will be “Latest search queries" We go down and find “Clear search history” there.
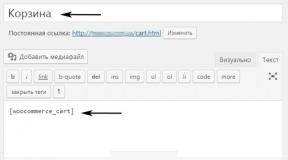
Windows stores not only search queries, but also the order in which folders are opened. We can clear other Explorer history like this - open your personal folder and right-click on the top field with the path, then in context menu enter “Delete journal”. That's all - contact our service center laptop repair -
And this time I’ll tell you how to remove computer junk manually yourself, using Windows tools and programs.
1. Where is garbage stored in operating systems?
In Windows XP
We go in and delete everything in the folders: Temporary Windows files:
- C:\Documents and Settings\username\Local Settings\History
- C:\Windows\Temp
- C:\Documents and Settings\username\Local Settings\Temp
- C:\Documents and Settings\Default User\Local Settings\History
For Windows 7 and 8
Windows temporary files:
- C:\Windows\Temp
- C:\Users\Username\AppData\Local\Temp
- C:\Users\All Users\TEMP
- C:\Users\All Users\TEMP
- C:\Users\Default\AppData\Local\Temp
Browser cache
Opera cache:
- C:\users\username\AppData\Local\Opera\Opera\cache\
Cache muck:
- C:\Users\username\AppData\Local\Mozilla\Firefox\Profiles\ folder\Cache
Google Chrome cache:
- C:\Users\username\AppData\Local\Bromium\User Data\Default\Cache
- C:\Users\User\AppData\Local\Google\Chrome\User Data\Default\Cache
Or enter it in the address chrome://version/ and see the path to the profile. There will be a folder there Cache
Temporary Internet files:
- C:\Users\username\AppData\Local\Microsoft\Windows\Temporary Internet Files\
Recent documents:
- C:\Users\username\AppData\Roaming\Microsoft\Windows\Recent\
Some folders may be hidden from prying eyes. To show them you need .
2. Cleaning the disk from temporary and unused files using
Standard Disk Cleanup tool
1. Go to “Start” -> “All Programs” -> “Accessories” -> “System Tools” and run the “Disk Cleanup” program.
2. Select the disk to clean:
The disk scanning process will begin...
3. A window will open with information about the amount of space occupied by temporary files:

Check the boxes next to the partitions you want to clear and click OK.
4. But this not all. If you installed Windows 7 not on a blank disk, but on top of a previously installed operating system, you probably have space-consuming folders like Windows.old or $WINDOWS.~Q.
Additionally, it may make sense to remove control points system recovery (except the last one). To perform this operation, repeat steps 1-3, but this time click “Clean up system files”:

5. After the procedure described in step 2, the same window will open, but the “Advanced” tab will appear at the top. Go to it.

Under System Restore and Shadow Copies, click Clean.
3. Files pagefile.sys and hiberfil.sys
The files are located in the root system disk and take up quite a lot of space.
1. The pagefile.sys file is system swap file(virtual memory). You cannot delete it (it is not recommended to reduce it either), but you can and even need to move it to another disk.
This is done very simply, open “Control Panel - System and Security - System”, select “ Extra options System" in the "Performance" section, click "Options", switch to the "Advanced" tab (or press the key combination win + R to open the run command and type SystemPropertiesAdvanced there) and in the "Virtual memory" section click "Change". There you can select the location of the paging file and its size (I recommend leaving “Size as selected by the system”).

4. Removing unnecessary programs from the disk
Good way To free up disk space (and as an added bonus to increase system performance), remove unused programs.

Go to Control Panel and select “Uninstall Programs”. A list will appear from which you can select a program. Which you want to delete and click “Delete”.
5. Defragmentation
Defragmentation hard drive, carried out by a defragmenter program, allows you to organize the contents of clusters, that is, move them on the disk so that clusters with the same file are placed sequentially, and empty clusters are combined.
This leads to an increase in the speed of access to files, and therefore to a slight increase in the performance of the computer, which can be quite noticeable at a high level of disk fragmentation. The standard disk defragmenter program is located at: start>all programs>standard>utilities>disk defragmenter.

This is what the program looks like. In which you can analyze the disk, where the program will show a diagram of disk fragmentation and tell you whether or not you need to defragment. You can also set a schedule for when the disk will be defragmented. This is a program built into Windows; there are also separate disk defragmentation programs, for example which you can download here:

Its interface is also quite simple.

Here are its advantages over standard program:

- Analysis before disk defragmentation.
- Do a disk analysis before defragmenting. After the analysis, a dialog box is displayed with a diagram showing the percentage of fragmented files and folders on the disk and a recommendation for action.
- It is recommended to carry out analysis regularly, and defragmentation only after appropriate recommendations from a disk defragmentation program. It is recommended to perform disk analysis at least once a week. If the need for defragmentation occurs rarely, the disk analysis interval can be increased to one month.
- Analysis after adding a large number of files.
- After adding a large number of files or folders, the disks may become excessively fragmented, so in such cases it is recommended to analyze them.
- Checking for at least 15% free disk space.
- To defragment completely and correctly using Disk Defragmenter, the disk must have at least 15% free space. Disk Defragmenter uses this volume as an area to sort file fragments. If the amount is less than 15% of free space, Disk Defragmenter will only perform a partial defragmentation.
- To free up additional disk space, delete unnecessary files or move them to another drive.
- Defragmentation after installation software or Windows installations.
- Defragment drives after installing software or after performing an update or clean install of Windows. Disks often become fragmented after installing software, so running Disk Defragmenter can help ensure peak file system performance.
- Saves time on disk defragmentation.
- You can save a little time required for defragmentation if you remove junk files from your computer before starting the operation, and also exclude from consideration the system files pagefile.sys and hiberfil.sys, which are used by the system as temporary, buffer files and are recreated at the beginning of each Windows session .
Lists open files and connected via USB devices, browser history, DNS cache - all this helps to find out what the user was doing. We have compiled step by step instructions how to remove traces of your activities in different Windows versions, Office and popular browsers. At the end of the article you will find several scripts that will help you automatically keep your machine clean.
1. Clear lists of recent places and programs
Let's start cleaning with lists of recent places and programs. The list of recent (in Windows 10 - frequently used) programs is in the main menu, and the list of recent places is in Explorer.

How to turn off this disgrace? In Windows 7, right-click on the “Start” button, select “Properties” and in the window that appears, uncheck both boxes in the “Privacy” section.

To clear the list of recent places and documents, you need to delete the contents of the %appdata%\Microsoft\Windows\Recent directory. To do this, open command line and run two commands:
Cd %appdata%\Microsoft\Windows\Recent echo y | del *.*
It also wouldn't hurt to delete the contents of the %appdata%\microsoft\windows\recent\automaticdestinations\ directory. It stores latest files, which appear in the jump list:
Cd %appdata%\microsoft\windows\recent\automaticdestinations\ echo y | del *.*
To ensure that recent files are cleared automatically when you exit, you must enable the "Clear the history of recently opened documents on exit" policy, which is located in the "User Configuration\Administrative Templates\Start Menu and Taskbar" section.
Now let's move on to Windows 10. You can disable the list of recently added and frequently used applications through the Settings window. Open it and go to the “Personalization” section, “Start”. Turn off everything that is there.

It seems that the problem has been solved, but this, alas, is not entirely true. If you enable these parameters again, then all lists with the same composition will appear again. Therefore, you will have to disable this feature through Group Policy. Open gpedit.msc and go to User Configuration\Administrative Templates\Start Menu and Taskbar. Enable the following policies:
- “Clearing the list of recently used programs for new users”;
- “Clear history of recently opened documents on exit”;
- “Clear notification log on tile when exiting”;
- “Remove the list of programs pinned to the Start menu.”

Clearing recent places in Windows 10 is easier than in Windows 7. Open File Explorer, go to the View tab and click the Options button. In the window that appears, disable the “Show recently used files in the Quick Access Toolbar” and “Show frequently used folders in the Quick Access Toolbar” options. Don't forget to click the "Clear" button.

As you can see, such a simple task as cleaning up the last objects has a rather complicated solution. No editing group policies- nowhere.
2. Clear the list of USB drives
At some sensitive facilities, only flash drives registered in the log are allowed to be connected to the computer. Moreover, as usual, the magazine is the most ordinary one - paper. That is, the computer itself does not in any way restrict the connection of unregistered drives. It doesn’t limit, but it records! And if during the check it is discovered that the user connected unregistered drives, he will have problems.
We under no circumstances advise you to try to steal military secrets, but the ability to clear the list of recently connected drives can be useful in other life situations. To do this, look at the following registry keys:
HKEY_LOCAL_MACHINE\SYSTEM\CurrentControlSet\Enum\USBSTOR\ HKEY_LOCAL_MACHINE\SYSTEM\CurrentControlSet\Enum\USB\
Here they are - all the drives that you connected to your computer.

It would seem that you just need to take it and clean everything. But it was not there! Firstly, the permissions for these registry branches are set in such a way that you cannot delete anything even in “seven”, not to mention “ten”.

Secondly, assigning rights and permissions manually takes a long time, especially if there are many drives. Thirdly, administrator rights will not help. The screenshot above was created when I performed the delete operation with admin rights. Fourthly, in addition to these two sections, you need to clean a long list of sections. Moreover, they need not just to be deleted, but to be edited correctly.
If for some reason you need to do everything manually, then search for the keywords MountPoints, MountedDevices DeviceClasses and RemovableMedia. But it's much easier to use ready-made program who will do everything for you. Some forums recommend USBDeview for this. However, I tested it and declare that it does not clear information from all required sections. USBSTOR And USB continue to contain information about connected media.
I can recommend the program. Run it, check the “Perform real cleaning” checkbox. You can turn on the “Save .reg cancel file” option or not, but if the goal is not to test the program, but to prepare for an upcoming computer inspection, then it’s better to turn it off.

The program not only cleans the registry, but also displays a detailed log of its actions (see below). When it finishes, there will be no mention of connecting drives to the computer.

3. Clear cache and browser history
The third point in our tutu is clearing the cache and browser history. There are no difficulties here - each browser allows you to reset the list of recently visited sites.
Continuation is available only to members
Option 1. Join the “site” community to read all materials on the site
Membership in the community within the specified period will give you access to ALL Hacker materials, increase your personal cumulative discount and allow you to accumulate a professional Xakep Score rating!
Windows 10 is the most commonly used computer operating system in the world and comes with a lot of features. While all of them are useful, some of them can work against you at times. One such feature is Explorer history. For those of you who don't know about it, let me take a moment to explain to you what exactly the history of a guide is. Every time you access files and folders on your computer under Windows control 10, the system takes note of this and stores these files and folders as temporary memory.
Now, when you launch File Explorer from your computer's Taskbar or anywhere else, your computer will display your most recent and frequently used files. While this feature can really save time, sometimes you don't want anyone else to be able to see the files you opened or accessed most often. That is, this is the moment when you want to clear the Explorer history on your computer.
Clearing history via file manager very simple. The only thing you can do not use is this, you can also disable this feature so that the system does not show the recently used files and folder history. So let's get to it.
Clear Explorer history
- Launch Explorer. You will find it pinned to your Taskbar by default.
2. Once File Explorer opens, click on the “File” menu, then select the “Change Folder and Search for Options” option.
3. Then a dialog box will appear. In this window, uncheck the “Show recently used files in” box. quick access” and “Show frequently used folders in quick access” if you do not want the computer to show your Explorer history again. Click on the “apply” button to apply these changes.

4. Then click on the “Clear” button to clear the history.
You can now return to Explorer to see that all the files that were previously displayed are no longer displayed.
So this was our tutorial on how to clear File Explorer history in Windows 10. This is a simple tutorial but in case you are facing any of the issues or have any doubts regarding this then feel free to write a comment below .
How to clear history on a computer? After all, operating systems are different, as well various browsers present a different interface.
It is also worth noting that there are two opinions about the meaning of the phrase: clear history. This could mean:
- that the user wants to hide his recent actions from other users on the computer, both in the browser and when working with documents, programs, etc.;
- that the user wants to clean up all possible personal information from a computer (usually this is part of the preparation for selling a PC).
If you want to transfer or sell a computer without any personal or indirect information related to you that could be restored using special programs and knowledge, it is better to reinstall the operating system.
How to clear history on a computer using special programs
How to clear your browsing history on your computer if a PC sale is just around the corner?
Programs aimed specifically at such situations when you need to put your computer in order so that the operating system remains pristinely clean without the threat of information leakage.
Such programs do not take up much space in the device’s memory, but guarantee clean operation.
Sysprep - utility program
Read also: TOP 12 Programs for computer diagnostics: description of proven software tools
It is part of Windows natively.
Located on drive C, there you need to find the name of the operating system, where the System folder is located with a postscript in the form of numbers indicating the number of bits. Already here you can find the name of this program.
Its essence is to personalize your account. That is, if you want to delete personal information, just do it in the settings with the desired account.
How to clear history on Windows computer with sysprep:
1 First of all, you need to carry out the so-called audit. That is, by clicking on the name of the program in the folder, a window appears where you need to make a choice in accordance with the screenshot below.

2 Sometimes after these manipulations an error appears, but, as a rule, it is easy to fix.
5 Now it's time to delete account, where information that is unwanted by others is stored. To do this, you need to go through the panel that controls the computer properties, then to the user accounts position.


8 In this case, you need to delete it and not leave any data.
9 In other words, in the end, only the administrator’s entry should remain.
10 Next, you need to go back to the program via drive C and configure the window settings. That is, in the first line, select, respectively, the provision about going to the window welcoming the system, called OOBE. It is necessary to pay attention to the checkbox for preparation for use, as well as the settings for finishing work - completion.

Complete the action by clicking “OK”
11 The last thing to do is click “OK”.
Using the PrivaZer program
Read also: How to delete a conversation in Skype if you really need it? Step-by-step instruction

The work consists of entering and selecting those positions in the computer that you would like to permanently delete.
It is also possible to scan garbage and unnecessary files, which is very convenient when using a computer when excess memory is used up and the PC begins to slow down.
Using CCleaner
Read also: TOP 5 Ways to delete all posts on the wall in VKontakte (VK)
This is also an easy-to-use program; when opened, it provides the choice of analyzing garbage, utilities and other rubbish, or checking boxes point by point for the purpose of removal from the program (as well as uninstallation from the computer).
CCleaner is able to identify all sorts of residues from deleted files, small garbage and even large programs that have not been used for a long time, suggests deleting them.