Setting up startup in Windows 10. What to do if the Start menu does not open. Switch to full screen mode
The Start menu is a critical component Windows systems 10, so users may want to customize it to their liking. There are many ways to do this. You can change the size of tiles, color, and select the folders to be shown. Below we will talk about the settings options.
How to resize the Start menu

How to enable full screen start menu

How to Pin an App to the Start Menu
If you want to see a specific app on the Start menu, you can pin it from anywhere. In this case, the application will be attached from the desktop, but it can also be attached from any other location in the system.
How to Unpin an App from the Start Menu

How to change the size of tiles

How to move tiles in the menu

How to disable live tiles
Live tiles contain updated information. They resemble slide shows; If you don't like this look, you can turn it off.
How to change the color of the Start menu

How to add folders to the Start menu
On the left side of the menu without tiles, you can add certain Windows folders 10 for quick access to them. By default, the Explorer and Settings folders are located here.
How to rename a group of tiles
In the Start menu, you can see headings next to groups of tiles. By default, there are “Entertainment and Recreation” and “Events and Communication” groups. These headers can be changed.
Greetings to everyone in the next issue, dear friends! Almost every user managed to try the new version operating system from Microsoft, which is called Windows 10. The new operating system has not only slightly changed functionality, but also an updated Start menu.
On the new line of Windows 10, tiles have appeared instead of buttons familiar to the user. Sometimes you just want to go back to the old Start menu that everyone has become so accustomed to since the Windows XP generation. It is not only possible to return the previous menu appearance in Windows 10, but there are also various options. Therefore, in today’s episode we will look in detail at how to make the start menu in Windows 10 like in Windows 7.
To return to the classic appearance of the Start menu in Windows 10, there is no need to install an earlier version of the OS. For this there are special programs and applications that have a significant advantage - they are free. If you don’t want to download applications to change the appearance of the Start menu, then there is another way standard method returning the menu as on Windows 7. Consider this method, as well as applications through which you can use Windows 10, but at the same time appearance It will be like on Windows 7.
Let's first look at how to make a start menu in Windows 10 like in Windows 7 using the usual standard method.
The standard way to change the Start menu on Windows 10
The first traditional way to change the menu is that the user needs to independently adjust the personalization to the classic format. To do this, you should perform simple manipulations:
- Use the keyboard shortcut “Win+I” to call system application"Options".
- After that, open the “Personalization” tab, and then select the “Start” option, as shown in the screenshot below.

— In the menu that opens, you will need to disable all functions except “Show list of applications in the Start menu.” This option should be left enabled, as shown in the screenshot above by the arrow.
— The next action is that you need to stand on the application call tiles and right-click. In the pop-up window, select the “Unpin from” option. home screen».

“After this we get the classic version of the Start menu in Windows 10.” This view is of course close to the classic “seven”, but much more convenient than the standard one of the new operating system.

With these simple manipulations you can replace the standard menu type in the “ten” with the classic “seven”. If you still want to make the menu completely similar to Windows 7, then you will need to turn to special applications for help.
How to make the start menu in Windows 10 like in Windows 7 thanks to the Classic Shell application
Initially, it should be noted that there are many applications for changing the Start menu in Windows 10, but one of the most high-quality and reliable programs is Classic Shell. In this article, I already told you how to use this application to change the start menu in Windows 8/8.1
In addition to quality and reliability, it is important to note that this application is in Russian and is also distributed free of charge. It simply doesn’t make sense to look for anything else, since many users have already appreciated the application.
The Classic Shell program is based on modules, which can be disabled during application installation if necessary. To disable certain modules, just use the “Component will be completely unavailable” button. Let's look at some module options:
- Classic Start Menu. A module that allows you to create a classic menu like on Windows 7, as well as customize it.
- Classic IE. A module that allows you to return the classic Internet Explorer.
- Classic Explorer. Allows you to change the appearance of the conductor, equipping it with new elements.

The screenshot above shows the installation window for the Classic Shell application, during which you will need to select the modules that will be needed for work. We are interested in the Classic Start Menu module, so we must install it. Now let's look at the procedure for changing the menu to a classic view using the Classic Shell application.
First of all, of course, you need to install the application by downloading it exclusively from the manufacturer’s official website. After installation, click on the “Start” button, after which the Classic Shell application settings will appear. The parameters are configured in the window that opens. It is important to note that the application allows you to select an icon for the Start button.

After selecting the appropriate settings, you should go to the “Basic Settings” tab. In this tab you can do additional settings according to the response to pressing the “Start” button. Below is a screenshot showing what basic settings the Classic Shell application allows you to perform.

The next tab “Cover” allows you to select the appropriate theme for the design. There may be different options that you need to try to decide.

The final tab “Customize the Start Menu” allows you to configure the display or hiding of elements of this menu. If you want to fantasize, then you need to check the box next to the “Show all parameters” item in the Classic Shell application window.

For comparison, below is a screenshot of the Windows 7 Start menu, and a second one that was configured using the Classic Shell application.

How to make the start menu in Windows 10 like in Windows 7 using the StartisBack++ application
The disadvantage of the StartisBack application for changing the standard Start menu is the ability free use only for 30 days. To renew your license you will need to pay 125 rubles, which in principle is not very expensive.
The StartisBack application is one of the best products for replacing the standard “ten” menu with “seven”. For those who are not familiar with the Classic Shell application, we suggest using the StartisBack program. To complete the setup you will need to perform the following manipulations:
When the application is installed on your computer, after launching it you will need to press the “Configure StartisBack” button. To perform the settings in the future, you will need to go to the “Control Panel”, and then click “Start Menu”.
When customizing, you can choose a variety of options for the appearance of the Start button.

If you open the “Switching” tab, you can customize the keys and the behavior of the “Start” button.
In the “Advanced” tab, you can disable Windows 10 OS services. If the user does not want anyone other than him to be able to configure the menu with the StartisBack application, then you can select the appropriate item in this application: “Disable for the current user.”

It is important to note that the application is much easier to manage than in the Classic Shell, which is especially pleasant for beginners. For comparison, below is a version of the Start menu that was obtained using the StartisBack application.

You can also download the StartisBack++ application from the manufacturer’s official website. There are other applications for customizing the display of the Start menu on Windows 10, as on the “seven”. For example, an application such as Start10, the main advantage of which is ease of setup.
I repeat again that the main drawback of this application is due to the need to purchase a license 30 days after installation. The cost of a license is about $5, which not everyone can afford. I hope today’s review helped you find the answer to the question: How can I make the start menu in Windows 10 like in Windows 7?
With the release of the Anniversary Update, the start menu in Windows 10 has become much more convenient, now any user can customize it for themselves. How exactly to do this - read our article.
Customize the tree structure of the program list

You can do with a list installed programs in the start menu you can do anything: add new shortcuts, delete unnecessary ones and change their location in folders. To do this, open Explorer and enter the address:
%appdata%\Microsoft\Windows\Start Menu
Keep in mind that this will only affect desktop programs and not Windows Store apps and games.
Remove unnecessary

You can remove unused applications directly from the start menu. Right-click or hold your finger on the name of the app you want to remove and select the uninstall option. You can also hide pinned app tiles.
Some pre-installed applications cannot be removed this way; special programs are needed for this.
Adjust menu size

Pull the edge of the menu up or sideways - it will increase. and the arrangement of tiles on it will change. Changes occur abruptly, affecting an entire column or row of tiles at once.
Add another column

Go to your personalization settings and in the “Start” subsection, find the “Show more tiles” option. If you activate it, another column of medium-sized tiles will appear in the start menu.
Change the size of tiles

Windows 10 comes with four tile sizes. It is advisable to use the largest ones for applications with any useful information, like news and weather forecasts. Otherwise, it all depends on which arrangement of tiles seems most beautiful and convenient to you.
Disable Live Tiles

If you are annoyed by the animation on one or another tile (or all of them at once), you can turn it off. Right-click on a tile and select the option you want.
Change the color of the tiles

Go to the personalization settings and in the “Colors” subsection, select a more pleasant accent color for the tiles. If you specify that it should be selected automatically, then the color of the tiles will depend on the wallpaper.
The start menu sometimes shows what other applications you can install in Windows store. You can turn off recommendations through your personalization settings.Recently added and frequently used apps
Perhaps you like a clean and minimalist start menu, and lists of recently installed and frequently used applications are of no use to you. You can remove them through your personalization settings.Switch the menu to tablet mode
If you use a tablet, you may find the full-screen start menu more convenient than the classic one. You can activate this menu design through the personalization settingsAfter release new edition Windows 10 operating system, many users began to encounter various errors in her work. This is due to the fact that the new version has not been fully debugged and is being finalized during operation. One of the shortcomings of the system was the frequent failure to activate the Start key menu: it does not respond to commands. At the same time, the icons in the “Taskbar” stop responding. Microsoft gradually resolves software issues through periodic updates. Until the errors in the system files, it is recommended to use methods developed and widely used to correct this deficiency.
What is the difference between the Start menu in Windows 10 and previous versions?
Due to the fact that the Windows 8.1 edition was criticized all over the world due to the lack of a Start key, the developers decided to return to the previous view of the Desktop with a familiar interface to everyone.
The Windows 10 Start button menu has a tiled interface
The Start button and its menu, shown in Windows edition 10 have a modified appearance.
The updated Start key menu is a hybrid edition that includes a menu similar to the classic view for the old Windows versions, and the tiled architecture introduced for the first time in Windows 8, which is most suitable for touch control.
The icons on the left half of the menu and the live tiles on the right side duplicate each other, so you can use the part that is more suitable for a particular user. They can be disabled, deleted or edited.
Unlike previous editions of Windows, in Windows 10 you can resize the Start menu like a regular window. To do this:

All the previous items remain in the menu, such as programs, power management icons and others.
If you click on the “Start” button with the right mouse button, a menu with system management tabs will open. With its help, you can manage disks, change system settings, configure the network, search and perform other operations.
 Right-clicking the Start button brings up a menu with system management tabs
 It is possible to remove tiles and add new ones using the icons on the left side of the menu. To do this you need to do the following:

If you remove all the tiles, the menu will take on an almost classic look. This can be done if the user does not use the right half when working. In addition, it increases resources random access memory, since the tiles take up a significant amount of it due to the drawing of graphic images.
How to return the classic Start menu design
Due to the fact that the appearance of the key and the Start menu is very different from the usual classic look, then, naturally, many users will want to return to the interface they have become familiar with over the years, like Windows 7. To do this, you can use two well-known methods:
- use standard Windows capabilities 10;
- install software third party developer.
How to use standard features is described in the previous chapter of this article.
Installation of third-party programs requires the use of one of the publicly available and proven utilities listed below:
- StartIsBack++;
- Classic Shell;
- Start10.
You can use other utilities that allow you to return to the classic design of the Start menu, but the above ones are the undisputed leaders in this direction. They take up little space on your hard drive and make it possible to change the menu view with a minimum number of steps.
To take advantage of the editing utilities external interface keys and the Start menu, you need to perform a series of sequential actions:
- StartIsBack++ allows you to return the usual image of the menu and Start key. To do this, you need to do the following:

- Classic Shell gained popularity after the release of the eighth edition of Windows. This utility made it possible to return the “Start” key to the “Taskbar”, since in the usual design the key was not there.

- In the Windows 10 edition, this problem no longer exists, but now, using the program, you can return to the classic design. To do this, you need to do the following: Start10 changes the standard Windows menu

10 to yours immediately after installation. This menu is more similar to the Start menu in Windows 7 and is not much different from it. In the utility settings, you can remove the Start key, select the size of menu icons, and configure other settings. To run the utility, you need to perform the following operations:
The Windows 10 operating interface certainly looks more attractive than its predecessors, but at the same time it uses a very large amount of RAM and video memory. For standalone devices, such as a laptop or tablet, the Desktop takes up even more resources. After returning to the classic view, you can increase the amount of free memory and battery power by reducing the requirements for drawing graphics.
Video: How to return the Start menu to the classic look using Classic Shell
Customizing the Start Menu in Windows 10
The new Start menu in Windows 10 consists of two parts:
- left half - classic view using pictograms;
- the right half is "live" tiles using the Metro interface.
The menu has its own settings, which can always be changed if necessary.
Video: How to customize the Start menu in Windows 10
Switch the desktop from classic view to full screen and vice versa
Initially, Windows 10 is installed on the computer’s hard drive, already having a “Start” button in the “Taskbar”. To switch the “Desktop” display to Start screen mode, you need to perform the following sequence of actions:

Also, run full screen mode possible by activating “Tablet Mode”. This will require the following:

Video: how to switch the “Desktop” to full-screen display mode
Set the Start menu color
Changing the color and shape of the Start menu in Windows 10 is carried out according to the following algorithm:

Video: How to change the color of the Start menu in Windows 10
Rules for working with live tiles in the Start menu
Users can change the size of live tiles if desired. You can also move them, edit groups, pin and unpin.
How to resize and move live tiles
To transform the size of a “live” tile, you must perform the following steps:

How to edit groups of "live" tiles in the menu
Windows 10 has a feature to distribute tiles into different groups. To create a new group:

More Start menu settings
To customize the apps that appear by default in the Start menu, follow these steps:

You can also set a specific set of directories to display in the Start menu. To do this, a sequence of certain actions is performed:

Video: How to change basic Start menu settings
Reasons why the Start menu may not open in Windows 10
The exact reason that is causing problems with the Start menu is on currently not exactly established. According to Microsoft experts, this can happen for several main reasons:
- incorrectly installed system updates;
- failures when drawing the graphical interface;
- damage to system files and directories;
- inheritance of system errors when installing Windows 10 on Windows 7 or Windows 8.1;
- failure in the system registry;
- penetration of malware into the system.
In addition to these reasons, there may be many other, minor reasons that affect the operation of the Start menu when the key does not respond to user commands.
What to do if the Start menu won't open
There are several proven methods used to fix errors that affect the key and the Start menu.
Solving problems in the Start menu using a special utility
To fix errors when working with the Start menu, Microsoft specialists have developed a small utility. It can be downloaded from the company's official website. The utility works without installation immediately after launch. To use it, you must follow the following instructions:
- Go to the official Microsoft website.
 Select the "Support" tab on the Microsoft website
 - Click on the "Support" tab.
- Select the problem Windows product.
 Click on the Windows icon
 - In the window that opens, click on the “Troubleshoot problems when opening the Start menu or Cortana” tab.
 Click the "Troubleshoot problems when opening the Start menu or Cortana" tab
 - Select the "Try the troubleshooter" tab from the suggested list of troubleshooters.
 Click on the “Try the troubleshooter” tab
 - In the drop-down tab, click on the line “Start Menu Troubleshooter”.
 Click on "Start Menu Troubleshooter"
 - Open batch file startmenu.diagcab.
 Click on the "Open" button in the pop-up window
 - Launch the startmenu CAB file.
 Launch the startmenu file through Explorer
 - In the “Main Menu” panel that opens, click on the “Next” button.
 Click on the “Next” button in the “Main Menu”
 - The utility will begin the process of searching for Start menu problems.
 Wait until the end of the search for problems with the Start menu
 - At the end of the procedure, click on the “Close” button. All bug fixes that are found are carried out automatically.
 Click the “Close” button if the utility does not detect any problems
Use the View More Information tab to view your problem search criteria. The utility checks the Start menu for the following parameters:
- system registry errors;
- incorrect installation of received updates;
- state of the live tiles database.
Based on the results of the check, a report is generated, which, if necessary, can be sent to print.
Using the Start Menu Troubleshooter is the most effective method at the moment, which fixes errors in the Start menu with an almost one hundred percent guarantee.
Restarting File Explorer to fix errors in the Start menu in Windows 10
Sometimes, to restore the Start menu, it is enough to restart the explorer.exe application. To execute it:

Video: how to restart Explorer in Windows 10
Restoring the Start Menu Using Registry Editor
Restore correct operation the start menu can be changed by changing system registry. To do this, you need to make some corrections and perform a number of operations:
- Right-click on the Start button.
- Click on the “Run” line.
 In the menu, click on the “Run” line
 - Enter the regedit command and click OK.
 Enter the regedit command and click OK
 - Navigate to HKEY_CURRENT_USER\Software\Microsoft\Windows\CurrentVersion\Explorer\Advanced.
- Right click on free space in the right half of the panel.
- Hover your mouse over “New” and click on “DOWRD (32-bit) Parameter” in the drop-down menu.
 Create a new DOWRD parameter (32 bits)
 - Name it EnableXAMLStartMenu.
- Click on the new parameter with the left mouse button and enter the number 0 in the “Value” field.
 In the “Value” field, set the value to 0
 - Restart your computer.
It is recommended that only experienced users make changes to the registry. If you are not sure that you can handle it, then it is better to entrust the solution to the problem to professionals, so as not to accidentally make an irreparable mistake that can only be corrected by reinstalling the system.
Video: How to restore the Start menu using Registry Editor
Recovering the Start menu using the built-in Maintenance utility
You can try to fix the Start menu error using the built-in Maintenance utility. To run the utility, do the following:
- Launch the “Control Panel” by double-clicking on the icon on the “Desktop”.
 Double-click the Control Panel icon to open it
 - Click on the “Security and Service Center” icon.
Many users were unhappy with the appearance of the radically new Start menu in Windows 8 and new version operating system, Microsoft decided to listen to the demands of millions of users from all over the world and gave them a choice: use the full-screen Start menu or install the classic version, the familiar Windows users 7 and older versions of the operating system. Are you new to Windows 10? Here are instructions for changing the appearance of the Start menu in Windows 10.

The traditional Start menu, installed by default in Windows 10.
By default, Windows 10 comes with the classic design, which looks like a combination of the Start menu from Windows 7 and Windows 8. On the left side you will find a list of frequently used applications and recently added ones, as well as a button that will open you a list of all installed applications. The right side of the menu displays all of your apps' pinned tiles, just like Windows 8.

The Start menu personalization window in Computer Settings.
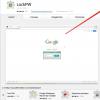
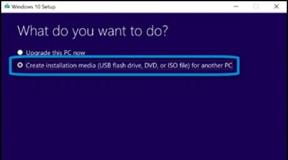
If you prefer full-screen display mode or just want to try an alternative interface, you can change it as follows:

Full screen Start mode in Windows 10.
This will switch the Start menu to full-screen mode, similar to Windows 8. Note that in this case, the computer's power key will appear at the bottom left, along with the all applications button. The list of installed applications will open in the sidebar, and the button will appear on the left top corner will open a panel with frequently used apps and four links to File Explorer, PC Settings, All Apps, and Power Management.
How do I turn off frequently used and recently added apps from showing in the Start menu?

Alternative Start Menu from Stardock.
Bonus.
Of course, no one has canceled third-party applications with which you can change the appearance of the Start menu. If you're still unhappy with the way Microsoft has changed the menu, you can install the classic option, which will look exactly the same as what is used in Windows 7. Please note that to do this you need to use third party applications. Stardock provide a great app called Start10 for just such purposes.