Converting a basic disk to active via DiskPart. Converting a basic disk to active via DiskPart Which disk partition is needed to install windows
As a rule, installing Windows 7 goes without any complications and the whole process takes 20-30 minutes. After installation, Windows 7 automatically detects devices and installs drivers, and even if a device driver is not found, Windows 7 will install it automatically the first time you connect to the Internet. So after installing Windows 7, you don't even have to install drivers.
First of all, the installation program will ask you to select a language, in general there is nothing to think about - of course, Russian. If you have the Windows 7 Ultimate variant, then you can change the language after installing the system. Less "fancy" versions of the "seven" do not know how, although with technical point In my opinion, this feature could be implemented in any edition of Windows 7, and the fact that it is not supported by other editions of Windows is Microsoft's marketing ploy.
After selecting the language, a window will appear with a single button Install.

This is followed by a very important installation step. You need to choose your Windows release 7. You need to choose exactly the edition that you purchased. If you choose Ultimate and purchased Home Basic, then the Home Basic key will not work and you will have to reinstall the system again to change the edition of Windows. But if you want to get acquainted with the capabilities of the "seven", choose Ultimate (Maximum) - and then within 30 days you can use all the features of the operating system for free.

Then you will need to read the license agreement and select the installation type - Update or Full installation. Let me remind you that the Update option can be selected if the installation of Windows 7 is launched from under an already running Windows versions. If you booted from installation disk, then you need to select the Full installation option.

The next step is the most important. You need to select a partition for installing Windows 7. When installing on a new HDD(new computer) you just need to click on the Next button. Windows 7 will automatically create partitions and format them. If the partitions have already been created, you need to select the partition on which you want to install the "seven" and click the Next button. If there is not enough space on the partition, then you need to click on the Disk Setup button, and then on the Format button. When formatting, all data will be deleted (after all, you created a backup copy?), but space for the operating system will be freed up.

Note. How to choose the right section if you are in doubt whether this is the right section? After all, when you browse a disk through Explorer, the drive letters C:, D:, E:, etc. are displayed, and the installer displays partition numbers. Considering that the installer does not even display partition labels, it is easiest to navigate by the size of the partition. For example, on my computer, partition C: is 20 GB, D: is 50 GB, and E: is about 90 GB. You want to install the "seven" on the D: drive, then select a 50 GB partition. There is another way to define a section. Sections are usually numbered according to alphabetical order, i.e. section C: corresponds to number 1, section D: - 2, etc.
After selecting the partition, Windows installation will begin. You will see a boring copy progress indicator, after which the system will automatically reboot. After rebooting, you need to wait a bit while the system performs a number of housekeeping actions like updating the registry. Installation on this, you understand, is not completed. You need to enter additional information. First of all - username and computer name. The username must not be the same as the computer name. It is clear that any computer name can be set, not just "user_name - PC", but it must be different from the user name.

The next step is to enter the user password and confirm it. If you don't want the system to ask for a password at startup, just click the Next button (you don't need to enter anything).
And now the most interesting moment in the entire Windows installation process has come: you need to enter the product key. Note that you first chose the edition of Windows, then you practically installed the entire system, and you only need to enter the key now. If you wanted to cheat and chose a more expensive edition, then you have two options: either reinstall the system by choosing the desired edition, or use the more expensive edition of the "seven" for 30 days for free, and reinstall it after a month.

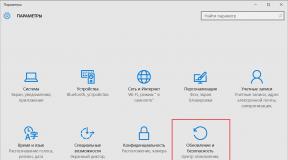
The next question is the choice of parameters Windows firewall. Considering that you have not yet installed any other firewall and do not plan to do so, select the recommended options. Immediately after that, you need to set the date, time and time zone. I think you can handle this without my comments.

Next, you need to select the type of network. Everything is simple here: if you have a home computer, choose home network, if you use a computer in the office - a work network, and if you mainly connect to public networks in libraries, airports, or connect to the Internet via GPRS / EDGE / 3G, then you need to select a public network.

That's all. After a few seconds of waiting, you will see a working Windows table 7.
Progress in creation personal computers and server systems, achieved over the past 20 years, is evident. However, the vestiges of dead platforms still define many technological aspects of the rapidly developing computing technology.
One of these rudiments is the BIOS - a microprogram in assembly language that runs in a special processor operating mode, written on a microcircuit, constituent part motherboard .
Time passes - and the rudiments die off. So the BIOS is being replaced, long-awaited, by UEFI technology, which is replacing the Main boot record(MBR - Master Boot Record) leads GPT.
What is GPT
GPT (abbreviation for GUID Partition Table) - format for placing partition records hard drive.
Unlike MBR, GPT does not contain executable code and does not transfer control of the computer to the operating system loader.

These functions are performed by UEFI. GPT contains the following information:
- hard drive block number, which is the beginning of the partition;
- section length in blocks;
- section type.
GPT has a number of significant advantages over MBR.
Among them:

For compatibility purposes, if the selected disk has a GPT partition style, there is an MBR in the zero block with the special meaning section type. This is necessary for the hard drive to work on computers with a BIOS.
It is clear that such a hard drive cannot be bootable, however, if the installed operating system supports disks with the GPT markup style, then information from them can be read.
Video: Installing OS on GPT
Installing Windows on a GPT Disk
To install Windows on a computer with GPT hard disk partitioning style, the following conditions must be met:
- a 64-bit version of the operating system must be installed;
- on motherboard The computer must be set to UEFI, not BIOS.
The first condition is dictated by Microsoft's policy: only 64-bit versions of Windows operating systems allow the use of UEFI and GPT.

The second condition follows from the fact that GPT is one of the UEFI standards and the regular BIOS is not supported.
To install the operating system, you need an installation disk or USB flash drive. Create bootable flash drive can be done in several ways:
- manually using command line operating system;
- using specialized programs.
As specialized programs, you can use:

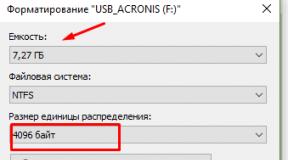
Important! A UEFI-compatible flash drive must be formatted in the FAT32 file system, therefore, the maximum amount of data placed on it cannot exceed 4 GB.
If the distribution of the operating system has a volume exceeding 4 GB, it is recommended to format the flash drive in file system NTFS.
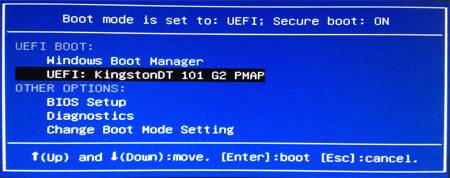
UEFI BIOS Setup
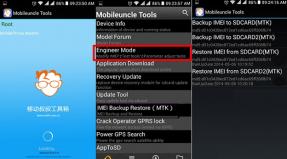
To configure the UEFI BIOS, you need to do the following:
- enter UEFI by pressing the appropriate key when the computer boots;
- if you use a flash drive formatted in NTFS, you will have to disable Secure option boot;
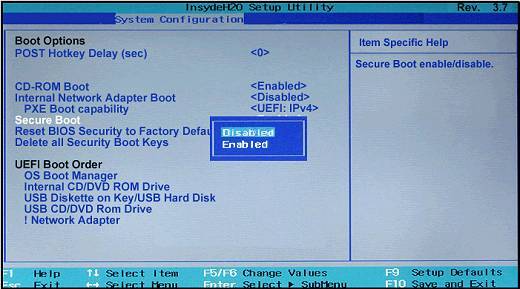

Figure 2. Save changes and reboot
Option secure boot allows only those boot programs, which are signed with digital keys known to UEFI. This option is usually located in the Security menu and must be set to Disabled to disable it.
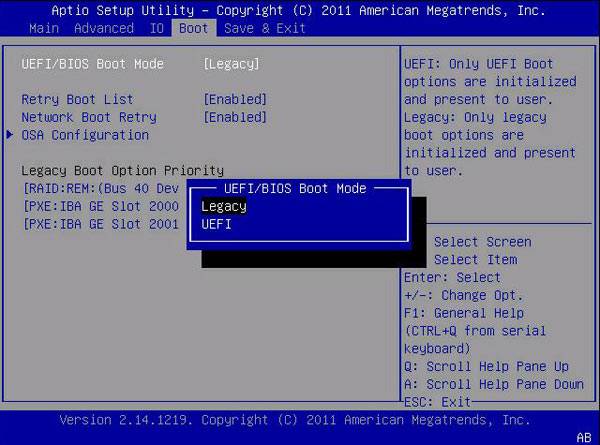
In some cases, to disable the Secure Boot option, you will need to put UEFI into BIOS compatibility mode. Such an operation may be called CSM, Legacy BIOS. For getting detailed information documentation must be consulted. detailed description UEFI options. A possible view of the UEFI menu for performing this operation is shown in the figure:
To determine the download order, click the button "Boot Menu" and in the dialog box that opens, select a USB flash drive or DVD drive.
Attention! If BIOS compatibility mode has not been enabled, the DVD drive must run in UEFI compatibility mode!
In some cases, saving changes is not required; the operating system installation process will begin immediately after the boot order is determined.
Please note: operating room Windows system 7 does not recognize a USB 3.0 flash drive as a boot drive. The flash drive must be installed in a USB 1.0 or USB 2.0 slot. These connectors are usually black, unlike USB 3.0 connectors, which are blue.
Installation process
The process of installing an operating system on a disk with the GPT partition style is the same for Windows 7 and Windows 8 systems and includes the following sequence of user actions:
- when the operating system installer reaches the disk selection stage, it is necessary to delete all pre-existing partitions, obtaining a completely unpartitioned disk;

Please note: the deletion of previously existing partitions cannot occur without data loss, so all information on the deleted partitions will be destroyed! Before deleting hard disk partitions, create backups important information.
What should I do if installing Windows on this disk is not possible with the gpt partition style?
If the operating system setup program displays the error "Installing Windows on this disc impossible."

The selected disk has GPT partition style", there are two possible reasons:
- the computer does not have UEFI;
- Legacy BIOS setting has been enabled in UEFI ( traditional BIOS), in which it is impossible to boot and work with GPT-style disks. In this case, disable BIOS compatibility mode.
If the computer does not have UEFI, then you need to repartition the hard drive in the MBR style. The easiest way is to use the diskpart console command.

Please note that changing the partition style of a disk can destroy all data on it, so you should make backup copies of information before changing the disk partition style.
Although GPT is relatively new technology, its developers have made every effort so that the process of installing the operating system is not very complicated.
When installing Windows on a disk with the GPT partition style, you need to pay attention to the following:
- the computer must be running UEFI;
- in UEFI, you must disable the "Secure boot" option;
- when booting from a DVD drive, you must set the compatibility mode to UEFI.
How to partition a hard drive when installing Windows? There is such an unspoken rule that the PC hard drive must be divided into 2 (at least) partitions. I think everyone knows about it, well, almost everyone. This rule is neglected only by those users who have not yet encountered the loss of an important personal information or she is not so dear to them.
As a rule, the system should have one disk (partition), Disk C - for the operating system, the second - for storing personal files.
Of course, there can be two or three partitions for storing multimedia and personal information, the bottom line is that the OS and important files for the user are should not be stored on the same hard drive partition!
One of the simplest and available ways partitioning a hard drive is partitioning a drive during the Windows setup phase. How to partition a disk installed system Windows without data loss is described.
The advantage of this method is also that it is the most secure, and most importantly, universal, that is, it will work regardless of which OS you will install, be it Windows 7, 8.1, 10, on its bit depth and device type (laptop or a computer).
Partitioning a hard drive at the Windows installation stage is a great option if you just bought a computer or laptop, but it is also suitable for users who decide to do it later. Just copy ahead important files on spare media (flash drive, external hard disk), and only then proceed to separation of hard disk.
If you are interested this method, then most likely you have already bought either the required version of the OS and are ready to partition the hard drive when installing Windows.
We insert a flash drive or disk into the device and reboot the system. To set the boot priority, you need to get into the boot menu. Depending on the device you are using, select the appropriate hotkey or a combination of them.
| Asus, Samsung | Esc |
| Asus Phoenix Award | F8 |
| Acer, Dell, Fujitsu, Lenovo, Toshiba | F12 |
| HP | Esc then F9 |
| MSI, Sony | F11 |
| Manufacturer | BIOS version | boot menu key |
| MSI | AMI | F11 |
| gigabyte | Award | F12 |
| Asus | AMI | F8 |
| Intel | Phoenix Award | Esc |
| AsRock | AMI | F11 |
| ECS | AMI | F11 |
| foxconn | Esc | |
| BioStar | Phoenix Award | F9 |
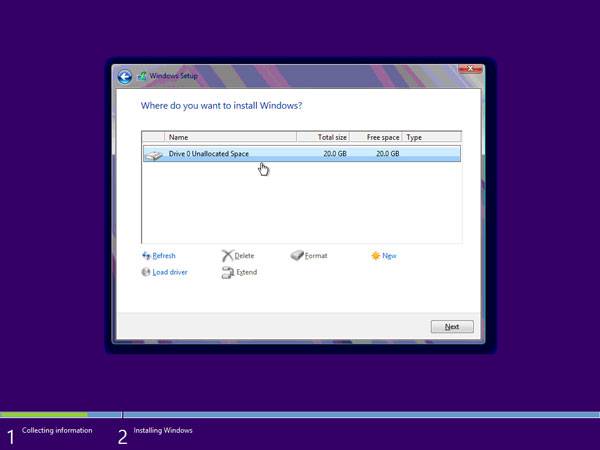
After launching the installer, we are interested in a panel where we are prompted to select the type of installation. Select - Complete installation.

We ended up in the section selection panel. This is the stage of Windows installation when you can partition the hard drive. As a rule, if a PC is just purchased, then its hard drive looks like this (DOS bundle - without an operating system). You may have a slightly different situation, but this is not so important.
In our case, there is free (not occupied) disk space, which in a particular example is 156 GB. We need to distribute how much space will be given to the system storage partition (drive C), and how much we will leave for personal use.

Let's say for Disk C I will allocate 50 GB. It turns out that for another disk there will be a little more - 100 GB.
Let's get started. Select "Disk Setup" and click "Create"

Now we have to specify how much we need to “pinch off” from the unallocated space for the future Disk C.

Pay attention to the unit of measurement that the installer suggests − Megabytes (Mb).
As far as we remember from school, 1 GB is 1024 MB. So 50 GB is 51200 MB. Set the size to 51200 MB and click "Apply".

If hard size disk allows, the recommended value for Disk C is 100-150 GB (102400 MB or more). We read the Windows warning about creating a backup partition and click OK.

So what do we have.
Partition 1 is reserved for Windows system needs. In Explorer (among the displayed drives), it will not be visible. Need an OS to protect download files.
Partition 2 is the partition that we assigned to the system (Disk C). When the hard drive is partitioned, we will select this partition to install Windows.
Unallocated space is disk space that we can use as we want. If you leave "as is", then in the explorer (in addition to Disk C), another disk will appear (Fig. 1). Or it can be divided into 2 sections. Then the system will have 3 partitions. System, and two for information storage.
Let's continue. If for some reason (made a mistake, changed your mind) you were not satisfied with the result, you can split it again. Select "Partition 2" and click "Delete".
If the hard drive is new or you have previously copied important files to an external flash drive, then you can safely delete and re-create new partitions until we get the desired result.
RECOVERY Section
On modern laptops, as a rule, there is a hidden additional RECOVERY section(for system recovery). The user at this stage can see the picture when the system already has 4 partitions: System, C, Recovery (D) and a partition for storing information. Is it possible to delete them and create new two or three partitions? Yes, you can. The question is, is it necessary? Of course, you don’t lose the license, but you lose the opportunity to recover without any extra effort. However, you can create a recovery disk yourself.
Let's continue. I decided (as an example) that 50 GB is not enough for me. I deleted this section, and now I will indicate - 61500 MB (60 GB). I set the size and click apply again.

Partition 2 of 60 GB has been created. Let's start creating a partition for storing personal information. Select the partition with unallocated space and click "Create".

Since I only want to partition the hard drive into 2 partitions (and one is already created), the system suggests creating a second partition from the remaining unallocated space.

The system has already calculated the free space and I just have to click "Apply". If you wanted to create not one, but two partitions from the unallocated space, then you first need to specify the size for the first one (for example, 51200 MB, that is, 50 GB) - “Apply”. Next, from the remaining 47177 MB (46 GB), create another partition. I think the meaning is clear.

So what happened.
Section 1 - is necessary for the system and we will not see it in the explorer (100Mb).
Section 2 is our future Disk C. Windows is installed here (60.1 GB)
Section 3 - space for photos, videos, documents (96.1 GB)
We successfully completed the task of partitioning the HDD during the Windows installation process. At this stage, Section 3 can be selected and formatted. This can be done now or later in the explorer of an already installed Windows.
As you can see, partitioning a hard drive when installing Windows is very simple and affordable. In one of the following articles, we will analyze how to do this in the system.
In this article, we will look at the detailed step by step installation one of the most modern and popular operating systems for desktop and mobile computers- Windows 7. This brainchild of Microsoft turned out to be so successful that in two years of sales it managed to catch up in popularity with the most used system in the world for many years - WindowsXP. Therefore, more and more users want to see this particular OS on their home computer, and the question of installing it now is as relevant as possible. Our computer portal, of course, could not leave this topic without attention and prepared an installation guide for you, trying to make it as clear and understandable as possible even for beginners.
SETTING UP YOUR COMPUTER TO BOOT FROM DISK
When you turn on the computer, as a rule, a short message appears indicating the key with which you can enter the BIOS settings menu. Be careful, because this inscription disappears from the screen quickly enough, especially for laptops. If you couldn't see it the first time, immediately restart your computer using the "Reset" button and try again. When the download starts, a large screen may appear on the screen. graphic image, covering the service labels on the screen. To remove it, press the key.
List of the most commonly used keys:
- Desktop computers - Del (almost always), F1
- Laptops - F1, F2, F3, Del, Ctrl + Alt + Esc. In the case of laptops, keyboard shortcuts can be very diverse, depending on its model. You can find this information either via the Internet or by calling the service. technical support.
Having found out the key responsible for calling the BIOS settings menu, restart the computer again and at the very beginning of the boot, press it several times (once is enough, but to accurately catch the right moment, multiple press not prevent). If everything is done correctly, the settings window should open.
As a rule, two types of BIOS are most common:
Phoenix AwardBIOS
.jpg)
If your window looks like this, then you need to select a section here Advanced BIOS Features, and in it the paragraph First boot device assign the value to CDROM. Then press the key and select Yes in the dialog box that appears.
American Megatrends BIOS

Or if your window has a gray background, as in this screenshot, then select the section at the top Boot and in the subsection Boot Device Priority in point 1st boot device set the name of your optical drive or as in the screenshot, just CDROM. Then press the key and select Yes in the dialog box that appears.

At mobile devices(laptops), BIOS programs can vary greatly, and it is not possible to give all their possible options within the framework of this article. In any case, you should find in the settings window an item whose name is associated with boot (Boot) and set it as the first device optical drive(CDROM).
STARTSETTINGS
After turning on / restarting the computer, if any Windows operating system is already installed on your computer at that moment, then after some time you will see the message “Press any key to boot from CD or DVD” on the screen (Press any key to boot from CD) which you should do.

Be careful, as you will only have 5 seconds to enter the system installation. If the current operating system starts loading, then the opportunity to start the installation was missed and you should restart the computer again for the next attempt.
If you are installing the system on a new computer or a blank hard drive, then you will not see the previous window, Windows installation should start automatically.
So, if the computer started to boot from the installation disk, then you should see a window to start installing the system, in which you can see the process of downloading the initially necessary files.

If this window did not appear, but the loading of the old operating system began (if it was installed) or messages appeared stating that boot disk not found (in the case of installation on a new computer or hard drive), this means that your computer could not boot from the disk and you should return to the previous step to configure the BIOS.
After downloading the main files, you should see a window for setting the language settings, date and time format, as well as the keyboard layout, in which the default settings for Russia will be set.


The system restore point may be useful to you in the future, in case of problems with the installed system, for example, due to damage, deletion or unauthorized modification of its system files. As a rule, this leads to unstable Windows operation or refusal to boot at all. In this case, you can restore the original system files from the installation disk using the above item.
In general, the “System Restore” section in Windows 7 is a powerful enough tool for fixing various kinds of problems that arise during its operation, and we will definitely devote a separate publication to it, and within the framework of this article, click the “Install” button to proceed directly to installation.
After a few minutes, a window with a license agreement will appear in front of you, the terms of which must be accepted by checking the box in the appropriate item and clicking the "Next" button.

In the next window, you have to choose the type of installation:

As you can see, here we can choose two options: update and full installation. You can use the "Update" item if you want to upgrade your old operating system to Windows 7, while retaining all installed programs and settings. True, for this, the installation of the "seven" must be launched directly from your already installed OS. It should also be remembered that this is only possible from Windows Vista, and the update is not applicable to older operating systems, including Windows XP. In general, this type of installation is not the best solution. The fact is that not only the settings of the previous system will be transferred to the new Windows, but also all its problems, brakes and glitches. And in general stable work systems and earlier installed programs in this case are not guaranteed. Therefore, the preferred type is full installation, which should be selected.
At the next stage of the installation, we have to select a partition on the hard drive for installing Windows. Here, I would like to make a small digression and give some useful advice for partitioning a hard drive into system partitions:
- Do not allocate all hard disk space for one single partition. This is considered bad form and can cause you a lot of trouble in the future.
- Modern hard drives have sufficiently large capacities for data storage and therefore it is advisable to divide them into several thematic sections.
- It is recommended to allocate a separate section for installing the operating system and the necessary software and not fill it with your personal data.
- choose size system partition follows with a margin, given that for the correct Windows work, 15% of the space in this section must remain free.
- Don't create too many sections. This will complicate navigation and reduce the efficiency of distributing large files and folders.
DEFINITION OF THE SYSTEM PARTITION
Now, let's get back to the installation. From this point on, the installation process can go two ways:
Option 1: You have a new computer and the hard drive has never been partitioned. In this case, you will see a window with the following content:

To partition a hard disk into partitions, select the item: "Disk settings". In the appeared additional options select "Create" and enter the required partition size in the window next to it. It should be remembered that you must specify the size in megabytes. Calculate it based on the fact that 1 gigabyte = 1024 megabytes. As a rule, for Windows 7 and related software, 60 - 100 GB is enough, but you can do more if necessary.

After specifying the required size of the future system partition, click the "Apply" button. Next, to use all its capabilities, ask Windows to create an additional partition for it. Don't worry, it will only take up 100 MB of free disk space and will be invisible to you.
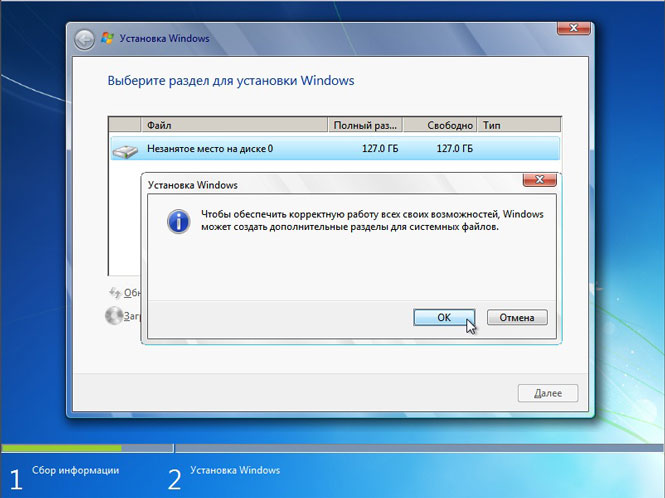
By clicking "OK", we will return to the partition selection screen for installing Windows.

As you can see, there have been changes here. Now we have a partition reserved by the system for its own needs, a newly created partition and the remaining unallocated area. From the unallocated disk space, in the same window, you can create additional partitions in the same way that we used above, or you can postpone this action for later and finally partition your drive already in Windows.
Having made the necessary decision, select the part of the disk on which we plan to install the operating system and click "Next".
Option 2 - If your computer already has an operating system installed. Then your hard disk is already divided into logical areas, and you will see a window listing all found partitions on it, for example:

Attention! All further manipulations with the partitions found can lead to the loss of your data, so be very careful in your actions.
If the current partitioning of the hard disk does not suit you, then you can delete the existing partitions in whole or in part by selecting the appropriate part of the disk, and then the "Delete" option. The unallocated disk space formed after this, you have the right to split at your discretion in the above way, considered in option 1.
If you are completely satisfied with the current disk layout, then you need to decide which of the existing partitions you will install Windows 7 on and whether you want to save the information available there. In this case, before moving on, let's first get acquainted with the possible installation options, after which you can already make an informed decision without pointing your finger at the sky.
You have selected the partition on which your old operating system is currently installed, and you plan to keep the data stored on it. In this case, after clicking the "Next" button, before starting the installation, you will see a window with a warning that the previous a copy of Windows with all its files and folders, will be moved to the "Windows.old" folder. The rest of the information will be untouched. By clicking "OK" in the warning window, you will start the installation process.

This setup has one significant disadvantage. As a rule, after a long operation of the operating system, the partition on which it was installed becomes very littered and contains a lot of junk files. Adding to all this also a new operating system with an accompanying software, you will encounter at least irrational use of hard disk space, defragmentation of files, and even its possible overflow, which will undoubtedly lead to a decrease in system speed.
If you have chosen a hard disk segment that does not contain Windows as a future system partition, and you want to save all stored information on it, then the installation will begin immediately after clicking the "Next" button.
If you plan to install Windows 7 on a blank partition (the preferred option of all) and you either already saved the information on it elsewhere, or you don’t need it, then you should format it before starting the installation. To do this, select "Format". The installer will warn you that this partition may contain important data for you and it will be destroyed.

After clicking the "OK" button, the selected part of the disk will be completely cleared of the information stored there, and to start the installation, all that remains is to select the "Next" item.
INSTALLATION AND INITIAL SETUPWINDOWS
So, after selecting the system partition, the system installation process will begin directly, during which files will be copied and unpacked, components and updates will be installed.

During installation, your computer will automatically restart several times, and the entire procedure may take from 10 to 20 minutes, depending on its capacity.


Finally, after the installation is completed and the next reboot of the computer, you will see the first window of the initial windows settings, in which you have to enter a username (the name of your account in the system) and a computer (the name under which it will be visible to other users on the network).

On the next screen, you will be able to create a password for your account or defer this action by leaving the fields blank and clicking the "Next" button.

The next step is to be able to select options for automatic windows updates, designed to regularly check via the Internet for all kinds of system security fixes, critical updates and service packs on the official technical support website. Turning on automatic update is desirable, but optional at this stage, since you can perform more flexible configuration of this parameter after installation from the control panel.

After selecting security options, the Windows Initial Setup program prompts you to check the date and time settings. If everything is correct, click "Next".

If drivers were installed during installation network card then you will see a window network settings, in which you will need to select the location of your computer.

After you make your selection, a window will appear to connect to the network and apply settings.

On this, the initial setup of the system can be considered complete. After the final application of the settings, a welcome window will appear in front of you, then the system will prepare the desktop, the appearance of which will mark the completion of the installation of Windows 7.


Immediately after the installation of the new operating system is completed, you should install all necessary drivers installed devices, after which you can start installing the software.
On computers with x86 family processors, the MBR partition can be marked as active via the Diskpart command line utility. This means that the computer will start booting from this partition. You cannot mark dynamic disk volumes as active. When you convert a basic disk with an active partition to a dynamic disk, the partition automatically becomes a simple active volume.
To make a partition active, complete the following procedure.
- Start DiskPart by typing diskpart on the command line.
- Select the drive containing the partition you want to make active, like so: DISKPART> select disk 0
- List the disk partitions with the command list partition.
- Select the required section: DISKPART> select partition 0
- Make the selected partition active by entering the command active.
Changing Disk Type in DiskPart
Windows XP and Windows Server 2003 support basic and dynamic disks. Sometimes it becomes necessary to convert a disk from one type to another, and Windows provides the means to accomplish this task. When you convert a basic disk to dynamic, partitions are automatically converted to volumes of the appropriate type. However, you can't simply convert volumes back to basic disk partitions. First you need to delete the volumes of a dynamic disk and only then convert it back to basic. Removing volumes will result in the loss of all information on the disk.
Converting a basic disk to dynamic is an elementary process, but it imposes some limitations. Before starting this operation, take into account the following considerations.
- Dynamic disks work only on computers running Windows control 2000, Windows XP, or Windows Server 2003. Therefore, if the drive to be converted contains earlier versions of Windows, you will not be able to boot those versions after the conversion.
- Disks with MBR partitions must have at least 1 MB free space at the end of the disk. Otherwise, the conversion will not be performed. The Disk Management console and DiskPart reserve this space automatically; however, when using other disk utilities, you must take care of the availability of this free space yourself.
- Disks with GPT partitions must have contiguous, recognized data partitions. If the GPT disk contains partitions not recognized by Windows, such as those created by another operating system, you will not be able to convert such a disk to dynamic.
In addition to the above, the following is true for any type of disk:
- you cannot convert disks with sectors larger than 512 bytes. If larger sectors are used, the disk must be reformatted;
- dynamic disks cannot be created on portable computers or removable media. In this case, disks can only be basic with primary partitions;
- you cannot perform disk conversion if the system or boot partition is part of a mirrored, striped, striped, or RAID-5 volume. First you must undo overlapping, mirroring, or striping;
- however, you can convert disks with other types of partitions that are included in mirrored, striped/striped, and RAID-5 volumes. These volumes become dynamic of the same type and you must convert all disks in the set.
Converting a Basic Disk to Dynamic in DiskPart
Converting a basic disk to dynamic is performed in the following sequence.
- Start DiskPart by typing diskpart on the command line.
- Select the drive to be converted, for example: DISKPART> select disk 0
- Convert the disk by entering the command convert dynamic.