Download the program for low-level formatting. How to low-level format a hard drive
Seagate Instant Secure Erase technology protects the data on the drive by instantly restoring it to its original factory settings and changing the encryption key, resulting in any data remaining on the drive being destroyed by cryptographic erasure. This means that, if necessary, all data on the disk can be instantly rendered unreadable. Learn more about Seagate Instant Secure Erase technology deployment options.
ISE technology requires a self-encrypting drive (with or without FIPS certification). SED drives allow you to secure the active reader through passwords, fingerprints, and other authentication methods, as well as cryptographically erase the drives using ISE technology when they are removed from service or repurposed.
Components needed to instantly securely erase disk data
- Seagate self-encrypting drive, uncertified or FIPS certified.
- A computer with Windows XP, Vista, Windows 7 or Windows 8 installed on it.
- A copy of SeaTools™ software for Windows (1.2.0.6 or later) can be downloaded here: .
- Go to the tab Downloads.
- On the Utilities tab of the SeaTools Software for Windows window, select Select OS, and then select the desired OS from the drop-down menu.
- Click the button Downloads.
- An adapter cable with a SATA connector and a USB plug for a laptop or a double SATA connector when connecting to a desktop computer motherboard.
Performing an instant secure erase
- Disconnect the drive you want to clean from the system and connect it to the computer using an adapter cable with a SATA connector and a USB plug. Note. The SeaTools app cannot perform an instant secure erase on your boot drive.
- Install and launch the application SeaTools for Windows. You may be prompted to install the Microsoft.NET 4.0 package if it is not already installed on your computer. You can download the platform installation package on the official Microsoft website. While downloading it, agree to make changes to your computer and accept the terms of the license agreement.
For more information about the SeaTools application, as well as preliminary steps to install it, see the SeaTools () page under the Downloads tab.
- Once you open SeaTools, you'll see the hard drives available for formatting, including their serial numbers and model numbers. Select the desired drive.
ATTENTION! Make sure you select the correct drive as all data on it will become unreadable and will be permanently deleted. By default, SeaTools does not allow you to erase data on your primary or boot drive. - Go to the tab Basic checks(Basic Tests) and scroll down to Advanced checks(Advanced Tests). A warning message will appear on the screen asking you to confirm your selection by pressing F8.
ATTENTION! Advanced Tests is a mode that removes all data from the disk. Seagate Technology LLC is not responsible for any loss of data. If the drive is selected correctly, press F8. - Go to the Advanced Tests menu and then select SED Crypto Erase. If there is no such item, make sure you have a SED disk. Note. If you don't have a SED drive, select Overwrite Erase and SeaTools will fill the entire drive with zeroes, thereby destroying the data. This procedure may take several hours depending on the size of the disc.
- The SED Crypto Erase dialog box will appear on your screen. Enter the 32-character PSID found at the top of the disc label. You can enter the number on the keyboard or use a 2D barcode scanner.
- Press F8 to begin the cryptographic erasure process. The dialog box will disappear. If the ID was entered incorrectly, the process will be stopped with a FAIL status. Note. The PSID may contain zeros. It is important not to confuse them with the letters "O". If the ID was entered correctly, within a few seconds the disk status will change to “SED Crypto Erase - Pass”.
If the ID is entered correctly, within a minute the disk status will change to SED Crypto Erase - Pass(Cryptographic erasure of SED data - Passed).
The disk will be restored to its original factory settings, and all data stored on it will become unreadable and will be permanently deleted. The drive can then be taken out of service, reused, or returned for warranty repairs or due to the end of the lease period.
Often, if any malfunctions occur in the hard drive, you can lose all the information on it. The optimal solution for saving important data may be low-level disk formatting.
Low-level formatting is carried out by the manufacturer during the manufacture of the hard drive. The procedure described in this article can rather be called “pseudo” formatting, since it is simply not possible to perform a real low-level procedure at home.
By completing this process, it is possible to correct software errors and remove virus software from your PC. Formatting will also be useful when selling a PC, so that the future owner will not be able to use the information stored on the computer.
How to do low level formatting
There is a list of programs that can perform low-level formatting. Some of them are suitable only for a specific brand of hard drive, while others are universal and make it possible to work with equipment from any manufacturer. This article will look at programs that are completely free and will easily cope with the necessary procedure.
Method 1: HDDLLFT
This application is suitable for any hard drive; the only condition for the program to work correctly is the presence of Windows OS installed.

Method 2: SeaTools DOS
The main difference between this utility and its analogues is the ability to create its image on any third-party storage device. This is an important detail that will be very useful for users whose system functionality is working with errors.

Method 3: Windows Data Lifeguard Diagnostics
Thanks to this application, you can perform low-level formatting of WD hard drives.

As you can see, the low-level formatting procedure is quite simple. Almost all known programs work on a similar principle, and mastering them will not pose any problems. The main thing to remember is that universal programs will not necessarily be worse than the utilities offered by a specific manufacturer.
Hard drives (hard drives, hard drives, HDDs) are unusually pampered devices. Just shake it a little, overheat it, look askance - and the disk is already covered with terrible “bad blocks” that threaten both it and all the information on it with inevitable death.
In the event of disk failures, the most important thing is to save valuable data. But what to do then with their carrier? Can it be used in the future? They say that one medicine helps with all such “sores”: low-level formatting of the hard drive. Let's figure out what this “pill” is and when it becomes necessary to prescribe it.
What is it really?
Low level formatting today is called something completely different from what it really is. In fact, this is one of the stages of manufacturing disk drives, and it is carried out at the factory.As you know, all . Each piece of data has a unique address where it can be found. Creating areas for recording data on a clean magnetic surface and assigning addresses to them is low-level formatting.
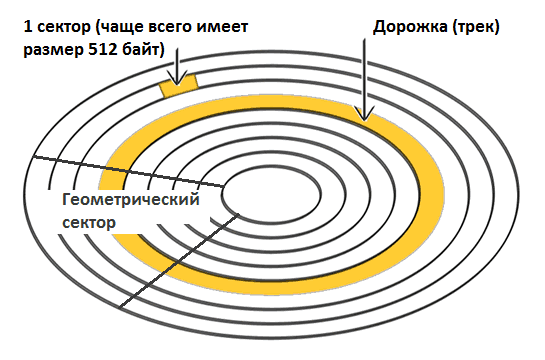
More precisely, this is the process of physically dividing the disk surface into tracks(circles or tracks along which the read/write heads move), their sectors(track sections are the smallest areas of information storage on a disk drive with their own address) and intersectoral intervals. And also - application servo tags– service records between sectors and within them, according to which the head control system ( servo system HDD) will be able to position the latter.
After marking, the disk surface is thoroughly scanned to identify defects in the magnetic layer (physically “broken” sectors), which must be excluded from addressing. Based on the test results, a list of defects and a translator are formed - a table correlating good physical sectors with logical (numbered) ones. This is also part of the factory formatting.
A long time ago, this entire procedure could be performed using the BIOS of a home PC. Today there are practically no such computers and storage devices left. Modern HDDs cannot be physically repartitioned without special equipment and software, and low-level formatting is the operation of “filling” the logical space with zeros (without access to the service areas in which the translator is stored).
As a result of this formatting:
- All information (except for service information) is deleted from the hard drive.
- A custom defect list is created with the addresses of bad sectors that will be hidden - excluded from subsequent read and write operations.
- Defective sectors are replaced with “healthy” ones from the reserve area (remap).
What problems does pseudo-low-level formatting help solve?
The operation is used:
- To prepare a computer for transfer into the wrong hands, so that the new owner cannot restore the files of the previous one.
- For corrections that cannot be removed using non-destructive methods.
- For the treatment of certain types of boot viruses.
It is effective:
- If the appearance of “broken” sectors is not associated with a malfunction of the mechanical and electrical components of the hard drive. For example, they formed after a short-term overheating of the disk or a sudden power outage of the computer, and their number is not growing.
- If there are relatively few defects.
An example of detecting several unstable sectors when scanning a hard drive with the HD Tune utility:

It's useless:
- If the hard drive has suffered from a fall, drowning, or depressurization of the case (hermetic unit).
- If it makes grinding, knocking, grunting and other unnatural sounds when turned on or is poorly detected by the computer (disappears periodically).
The main area of this disk is occupied by unreadable sectors. Treatment with homemade “low-level” formatting will most likely not help him:

What and how to carry out “low-level” formatting at home
Any utility designed for this will be able to fill the surface of the hard drive with zeros and replace the “bad” sectors with normal ones. Even created by a manufacturer of hard drives of a different brand. Rewriting and remapping operations are launched by a standard algorithm that is understood by all disk controllers (the final decision on reassigning bad sectors is made by the controller). These utilities do not have the ability to use highly specific technological commands, so they are not able to cause any harm to the device.Which utility will do the job you need best? It’s not a fact that the native version of your hard drive will work more accurately than the universal one. One didn’t help, try another. There will be no harm from this, but there may be some benefit, since to correct one defective block sometimes you need to make several attempts.
Let's figure out how to perform “low-level” HDD formatting using three free utilities.
Universal HDD Low Level Format Tool (HDDLLFT) for Windows
- Let's connect the problem disk to a PC running Windows.
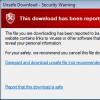
- Download and install the application HDDLLFT. After installation, select “ Continueforfree» (Continue for free).

- In the list of drives, mark the one that we are going to format and click the “ Continue>>>».

- In the next window, go to the section “ LowlevelFormat" and click " Formatthisdevice»

- Let's confirm the operation again and wait for it to finish.
SeaTools for DOS for HDD Seagate
SeaToolsforDOS released in iso image format for recording on bootable DVDs, flash drives and floppy disks. After starting the computer from such media, the main utility window immediately opens. For convenience, let’s switch it to Russian, mark the problematic drive in the list, go to the menu “ Additional functions"(Advanced Features) and click " Erase everything"(Erase all).

Windows Data Lifeguard Diagnostics for WD hard drives
W indows Data Lifeguard Diagnostics is one of Western Digital's proprietary applications with the function of “low-level” disk formatting. In addition to it, this function is supported by utilitiesAll new hard drives are already low-level formatted by the manufacturer and do not require reinitialization. In practice, under normal circumstances, you are unlikely to need to perform low-level formatting on your hard drive, since technically only the manufacturer can perform this kind of real formatting.
What computers call low-level formatting is actually more of an initialization and testing of the disk surface, as the process writes and reads to all sectors of the disk. If there are no problems with the disk, there is no need for a full initialization or surface check.
What is low level formatting?
First, let's understand the concepts of low- and high-level formatting.
Low level format- an operation during which servo marks (information that is used to position the hard drive heads) are applied to the magnetic surface of the disk. It is performed during the manufacturing process of the hard drive, using special equipment.
When the process of low-level formatting a hard drive is started for the first time, the hard drive platters are empty, that is, they contain absolutely no information about sectors, tracks, and so on. This is the last moment when the hard drive has completely empty platters. Information recorded during this process will never be rewritten again.
Old hard drives had the same number of sectors per track and did not have built-in controllers, so the low-level formatting was handled by the external hard drive controller, and the only information it needed was the number of tracks and the number of sectors per track. Using this information, the external controller could format the hard drive. Modern hard drives have a complex internal structure, including changing the number of sectors per track when moving from external to internal tracks, as well as built-in servo information to control the head drive.
Due to this complex data structure, all modern hard drives are low-level formatted only once - at the factory.
There are two types of high-level formatting:
Formatting in normal mode – a process that consists of creating a master boot record with a table of partitions and (or) empty file system structures, setting the boot sector, and similar actions. The formatting process also checks the integrity of the media to block bad sectors.
Quick format - the same process as formatting in normal mode, only without checking the media for bad sectors.
The use of the term low-level formatting in relation to hard drives has given rise to many myths. For example, there is an opinion that it is impossible to perform low-level formatting of a hard drive and that attempting such an operation will lead to the destruction of the disk. In principle, there is some truth in this misconception. It consists in the fact that when low-level formatting old disks from the late 1980s, the optimal settings for the bevel of heads and cylinders established by the disk manufacturer, as well as the map of disk defects, were violated.
All this negatively affected the performance of the devices. The problem described has long been resolved, and all devices using zone recording (with a variable number of sectors per track) are immune to any problems that low-level formatting may cause, since real markers cannot be replaced by a sector.
So low-level formatting of discs made in the 1990s and later will prevent it from disturbing its settings.
At the same time, there is often a real need to perform low-level formatting of ATA and SCSI drives. Now we will talk about programs that will help you do this.
Programs for low-level formatting of ATA disks (SATA, PATA, etc.)
ATA drive manufacturers defined and standardized extensions to the original WD1002/1003 hard drive controller, creating the AT bus interface (known as the ATA interface). The ATA specification is implemented for unique vendor-specific commands that are an extension of the standard. To avoid performing incorrect low-level formatting, many ATA devices have special commands that must be sent to the device to enable formatting procedures. These commands vary by device manufacturer, so you'll need to look for low-level formatting and defect management programs created by the drive manufacturer.
These programs are most often intended not only for devices from a specific manufacturer, but also for their individual models. So before performing a search, make a note of the manufacturer name and model number of your hard drive.
Modern hard drives are protected from the possibility of changes in the skew factor or defect map, since they are always in conversion mode. Devices with zone recording are always in this mode and are thus fully protected.
Most hard drives have an additional set of commands that are used during the formatting process, and the standard ATA specification commands do not work (especially for ATA devices with zone recording).
Spare sectors can also be allocated automatically using programs provided by the device manufacturer. Without knowing the correct manufacturer-specific commands, it is impossible to replace defective sectors with spare ones, specially allocated in modern devices for these purposes. A detected defective sector is replaced in the distribution structure by the closest spare sector.
Some hard drive manufacturers offer low-level formatting programs. They can be found at the following addresses.
- Seagate
ftp://ftp.seagate.com/techsuppt/seagate_utils/sgatfmt4.zip
http://www.seagate.com/support/seatools - Hitachi/IBM
www.hgst.com/hdd/support/download.htm - Maxtor/Quantum
http://www.maxtor.com/softwaredownload/default.htm - Samsung
www.samsung.com/Products/HardDiskDrive/utilities/hutil.htm
www.samsung.com/Products/HardDiskDrive/utilities/sutil.htm
www.samsung.com/Products/HardDiskDrive/utilities/shdiag.htm - Western Digital
http://support.wdc.com/download/
First of all, you should try the programs provided by the device manufacturer. All of them are free and often allow you to work at a low level in a way that large-scale programs do not allow.
If the drive manufacturer does not offer an initialization/verification/formatting program, you can use the Drive Fitness Test program from Hitachi (formerly IBM). This program works great with drives from other manufacturers and performs detailed, full testing of the entire hard drive. This is one of the best general purpose programs because it allows you to perform a non-destructive test. Although it can test any device, there is one limitation: destructive read/write tests can only be performed on Hitachi and IBM drives.
Advice!
All of the listed programs for initializing, testing and formatting a hard drive, as well as many others, can be found in the Ultimate Boot CD (UBCD) collection of utilities. This is a fantastic collection of diagnostic tools contained in one downloadable CD! A copy of this CD can be downloaded from www.ultimatebootcd.com.
Non-destructive formatting tools
I strongly advise against using BIOS-level non-destructive formatting tools such as Calibrate (formerly included with Symantec Norton Utilities) when low-level formatting is truly needed. Such funds are characterized by a number of limitations and problems that reduce their effectiveness. They perform low-level formatting on individual tracks using BIOS functions; This backs up and restores individual tracks.
These programs also do not create a defect map, as low-level formatting programs typically do. Moreover, they can remove defect map markers added by standard low-level formatting programs. As a result, it becomes possible for data to be stored in bad sectors, which in some cases may void the warranty.
Another limitation is that these programs can only be used when working with hard drives that have been previously formatted using BIOS functions.
A low-level format program created by drive manufacturers bypasses the system BIOS and passes commands directly to the controller. Therefore, many such programs are designed to work with specific controllers. Having one such program that could be used when working with different controllers is almost impossible to imagine. Many hard drives may be incorrectly identified as defective simply because the wrong program was used.
Low-level formatting of Western Digital HDD and SSDs
Let me make a reservation right away that in this case, low-level formatting means testing the disk surface for bad sectors through reading and writing. As mentioned above, factory low-level formatting of a modern hard drive can only be done by the manufacturer.
Hard and solid state drives can be formatted at a low level using several methods. Let's consider one of them, applicable to PC. Mac computers are not suitable for this example.
To low-level format a hard drive we need:
- The hard drive, in this case, is from Western Digital (in this example, the Maxtor drive was tested, and the procedure was successful)
- Data Lifeguard Diagnostics Software for Windows
Before the formatting process, connect the device to the computer. This can be done either through the IDE, SATA, USB or Firefire interface. In this case, low-level formatting will be carried out in the Windows system, without first loading using special boot disks. This is the easiest method for the average PC user.
Once the device is connected:
1. Download Windows Data Lifeguard Diagnostics from http://support.wdc.com/product/download.asp?groupid=113&sid=3&lang=ru
2. After downloading the application, launch it and follow the installation wizard.


If after installation a dialog box appears with a message stating that the program cannot be started, close it and click the OK button. The program must be launched in a different way.

3. A program shortcut will appear on the desktop, double-click on it.

4. Check the box next to I accept this... and click on the Next button.

The program will display all connected drives. Despite the fact that in my example, the Maxtor test hard drive was formatted, and it was successful, I recommend that you use this program only for Western Digital drives, to avoid possible problems with the media. If you have a Seagate hard drive, use a similar program from Seagate.
5. Select the disk that needs to be diagnosed and click on the to run tests button. BE SURE to double-check that you have selected exactly the right disk, otherwise you will lose all data on this media, without the possibility of recovering it, since this process is destructive and irreversible.


7. In the next window, select the EXTENDED TEST option and click the Start button.

8. Close all files that are open on the selected hard drive and click the OK button.

9. The testing procedure on a 20 GB hard drive took approximately 10 minutes. At the end of testing, click on the Close button.

10. But that's not all. Now again click on the to run tests button and in the dialog box select the WRITE ZEROS option and click on the Start button. This procedure will overwrite all sectors with zeros.

10. Depending on the condition of the drive, you will receive one or two prompts reminding you that this action will destroy all data currently on the drive. Click the Yes button.


10. Then choose which method you would like to use to write the zeros. The QUICK ERASE option is much faster, but does not completely erase the disk. This is suitable for users who plan to rewrite the disc multiple times. A FULL ERASE erases the disk completely. This takes longer, but ensures that no data on the drive can later be recovered using data recovery methods. This method is designed for people who need to permanently delete data from their drive, such as hackers ;).
Once you have determined which method you would like to use, select the OK button to begin the formatting process. I recommend choosing FULL ERASE.

11. Start of the rewriting process. For example, it took me about 10 minutes to overwrite a 20 GB hard drive.

12. After the process is completed, click again on the to run tests button and in the dialog box, select the VIEW TEST RESULT option and click on the Start button.

13. The window will display information about the hard drive and the tests that have passed. To be honest, the information in this report is very sparse.

14. If the process was successful, the low-level formatted hard drive will not be available in the system. Now it needs to be initialized, partitioned, and formatted at a high level.
14. Open Start -> All Programs -> Accessories -> Run and enter the command in the window diskmgmt.msc .

15. The Disk Management program will launch and the Initialize Disks window will automatically appear, where the required disk will be selected. Specify the Master Boot Record parameter and click the OK button.


This completes the low-level formatting process.
A similar process can be used for media on hard drives from other manufacturers. For example, Seagate offers a very convenient diagnostic tool for its media.
In conclusion, I will give an example of how the Data Lifeguard Diagnostics program displays a failed drive. As an example, a Fujitsu hard drive was taken. The program has determined that the media is faulty, as indicated by SMART STATUS.

Using EXTENDED TEST, the program showed that bad sectors were found on the disk.

The program tried to fix them, but nothing worked.

There may be two reasons for this: firstly, the hard drive and the diagnostic program are from different manufacturers, so some commands may not be processed correctly, and secondly, this disk cannot be restored, since it has begun to “crumble,” i.e. physical damage appeared on the surface of his discs; it was already on my inspection table before.
To completely clear a partition or connected external storage device of files, a procedure such as formatting is very often used. Beginner users sometimes confuse it with deletion, but they are not the same thing. Formatting involves bringing the logical structure of a disk to a certain order, without which recording, storing and deleting data is impossible. During the formatting process, the file structure of the media is recreated, the MFT table containing information about the files is reset, whereas with a normal deletion or even a shredder using multiple rewrites, nothing like this happens.
What is low-level formatting and how does it differ from regular formatting?
Formatting can be fast or slow, and there is also high-level and low-level formatting. This last one will be discussed today. To be fair, it should be noted that the concept of low-level formatting today is somewhat distorted. Previously, it meant dividing a disk into tracks and sectors, as well as applying special electronic marks called servo marks to the magnetic surface. All this is done exclusively on special factory equipment (servowriter).
The first HDDs were imperfect; they expanded under the influence of temperatures, which caused the sectors to shift relative to the read heads. For this reason, they needed to repeat the servo marking procedure. In new disks, thermal expansion is compensated by recalibrating the parameters of the disk heads at the software level, and the servo marks themselves are applied once. Only such hardware formatting is most correctly called low-level, however, over time, the concept has also extended to software formatting.
Today, low-level formatting is understood as the irreversible destruction of all data on the storage medium, including part of the service information by sequentially overwriting all sectors with zeros. What is now called common is quick formatting, in which only the MFT table is cleared, while the data itself physically remains on the disk. Low-level, or better yet pseudo-low-level formatting of a hard drive solves the following problems:
- Deleting all user data before selling your computer or media.
- Removing some types of boot viruses (bootkits).
- High-quality disk cleaning before reinstalling the operating system.
- Correction of logical errors, treatment of bad sectors, provided that their appearance is not caused by wear and tear of the media or its breakdown.
- Disk prevention, bringing its logical structure to proper condition.
Features of formatting a hard drive and flash drive
From a technical point of view, there is a slight difference between formatting HDD and flash-based media, but for the user this does not matter much. Regular or low-level formatting of a flash drive is performed with the same software tools that are used to format conventional hard drives. Exceptions are cases when a flash drive cannot be formatted using standard tools or even third-party programs, which will be discussed briefly below.
If a flash drive is defined as a device with zero capacity or as an unknown device and produces read/write errors that cannot be corrected in other ways, it is recommended to use special proprietary utilities to format it, which can usually be downloaded directly from the official website of the flash device manufacturer. All of the above is also true for low-level formatting of SD cards.
The best programs for low-level formatting
In principle, such formatting can be done using Windows itself by running the utility on the command line Diskpart and running the command for the selected drive clean all, but it is still better to use special programs for these purposes.
Perhaps the most famous program for low-level formatting of HDD/SSD hard drives, flash drives and memory cards. The utility is free, lightweight, has a simple interface, and supports SATA, IDE, SCSI, USB and Firewire. Additionally, the program supports Ultra-DMA mode, viewing disk information and S.M.A.R.T data. During the HDD formatting process, Low Level Format Tool completely destroys all data on the disk, including the MBR and the contents of the partition table, filling each sector or memory cell with zeros.
The utility is easy to use. After connecting the problematic media to the computer, you need to select it in the program window and click the “Continue” button. In the next window, you need to switch to the “Low-Level Format” tab and click “Format This Device”.

The low-level formatting process will start. As you go, you will be able to monitor the progress: how many sectors have been processed, what percentage is left until the operation is completed, and also at what speed it is being performed. After formatting, the disks become uninitialized.
 SeaTools for DOS and SeaTools for Windows
You can completely clean a disk or flash drive using the SeaTools diagnostic tool. The program is designed for Seagate drives, but can also work with drives from other manufacturers. The application supports working with SATA, USB, 1394, PATA, IDE and SCSI interfaces, performing a structural check of the media, testing the controller and system memory. Formatting acts as an additional function.

To clean a disk or flash drive, in the SeaTools menu you need to select Advanced – Full Erase, after which low-level formatting will begin, during which all sectors will be overwritten with zeros.

SeaTools is distributed in two editions: For DOS and For Windows. Unlike the second, which is a desktop application, the first edition is a bootable ISO image. Both versions support the Russian language, but by default the program interface is English.
Western Digital Data LifeGuard Diagnostics
Another proprietary diagnostic tool that allows you to efficiently format digital media.

The program supports reading S.M.A.R.T. readings, viewing detailed information about connected media. Using it as a shredder is very simple. Double-click on the media selected in the utility window, click “Erase”, and then “Start”.

As a result, all sectors of the disk will be filled with zeros, that is, it has been low-level formatted.