Creating winpe windows 10 with a set of programs. Creating a basic Windows PE boot disk. Working with the system
This documentation has been archived and is no longer maintained.
Wednesday before Windows installations(WinPE)
Windows Preinstallation Environment (WinPE) for Windows 10 is a small operating system that is used to install, deploy, and repair classic Windows releases 10 (Home, Pro, Corporate and Educational), Windows Server 2016 Technical Preview, and other Windows operating systems. In Windows PE you can:
- tune HDD before installing Windows;
- install Windows using applications or scripts over the network or from a local drive;
- recording and application Windows images;
- modify the Windows operating system when it is not running;
- configure automatic recovery tools;
- Recover data from devices that cannot boot.
- add your own shell or your own GUI to automate tasks like this.
Where can I download this environment?
To obtain Windows PE, use the installer that is included with the Windows Assessment and Deployment Kit (Windows ADK). For more information, see , and Demo: Installing Windows PE on a USB drive.
Support for many Windows components
Windows PE launches a command environment Windows strings and supports the following Windows components:
- Batch Files and Scripts, including support for Windows Script Server (WSH) and ActiveX Data Objects (ADO), as well as additional PowerShell support.
- Applications, including Win32 application programming interfaces (APIs) and additional support for HTML applications (HTA).
- Drivers, including a common set of drivers that manage network, graphics devices and storage facilities.
- Capturing and servicing images, including the Deployment Image Servicing and Management (DISM) system.
- Net, including connecting to file servers using TCP/IP and NetBIOS over TCP/IP on the local network.
- Data storage, including NTFS, DiskPart and BCDBoot.
- Security features, including additional support for BitLocker and Trusted Platform Module (TPM), secure boot and other means.
- Hyper-V, including VHD files, mouse integration, storage device drivers and network drivers, allowing Windows PE to run in a hypervisor.
equipment requirements
Windows PE PE requirements are similar Windows requirements with some exceptions:
- No hard drive required. You can run Windows PE completely from random access memory.
- For basic version Just 512 MB of RAM is enough. (You will need more memory if you add drivers, packages, or applications.)
- To boot Windows PE directly from RAM (also called booting from a RAM disk), a contiguous area of physical memory (RAM) must be available in which the entire Windows PE image (WIM) can be stored. To optimize memory usage, manufacturers should ensure that their firmware reserves memory areas at either the beginning or end of the physical memory address space.
The 32-bit version of Windows PE can boot 32-bit computers with UEFI and BIOS and 64-bit computers with BIOS.
Windows PE 64-bit can boot 64-bit computers to UEFI and BIOS.
Restrictions
Windows PE is not an operating system general purpose. It can only be used for deployment and recovery. The environment cannot be used as thin client or an embedded operating system. You can use other Microsoft products to do this, such as Windows Embedded CE.
To prevent its use as the main operating system Windows PE automatically stops the shell and reboots after 72 hours of continuous operation. This interval cannot be adjusted.
When you restart Windows PE, all changes are lost, including changes to drivers, drive letters, and Windows PE registry. To make permanent changes, see the section.
When installing Windows PE, the default format is FAT32, which imposes its own limitations: file sizes are limited to 4 GB and disk size is limited to 32 GB. For more information, see section.
Windows PE does not support:
- usage file server or terminal server;
- joining a network domain;
- connecting to an IPv4 network from Windows PE on an IPv6 network;
- remote Desktop;
- installation MSI files;
- loading from a path that contains characters not found in the English alphabet;
- Running 64-bit applications on a 32-bit version of Windows PE;
- Adding app bundle bundles using DISM (packages.appxbundle).
Note In general, for Windows deployment you should use latest version WinPE. If you are using a custom WinPE environment for Windows 10 images, you may prefer to continue using your existing Windows PE image and run the latest version of DISM from network location. For more information, see .
Notes about running Windows Setup in Windows PE.
- 32-bit versions of Windows PE and Windows Setup can be used to install 64-bit Windows versions. For more information, see .
- Although Windows PE supports dynamic disks, Windows Setup does not. If you install Windows on a dynamic disk created in Windows PE, dynamic disks will not be available in Windows.
- For correct installation Windows on UEFI-based computers that support both UEFI and legacy BIOS versions, it is important to load Windows PE into desired mode. For more information, see .
see also
| Type of content | Links |
|---|---|
|
Product Rating | |
|
Deployment |
AOMEI's free PE Builder helps you create boot environment based on Windows PE, without installing AIK/WAIK, with a set of programs you define. A ready-made bootable USB flash drive or disk will help you restore your system or gain access to hard drives to back up files before reinstalling the system when installed Windows corrupted and won't load.
After booting the computer from the flash drive or CD created using PE Builder, you will receive the familiar Windows interface (Desktop, Explorer, Start menu, Taskbar, etc.).
Program Partition Assistant Standard Edition will help you manage, and with AOMEI Backupper Standard it's easy to do backup. The PE Builder utility itself is fully compatible with Windows 7 and 8, as well as Server 2008 R2/2012, but will not run on Windows 8.1, XP or Vista.
But don’t be upset, because the boot disk or flash drive that will be created by the program on a computer with Windows 7 or 8 will work with Windows 8.1 and other versions of the operating system.
PE BUILDER
Go to the site:
https://www.aomeitech.com/pe-builder.html
and click on the “Free Download” button.

Run the downloaded installer and install the program as usual.

HOW TO CREATE A BOOT ENVIRONMENT
Launch PE Builder and click the “Next” button.

Continue by clicking “Next” again.

If desired, click “Add Files” and add the portable programs you need for work, which will be located in separate folder on the Desktop or click “Add Drivers” and add drivers to define more equipment.


We also select the desired programs to include in the system on the left side of the window and click the “Next” button.

We choose where to record the boot environment: on a CD/DVD, flash drive or on a computer as a disk image format (I chose the latter) and continue by clicking on the “Next” button.

A few minutes and everything is ready, click the “Finish” button.

The disk image took only 351 Megabytes.

Create from a disk image bootable USB flash drive as written.
WORKING WITH THE SYSTEM
In the computer BIOS we set it to boot from a bootable CD or flash drive, wait for the Desktop to appear and choose what we will do. For example, let's copy important files from the disks before reinstalling the system.

Maybe we can cure the system of viruses (it’s not for nothing that I included AVZ in the image!).

Let's try to restore the system by turning on the Windows Recovery Environment or work with disk partitions by running Partition Assistant SE, or maybe launch any other available program.

That's all for now! Use PE Builder for easy and automatic creation bootable media based on Windows PE with those portable programs which you choose yourself.
There are a million scattered articles about what Windows PE is and why it is useful. There are a million ways to create this very Windows PE on the Internet. which one is the best? We will try to summarize the basic necessary information and draw conclusions in this article.
Why do you need Windows PE?
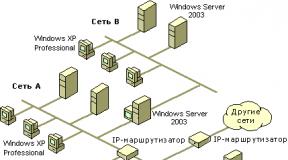
Windows PE (Windows Preinstallation Environment) - Windows preinstallation environment, with limited services, built on the regular Windows kernel. It is used to prepare your computer for Windows installation, copy a Windows image from a network file server, and run Windows installation. It is a built-in element of other installation and system recovery tools, such as Windows Setup, Windows Deployment Services (WDS), SCCM Server Operating System (OS) Deployment Tool Kit, and Environment Windows recovery(Windows RE). Initially Windows environment PE was created to help OEMs, system builders, and corporations boot a computer without a running operating system. Thus, PE is most often launched with either external storage or over the network from the company’s WDS/TFTP server.
Yes, don't confuse Windows PE and Windows RE. Windows RE (Recovery Environment) is an environment for recovering Windows after a failure. However, Windows RE as a set of tools can be run from under PE. And then the thought arises: why not use PE for tasks of restoring fallen systems, integrating the necessary applications into PE? Yes, that's exactly what we need.
What tasks can we perform under it:
- partition management hard drive using the utility Diskpart or third party tools;
- Capture volumes into a WIM image using the utility ImageX and saving them to another hard section disk or USB disk;
- applying WIM images to a partition of an existing hard drive using the utility ImageX and its varieties;
- launch automatic installation Windows using scripts and XML response files;
- copying and replacing files, as well as editing the registry of the installed operating system if it does not boot;
- diagnose equipment malfunctions;
- fight viruses using various antivirus utilities for Windows PE.
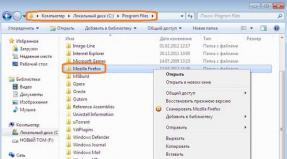
After downloading the archive, unzip it and run the application BuilderSE.exe. Next, follow the instructions: specify Source with installation files OS (there should be install.wim), configure the subprojects (each has a settings page) and start building the project.
This documentation has been archived and is no longer maintained.
WinPE: Creating a Bootable USB Drive
Create a bootable WinPE USB flash drive or external hard USB disk.
By default, installation is performed from RAM (from the RAM disk), so the disk can be removed during Windows operation P.E.
Installing Windows ADK
Deployment Tools: contain deployment and imaging environment.
Windows PE: Includes files for installing Windows PE.
Install the following components from the Windows Assessment and Deployment Kit (ADK):
Installing Windows PE
Run Deployment and imaging environment on behalf of administrator.
Create a working copy Windows files P.E. Specify x86, amd64 or arm:
copype amd64 C:\WinPE_amd64
Install Windows PE onto the USB flash drive using the drive letter:
MakeWinPEMedia /UFD C:\WinPE_amd64 F:
Warning
This command formats the disk.
Connect the USB device to the computer you will be working on.
Turn on your computer and press the key that opens the firmware boot menus.
Select USB storage. Windows PE will launch automatically.
After opening the window command line The wpeinit command is launched, which configures the system. This may take a few minutes.
Diagnostics
To boot a computer that supports UEFI mode, try manually selecting the boot file from the firmware boot menu: \EFI\BOOT\BOOTX64.EFI.
Try connecting to a different USB port. Do not use hubs or extension cords.
Do not use USB ports 3.0 unless the firmware does not natively support USB 3.0.
Clean the USB flash drive and reinstall Windows PE. This will help remove excess boot partitions and other boot software.
diskpart list disk select disk
clean create partition primary format quick fs=fat32 label="Windows PE" assign letter="F" exit MakeWinPEMedia /UFD C:\winpe_amd64 F: Try booting Windows PE from the DVD. Create ISO file, which can be burned to DVD:
MakeWinPEMedia /ISO C:\winpe_amd64 c:\winpe_amd64\winpe.iso
In Explorer, go to C:\winpe_amd64 directory, right click winpe.iso and select Burn to disc. Create a DVD by following the onscreen instructions.
If your computer requires storage or video drivers to boot, try adding the same drivers to the Windows PE image. For more information, see .
Install the latest computer firmware.
If the copype command is not recognized, make sure you are running the command in the Deployment and Imaging Tools environment that is included with the Windows ADK.
If Windows PE does not appear, try the following workarounds, restarting your computer each time.
If your computer does not connect to network folders, study the section.
Storing Windows images on a Windows PE disk
Most USB flash drives only support one disk partition. The MakeWinPEMedia command formats the drive in FAT32 format, which supports booting computers with BIOS and UEFI. This format only supports files up to 4 GB in size.
On external hard drives With a USB interface, you can create a separate NTFS partition that supports larger files.