Load control device using any IR remote control. Remote control of light Load control with TV remote control
If you take the remote control in your hand and wave it, a pointer usually appears on the TV that you can control with your movements. But what to do if the pointer does not appear, no matter how much you shake the remote control?
The remote control can fail for a huge number of reasons, and it does not necessarily have to break down or fail. The more complex the technology, the greater the chance that something may go wrong. It is worth noting that one of the main causes of the problem may be ignorance of the instructions for the TV. Tell me honestly, did you read it before using it? At least the main points? Most likely not, but believe me, the answers to almost 90% of your problems lie there.
Let's take a look at a brief guide to using the remote control, perhaps this will give you the right ideas (the remote control in the pictures is old, but nevertheless, its operating principle has not changed since then):
Possible reasons
If the instructions above did not help, let's look at the main scenarios, by analyzing which you can understand what happened to the Magic Remote.
Before you start, do a simple test: Point the remote control at a digital camera (for example, the one on your phone) and press any key. If at the same time you see a flashing light in the camera display, the remote control is working (and the problem is most likely in the TV), if you don’t see anything, there is a problem with the remote control.
1. The batteries on the remote control are low.- when you press the buttons on the remote control, the red indicator in its upper front part should light up. If this does not happen, the batteries may be dead (or there are none at all). Check (preferably in another device or using the indicator on the batteries themselves) and replace them if necessary.
- Check the functions of the remote control selectively - if nothing works at all, the batteries are most likely dead.
- Make sure the batteries are working.
- The polarity of the installed batteries must be observed according to the indicators on the remote control.
2. The remote control has lost connection with the TV (or has not yet been connected). This is one of the most common cases. The Magic Remote works via Bluetooth and in order to control the TV with it, you need to “introduce” them.
But even if you have already done this, the TV may forget your remote control. This can happen due to a glitch or if you hold down a combination of buttons for a while BACK+HOME- after a few seconds, the functions of the magic wand will stop working and you will only be able to use it like a regular remote control (buttons only). Naturally, pressing these buttons could happen accidentally without your knowledge (for example, someone sat on the remote control with their fifth point or children were playing around).
To connect the Magic Remote back to the LG TV, you need to hold down the central button (wheel, also known as the OK button). If you did everything correctly, after a moment the following message will appear on the TV display:
Registering a new Magic Remote Control...
And after a few seconds, if the connection is successful, you will see the following message:

Registration successfully completed.
If anything else is not clear, watch the video, which contains instructions on how to connect the remote control:
- Make sure that there are no devices near the TV or remote control (even in adjacent rooms) that may cause interference (electronic devices, bright lamps, etc.).
3. The remote control was filled with liquid- this also happens. No need to panic, remote controls, keyboards, phones, tablets and other devices very often take a shower of water, tea or other drinks.
If you immediately notice that the remote control is flooded, you need to quickly remove the batteries, wipe and dry it. If it was exposed to liquid for a long time or something viscous was spilled that cannot be easily dried (beer, compote, etc.), then you will have to disassemble it. If you can handle it yourself, you need to get to the microcircuits and thoroughly clean and dry everything.
4. Batteries are leaking- not a very pleasant moment, not a single device is immune from this. If this happens, then when you open the battery compartment you will see a white coating. In this case, even if you replace the batteries with new ones, the remote control most likely will not work. As in the previous point, it will have to be disassembled and cleaned. By the way, I recommend using hydrogen peroxide for cleaning.(you can’t just buy alcohol anymore, but vodka and other strong drinks leave a residue).
It is also worth considering that if the batteries leak, then the remote control may completely fail.
5. The remote control stopped working after a year and a half and no matter what you do, nothing helps. This is a known issue that many customers have encountered. There is an opinion that in the early versions of the remote control (2012, early 2013) there was a manufacturing defect.
To solve this problem, you will have to disassemble the remote control and solder it. More details have been written about this. If you yourself do not understand soldering, it is advisable to take the remote control to a workshop, providing them with instructions using the link provided.
6. The remote control is slow. In addition to a completely non-working remote control, there is also a problem when it works inadequately - the pointer moves jerkily, very slowly or vaguely follows your movements:
- this could be a short-term glitch that can be treated like this - leave the remote control alone for a few seconds so that the pointer disappears from the screen, then move the remote control again;
- if this does not help, then you need to re-register the remote control in the TV (point 2 of these instructions);
- change the batteries if none of the two options above help.
Alternative to the remote control
If you have a tablet or smartphone based on iOS or Android, then you can download a free application for Sart TV LG, which is called LG TV REMOTE. With this program you can easily control your TV using your phone, for example.
A remote control (remote control) is an incredibly convenient thing, and it’s unclear how we lived before without them? With its appearance, we have one less problem, although sometimes another, no less important one arises - how to configure the remote control remote control?
How to set up the remote control?
The ideal option, of course, would be for a service technician to set up the remote control for you. But if this is not possible, then you can try to do it yourself. We will try to help you with this.
Setting up a universal remote control for your TV
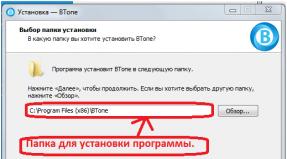
To set up a universal remote control, do the following:
- First you need to turn on the TV, because the setup happens while the TV is running.
- Press the SET button on the remote control and hold it until the LED next to it starts blinking.
- We take the table of codes (in the instructions) and enter the three-digit code that corresponds to the brand of your TV. For each brand there can be ten or more codes. When the code is entered, the LED blinks, and after you have already entered it, it simply continues to light, but evenly, without blinking.
- Then you need to check the operation of the remote control, only without using the number buttons. Those. try turning up or down the volume, changing the channel. If the remote control does not work, then enter the next combination, and so on until your remote control starts switching channels or adjusting the volume.
- After the code has been selected, press the SET button again - this will allow you to remember the operating mode.
Your remote control is configured, the LED no longer lights up, but only lights up when you press any button on the remote control. Now you can easily turn on and off the TV, turn up and down the volume, switch channels, and select a video source. In a few words, you can use all the buttons.

Now it is difficult to imagine our life without electronic household devices. We use them all the time: both for entertainment and for solving everyday problems. Often these devices are equipped with a remote control function using remote controls. Every year the number of electronic equipment in our homes increases, and with it the number of remote controls for them too. But very often remote controls get lost, and it takes a long time to find them.
You can solve this problem by purchasing Universal remote rolsen, which is suitable for various equipment that has an infrared receiver.
Setup instructions
A remote control is a small device with a keyboard, circuits and an LED, equipped with an infrared transmitter that controls other devices using radiation. The transmission of commands between the remote control and equipment occurs by entering a special “code” available for any equipment (it is indicated in the operating instructions for this device).
A universal remote control works according to the same scheme, only its feature is that it can remember several devices with different codes. But for some devices, in particular for Rolsen TVs, the code for the remote control is sometimes missing from the instructions. And then setting up a universal remote control becomes problematic. But there is a certain algorithm of actions that allows you to configure the remote control without a code.
- It happens like this:
- You need to turn on the TV for a channel to work on it.
- We type the combination of SET and TV keys on the remote control and simultaneously hold them down for several seconds until the power indicator starts blinking.
- Point the remote control at the controlled device and quickly press any key except SET. If we didn’t manage to do this, then we repeat everything again.
This is how you can configure any universal remote control for equipment without a code. Using such remote controls is very convenient, since you can control several devices using one small device.
Today, any modern equipment, in particular air conditioners, media players, tuners or televisions, is controlled by remote control. Without a remote control, normal control of equipment is impossible, since such devices greatly simplify the life of an ordinary person. But since such devices, especially modern ones, have extensive functionality, not every consumer knows how to configure them. Sometimes, having bought a new TV, a person has to spend hours setting up the remote control, pressing all sorts of buttons, that is, essentially working at random.
In some cases this leads to negative consequences. The configuration of equipment, for example, a TV, can be set in such a way that it will subsequently bring significant inconvenience to the owner. To prevent this from happening, you must immediately configure the remote control for your TV correctly. We will talk about this further.
Recommendations regarding setting up universal devices are given below. Some nuances may differ, it all depends on the specific brand of equipment and its specifics, however, in general, the setting procedure is identical for many remote controls. By the way, a huge selection of remote controls for Bravis TVs at reasonable prices is presented at the link http://pulti.ua/Bravis. So, what is the setting:
- First of all, you need to turn on the equipment - configuration is carried out only with the TV turned on.
- Now on the remote control itself you need to find a button that activates the setup mode, it can be Setup or Set. Press and hold the key until the LED indicator turns red or blue.
- After this, you will need to hold down the volume button. You will be able to see the light blinking at this moment. This indicates that the device has begun the procedure for selecting codes for the TV.
- You will have to wait for some time until you see the volume scale on the TV screen. When it appears, this will indicate that the configuration selection process is complete.
- This is the last but not least important step. You need to make sure that the TV remembers everything you did. To do this, press the settings key on the remote control again. If this is not done, the setup process will need to be repeated.
You can find other methods for configuring devices on the Internet, but they themselves are not so universal and are usually suitable for a specific remote control model. Also, when you buy a remote control, it should come with a service book that will help you choose the right configuration.
This type of lighting is actively used in residential, office and even industrial premises. The most popular today are control systems implemented using radio switches, motion sensors, controllers with control panels, smartphones and computers. Modern technologies allow you to manage or on the local area, being hundreds of kilometers away from them. Some of them will be discussed in the article.
Advantage of remote control
The use of remote control devices allows you to solve a number of problems:
- Use energy economically;
- Make the process of turning on/off lamps as comfortable as possible;
- Secure your home or apartment from attacks by intruders (presence effect).
Types of remote control
Remote switching on of light can be wired and wireless, manual and automatic, with the ability to manipulate light from devices operating on the principle of emitting and receiving waves of certain frequencies: infrared, microwave, radio frequency, sound, ultrasonic, voice (control of specific commands). In this article we will dwell in detail on lighting control using various types emissions, voice and sound commands.
Infrared and radio wave control of light from the remote control
Infrared lighting control using a remote control is used extremely rarely. Basically, such systems operate on the principle of transmitting a signal over a radio channel. To be able to manipulate lighting devices using an IR beam, a remote lighting control unit, for example BM8049M, is connected to the open circuit. It allows you to turn on the lamp switch using a regular TV remote control. To do this, point the remote control at the unit, press any key (which is not used to switch channels), after which the command is recorded in memory and now you can control the switching on of the light without getting up from the couch.
The main disadvantages of using IR remote control lights are the need to accurately point them at the signal receiver, since they only work within line of sight, and the short range of the beam, but in this case repeaters can be used.

Light control systems using a remote control have become much more widespread, in which a signal is transmitted from a control device to a controller that regulates the process of turning on/off the light at a certain radio frequency.
Light control via radio is more in demand for several reasons:
- The ability to control the light not only from the remote control, but also from a computer, smartphone and other devices;
- The signal range is about 100 meters in the absence of obstacles, 15-25 meters in the presence of obstacles;
- Possibility of installing signal amplifiers and repeaters for better transmission of commands from the control device.
The lighting remote control system via radio using a remote control consists of:
- Remote control;
- Battery;
- Remote control controller connected to the network and load.
Install the controller into the wall or glass of the chandelier (see photo). It can control incandescent, compact and conventional fluorescent, halogen, LED lamps, and not only with individual lamps, but also with a group of them.

Review of remote lighting control units, made in China, using a remote control, via radio, video:
Remote control of light using infrared and radio switches
Infrared switches are a rarity in the lighting market, as it is smarter to control the light using radio devices. One of the most popular switches is “Sapphire” from Nootekhnika (Belarus). The same company produces many wireless lighting control devices, including those mentioned below. The switch is controlled by any remote control, for example, a television remote control or manually. The signals are received by a receiver located inside the device on touchpad. The light switch with remote control is shown in the photo.
Review of the Sapphire IR switch, video:


A remote-controlled light switch is placed in any convenient place, power units are placed in a distribution box or chandelier glass.
An example of “binding” a lighting control unit to a radio switch, video:
Using sensors to control lighting
The lighting equipment market is widely represented various sensors movement, for remote control of lighting. The most common of them are infrared. They are devices that close or open the lighting circuit when the level of infrared radiation increases in their “visibility” zone. As soon as a person or animal whose body temperature is higher than the background temperature enters the sensor’s field of action, the light turns on. As soon as a person leaves the sensor’s coverage area or remains in a stationary position for several seconds, the light turns off. Motion sensors are most often installed in entrances, above the front door, and less often - inside the apartment.

Disadvantages and advantages of infrared sensors
The disadvantages of using motion sensors include the possibility of false alarms (reaction to warm air, sunlight), deterioration of work on the street due to precipitation, failure of the device to operate when a person’s clothing does not transmit infrared radiation, constant turning off of the light after 10-15 seconds as soon as motor activity decreases.
The advantages of sensors include the ability to control electrical energy consumption and, as a result, reduce financial costs, safety for human health, and ease of use.

Connecting motion sensors is not difficult; the installation diagram presented below is very common. To implement it, a three-core wire is required, with which the lighting control device is powered from the network and connected to the load. The phase wire of the network is connected to the phase wire of the sensor. The neutral conductors of the lamp, power supply and sensor are connected together. The lamp is connected with a phase wire to the remaining sensor wire.
Selecting infrared motion sensors
When choosing IR sensors, pay attention to the following parameters:
- Place of application. Sensors are available with degrees of protection from IP20 to IP 55 and are available in built-in and mounted versions. For use in an apartment, a built-in sensor looks more advantageous, and the degree of protection practically does not matter. To install the device on the street or in the entrance, it is better to choose a model with protection from dust and water, mounted on a bracket;
- Maximum range. IR sensors detect changes in background temperature at a distance of 10-20 meters. Those of them that are planned to be installed on the street must have a larger “coverage” radius. Indoors this parameter is of no use;
- Detection angle. In the vertical plane, the viewing angle of the sensors is 15-20 degrees, in the horizontal plane – from 60 to 360 degrees;
- Load power. Before purchasing a sensor, you need to know the power of the load connected to it and select a device based on these indicators with a margin.
Using other motion sensors to control lights
In addition to infrared controllers, microwave, sound and ultrasonic, as well as combined sensors are sometimes used to control lighting.
Microwave sensors
Microwave sensors operate on the principle of emitting and receiving electromagnetic waves. In normal mode, the frequency and length of the waves emitted and reflected from objects are the same. When a person enters the sensor’s coverage area, these parameters change, after which the light circuit switching mechanism is activated. The advantages of microwave sensors are that they are high-precision devices and work well even in bad weather, while the disadvantages are the possibility of false alarms, high price, and harmful radiation for sensors with a large coverage radius.
Ultrasonic sensors
Ultrasonic sensors are similar in operating principle to microwave sensors. A generator is installed inside these devices sound waves, with a frequency from 20 to 60 kilohertz, which are emitted and reflected from objects located in the field of action of the sensor. When a person or animal enters the coverage radius, the frequency of sound waves arriving at the sensor changes, which the device immediately registers. Disadvantages of ultrasonic sensors: they may not respond to smooth movement and cause discomfort in animals. Advantages of sensors: low cost, work in conditions of high humidity, temperature changes, react to movement regardless of what material the person is wearing.
Combined sensors
Combination sensors combine several motion detection technologies. They may use microwave and ultrasonic radiation or infrared and microwave radiation. Such devices perform their assigned tasks most efficiently.
Sound sensors
Sound sensors respond to sudden changes in sound, the level of which is set by changing the sensitivity of the sensor. Most often, the light is turned on and off by clapping your hands. Voice switches can also be considered a type of sound sensors.
Voice control of light
Voice control of lighting devices in an apartment is implemented using voice sensors-switches, often used in systems " Smart House", as well as computers or smartphones on which a special program is installed.
Light switches with remote control (voice) are divided into two types: with the need for adjustment and without it. In the first case, you need to teach the device the commands to activate, turn on and off the light, in the second case, all the commands are already written in memory and indicated in the instructions, you just need to use them for control. Often such switches can be controlled not only by voice, but also by any remote control. These include "Jaco" and "Servi". You can get acquainted with the features of their work on the manufacturers’ websites.
Price: $3.92
Good afternoon friends! Not so long ago I was puzzled by another modernization of my home, namely the creation of remotely controlled LED lighting. Details under the cut)
A short background: I live with my beloved girl, who, despite her 20 full years, second year of medical school with anatomy and other delights and strong nerves, is terribly afraid of the dark. Just to the point of trembling. So much so that the moment between the flick of the switch and the fall of her body into the warm crib with the anti-monster blanket makes her slightly hysterical. I thought that this wouldn’t work and solved the problem ingeniously by ordering the main character of this review.
Meet the load remote control module with an electromagnetic relay and a 433 MHz remote control.

Allows you to control a load of 10 A at a voltage of 250 Volts. "But it is not exactly". These are the Chinese. However, I can say with confidence that the relay handled a load of 800-900 W for 2 hours absolutely without problems, I specifically checked it before writing this review. In addition, this relay has been working for me for about a year to control the table lighting, and a similar module with the same relay works in the corridor, controlling the light bulb.
Let's finish with the introduction. Let's start looking at the relay itself.

We see 2 terminal blocks: one for 2 wires and the second for 3 wires. Through the terminal block, 12 volt power is supplied to 2 wires, and the second is used to connect a controlled load. Now let's move on to consider the reverse side of the relay, in particular the connection point of the three-terminal block.

The central contact (COM) serves to connect the input of the open circuit, and the NC and NO contacts, respectively, for the output of the open circuit. In this case, the NC (normal close) contact is closed in the off position of the relay, and the NO (normal open) contact, on the contrary, is open and when the relay is turned on, they change places. This allows you to turn on or turn off the connected load at the press of a button.
Now let's look at the jumper and understand what it is intended for.

This jumper allows you to change the operating mode of the relay panel, choosing from 3 options.
1) In the case where the jumper is not installed at all: pressing button A closes the relay, and releasing this button opens the relay.
2) A jumper is installed on pins 1 and 2: pressing button A closes the relay, and pressing button B opens the relay.
3) The jumper is installed on contacts 2 and 3: the first press of button A closes the relay, the second press of button A opens the relay, then in a circle.
Now let's look at the button for recording the key fob into memory.

I didn’t have a chance to use it, so I’m quoting the translation from the description on the product page:
1) To record a new key fob, hold the button for 3 seconds and then press the button on the key fob.
2) To clear all recorded keyfobs, hold the button for 8 seconds or more.
As for the range: I can reach about 20 meters through 3-4 concrete walls, and about 50-70 meters in an open area without any problems.
To summarize: I really liked the product, both for its appearance and big amount use cases. Now I use such a relay to remotely turn on the lighting in the room (about six months - no problems). In the future I plan to make a remote electric igniter for pyrotechnics based on such a relay. By the way, the current consumption is stated by the seller to be about 6 mAh, but according to my measurements it turned out to be 4 mAh. This will allow you to create autonomous projects based on this relay. Overall, I definitely recommend buying it. Justifies its price.
Hi all.
A short review of relays with a 433Mhz radio channel.
There are NC/NO options for connecting one control line
Sometimes you need to turn something on/off remotely, without any 3G/Wi-Fi or cloud services.
For such purposes, it is better to use simple and “clumsy” relays.
The simplest are remote controlled relay modules.
Appearance relay module in the photo. 
It's small printed circuit board with a simple relay SONGLE SRD-12VDC-SL-C (3 contacts COM/NO/NC, plus 12V pins per coil), located in a box ala a fuse box.
For control, a small remote control with two buttons (A/B) and an indicator is used.
The AK-RK01SY board contains an LED indicator, a relay and a module wireless communication 433MHz. 
Appearance of the control panel 
Application options: turning lights on and off, activating an electric lock, opening gates/doors/curtains, remotely turning devices on/off, and so on.
Characteristics:
Brand: No Name
Model: AK-RK01SY
Input Power: DC10V-14V
Standby Current:<5MA
RF Frequency: 433MHz
RF working mode: superheterodyne reception
Receive sensitivity: -108dbm
Transmitting distance: 100m (open area)
Decoding mode: MCU software decoding
Working mode: Momentary, Toggle, Latching
Wiring type: fixed terminal
Output Terminal: NO, NC, COM
Remote Control battery: 1*12V 23A (included)
Supporting Remote Control Type: learning code (1527 chip); fixed code
Receiver Board Size: Approx. 3.5*3*3cm
Fuse Box Size: 4*3.7*2.7cm
The parcel arrived quickly, in a postal bag, inside a zip bag with a relay module and a remote control. 
Also included was an instruction sheet. 
External view of the relay block.
Dimensions almost 4 cm x 4 cm x 2.7 cm 
Weight 25 grams is not at all critical, since it implies a stationary installation. Although… 
The fuse box case can be easily disassembled; inside there is simply a board with a relay and a receiver. 
The sizes are also small 
On the reverse side there is a pinout of the block, as well as a reminder marking about the operating modes. 
The antenna is in the form of a spiral of wire, the receiver module is soldered vertically to the relay board 


Assembled. 
The remote control for the relay module is small, convenient to carry on your keys as a key fob 
Weight only 20 grams 
On the back side there is a sticker with the frequency of the remote control range.
Let's disassemble the remote control 
Inside there is a 12V 23A battery (like in car alarms), as well as a board with two buttons and a radio transmitter 
The battery itself is comparable in cost to the entire relay module. The fact that it already exists is a big plus. 
Marking of the printed circuit board of the AK-BF02 remote control 
The transmitter is assembled based on the NDR4208 resonator (received frequency is about 433.92 MHz) 
Well, two microbuttons A and B, respectively. As well as an LED indicating operation. 
Reverse side without elements. It is noteworthy that there is a footprint for one chip and on the reverse side for coding (an array of HLF jumpers). In this version, all this is not used. 
The work is simple. We connect according to the above diagrams into the open circuit of the power supply of the actuator.
We press the buttons on the remote control. Please note that during transmission from the remote control there is an indication (red LED). 

Button A made of red transparent plastic. IN- from gray 
Once again, the reverse side of the remote control - everything is held on by two screws 
Photo in hand. The remote control is really like a keychain, small. 

Of the important things, here is a description of the remote control training modes:
Operating modes: Momentary, Toggle and Latched.
1. Press the Learn button on the board once. We are waiting for the diode to blink. Press the button on the remote control. The diode flashes again and the operating mode is set to “1” - Instant.
It serves to activate the device while holding the button. Conventionally, we hold the button on the remote control and the backlight is on.
2. Press the Learn button on the board 2 times. We are waiting for the diode to blink. Press the button on the remote control. The diode flashes again and the operating mode is set to “2” - Switching.
Presses a button on the remote control - the device turns on. Press the same button again - the device turns off.
3. Press the Learn button on the board 3 times. We are waiting for the diode to light up. Press button A on the remote control. The diode on the board blinks. Then press button B on the remote control. The diode flashes again and goes out.
Now the device will be turned on only by button A, and turned off by button B.
The most convenient mode for me))))
Additional information - instructions in English

A universal way to connect to the power supply circuit of a controlled device 
Another connection example: A) 12V power supply for lighting (for example, LED strips), and B) 220V power supply for light bulbs (suitable for controlling any load, 1V.....250V, up to 10A). 
I connect the relay module for testing.
In the photo, LED indication during training 
Several tests
In idle mode, consumption is minimal - about 0.002A. 
When triggered and held, the current increases. About 0.05A. 
Instant mode. I press and hold A- the light is on. I let go and it immediately goes out. 
Hold mode. I press A and when I release it, the light comes on and stays on. The relay is always on. I press IN and let go - it goes out. 
At first I thought about putting it in the 3D printer's power supply as a backup button.
But a problem arose with the power of the heated table. 
Naturally, such a connection is not effective.
Converted it to separate power supply for the table and the rest of the electronics. 
From the power supply 6A goes through this relay module and I can turn off the printer control and nozzle/motor heating using a button.
The table is heated through a solid state relay. Accordingly, if the control board is de-energized, then the table does not heat up.
Quite convenient, especially when monitoring within a room/apartment. If someone at home starts screaming that there’s a cobweb again or something else, then you can always turn it off from the key fob without taking out your smartphone and without frantically searching for the cloud control button.
Overall the relay is convenient. Small size and universal connection allow you to control anything.
Two points are important: control is used at a frequency of 433 MHz, that is, you can control another similar relay module with a similar frequency, as well as select a remote control for your module if it is lost.
The second point is that the remote control range is stated to be no more than 100m (without interference). I worked within the apartment - it works fine. If you open a lock or gate while standing directly in front of it, there is also no problem. At a glance - 20 meters works. I have not checked the maximum operating range. Again, this very much depends on the battery level.
The product was provided for writing a review by the store. The review was published in accordance with clause 18 of the Site Rules.
I'm planning to buy +37 Add to favorites I liked the review +45 +71