Illustrated tutorial on Adobe Dreamweaver MX. Installing a Template in Dreamweaver Graphics Options
We have prepared the page to make it into a template in Dreamweaver.
Let's remember a little what I already wrote about the template in Dreamweaver. When you add the nth number of pages to the created template, and then change it, then all the pages will change following the template!
The only place that won't change is the editable area! There may be original text, or any other unique information.
How to make an editable area in Dreamweaver.
The number of editable areas is unlimited and you can set such areas anywhere.
We will create an editable area in the area where we will have the main text!
Open the prepared one in Dreamweaver.
If you don't have any text, then you simply move your mouse over where you have the editable area. I have text, I select it. Click , - next - templates - a new editable area.
In the new window, name your editable area. I do not use text for this, but simply put a number. For text on all sites, the number is 2. And for the title I make a separate editable area No. 1 - why is that? I don’t know, it’s just how it was initially.
In principle, both the title and the text can be made in one editable area!

Let's see what we got.
Here we see that there is text in the editable area No. 2 that we created. This editable area can only be seen in the program, it is not visible in the browser!


When you save the first template, a folder for storing templates is automatically created, which will be called Templates.
A new window opens where:
Website - website
Existing templates - I already have templates, but for you, if this is the first template, then the window will be empty.
Description - always left it blank.

What do you name a template in Dreamweaver?
Why did this question arise? If you are going to make a website on different topics, or you will have different categories, then the templates will probably be different. I have a lot of themes - so there are a lot of templates. Each template is different from its brother top line, the first line on the page indicating where you are.

Each of the templates must be called something. The template name will be displayed in the code. How this name will affect the optimization of your page is difficult to say, but it seems to me that if we name the template in accordance with the topic that you are going to develop, it will be better than calling the template a number or a faceless word.
Let's look at an example, if you now press the key combination ctrl + U, you will see the code.
This is the second line, and we see that our template is called - “All about the Dreamweaver.dwt program”

Good afternoon
We all know that a unique template is well received by search engines.
So, today I want to talk about how to write your own template using the program Adobe Dreamweaver
This program is paid, but if you search on Google you can find a free version (not a demo),
Adobe dreamweaver cs6 + crack
Once downloaded and installed, I think you can start
Before you start, create a folder somewhere for the site, where we will save our files. And immediately create a folder for pictures
From the main menu select HTML
will appear in front of you source document.
Title- needed to display the site name in the browser. We write the name of our future site there. For example, I will now create a website on the topic of tourism. And you must admit, the cost per click in contextual advertising for tourism topics is higher than for cinema or sports topics. Of course, it’s not good on my part to make a website solely for making money, but I’ll try to make it half SDL. I don’t write articles myself, I will only order them. But the topic of TOURISM is too broad, so my site will be about a specific country, that is, about Italy. Here's what I got
Body- this is the body of the site, place the cursor between them and click on " Insert", in it on " Tables". Here you can select the number of rows and columns.
Using a table, we will divide our site into sections (header, menu, footer, base). My frame will be simple. If you can figure it out right away, you can choose the difficult path. This is how I divided my future site:
First I set 2 columns and 3 rows, and then I combined the top 2 and bottom 2 cells. To do this I went to " Design". Selected using the button " ctrl"2 cells, and right mouse button" tables" => "merge cells"
This is what I got in the section " Code"
width - width, set it to 1115, the hat will also be this size
height - height, 100%, full screen
border - let it be set to 1 for now so that we can see the borders. Then when you're done you can change it to 0
I would like to highlight one of the advantages of the program: when you start writing a tag, a hint pops up, and there you can immediately select that tag and insert it.
Save as once index.html. You never know, the lights will turn off and some error will appear...
Now let's start filling the site with content
First we have to put the hat on, I have a hat prepared in advance
To do this, insert the cursor into the first cell, then " insert" And " image", select our header there. And it will be automatically inserted into the code, I change the width to 1115px, and leave the height as it is.
But when you increase the scale of the page, the table goes to the left side and the right side remains empty. Everything needs to be aligned in the center. To do this, select the entire table (in the code), look down and see there " level out" , select " in the center", that's all. Let's look at the screen
Let's make our header clickable right here, select the text, go down and there is a line " link", write index.html there
You're done with the hat, you can add something else, use your imagination
Now you can add categories to the Menu block: " insert" - "hyperlink". By changing the parameters we insert several categories to suit ourselves. For example, for me, Cities of Italy- city.html, Italy review- italia.html, Italian Cuisine- italyanskaya-picca.html, etc.
If you click on the " page properties" , bottom of section " design", you can change the link parameters (light, size, indents, font, etc.)
Main part: Go to the design, hover over the “main part” block and insert your text, the code for it will be written automatically. It's the same here if you go to " page properties", you can edit the parameters
Now let's create our other pages
Let's go to " design", there in the "Main part" block we delete everything and fill it with other information. For example Cities of Italy, I write here everything related to the theme of the City of Italy, and save the page as city.html
Italy review, fill in and save as italiya.html
In the end this is what I got
This is naturally not a masterclass. And for experienced designers, of whom there are many on this forum, my lesson will seem funny, but for a beginner who has no idea about creating a website, it will do just fine.
I hope my lesson will be useful for beginners good example, and will direct him to do more serious projects
If I made a mistake somewhere, don’t judge harshly
We continue the series of articles devoted to creating a one-pager in the Dreamweaver program and in this next article we will look at an html template based on a one-pager.
We will create our html template based on a ready-made example of a simple “funnel” for attracting potential distributors (clients) or subscribers.
In the previous article, “How to make your own website in Dreamweaver,” we studied a little about the Dreamweaver program and created our first html page using it.
If we talk about why I started this topic (the topic of creating one-pagers or, as they also say, creating a funnel for attracting potential clients, distributors), then...
The fact is that I repeatedly encounter how many people simply do not understand the obvious. Precisely, in order to create high-quality one-page websites and set up an attraction system in this particular way, it is not even advisable, but simply necessary to navigate the layout languages, be able to create a simple html template and, if necessary, make additional changes to it.
You don't need to know everything perfectly. You just need to know what is necessary to solve your problems. And, as you understand, one of the tasks is to have a strong skill in creating a one-page website. Bring this skill to the point that you can create the HTML template you need for any purpose at any time.
This can be an html template for a one-page website, for a newsletter, for a business card website, for a sales page, as well as an html template for various custom inserts on your website.
Whatever they say, the technical component of your network business or business based on the sale of information products is very important.
As I said in the previous article, there are currently a lot of services for creating one-page websites that offer various technologies for creating html template.
However, Firstly, such services become outdated and over time no longer meet the requirements imposed by modern technologies.
Secondly, if you have little or no knowledge of html layout, then it will be very difficult for you to make the changes that you need on such services. However, if you are vitally interested in increasing your conversion rate for attracting partners, you simply need the skills to create an html template.
Third, - if you study this topic only superficially, your individuality, your style and, as a result, will suffer - Your Brand.
So it turns out that many people fall for all sorts of products, buy various packages and services, copy what in many cases does not work, and then wonder why there is so little return on their business.
The problem is that even after purchasing such products, people are faced with various pitfalls, give up and, in the end, “throw away” it all, without even making an attempt to find out the true reasons for the failures.
The most interesting thing is that these errors and failures are largely related to the technical component of html layout, the study of cascading style sheets (css), and also we understand what the insides of the created html pages.
We create a local server and prepare the ground for creating the first html template
So, let's start creating our first html template in the Dreamweaver program.
In the last video and article, we got acquainted with the Dreamweaver program, and also learned how to insert several elements (or, as they also say, blocks) on our simplest html template.
We also created a special folder where we placed the files we needed for work.
Now we will learn how to create a more complex thing - a local server. It is needed so that we can create, customize and test our created HTML templates without the help of the Internet.
Those. while creating local server A virtual partition (disk) is created on your hard drive, which simulates the Internet. Accordingly, when we install a local server on your HDD, the path to your html page will look as if you were on the Internet.
As a local server to create our html template we will use "Denwer".
I want to stop you right now. There are many modifications of “Denwer” and there are many additions to it. Therefore, if you go to the main site for downloading, then although it will be sufficient for our tasks, I recommend that you download exactly the version and assembly that the link to which is below.
This assembly contains a very important component - “Zend Optimizer”, which we will need in the future to configure a very important script to increase the conversion of your html pages.
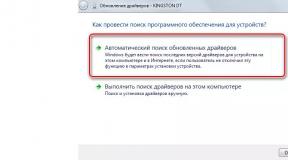
To install a local server on your hard drive, simply run the executable file and follow the instructions that appear on your screen.
I told and showed in more detail about installing and configuring a local server in a specially created video tutorial.
Html template as an example
The HTML template that we will consider is the simplest, but currently the conversion to such one-pagers is still quite high. Therefore, you can safely place this type of html template on your websites.
What you should pay attention to...
I tried to make the lesson so that it would not be difficult for you, because... I understand that many people still do not know the HTML layout language very well, as well as cascading style sheets. Therefore, the lesson explains in detail which buttons you can use to make your own one-page website without this knowledge and skills.
In general, watch the lesson, that's it necessary files(if you haven’t downloaded it yet) and create your one-pager in visual editor html "Dreamweaver".
P.S. There is a small error in the lesson, which I noticed after creating the video. See the video itself for explanations.
P.S. In the next article I will prepare a video in which I will show an “advanced” method of creating a one-page website based on the most popular html templates on the Runet.
Best regards, Andrey Averkov
#averkovteam #mlm #networkmarketing #work from home #recruiting #mlm business #social networks
In order to create page templates in Dreamweaver, you must use the File -> Save As Template menu. Let's start creating them. First, let's create a template home page future site. To do this, select the bookmark with the index.html file open in Dreamweaver. Then in the main menu of the program, select File -> Save As Template.. (save as a template). As a result of these actions, the panel shown in the figure below will appear.

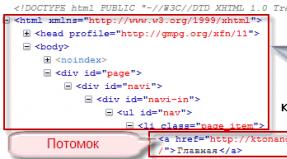
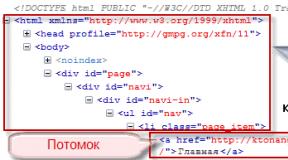
Next, all you have to do is click the Save button, a panel will appear with the question “Update Links?” to which you must answer “Yes”. As a result of this, another folder called “Templates” will appear in the folder with our project, and in it there will be a file called index.dwt. This is the real website home page template. Since this file is already open in the Dreamweaver work window, you can look at its code and find out how it differs from the code in the index.html file. After all, externally, these files are no different when opened in the browser. So what's the trick? And the trick is that between the tags
And inscriptions appeared highlighted in green.
These are the so-called editable regions. What does this mean? This means that if a site page is linked to this file template, then changes to the page can only be made in these places. The rest of such page will be closed for editing.
We have now completed our third Web site. Everything works, all pages load normally and are displayed in the Web browser. It would seem that there is no reason to worry.
No, but only for the time being.
Let's imagine such a situation. We suddenly decided to add to our website new page. To do this, we need to change the navigation bar in all pages, and to do this we will have to open each of them in a document window, add a link and save the page. Our site is small in size and we will complete this work fairly quickly. What if he was great?
Of course, we can use Dreamweaver's built-in tools. For example, call the dialog box Find and Replace- the product is extremely powerful. (For information on searching and replacing substrings, see Chapter 2.) Or start replacing hyperlinks by calling the item Change Link Sitewide menu Site panels Site(see chapter 6). In many cases, this will help us quickly replace entire sections of a page's content or HTML code. The assets and element library, also described in Chapter 6, can be of great help.
But what if we want to make some significant changes, for example, radically change the layout table structure? Search and replace is unlikely to help us, much less automatically replacing hyperlinks. Even assets with a library will not help us in this case. Do you really have to redo all the pages again?!
If you weren't working in Dreamweaver, you probably would have to do this. But we were lucky. Dreamweaver supports this powerful tool, like templates. They were already mentioned in Chapter 3. Now we will look at them in more detail.
Sample- this is a kind of sample, the “skeleton” of a Web page, containing elements common to all pages. When you create a new page based on a template, all you have to do is enter the unique content of this very page in the right places and save it. You can later change the template and Dreamweaver will update all pages created from it.
In this sense, templates are similar to library elements (see Chapter 6). The difference is that a template is a template for an entire page, while the library stores only its individual elements. However, the Dreamweaver developers believe that templates are closest in "relatedness" to assets (see Chapter 6), and have placed a list of templates in the panel Assets.
Initially, the template cannot be changed, i.e. when you create a page based on it, you can place content only in specially designated places - editable areas. You cannot edit elements of the template itself, since they are immutable areas. If you want to correct something, you will have to open the template itself in the document window. Thus, Dreamweaver saves you from mistakenly changing the template and, accordingly, from distorting the Web pages created from it.
We can say that templates are ordinary Web pages. When editing, you can treat templates like regular Web pages and use the same tools. You can also set the parameters of the page that will be created based on this template (title, background color, text and hyperlinks). However, Dreamweaver uses a lot of its own tags and attributes when creating HTML code for templates, so it is not entirely correct to say that a template is a regular Web page.
Templates are saved in files with the .dwt extension in the Templates folder, located in the root folder of the local copy of the site. It follows that templates are an integral part of your site, just like the library. To use any template on another site, you will need to copy it to that site using standard means Dreamweaver (see Chapter 6). Several templates can be used on one site.
Templates are most useful to you if you create pages based on a tabular design. Such pages almost always contain many repeating elements, which are extremely labor-intensive to update manually. But you can also prepare templates for “regular” pages. This may be necessary, for example, if you create pages with the same design for a large corporate website.
Dreamweaver comes with quite a few templates created by professional Web designers. You can use these templates to create your pages; how this is done was discussed in Chapter 3. Try it - you may find something that suits you.