How to unlink a Google account from a Tele2 phone. We bypass Google account verification (FRP) after resetting the smartphone (Hard Reset). Official unlock method
Gray methods of “unlocking” are a 100% loss of warranty and a sure way to get a “stone” instead of a mobile phone. Therefore, in this article you will receive recommendations on how to unlock your phone using methods that will not in any way affect the performance of the smartphone and the ability to take advantage of the warranty. Moreover, you will find out a solution to the problem when access to phone functions is blocked due to the need to enter Google account information.
Official unlock method
Find the box for your phone and don't forget to put the receipt and the device itself in there. With all this, go to the nearest official Tele2 store and ask the employee to unlock your smartphone. Then the situation can go according to 3 scenarios:
- It will immediately unlock your phone without any questions asked.
- He will fill out a service request for unlocking and say that the code will then be sent to you via SMS or email.
- He will tell you that unlocking the SIM card is not available and will refuse to do anything.
In theory, the first 2 points work like clockwork - they are listed on 90% of sites about unlocking Tele2 Mini. However, when talking with company representatives, it turns out that “the first slot of the smartphone is intended only to work with Tele2 SIM cards.” Like, there was never any talk about unlocking two slots, and no one can provide an unlock code.
Most likely, when you visit the salon, you will write an application for unlocking, and then wait for a decision. The process may take several months, but you won’t have to delve into the device’s software.
Many will say: “refusal to unlock is a surefire reason for litigation.” However, in the legislation of the Russian Federation there are no clauses at all that in any way prohibit the sale of phones with blocked SIM cards. Moreover, the smartphone from Tele2 has one slot that works with SIM cards from MTS, Megafon, Beeline and other operators.
How to do without official unlocking and not lose the warranty
There are universal slot unlock codes on the Internet (the first one, since the second one initially works with any SIM cards) with which unlocking is available on any Tele2 Mini. The action plan is:
- turn off the device;
- remove the battery;
- insert a SIM card of any operator;
- return the battery to its place;
- turn on your smartphone;
- in the window enter the following nck code: 34127856;
- restart your phone;
- check the functionality of the inserted SIM card (on some devices the code is useless).
The disadvantage of this method is that you will have to enter the combination every time you turn on the smartphone. So you will either have to remember these 8 numbers or write them down somewhere.

As for the connection between the method and the possibility of further servicing the phone, the Tele2 Mini warranty card states that you can lose the warranty in case of “incorrect software installation” (this includes flashing the firmware, which you can read about below). From which we conclude that entering the above code is harmless.
On the Internet you can find several methods on how to flash your phone and thereby unlock the first slot. For those who don’t know, firmware for smartphones is the same system reinstallation as for computers. Inexperience during this operation leads to:
- loss of normal operation of the phone;
- the need to call a specialist for help;
- loss of warranty.
If you are a fairly experienced person in technical matters, to unlock Tele2 Mini you will need:
- Smart Phone Flash Tool program (can be installed from the official website);
- new firmware and brief installation instructions (both are available for free on the forum of the 4pda.ru resource).
Attention. If you have never been involved in flashing smartphones, watch a few thematic videos before doing so. Or entrust the matter to a professional.
How to Bypass Google Account Login
If the smartphone asks you to “log in to one of the device accounts,” there is the following sequence of actions:
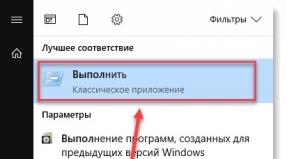
- Call up the keyboard (on the login screen, press and hold the @ symbol);
- Click on the gear that pops up;
- Tap on “Android Keyboard”;
- Go back and press the task manager key;
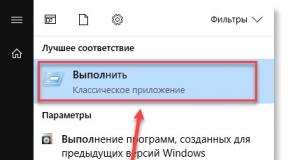
- In the Google search box, type settings;
- Do a factory reset.
Using this method, you can delete your Google account. This could theoretically come in handy when you reset your phone and removed your email and Google password from memory.
Unblocking Google account (FRP) – Tele2 Mini 1.1
To unlock a google account on your Tele2 Mini 1.1 device, follow these steps:


If SP Flashtool does not see the phone and a green check mark and a message about successful formatting do not appear on the computer screen, then try downloading the drivers and installing them manually as stated, then repeat all the steps in the instructions.
Development of the android system is one of the main tasks of Google. Among the many new features, we want to talk about a new protection program that has appeared on all Android phones with version 5.1 and higher. Thanks to it, for example, if the phone is lost or stolen, the owner of the device has the opportunity to block it. Thus, no one will be able to boot the phone without knowing the login and password for your account in . It will also work when resetting the phone settings (hard reset).
This feature is called Google Factory Reset Protection, abbreviated as FRP lock.
A similar security scheme has long been implemented by Apple in its products and has proven itself quite well. This is what will happen if you do (for example, when deleting a pattern or phone firmware). When you first start and check access to the wi-fi network, the phone will ask confirm account. A similar message will appear.
Of course, if you remember the necessary data (they are entered when purchasing the phone), login and password, there will be no problems. But how can you bypass Google account verification if you have forgotten all your personal data and there is no way to restore them via email, and the firmware does not help?
There are several ways to choose which one is right for you, I can’t say, since each phone manufacturer (Samsung, Micromax and others) produces models with their own individual features - different function keys and software.
- Reset system settings and remove DRM license without cable.
To do this, we need to get into the phone settings by bypassing the standard boot through the help system. Watch the video for step-by-step instructions using a Lenovo phone as an example.
- Soft reset via app.
Here the procedure is more complicated. To do this, we need an OTG cable with a program downloaded to a flash card, or simply reset the application (StartSettings.apk) on Micro SD and insert it into the device. More details in the video using the example of a ZTE phone.
- Other non-standard methods.
Due to the huge number of models, there is no single correct solution to this problem. For example, in this video, the author turned off the modem with Internet access during the test and was able to bypass the confirmation on the LG G4 phone.
The most complete list of all non-standard methods is presented.
I hope that with the help of our material you were able to unlink your phone from your Google account. If you have any questions, write them in the comments
Many of you leave your own options for bypassing the protection. We want to share one of them. This method was used on the Huawei MediaPad T3 7 tablet.
1- Charge the tablet 100%
2- Turn on, select the language, region and connect to Wi Fi, accepting the terms of use.
3- On the next page “Google Services”, click on the blue inscription “Google Privacy Policy” and in the window that appears, click and hold on any of the words so that an additional menu appears in which there is “Web Search”. Click on it and select Opera (namely opera, because in Chrome it may not be possible to open downloaded files).
4- Download Test+DPC. I had version 4 (as an option, use other programs quickshortcutmaker and Google Account Manager). I don’t know how anyone downloads it, but I went to my Yahoo mail, where in my incoming messages I sent myself the required file from another mail. Install and launch. Select the second item “set up device owner”, encrypt the device. Although in many videos I have seen they choose the first one. I haven't tried it personally. A reboot is in progress. Several times further, and then the DPC window pops up asking you to set up a profile. We accept the agreement. Customizable. Then some kind of sign will pop up endlessly (I don’t remember which one, I don’t have a tablet at hand anymore). Reboot.
5- By clicking next it should start (if the DPC menu pops up asking you to create a profile in English, select the lower value “skip”.
6- That's it, the tablet is running in normal mode. Go to settings and do a full reset. After turning on, we are happy with the unlocked device
They also ask in comments and private messages on Google. We have a separate article about this. Here we are discussing something a little different, namely possible ways to bypass confirmation.
Let's supplement the material with another video from a visitor. This method will be useful to all owners of Xiaomi phones, regardless of the model.
Google is actively improving the security of the Android OS and introducing anti-theft protection such as linking the device to a Google account. In this article, we will figure out how to bypass your Google account after a reset.
Before you start re-reading the article! Read the comments first, and then carefully the entire article!
A little background
With each new release of Android, Google tries to raise the level of security of this mobile operating system and introduces new protection mechanisms.
So, with version Android 5.1 Lollipop, a new anti-theft mechanism was added, the essence of which is as follows: after purchase, the owner of a smartphone or tablet links the device to his Google account. If the device is suddenly stolen and the attacker erases all data, he will run into Google Device Protection called Factory Reset Protection or FRP.
But not everything went as smoothly as we wanted, if you bought the phone second-hand or forgot your account and reset it, then naturally you fall for FRP protection. You need to reset your Google account!
Workarounds
Google account after reset
If we consider it globally, there are two options for resetting the protection:
- Official
- Unofficial (bypass Factory Reset Protection)
Let's first look at the official option for resetting FRP or how to avoid this problem when resetting, and then look at all the ways to bypass Factory Reset Protection.
Official FRP Reset/Bypass
- Enter the login and password for the Google account that was before the reset; if the device was purchased second-hand, then ask for this information
- From your computer, go to your Google account settings and
- If you have receipts and warranty cards, contact the service center
- When replacing key modules or the motherboard of a smartphone or tablet
To completely disable Factory Reset Protection/FRP

If after resetting Android does not accept the password
If you try to enter your Google account after resetting your Android settings, but you can’t go any further, then most likely you reset your password not long ago; if this is the case, then wait 24-72 hours, then try again.
Bypass Factory Reset Protection/FRP or how to bypass Google Account? (Unofficial)
Below we will suggest many methods on how to unofficially bypass FRP protection, you just have to try each one to eventually get a working Android.
Option 1 bypass Google account after reset
- Insert the SIM card into the device on which you want to delete your Google account
- Call this Android device
- Accept the call and click the add new call button
- Write any numbers into the dialers and “Add a number to an existing account”
- Enter your Google account information
- Save contact to your account
- Restart Android
Option 2 bypass Google account after reset
- Insert SIM card into locked Android
- Call this device
- Accept a call and create/add a new call
- In the dialers we dial the following engineering code *#*#4636#*#*
- After typing, your Android should automatically redirect you to the advanced settings menu
- Press the back button and find yourself in the settings menu
- Go to the section " Recovery and reset" or " Archive and Restore«
- Disable “Data Backup” and everything related to data recovery
- We reset the settings
- When setting up the device for the first time, enter your account
Option 3 bypass Google account after reset
If your Android device supports Fastboot, then you can try performing an FRP reset through it.
To do this you will need:
- Computer
- Installed
- to device
- Transfer device to
Then you can enter the following commands:
fastboot oem clean_frp
or run this command
fastboot erase persistent
fastboot erase frp
fastboot erase config
Option 4 bypass Google account after reset
After the reset, you need to try to enter the settings menu, after which you will need:
- Computer
- Installed
- to device
- Connect Android to computer and run ADB RUN
Then enter the following commands:
adb shell content insert --uri content://settings/secure --bind name:s:user_setup_complete --bind value:s:1
adb shell am start -n com.google.android.gsf.login/
adb shell am start -n com.google.android.gsf.login.LoginActivity
For this method, you will need official firmware for installation using a computer. This firmware must contain a scatter.txt file.

Option 7 bypass Google account after reset
- Install the SIM card, turn on Android and get to entering your Google account
- From another phone we call the installed Sim in a locked Android, accept the call, hold the center key until Google Now appears, end the call from another device
- Click on the button Back, enter the word “settings” in the search bar and go to them
- Next, move to the “restore and reset” section and disable all the checkboxes and reset Android settings
Option 8 bypass Google account after reset

Option 9 bypass Google account after reset
For this method you need to have:
- Ability to install an SD card
- Download and transfer the file to the memory card
Then put Android into Recovery mode and flash the FRP-False.zip file.
Option 10 bypass Google account after reset
- Connecting to Wi-FI
- When the network check starts, go back
- We choose another Wi-FI network, no matter which one
- In the password entry field, type absolutely any characters, then select them, and click on the three dots (additional menu) and “Show hints”
- In Google we write “SETTINGS” and open the phone settings
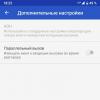
- Next, select “Restore and reset” -> “Reset DRM licenses”
- We return to the Wi-Fi connection, connect and enter a new account
Option 11 reset FRP. For Xiaomi
- Choosing a language
- Select region (country of residence)
- Connect via Wi-Fi to the Internet
- Go back to the beginning using the back key
- Hold on the welcome page with 2 fingers until turned on. TalkBack
- Draw the letter L on the screen
- Select TalkBack settings
- Hold down the volume keys at the same time and turn off TalkBack
- Scroll to the bottom and select “Help Review”
- Start the video and go to YouTube (click the three dots when going)
- We find a video where there is a link in the description (almost all Android videos +1)
- Click on the link and then three dots, launch Chrome
- Login to Chrome, skip logging in
- We type in the search “ quickshortcutmaker «
- Download the found application
- Start installing the app > Allow apps to be installed
- Download the app again and install it
- Launch the application
- Turn on voice search and find Settings
- Select view
- Go to the settings menu "About phone"
- Press quickly seven times on the item “Miui Version” 7 times
- Go back
- Go to "Advanced Settings" > "For Developer"
- Select "factory unlock"
- Go back
- menu "Backup and reset" and perform a reset
Do you still have additional questions? Write them in the comments about what you did or vice versa!
Read also...
- Creating a custom archives page in WordPress How to integrate this template into any theme
- Remotely turn on your computer for free, without SMS and without clouds, using Mikrotik
- Professions: social group administrator
- How to remove a program from Android, including the standard desktop application of various fruits android how to remove