Flash the img file. Custom Android: we make our own firmware from stock, without delving into the sources. Android IMG Repack Tools what is it and why
All firmware for tablets on the Allwinner processor have the same img format (IMAGEWTY).
After a long search, I finally found a program that allows you to disassemble and assemble firmware for tablets based on Allwinner. It's called unPacker
Let's proceed directly to disassembling the firmware file.
Disassembling the IMG file
For disassembly you will need:
- The firmware file itself
- The unPacker program, which can be downloaded (For Allwinner a31s you can use imgRePacker)
Download the archive and unpack it. Run the program unPacker.exe
We drag our file into this window and wait for it to unpack.
After unpacking is completed, a new folder will appear called “firmware.img.dump”
In the out folder there is a file system.fex - this is a file with system files (system folder). That's what we need.
Editing the system.fex file
To edit this file you need a nix system and a conversion utility that can be downloaded
We create a folder in the home directory in which we will edit our firmware. Let's call it NEW for example. Now unpack the files from the ext4_utils.zip archive into the NEW folder. Launch the terminal and type
The program will compile and we will get a tool for editing Sim2img. Now put our system.fex file in the NEW folder and rename it sytsem.img
Enter in the terminal
./simg2img system.img output.img
Now we have an output.img file. Now create a folder, for example, called sys
And mount our output file there
sudo mount output.img sys
The sys folder now contains files that can be edited. For example, you can make changes to the build.prop file that will improve the system's performance.
After editing, we begin assembly
./mkuserimg.sh -s sys/ ./factoryfs_custom.img ext4 ./temp 512M
Rename the resulting factoryfs_custom file to system.fex.iso
note: you can similarly edit other image files (boot and bootloader)
Assembly
Now, in order to assemble the edited files into the format required for firmware, you need to place the system.fex.iso file with replacement in the folder (on Windows) _iso and drag the folder
Mega utility Android IMG Repack Tools for all beginners and advanced romodelers, developers, for editing Android images.
Android IMG Repack Tools what is it and why?
Android IMG Repack Tools utility from user under nickname A.S._id(xda, w3bsit3-dns.com), designed to edit Android images:
- unpack Android image(img, ext4)
- editing files (manually)
- collect the image
And also work with kernels (boot.img) and recovery (recovery). The utility is designed to work both under Linux and Windows (you must install Cygwin).
Android IMG Repack Tools will be useful to absolutely all Android Romodels for creating new custom firmware, as well as software developers.
Where to find and download Android IMG Repack Tools?
Download and latest version Android IMG Repack Tools utilities can be found from the official project page on XDA.
Installing Android IMG Repack Tools on your computer
Since the Android OS is based on the Linux kernel, it would still be more correct to work with the Android IMG Repack Tools utility from operating system based on Linux.
OS pre-configuration for Android IMG Repack Tools
If you have Ubuntu version 14.04 and older (and Mint based on it), then you will need to install GCC 5 from the repository (open a terminal and type the following commands):
sudo add-apt-repository ppa:ubuntu-toolchain-r/test
sudo apt-get update
sudo apt-get install gcc-5 g++-5
sudo update-alternatives --install /usr/bin/gcc gcc /usr/bin/gcc-5 60 --slave /usr/bin/g++ g++ /usr/bin/g++-5
For Ubuntu users 16.04 (and Mint based on it), then you need to install first:
1. GNU Automake 1.14 (download and unpack)
2. Go to the folder with Gnu Automake, open a terminal and execute the commands one by one: ./configure make sudo make install
3. Install packages: sudo apt-get install git-core gnupg flex bison gperf libsdl-dev libesd0-dev build-essential zip curl libncurses5-dev zlib1g-dev valgrind libreadline6-dev gcc-multilib g++-multilib libc6-dev x11proto-core -dev libx11-dev libz-dev gawk texinfo automake libtool cvs libsdl-dev
Setting up Android IMG Repack Tools
1. After downloading Android IMG Repack Tools, unpack, go, open terminal
2. Type the command to launch the utility./main_menu
If you have Mint installed, then click on the main_menu file
3. Go to the utility section " 0 - Configure & clean tools menu»
4. Select " 1 - Build android_img_repack_tools“, in order to download and configure the tools that work with Android images.
Working with the Android IMG Repack Tools utility
Expect an update to the article with instructions on how to use the utility soon!
For those who want to start the journey to creating their own firmware for Sony based on the official ones, you need to know how to unpack Sony firmware FTF format.
What is necessary?
1. Computer
2. Download latest version not an official flasher FlashTool and install
3. Download Unix image manager ext2explore.exe
3. Download and install free archiver 7-zip
4. Sony firmware in FTF format
Instructions on how to unpack Sony firmware in FTF format
1. Right-click on the FTF firmware - open the archive or unpack from the archive
2. After installing FlashTool, go to the path C:Flashtool  3. Launch the FlashTool program and select the menu in the panel Tools -> Sin Editor
4. Select the sin file extracted from the ftf firmware in the Sin Editor and click Extract data. After this, the process of converting the firmware file into readable form will begin.  5. At the exit you can get new file with extension yassf2 or ext4 or elf
If the file *. yassf2
Select Tools -> Yaffs2, after which a window will appear to select a file, select a file with the extension *.yasff2

In a couple of minutes you will receive a folder with files that were in the firmware

If the file is *.ext4 or *.elf
1. If you have a file with the extension *.elf, then rename it to *.ext4
2. Run the previously downloaded ext2explore program, select the firmware file, after which the contents of the firmware will appear in the window, now you can save the contents. 
What's next?
If you plan to create a flashable update.zip in the future, then you should go to the article - creating an Updater Script
How to correctly extract the kernel from FTF firmware?
In order to get the “correct” kernel for flashing using update.zip, you will need the same Flashtool.
1. Open the FTF firmware with an archiver and extract kernel.sin 
Need to flash Android using FastBoot, but don't know how? This article provides detailed instructions on using the FastBoot utility, how to use it, where to download it from and how to flash an Android device.
This manual will fully explain how to use FastBoot! How to use Fastboot to clean partitions, flash IMG files, reboot and many others.
Downloading and installing FastBoot
Before flashing Android using FastBoot, you need to download this utility and install it on the desired computer:
- You can download FastBoot from the page Android developers included platform-tools .
- Or use the program Adb Run, more precisely better , in which everything is included, and also knows how to unlock the Android pattern.
Why is ADB RUN better?
Launching the Fastboot utility
Depending on what you chose, downloaded the fastboot utility separately or selected adb run, the launch may differ!
If you downloaded Separately Fastboot
Extract the files:
- adb.exe
- AdbWinApi.dll
- AdbWinUsbApi.dll
- fastboot.exe
- libwinpthread-1.dll
Move them to the C:\ drive. Windows folder. You have successfully installed ADB and Fastboot on your computer!
After you have downloaded and installed FastBoot, open the " Command line".
Windows command line example
Example of installing ADB and Fastboot.
If you downloaded ADB RUN
If your choice fell on a proprietary program ADB RUN, then run it, type A and press Enter. 
It is advisable to place the files that need to be flashed in the same folder as the Fastboot utility.
Instructions on how to flash Android using FastBoot
It is very important to write commands and firmware files as they are specified!
If you have the command:
fastboot flash cache NazvaniAFiLe.img
then you need to write exactly this way, and not any other way. In other words case is important otherwise you will get - there is no such file.
Reboot Commands
Fastboot to firmware mode (bootloader)
- To start working with Android device Using Fastboot, first you need to put your smartphone or tablet into bootloader mode using adb:
adb reboot bootloader
- Reboot Android from firmware mode (bootloader) to the same mode:
fastboot reboot-bootloader
- Reboot Android from bootloader firmware mode to bootloader mode:
fastboot reboot-bootloader
- Reboot Android to normal mode from bootloader firmware mode:
fastboot reboot
The command "sees" your Android PC
Make it a habit before doing anything in Fastboot to check if there is a connection between your computer and Android:
- Checking whether the PC “sees” your Android:
fastboot devices
This command must be executed when the device is already in firmware mode (bootloader)
Commands for unlocking and locking Google Pixel, Nexus bootloader in Fastboot
- Unlock bootloader for Pixel, Nexus:
fastboot oem unlock
fastboot flashing unlock
- Lock bootloader for Pixel, Nexus:
fastboot oem lock
Command to find out bootloader version
Shows the bootloader version number installed on Android:
fastboot getvar version-bootloader
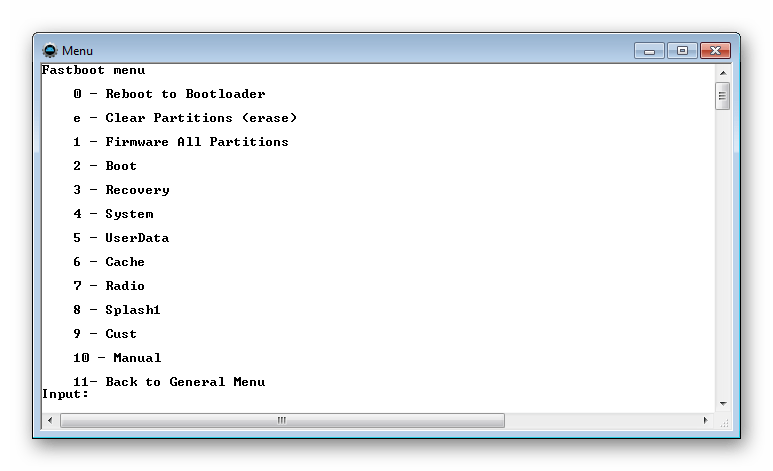
Commands for formatting a partition in Fastboot
Before flashing any partition in Android, you must first format it so that there are no problems with operation
fastboot erase Imya_razdela— erase partition: boot, radio, recovery, system, userdata and others.
- Erases the Cache partition in Fastboot:
fastboot erase cache
- Erases the Date section (Data/UserData) in Fastboot:
fastboot erase userdata
- Erases the System partition in Fastboot:
fastboot erase system
- Erases Recovery section in Fastboot:
fastboot erase recovery
Commands for flashing Android partitions in Fastboot
After you have formatted the Android partition or partitions, you can proceed to the next step, flashing the firmware:
fastboot flash Imya_razdela imya_file.img— firmware of the selected partition: boot, radio, recovery, system, userdata and others.
- Flash the system partition:
fastboot flash system imya.img
- Flash the cache partition:
fastboot flash cache imya.img
- Flash the Data section:
fastboot flash userdata imya.img
- Flash the Recovery partition:
fastboot flash recovery imya.img

- Flash all partitions (boot, recovery and system):
fastboot flashall
Command to install update.zip
Flashes an update archive on Android in the update.zip format - ZIP archive with IMG images of various sections:
fastboot update filename.zip
For Sony devices
Checking the connection of the Sony device, if the answer is 0.3 device, then it is connected:
fastboot.exe -i 0x0fce getvar version
Unlock bootloader
fastboot.exe -i 0x0fce oem unlock 0xReceived_Key
More detailed information to unlock Bootloader Sony - How to unlock Bootloader Sony
Waiting for Device error
If you have the following message on in the command window for a long time: waiting for device- Means:
- The driver is not installed or installed incorrectly - reinstall or install
- Android device is not in Bootloader mode - translate
- Incorrect connection to USB port- use the rear ones USB ports 2.0 computers, do not use USB hubs
Video example of working with the Fastboot utility
For those who don't understand anything!
For those who don’t understand anything, then use the proprietary application ADB RUN, this program contains almost all the commands that are needed for FASTBOOT!
Below is an example ADB work RUN - how to quickly flash a Recovery file using ADB RUN in less than 5 seconds (just don’t forget to switch to bootloader mode first)! 
That's all! Read more articles and instructions in the section Articles and Android Hacks. Stay with the site, it will be even more interesting!
Android firmware, i.e. writing certain file images to the corresponding sections of the device’s memory using special Windows software that almost completely automates the process is today not the most difficult procedure from the user’s point of view. If using such tools is impossible or does not give the desired result, the situation can be saved.
In order to flash an Android device via Fastboot, you will need knowledge of the console commands of the same mode of operation of the device, as well as certain preparation of the smartphone or tablet and the PC used for operations.
Due to the fact that in fastboot mode, manipulations with the device’s memory sections are performed virtually directly, when using the firmware method described below, some caution and attentiveness are required. Additionally, the following steps should probably only be recommended if you are unable to flash the firmware using other methods.
The user carries out every action with his own Android devices at his own peril and risk. The site administration is not responsible for possible negative consequences of using the methods described on this resource!
Strict implementation of the preparatory procedures determines the success of the entire process of flashing the device, so the implementation of the steps described below can be considered a prerequisite before carrying out operations.
Installing drivers
You can learn how to install a special driver for fastboot mode from the article:
System backup
If there is the slightest possibility, before installing the firmware, it is necessary to create a complete backup existing device memory sections. The steps required to create a backup are described in the article:
Downloading and preparing the necessary files
Fastboot and are complementary tools from the Android SDK. We download the entire toolkit or download a separate package containing only ADB and Fastboot. Then unpack the resulting archive into separate folder on drive C.

Through Fastboot it is possible to record both individual sections of the memory of an Android device and firmware updates as a whole package. In the first case, you will need image files in the format *.img, in the second – package(s) *.zip. All files that are planned for use must be copied to the folder containing unpacked Fastboot and ADB.

Packages *.zip We do not unpack it, you just need to rename the downloaded file(s). In principle, the name can be anything, but should not contain spaces or Russian letters. For convenience, you should use short names, for example update.zip. Among other things, it is necessary to take into account the fact that Fastboot is case-sensitive in sent commands and file names. Those. “Update.zip” and “update.zip” for fastboot are different files.
Launching Fastboot
Since Fastboot is a console application, working with the tool is carried out by entering commands of a certain syntax into command line Windows (cmd). To launch Fastboot, the easiest way is to use the following method.


This add-on allows you to perform all the operations from the examples described below in a semi-automatic mode and without having to resort to manually entering commands into the console.

Unlocking the bootloader
Manufacturers of a certain number of Android devices block the ability to manage device memory sections by locking the bootloader. If a device has a locked bootloader, in most cases flashing its firmware via fastboot is not possible.
To check the status of the bootloader, you can send the following command to the device, which is in fastboot mode and connected to the PC:
fastboot oem device-info

But again we have to admit that this method Finding out the locking status is not universal and differs for devices from different manufacturers. This statement also applies to unlocking the bootloader - the procedure methodology is different for different devices and even for different models of the same brand.
Writing files to device memory sections
Having completed the preparatory procedures, you can proceed to the procedure for writing data to the device’s memory sections. Once again, we double-check that the image files and/or zip packages are loaded correctly and that they correspond to the device being flashed.
Attention! Flashing incorrect and damaged file images, as well as images from another device into the device leads in most cases to the inability to Android downloads and/or other negative consequences for the device!
Installing zip packages
To write to the device, for example, OTA updates, or a complete set of software components distributed in the format *.zip, the fastboot update command is used.

Writing img images to memory partitions
In many cases, searching for firmware in the format *.zip may be difficult to download. Device manufacturers are reluctant to post their solutions on the Internet. In addition, zip files can be flashed through recovery, so the advisability of using the method of writing zip files through fastboot is questionable.
But the ability to flash individual images into the appropriate sections, in particular "boot", "system", "userdata", "recovery" etc. via Fastboot when restoring the device after serious software problems, can save the situation in many cases.
To flash a separate img image, use the command:
fastboot flash partition_name file_name.img


In this way, the firmware is flashed using commands sent via the console. As we see, large quantity Preparatory procedures take time and effort, but if they are performed correctly, recording sections of the device’s memory occurs very quickly and almost always without problems.