Remote work from a PC. Network Card Configuration
Quote: Fik-Vam
Let's keep it simple. If I turn it off using the "Shutdown" icon, can I turn it on remotely?
That's the point - YES! And not only turn it on remotely, but also turn it off.
This is exactly how Wake On Lan technology was originally conceived if the computer that they want to turn on is a member local network.
To turn on any other PC via the Internet, the service must be activated for that computer from the provider Dedicated IP address(the service is paid for under a separate contract, it is not expensive enough, in any case, connecting it for the period of your vacation will not burden anyone).
One more prerequisite is - the motherboard and network cards on the remote computer that you want to enable must support Wake On Lan technology and support for this technology for both the motherboard and the network card on that computer must currently be connected and accordingly configured.
On the computer (smartphone or tablet) from which you will try to turn on the power on the remote computer, the Wake On Lan, TeamViewer or similar program must be installed on both ends, it’s not for nothing that you turn on remote computer- you are going to manage it.
By the way, you can send a signal to turn on a remote computer directly from TeamViewer on your current device; after connecting the Wake On Lan technology, the corresponding options, which were previously absent, will automatically appear in the TeamViewer menu.
TeamViewer on the end you want to turn on must be added to Startup and must be configured accordingly so that after loading the OS on the remote computer, a connection is automatically established between your current device and a remote computer and it became possible to control it remotely.
You can also turn off the computer by holding down the computer's Power button for 4 seconds. front panel central block. It is only important that you do not turn on the switch on the computer’s power supply or pull out the cord from the 220V socket.
At this point it is appropriate to note that if you are using the Windows 8 or Windows 10 operating system, then the computer will not turn on when it is turned off.
This is due to the fact that these systems use " Hybrid mode boot and shutdown", in which the system starts faster, while there is not enough current and voltage to start the network adapter.
You can turn on the computer only when it is in “Sleep mode” or “Hibernation mode (standby)”.
However, you can turn off "Hybrid Boot/Shutdown Mode" in order for Wale on Lan to work. For laptops, this should not be done, as it may increase battery drain when turned off.
“Hybrid shutdown and boot mode” can be turned off in Power Options by going to the “Button actions” item and unchecking the “Enable fast startup” item.
On the page to which I provided a link, all this is well described - by enabling support for Wake On Lan technology in the BIOS, you thereby gave the command to allow voltage to be supplied to some of the components of the motherboard and network cards, after which the network card was able to receive and analyze ID and MAC address signals, for example, you are trying to connect to your home computer from work, from Yalta or Sochi - it doesn’t matter, for example, using TeamViewer.
But even when receiving such signals, the network card will not react to them in any way, remaining in standby mode for receiving a special Ethernet frame, which is a signal generated by the Wake On LAN program (or similar), in the data field of which there is a sequence of 6 bytes FF and its own MAC address repeated 16 times, i.e. you must access your computer not using TeamViewer, but using Wake On LAN programs or something similar (to turn on the power of a completely switched off computer via the Internet, it is required that the computer you are trying to turn on has the service connected to its provider - Dedicated IP address).
Having received such a packet, the network card generates a signal to wake your computer from the “Sleeping” or “Waiting (aka hibernation)” state, if it is currently in one of them, or
- signal to turn on the power supply of your computer (if it is a member of your local network), if it is in currently completely turned off, after which boot will follow operating system.
(to turn on the power of a completely turned off computer that is not a member of your local network, but via the Internet, it is required that for the computer you are trying to turn on via the Internet, its service provider has a Dedicated IP address enabled).
If TeamViewer on your home (or any Internet-connected) computer is included in Startup and configured accordingly, then you will then be able to connect to it, and once connected, you will receive full access to control the computer, after which you can work on it as if were directly in front of him.
As for the procedure for setting permission to use the Wake On LAN mode in the BIOS:
IN BIOS settings On modern motherboards, the term "Wake On Lan" is practically not used.
Look for a value that is similar in meaning in the settings of the power management section ("Power Management Setup", or "ACPI Configuration", etc.), for example, "Wake-Up by PCI device", "Power on by Ethernet Card", etc. P.
Below is an example of the settings of the "Power - APM Configuration" section in AMI BIOS v2.61(my computer):
Setting up Wake On Lan in BIOS Setup
To enable Wake On Lan mode, you must set the "Power On By PCI Devices" item to "Enabled".
If you configure the BIOS using the utility
Phoenix - AwardBIOS CMOS Setup Utility
then to complete the setup process you will need to complete 4 steps.
Step 1. Phoenix - AwardBIOS CMOS Setup Utility
Step 2. Select an option Power Management Setup
Step 3. Select an option Power Management Events
Step 4. Select an option Wake Up On LAN, assign it a value Enabled
Similarly, you need to give permission to the network card to use Wake On Lan mode. To do this, go to "Network Connections", right-click on the "Local Area Connection" icon, select the "Properties" option, in the window that opens, click the "Configure" button, which is located to the right of the "Connection via:" field, which displays the model of your network card, go to the “Advanced” tab, the “Properties” list will be displayed in the newly opened window, select the property in it
Wake on Magic Packet and set its Value to Enabled
then select the property
Wake on Pattern match and set its Value to Enabled.
1. You ran out of the house in the morning and forgot to turn on your computer to maintain your Torrent rating?
2. You once again ran out of the house, and when you came to work you remembered that you had left on your home PC necessary files? or vice versa.
3. Did your power turn off and your PC, Server, etc... turned off? but do you need them in working order?
4. Any other critical incident that happened to you on the road.
This article will talk about how, using Wake On LAN, which has been present in almost all BIOS since 2002, you can turn on your computer over a network or via the Internet.
From another PC or mobile device.
What you need to have
- ATX motherboard with WOL connector;
- Network card with WOL support;
- BIOS with WOL support, also WOL must be enabled;
Magic Packet from AMD, for Windows;
PocketLAN for Windows Mobile;
Wake On Lan for Android;
Maemowol for Nokia N800/900 Maemo;

Power On or (NetScan thanks to Tuxozaur) for iPhone/iPod Touch;

Configuration Network Card
For WOL to work, it is necessary that after turning off the PC, the network card is in the " Standby", as evidenced by the blinking lights on the network card. If everything is in order with this, you can skip further text.If the lights do not light up, do the following:
Start - Control Panel - Network Connections, Select the active network card, go to its properties, then " Tune".
- If there is an NDIS Version item, - Select “NDIS X” (the default may be Auto), where X is the version of the Network Driver Interface corresponding to your operating system;
- Here you can also enable Wake on Magic Packet 
Save the changes, restart the PC, then turn it off and check if the lights on the Network card are on.
Remote work from PC
In order to enable and work remotely from a PC, you need to know the IP and MAC address. The command line will help you with this: ipconfig.exe /allYou can also try to find the MAC from another computer if you are on a local network by running the “ping” command and then displaying the ARP table (where the correspondence between IP and MAC will be displayed):
ping.exe IP_address
arp.exe -a
If you are using a router you need to configure redirection of broadcast messages on some port to your computer.
WakeOnLan Broadcast
Enable: yes
IP Address: Your internal broadcast address
Protocol: UDP
Private Port: 9
Public Port: 9
Schedule: Always
If you are not using a router, then it’s enough to know your external (dedicated IP) and open port 9 in the firewall. and use WOL from any device, for example an iPhone, after specifying the details of the PC to be turned on.
UPD: Lately I don’t have a Mac at hand, and I can’t check everything myself, so for those who need information on WOL for MAC OSX, read
Did you know that you can turn on your computer remotely via lan network or even via the Internet. Wake-On-LAN technology has been around for quite some time, and now we'll look at how it works.
Wake-On-LAN (sometimes abbreviated WoL) is a standard protocol for waking up computers remotely. Naturally, the computer must be physically connected both to electricity and to the router using a wired connection or even via Wi-Fi connections. The Wake-on-Wireless-LAN protocol allows you to turn on your computer without a wired network connection.
Enabling Wake-On-LAN depends on two things: motherboard and network card. Your motherboard must be connected to an ATX-compatible power supply, i.e. to almost any power supply that has been in production for 17 years. The network card or wireless card must also support this feature. Since enabling the WoL protocol is set either through the BIOS or through the firmware of your network card. In the latter case, you will need a special software to turn on the computer.
Wake-On-LAN support is a fairly common feature built into motherboards and network cards by default. Moreover, among the listed characteristics in stores you will no longer find mention of support for Wake-On-LAN.
Magic Packet: How Wake-on-LAN works
Wake-On-LAN turns on the computer by sending "magic packets" to its network card, which include the network broadcast address, the broadcast address, the MAC address of the network card, and a special sequence of bytes - the data packet. These magic packages are absolutely identical for any platform, be it Intel or AMD or Apple. Typical ports used for WoL and magic packets are UDP 7 and 9. Since each computer is actively listening to the data channel, such a magic packet, which has a unique computer identifier (MAC address of the network card), will be easily caught and processed.
The picture above shows the results of the packet sniffer. Here a reasonable question arises: is the transmission of a magic packet safe? After all, intercepting unprotected traffic will not be difficult. How secure is Wake-On-LAN transmission when used on insecure networks and over the Internet? On a secure network or in home use there should be no cause for concern. And in an open network, it is better not to use Wake-On-LAN or at least take care of the connection profile of your network card, choosing at least options with minimal openness of resources to the outside.
How to enable Wake-On-LAN
In order to start using Wake-On-LAN, there are several options for enabling it. The easiest way is through the motherboard BIOS. Another option is through a special utility from the manufacturer of your motherboard or network card.
In BIOS
Most old computers and many modern ones have own settings Wake-On-LAN, hardwired into the BIOS. In order to enter the BIOS, you need to click on the button DEL or F1 or F2 when the computer boots, After entering the BIOS, go to the power settings (Power) or Additional settings(Advanced Options).
 Award BIOS
In UEFI BIOS, the setting to enable Wake-On-LAN is usually located in additional options, sometimes in the section Turning on PCIE / PCI power.
Also, motherboard manufacturers call the technology differently: Aggresslive Link from ASRock, ErP from Gigabyte, PME from ASUS.
 UEFI BIOS
On Windows operating system
You can also enable Wake-On-LAN in the operating system. How to do this on Windows. Open menu START and enter device Manager. After opening Device Manager, expand the section Network adapters. Right click on the network card and select Properties, then go to the tab Additionally.

Scroll the list and find Wake on Magic Packet, Wake on LAN- each manufacturer calls this setting in its own way. Change the value to Enabled, if it is turned off.

Now go to the tab Power management, and make sure the option Allow the device to wake up the computer included. Additionally, you can check the box next to Allow only the magic package to wake up the computer.

On macOS
Open system settings and select Energy saving. Check the option Wake for Network Access or something similar. This will enable Wake-on-LAN.

On Linux
Ubuntu has great tool, which can check whether the network card supports Wake-on-LAN and whether it can be enabled. Open a terminal and install ethtool using the following command:
Sudo apt-get install ethtool
And you can support Wake-on-LAN by running:
If you have network interface another eth1, eth2, eth3 and so on, replace it.

Find an item Wake-on. To enable this option, use the following command:
Sudo ethtool -s eth0 wol g
Run the command again to make sure it is enabled. Must be Wake-on: g.
How to turn on your computer using Wake-on-LAN
To send Wake-on-LAN requests, there are several options available:
Depicus for Windows, Apple and Android
Depicus has an excellent series of lightweight tools to get the job done, including a GUI for Windows and a command line for Windows and MacOS. Also available separate application on Android, iPhone and Windows Mobile.
The forum often receives various questions. Whenever possible, they are answered promptly. And sometimes, the number of questions with the same content begins to go off scale. And this phenomenon did not bypass the Wake-On-Lan technology, which was implemented on a lot of motherboards manufactured by GIGABYTE.
Today's example with pictures will be an attempt to bring some clarity to the specifics of setting up and working with WOL. What Wake-On-Lan is and why it is needed can be found on the all-knowing Wikipedia website:
I'll start with the configuration. The following equipment was used:
GIGABYTE GA-Z77X-D3H motherboard
CPU Intel Core i5 -2300
Intel BOX Cooler
RAM Kingston KHX11000D3LL/2G connected to DDR3_1 slot
Drive wd1002faex
Power supply CFT-1000G-DF
operating room Windows system 7 Professional x64
So, it is considered that the system is assembled, tested, works properly and is included in the local network. However, to guarantee correct settings in the UEFI environment, it is still necessary to bring it to uniformity and harmony. To do this, you need to perform a CMOS clearing procedure. This is done by shorting the two CLR_CMOS pins using a metal jumper WITH AN ABSOLUTELY DE-ENERGED SYSTEM. But we used the proven, old-fashioned method and closed the contacts with a screwdriver☺
Refer to the official motherboard manual for details on the CMOS reset procedure.
Afterwards, the system turns on, and subsequently a message indicating that the BIOS reboot has been completed is displayed on the screen, and you are prompted to select the desired action option. The third one is selected - entering the BIOS settings menu.

After resetting the CMOS, all parameters are returned to the factory settings and, therefore, the possibility that some settings affected the necessary correct operation WOL functions are excluded.
In a UEFI environment, you need to switch to Advanced mode (where there is no beautiful views for a fee). This is done by pressing the F1 key. Next, you need to go to the Power Management menu and make sure that the ErP parameter (it is responsible for the WOL functionality) is set to Disabled. If not installed, you need to install it.

So, in the operating system environment, it is necessary to prepare the Ethernet adapter to “listen” to the airwaves in order to receive the “magic packet”. This package is specifically designed to transfer a computer from S5 mode to S0 mode at the right time, without physical user intervention. To do this, you need to perform the following adapter settings. Let’s go to the computer’s management menu by right-clicking on the “Computer” icon on the desktop and selecting “manage”:


Go to the “advanced” tab. There we select the “WOL Magic Package” option. It must be turned on. If it is turned off, turn it on.


In fact, after this the computer is ready to wake up at the “Magic packet” command. And all that remains to be done is to find out how to “wake it up”. But before that, you need to find out what physical and IP address the computer currently has. You can do this as follows:
Go to Network and Sharing Center and shared access(either using the device manager or via the tray icon), select current connection via the local network and click the “information” button there. Afterwards, you can see extensive information regarding network connection. We are interested in the columns “Physical Address” (aka MAC) and IPv4 Address. We write them down on paper. In our case, these are 50E549EDFCA3 and 192.168.100.55, respectively.

Afterwards, turn off the computer exclusively the right way, through "shutdown". This is necessary so that the network adapter continues to function correctly and receive “magic packets” after the computer is turned off.

After the computer quiets down, you can make sure that the network adapter continues to work by blinking the LED:

Please note that further loss of power is strictly unacceptable. If you unplug the power cable or turn off the pilot surge protector, the computer will not be able to turn on remotely.
So, now you can proceed directly to the procedure for remotely turning on the computer. This is done using special software capable of generating and sending a “Magic packet” to the desired address. There is a huge amount of such software available, and everyone can find something personally to their liking. We stopped at free utility WOL 2.0.3. It is installed on a third-party computer, from which, in fact, the computer waiting for the “Magic Packet” will be remotely turned on.
The installation is carried out in the most basic way:


After that, the program starts, and in it you need to make settings to add a computer that will be turned on remotely. To do this, in the main window, click the “add new item” icon, in the window that appears, enter the IP and MAC addresses previously written down on a piece of paper. Next, click OK.

Afterwards, in the list rows of the main window, an entry about the computer with the previously entered parameters should appear. Select the entry below the “Host” column, the interaction icons become active, and click on the one called “Wake-up”. After this action, the treasured “Magic packet” will be sent to the remote computer, and the computer will react as if the Power button had been pressed, or, more simply put, it will turn on.
This is, in brief, the procedure for remotely turning on a computer based on the system GIGABYTE boards using Wake-On-Lan technology. But what to do next with the computer, how to connect, how to work and how to turn it off - it’s up to you to decide, because this is a completely different story☺
Wake On Lan (WOL) technology is used to remotely turn on the computer's power via a local network and is implemented in accordance with the provisions of the specification ACPI (Advanced Configuration and Power Interface). This specification is an open standard that defines how software and hardware interact to discover, configure, monitor, and manage connected equipment, power, and cooling. ACPI 1.0, released in the late 1990s, is nearly 400 pages long, while the current specifications are over 1,000 pages long. The ACPI 1.0 specification was adopted in 1996. and turned out to be a rather successful decision, which entailed further development this technology, which led to the appearance in 2000 of ACPI 2.0, which actually became an industry standard for all manufacturers of computer hardware and software.Currently, the development and support of the ACPI specification is carried out by the international organization UEFI Forum. The section on the ACPI specification contains a complete set of documentation, starting with version ACPI 1.0 and ending with the latest version accepted at the moment (as of English language).
The ACPI specification defines system states, denoted as Gn - global states, and Sn - sleep states, which correspond to their own level of power consumption in decreasing order. Those. condition S1 corresponds to maximum consumption, and S5- minimal.
G0(Working) - normal operation.
G1(Suspend, Sleeping, Sleeping Legacy) - the machine is turned off, but the current system context is saved, operation can be continued without rebooting. For each device, the “degree of information loss” during the process of falling asleep is determined, as well as where the information should be stored and from where it will be read upon awakening, and the time to awaken from one state to another (for example, from sleep to work state). Level of electricity consumption and depth of the “sleep” state Sn are defined as follows:
G2(or sleep state S5, soft-off) - soft (software) shutdown; the system is completely stopped and turned off, but part of the equipment is under standby power supply generated by an ATX standard power supply in the off (but not de-energized) state. Standby voltage from power supply output +5VStandby (+5VSB) is supplied to that part of the devices that can be used to turn on the power supply to the entire system when certain events occur, such as when receiving into a buffer network adapter a special Ethernet frame (Magic Packet, Wake-On-Lan) or pressing a specific key combination on the keyboard.
G3(mechanical off) - mechanical shutdown of the system; block ATX power supply disconnected from the input voltage (220V). The power supply cannot be turned on.
To transition from one state S1-S4 to another (S5 to S1 for example) are used power management events - PME (Power Management Events)-, most of which are caused by a hardware interrupt from a specific device.
Principles for implementing remote power supply.
The most common implementation of remote power supply is the technology Wake On Lan or technology Magic packet. The computer's power is turned on when the network adapter receives a specially crafted Ethernet frame, the contents of which include its hardware address (MAC address). When the computer is turned off (state S5), the network adapter is powered by the standby voltage +5VSB, and upon receiving an Ethernet frame in the data field of which a “magic” packet is detected, it generates a signal to turn on the computer.
In other words, to remotely turn on the computer's power supply, it must comply with the ACPI specification, support for the "Wake On Lan" mode must be enabled in the BIOS settings (usually it is disabled by default) and the network adapter must have received a special Ethernet frame, in the data field of which there is a sequence of 6 bytes of FF and its own MAC address, repeated 16 times. Below is the actual content of an Ethernet frame for remotely powering up a computer.
The first 6 bytes of the frame contain receiver address, equal FFFFFFFFFFFF, which is commonly called a broadcast address. Then, in the next 6 bytes, the address of the source that sent this frame, in in this example, equal 0015F20016CA. The frame data area, highlighted in red, displays the contents of the magic packet, which is
– 6 bytes with code FFFFFFFFFFFF
MAC - address of the computer being turned on, repeated 16 times and, in this example, equal to 00046175F9DA.
As a rule, to turn on the power remotely, software is used that provides broadcasting of a frame with a “magic packet” that is received by all computers on the local network, and turning on is performed only for the computer whose MAC address matches the address from the contents of the “magic” packet.
Almost all network adapters and motherboards released after 2001 support remote power-on technology, but there are some technical features:
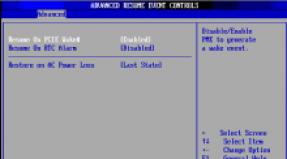
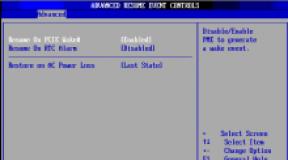
Below is an example of the settings of the "Power - APM Configuration" section of AMI BIOS v2.61:

To enable Wake On Lan mode, you must set the item "Power On By PCI Devices" to "Enabled".
Meaning of other options:
Restore on AC Power Loss- behavior of the system when the primary 220V power supply is lost. The value is Power Off - the system will remain off, Power On - the computer will turn on as soon as the power supply is restored.
Power On By RTC Alarm- turning on the power supply according to the computer’s internal clock (analogous to an alarm clock).
Power On By External Modes- the power supply will be turned on when incoming call on external modem connected to the serial port.
Power On By PCIE Devices- allows the computer to be turned on from devices on the PCI-E bus. If your network card uses PCI-E bus, and not PCI, then to enable Wake On Lan mode you need to set this option to “Enable”.
Power On By PS/2 Keyboard- allows turning on power from a keyboard connected to the PS/2 connector
Some features of power settings for modern UEFI BIOS
The ability to turn on remote power may be affected by some other BIOS settings specific to computers manufactured later than 2016. Specifically, remote enable fails if the following options are enabled:
ErP- mode of minimum system power consumption in the off state (the power of the standby power supply is limited to no more than 1W). This mode implemented in accordance with the recommendations of the European Commission to reduce power consumption of devices in standby mode ( E energy- r elated P roducts* (ErP). If in the BIOS settings, the mode ErP is enabled (Enable), then most of the possibilities for turning on the power supply from peripheral devices is not implemented. To remotely turn on the computer's power via Wake-On-Lan, mode ErP
EuP- completely similar ErP, but another name derived from E energy U sing P product. To remotely turn on the computer's power via Wake-On-Lan, mode EuP must be disabled.
CEC 2019 Ready - low power consumption in standby mode and in accordance with the standards set by the California Energy Commission (CEC 2019) for low power and high efficiency products. When Enable is enabled, the computer's power consumption when turned off is reduced, and peripheral power-on features do not work. To remotely turn on the computer's power via Wake-On-Lan, mode CEC 2019 Ready must be disabled.
In some cases, after changing the settings of the above BIOS parameters, to turn on the computer's power via Wake-On-Lan, you may need to complete shutdown primary power supply for the computer (220V).
IN modern computers Wake-On-Lan technology can provide remote power switching not only after a software power-off (Soft-Off), but also immediately after the primary voltage is supplied to the power supply (220V). The possibility of such inclusion depends on specific model motherboard.
Software for remote power on.
To turn on the power supply to a computer over a local network, software is required to send a Wake-On-Lan packet (Magic Packet) to the computer that is turned on remotely. Today there are a fair number of programs designed for this purpose, ranging from the simplest console utilities to software modules of complex industrial enterprise management systems.
One of the simplest utilities for remotely turning on power - (download, 32kb)
It is a small console program that allows you to send WOL packets in accordance with the parameters command line. It is convenient to use in administration scripts, scheduler tasks, and batch files.
Command line format:
broadc.exe
In the broadcast segment of the local network, the command line format usually looks like this:
broadc.exe MAC address of the network card 255.255.255.255 67
Examples of use:
broadc.exe 0002b3d8b4e6 255.255.255.255 67- turn on the computer whose network card MAC address is 0002b3d8b4e6.
broadc.exe 0002b3d8b4e6 192.168.65.255 67- similar to the previous example, but the broadcast address is used in the form 192.168.65.255. This address must be used in cases where the computer on which the program is running has more than one network interface and is connected to different subnets. If the broadcast address is 255.255.255.255, the WOL packet will be sent to the first network interface discovered by the program that is not a loopback.
There is similar software for Linux - wakeonlan- (download, ~5kb)
By default, the program uses a broadcast address to send Magic Packet and UDP port 9 (discadrd). Therefore, inside the local network, to turn on the computer, it is enough to set the MAC address of the network card in the form 00:01:02:03:04:05
Command line format:
wakeonlan MAC address
You can use the technology for remotely turning on the power supply not only on a local network, but also on the Internet, you just need to take into account the fact that the packet generated by the program must be delivered to the end device, the IP address of which is specified as a parameter, and this device must perform broadcasting WOL packet to the local network to which the remotely turned on computer belongs. To generate a Magic Packet that allows you to remotely turn on a computer on a foreign network, you can use the utility wol.exe-(download, ~5kb) . Although smaller in size than broadc.exe, the program has somewhat greater capabilities. You can specify a name in command line parameters text file, containing a list of MAC addresses of computers for remote activation.
wol.exe –f=macs.txt- use the contents of the file to turn on the power remotely macs.txt
Sample content:
# maclist - mac addresses for wakonlan - line starting with # is not processed - it is a comment
00:BA:BE:FA:CE:00 PC1 - Enable by MAC address
00:11:22:33:44:5A PC2
195.210.128.3-01:12:23:34:45:67 SERVER.COM - Enable by IP plus MAC
0xC0A801F0-12:23:34:45:56:67 HOST.RU - The same as before. case, but the IP is in hexadecimal.
Default program wol.exe generates a UDP packet on port 60000. The port number can be changed. Examples:
wol.exe 01:02:03:04:05:06:
wol.exe 212.248.111.222-00:00:00:00:00:99
wol.exe -p=4096 212.248.111.222-00:00:00:00:00:99
Please note that the IP address in the command line parameters is not IP - the address of the computer to be turned on, and the address of the enabled and accessible node that ensures the transmission of the packet to the final recipient, i.e. switched off computer. The switched off computer has no downloaded network drivers and its IP address cannot be associated with a MAC address (ARP protocol), and the remote enable program will fail with an IP resolution error. A fairly common reason that Wake On Lan “does not work” is the use of the IP address of the computer being turned on in the parameters of the programs to turn it on.
Example of using the utility wol.exe to turn on your computer remotely via the Internet.
The router through which the computer connects to the Internet is configured in such a way that the packet generated by the wol.exe utility and arriving at a specific port (for example, 4009) is sent to the local network with a broadcast MAC address. By default, the network adapter accepts only those Ethernet frames whose destination address matches its own hardware address (its MAC address) or broadcast address (the address is 0xFFFFFFFFFFFF). In the settings of the Zyxel P660RU2 ADSL modem (Network-NAT-Port Forwarding), a rule is created to redirect the received WOL packet to the broadcast address 192.168.1.255: 
Enable command:
Wol.exe -p=4009 <IP of the ADSL modem>-<MAC address of the computer’s network card>
For example:
wol.exe -p=4009 85.140.21.22-00:00:A0:80:87:99
In addition to command line utilities, there are also programs with a graphical user interface, for example, a miniature and very easy to use utility wakeup.exe-(download, ~78kb) .

The "Get MAC" button is designed to determine the hardware address of the network adapter, which is used to remotely turn on the computer's power supply.
The "Wake" button performs remote activation.
More functional program for remote activation -

The program is free software with open source source code, has support for the Russian language and, in addition to remote power switching, has a lot additional features, such as turning off computers under Windows control and Linux, monitoring and displaying the contents of WOL packets, scanning the local network and creating a database network devices. There is also a console version of the utility - WakeOnLanC.exe. And among other things, there is a customizable notification system for important events, including via email.
Some features of the implementation of Wake On Lan by equipment manufacturers.
Most motherboards are characterized by one feature - remote power-on does not work if the computer has been completely de-energized, for example, when the primary 220V power supply is lost. In this case, to ensure that it turns on independently, you can use the BIOS mode setting in the "Power Management Setup" section - "Power on after power fail" or similar in meaning (“After AC Power Lost” - “POWER ON” - the name depends on the version and manufacturer of the BIOS). After restoring the primary power supply to the power supply input, the computer should turn on on its own, without pressing the "Power" button.
The practice of using Wake On Lan has revealed another point - some computers, when enabling the network switching mode in the BIOS settings, turn on the power supply on their own, without even receiving a frame with the Magic Packet. The reason for this phenomenon is that some network cards (noted by Intel, 3COM) to turn on the power supply over the local network, not only WOL package, but also other events (Wake on ARP, Wake on Link Change, etc.), and by default several inclusion criteria are used at once. You need to remove it from the adapter settings (usually using special utility) extra conditions, and everything will work correctly.
Example, for the Intel(R) PRO/100VE network adapter. Using the Intel(R) PROSet II utility (supplied with the adapter), uncheck all events except “Wake on Magic Packet”:

After saving the settings, your computer will turn on only when it receives a Magic Packet.
Sometimes allowing remote power on via local network in the BIOS settings is not enough. This is usually due to the characteristics of a particular type of network adapter. I’ll explain using the example of a network card based on the Atheros chipset (controller AR8121/AR8113/AR8114 PCI-E Ethernet Adapter). After setting the mode Power On by PCI-E Device In the BIOS settings of the motherboard, the computer does not turn on the power remotely. In the network connection properties for this adapter there is a button Tune

In the network adapter properties there is a tab Additionally.

In this window you can view or change some parameters and operating modes of the selected network card. In particular, by default, modes Wake up after shutdown And Awakening Possibilities installed in No. This is why remote power-on is not possible. After configuring the Wake Mode and Frame Type settings Magic Packet, remote power-on using this network adapter will be performed when a WOL packet is received.
Determining the MAC address of the network card.
On LINUX, you can use the arping utility to determine the hardware address:Arping < IP address >
For example:
arping 192.168.0.1
On Windows, you can use the arp command to display the contents of the ARP cache on the screen. To ensure that the code is relevant for the required IP address, before the command arp can be done ping, i.e. execute sequentially:
Ping < IP >
arp -a
for example:
ping 192.168.0.1
arp -a
By the way, the same method can be used in LINUX.
Own The MAC address can be determined using the commands:
IN LINUX
ifconfig < interface > for example - ifconfig eth0
On Windows
ipconfig /all
In Windows XP and higher, you can use the console command to obtain the MAC address of your network card getmac.exe