Cleaning sound from noise. We remove extraneous noise from the microphone on Windows. Programs for processing audio and sound recordings
We greet you!
On this page you can use the service cleaning up noise in recordings made on a smartphone, voice recorder, video recorder, etc. in unfavorable acoustic conditions, when due to the high noise level it is difficult or impossible to hear the information of interest in the recording.
Taking into account the various nuances of “defects” (noise level, its nature and other aspects), the approach to processing each file is individual, and consists of several stages, each of which generally contributes to reduction of noise in sound and improvement useful information in the signal.
For natural reasons (due to not the most best quality source), it is not always possible to achieve the ideal result, but the final sound quality is always “ AFTER" better than " BEFORE“, about what (about the final quality) you can form your own idea…
Namely You can send a sample recording to evaluate possible future quality in the order form below. The processed fragment will be sent to the specified return e-mail address for your evaluation absolutely free. If the quality of processing of the demo sound is acceptable to you, then we can agree on an advance payment and further interactions. If the quality of sound processing does not suit you, then you have absolutely no obligations in this regard.
Processing prices, depending on its complexity, usually amount to from 599 RUR per file, lasting up to 1 hour. The cost of processing files exceeding the number and duration is calculated at a discount.
Today, our service has many users who, thanks to improving the quality of the audio clips they sent, managed to win a lawsuit, or learn some commercial or other secrets.
(We also cooperate with companies producing educational and other media products to improve the quality of the audio provided.)
The confidentiality of the information sent is guaranteed.. This means that the final result will be transferred only to the customer, after which all sources, as well as the copy(s) sent to the customer, will be permanently deleted.
With the permission of our clients, we present examples of removing noise from recordings:
Voice recording with noise without processing:
Recording after noise editing:
Audio clip: Adobe Flash Player (version 9 or above) is required to play this audio clip. Download the latest version. You also need to have JavaScript enabled in your browser.
Another example of recording BEFORE removing noise:
Audio clip: Adobe Flash Player(version 9 or above) is required to play this audio clip. Download the latest version. You also need to have JavaScript enabled in your browser.
After partial noise removal:
Audio clip: Adobe Flash Player (version 9 or above) is required to play this audio clip. Download the latest version. You also need to have JavaScript enabled in your browser.
Another BEFORE example:
Audio clip: Adobe Flash Player (version 9 or above) is required to play this audio clip. Download the latest version. You also need to have JavaScript enabled in your browser.
AFTER:
Audio clip: Adobe Flash Player (version 9 or above) is required to play this audio clip. Download the latest version. You also need to have JavaScript enabled in your browser.
Example of muffling car engine noise
BEFORE:
Audio clip: Adobe Flash Player (version 9 or above) is required to play this audio clip. Download the latest version. You also need to have JavaScript enabled in your browser.
AFTER:
Audio clip: Adobe Flash Player (version 9 or above) is required to play this audio clip. Download the latest version. You also need to have JavaScript enabled in your browser.
An example of processing a recording made during a court hearing:BEFORE
Audio clip: Adobe Flash Player (version 9 or above) is required to play this audio clip. Download the latest version. You also need to have JavaScript enabled in your browser.
AFTER:
Audio clip: Adobe Flash Player (version 9 or above) is required to play this audio clip. Download the latest version. You also need to have JavaScript enabled in your browser.
Optionally we carry out speech to text translation, but in this case, recordings made on voice recorders with a sampling frequency of at least 22,000 Hz are accepted (preferably higher, and preferably in uncompressed form, in the format WAV).
Prices for speech to text translation: from 1000 rub. for a duration of up to 1 hour of sound. (Most often, this price is 2-3 times higher than the work compared to transcription (translation of speech into text) of recordings with fairly clearly audible speech. This is due to the high time costs of transcription). The percentage of relatively reliably translated information into text, depending on the original quality, usually ranges from 30 to 80%.
We also provide restoration services for other defective records, for example, live concerts, when, with a generally high-quality sound accompaniment, it is necessary to get rid of some extraneous sounds (whistles, squeaks, coughs, etc.). The price is determined by the level of tasks.
Audio cleaning cost video recordings concert costs from 2000 rubles. for 1 hour of playing time.
Cutting a uniform tone using sound as an example mobile phone from a concert recording.
WAS (sound at 9 seconds):
Audio clip: Adobe Flash Player (version 9 or above) is required to play this audio clip. Download the latest version. You also need to have JavaScript enabled in your browser.
OUT OF:
Audio clip: Adobe Flash Player (version 9 or above) is required to play this audio clip. Download the latest version. You also need to have JavaScript enabled in your browser.
SOURCE:
Audio clip: Adobe Flash Player (version 9 or above) is required to play this audio clip. Download the latest version. You also need to have JavaScript enabled in your browser.
AFTER PROCESSING:
Audio clip: Adobe Flash Player (version 9 or above) is required to play this audio clip. Download the latest version. You also need to have JavaScript enabled in your browser.
We provide exclusive reverberation removal service(hall, room, “echo”, club, “barrel”) from audio.
An example of muting the reverberation effect (echo) in a wedding recording:
SOURCE:
Audio clip: Adobe Flash Player (version 9 or above) is required to play this audio clip. Download the latest version. You also need to have JavaScript enabled in your browser.
AFTER PROCESSING:
Audio clip: Adobe Flash Player (version 9 or above) is required to play this audio clip. Download the latest version. You also need to have JavaScript enabled in your browser.
Deadlines for completing the task
After agreeing on the terms of the order, the total time to clear the sound from noise is usually from 3 to 5 hours. (In any case, the final result of processing is sent to the customer no later than 23:59 Moscow time on the day of payment, if payment was made no later than 19:00 Moscow time)
I wrote it for the next competition and wanted to voice it. To record audio, I used Adobe Audition 3.0, but after listening to it I found there was too much extraneous noise, i.e. The recording was made using the laptop's built-in microphone. You can solve this problem using the same program, Adobe Audition, now I’ll tell you how.
Noise can be removed using the “noise editor” or “ Noise Reduction" It will help remove noise while maintaining sound quality. The maximum effect is achieved on 16 and 32 bit recordings. The tool will help remove hiss, background noise from the microphone, etc. (At the end of the article you will find video instructions).
How to remove noise from an audio recording?
1. We need to show the program an example of noise, for this we select a piece of the track without your voice, which contains only noise, it is advisable to select the longest period. Although 2-3 seconds is enough. Select it with the mouse.
Listen to the selected piece again, make sure that the necessary elements or voice particles are not there! Otherwise it may ruin the recording.
2. Go to the “effects” tab, select “restoration” and the “noise reduction” tool. As the picture shows. 
3. Click on the button “ Capture profile“, our noise is unloaded. A similar picture will appear, with a noise graph.

The “Load from file” button allows you to load previously obtained noise profiles, i.e. if you have the same type of noise, you can save it and use it later. Or if you specifically collected a more complete full spectrum of noise. The “Save” button allows you to save the noise profile. I didn't need this feature.
Press the button " Close", close. Attention namely “Close”, not “Cancel”.
4. After this, select the entire file, to do this, click on it 2 times with the mouse or simply select it, again go to our tool ( Effects → Noise Reduction Process ).
With adjustment, we look for a suitable noise/quality combination by scrolling the slider left and right. Then click the button apply to file “ Select Entire File". Using the button " Preview» You can listen to the preliminary result. When you are completely satisfied with the result, click OK and our file is ready.
 All that's left to do is save it! File →
Save. The whole operation will not take you more than 5-10 minutes.
All that's left to do is save it! File →
Save. The whole operation will not take you more than 5-10 minutes.
As is known, the quality of sound recording is modern smartphones, tablets and laptops leave much to be desired, to put it mildly. What to do if you need a high-quality audio recording, but all you have at your disposal is a track with buzzing, hissing and muttering? The answer is simple: install Audacity on Ubuntu and apply the wonderful Noise Removal filter, which will do all the work for you.
How to Install Audacity on Ubuntu
Apt-get install audacity
How to remove noise
Launch Audacity, open your audio file for cleaning. You will need to find a few seconds of silence in the recording. They are needed to create a noise profile of the recording. That is, silence means the absence of external sounds (for example, a pause between remarks). It is during these seconds that only the so-called white noise, created by the recording device and microphone itself, remains on the recording. It is this white noise that is needed so that the Noise Removal filter in Audacity can create a mathematical model and “subtract” extraneous sounds from the main stream.

Well, take a few seconds of silence and go to the Effect menu. There, find the Noise Removal filter. A window will appear asking you to create a noise profile. Feel free to click the Get Noise Profile button and follow the instructions. Then you can move on to the second cleaning step. You will be prompted to adjust several noise reduction settings. They are selected experimentally. Try it different meanings, click the Preview button, listen and look for the optimal settings. When you are satisfied with the cleaning result, press the OK key. Ready.
Instructions
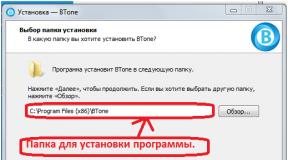
Download the VirtualDub program from the developer’s website at http://www.virtualdub.org/download.html and install it on your computer. To ensure that all program logs remain in the same directory as the program, install the entire software package in the system directory local disk personal computer. To open the program, double-click on the start file. Open yours in the application.
To process the audio track, you need to separate it from the video image. Do this through the Direct Stream Copy item of the Video menu item. Then save the audio track as a WAV file through the Streams - Stream List menu.
To edit an audio file, you need an audio editor. Audacity or the more complex Adobe Audition will suit you. Open the track in the editor as a separate audio file and use the program’s functionality. You will need filters to clear the sound of extraneous noise, or cut-and-glue operations. you can use Various types video files for editing, since this software works with almost all common formats.
Attach the audio track to the video image using VirtualDub when all audio operations are completed. This can be done through the Add item in the main menu. To synchronize audio and video, use the Interleaving item. Save the modified file through the Save As section of the File menu.
You can find and download instructions for working with sound editors and the editors themselves on the official websites of the developers. The Adobe Audition editor has more advanced features than Audacity. For more extensive tasks you can use this program.
Sources:
- how to remove music from video
If you experience discomfort from sound Windows boot Every time you turn on the computer, you can set the sound settings so that the computer turns on in complete silence.
Instructions
Interface operating Windows equipped with sound circuits from which you can control the playback of sounds for certain. To change the sound for any system action, such as turning on the computer, you need to perform several simple steps.
Open the Start menu and go to Control Panel.

Now click on “Change Sound Layout”.

In the dialog menu, go to the “Sounds” tab, and in the “Program events” list, select “ Starting Windows».

The final step is to select the “None” option in the “Sounds” section. After this, you should click the “Apply” button, and all subsequent computer starts will be silent.


You will need
- - VirtualDub 1.9.9 - free application for video processing (you can download it from virtualdub.org).
Instructions
Load the file into the VirtualDub editor. To do this, press the hot keys Ctrl+O, or select the "Open video file..." item in the "File" section of the application's main menu. In the file selection dialog that appears, go to the desired directory. Select a video file in the directory listing. Click the "Open" button. You can also use dragging a file into the program window as a quick alternative to the described steps.
Disable conversion and copying of audio data when processing a file. In the main menu of the application, click on the "Audio" item. In the child menu that expands, check the "No Audio" checkbox.
Switch the application to direct copying of video stream data. Click on the "Video" item in the main menu and check the "Direct stream copy" option. IN this mode the video will not be processed at , which will greatly increase the processing speed and prevent deterioration in image quality.
Save a copy of the movie file without the sound. Click the "Save as AVI..." item in the "File" section of the application's main menu. The Save AVI 2.0 File dialog will be displayed. Select the directory in which the video will be recorded, enter the file name. Click the "Save" button.
Wait until the video file is recorded. If the volume of source data is large enough, the saving process may take a long time. Statistical information regarding the progress of the process will be displayed in the "VirtuaDub Status" window. In particular, in the "Projected file size" field you can see the value of the estimated size of the resulting file, and in the "Time elapsed" and "Total time (estimated)" fields - the elapsed and estimated time of the operation, respectively.
Video on the topic
Sound in applications is often not so easy to turn off. This applies not only to computer programs, but also to mobile programs. In particular, it is difficult to choose individual settings for each application - such functions are supported by a minimum number of mobile devices.

You will need
- - mobile device;
- - applications that support sound control.
Instructions
In order to turn off the sound of applications downloaded from various Internet resources, make the appropriate settings in its menu. Please note that in these cases, completely different buttons are responsible for turning off music and turning off sounds. Look for the icon depicting the corresponding settings and simply click on it once with the left mouse button.
If you are unable to turn off the sound of a flash application in the usual way through the program menu, use disabling this function in the browser. It is best, of course, to avoid this, since in this case, in order to play audio or video files, you will need to go into the settings again and turn it on. While in the browser Internet Explorer, click on the “Internet Options” menu item. In the window that appears, uncheck the “Play sound on web pages” checkbox. Apply and save the changes.
If you want to turn off the sound in all mobile applications, open the sound settings option in the phone menu. Go to the application sounds menu, turn it off. In some models, application sounds are turned off in the same menu from which they are launched - it all depends on software your his mobile device. Also for almost everyone mobile application A function for individual volume adjustment is available, which can be called up from its menu. Most often this setting is hidden in the game options. Also try muting the sound by pressing the side down arrow button several times. You can also switch your phone to silent mode.
Check if yours has individual volume settings for each application from the menu of the phone itself. You can do this by reading the instructions that came with your phone, or by carefully familiarizing yourself with its interface.
Video on the topic
Before installing applications on your phone, always check them for viruses.
To mute the sound in Flash applications running in your browser, you need to know their interface. Sometimes users are faced with the problem of the lack of this function in management.

Instructions
In the Flash application open in your browser, find the mute button. Sometimes there may be two buttons - one of them turns off the music, if there is one in your case, the other turns off the sounds of the application itself. If you cannot find them in the control menu, please read the user information regarding its use carefully; You may find mute options there.
Go to the main flash application settings menu; It is quite possible that the sound and music can be adjusted or removed completely in one of its points. Also try right-clicking directly on the program itself and finding in context menu the desired option.
If you want to turn off the sound in a Flash application running on your computer, use special programs to open them. They usually contain additional functions playback, which also means the ability to turn off sound or music. Regular browsers will not work here; you rather need a flash player.
It happens that when you record sound outside of the studio, extraneous noise appears on the recording that hurts your ears. Noise is a natural phenomenon. It is present everywhere and in everything - tap water gurgles in the kitchen, cars make noise on the street. Accompanying noise is any audio recording, be it a recording on an answering machine or a musical composition on a disk. But you can remove these noises using any audio editor. We'll show you how to do this using Audacity.
Audacity is an audio editor that has a fairly powerful tool for removing noise. The program allows you to record sound from a microphone, line input or other sources, and also immediately edit the recording: trim, add information, remove noise, add effects and much more.
We will look at the noise removal tool in Audacity.
Let's say you decide to make some kind of voice recording and want to remove unnecessary noise from it. To do this, first select an area that contains only noise, without your voice.

Now go to the “Effects” menu, select “Noise Reduction” (“Effects” -> “Noise Reduction”)

We need to create a noise model. This is done so that the editor knows which sounds should be removed and which should not. Click on the “Create Noise Model” button

Now select the entire audio recording and go to “Effects” -> “Noise Reduction” again. Here you can adjust the noise reduction: move the sliders and listen to the recording until you are satisfied with the result. Click OK.

No Noise Removal button
Often, users have problems due to the fact that they cannot find the noise removal button in the editor. There is no such button in Audacity. To go to the window for working with noise, you need to find the “Noise Reduction” item in Effects (or “Noise Reduction” in the English version).
With Audacity, you can not only make cuts and remove noise, but also much more. This is a simple editor with a lot of features, using which advanced user can turn home recordings into high-quality studio audio.
Read also...