What to do if an error occurs during Windows system recovery? Returning your computer to its original state: detailed instructions with pictures Returning to its original state windows 10 error
Hello admin! Back in the summer I installed Windows 10 on my laptop, but now the OS is unstable and has errors, and yesterday it didn’t boot at all and gave me a blue screen with some code. I read on one blog that you don’t have to reinstall Windows 10 again, but simply return it to its original state while preserving installed programs and personal files; this can be done even if the system does not boot. Don't you have such an article?
Returning Windows 10 to its original state while preserving personal files, as an alternative to the factory reset program built into every laptop
Hi all! Yes, that’s right, if your Windows 10 is unstable or won’t load at all, then you can return it to its original state, but only while preserving your personal files (all programs will be deleted). Friends, I believe that this method is practically no different from the usual installation of Windows 10 again, the only difference is that you do not need to boot the computer from the Windows 10 installation disk. After returning Windows 10 to its original state, almost all your settings will be reset to their original settings , and the programs are deleted, the only thing is that the drivers will remain in place and all your files in the user profile C:\Users\Your username: Documents, Images, Contacts, Music - will remain safe and sound, but again, files on the desktop will be deleted.
Note: Reverting Windows 10 to its original state seems like a good alternative to having the program built into every laptop. See for yourself. takes up 15-25 GB on the hard drive of your laptop and there are already 2 or even 3 of them on modern laptops.
When you roll back to factory settings, the same thing happens as when you return Windows 10 to its original state, that is, the state of the operating system is restored to its original state, which means that if you have Windows 8.1 or Windows 10 installed, then hidden partitions with factory settings can be deleted. But I would recommend this primarily to experienced users. For novice users, hidden partitions with factory settings can be left, because 20 GB with modern sizes of hard drives for laptops: 750 GB - 1 TB, this is not so much and now you will have two hundred percent opportunities to surely restore your laptop after a serious failure.
And yet, what if you decide to sell a laptop, and the new owner will need hidden sections.
You can return Windows 10 to its original state directly in a running Windows 10. If your computer does not boot, then you need to boot from the Win 10 installation disk or flash drive into the system recovery environment and start returning Windows 10 to its original state from the recovery environment. Let's look at both options.
- Note: An inexperienced reader may ask: Where does Windows 10 get its files to return to its original state, since the installation DVD with Windows 10 is no longer needed during recovery? Answer - The Windows 10 operating system takes files for rollback in the folder, this folder is a storage for Windows system files and is located at C:\Windows\WinSxS.
Return Windows 10 to its original state directly on a running system
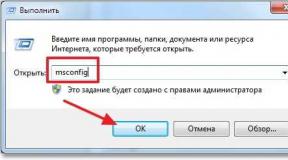
Right-click on the “Start” menu and select “Run”.

Enter the command in the input field systemreset

If you choose the option of saving files, then, as I already noted, all your data in user folders will not be deleted.
If you want to reinstall Windows 10 again, select "Remove everything."

Windows 10 shows a list of programs that will be removed from your operating system (almost all installed software).


Click “Reset”


The process of returning the computer to its original state begins with three reboots.


Windows 10 is loading, into which you will need to install programs again.
There is a file on the desktop "Deleted applications" with a list of programs that have been removed.


Files in user folders are not deleted.

Owners of computers and laptops with operating systems Windows 8 and higher have access to the useful function of rolling back the device to its original state. The rollback is performed using standard Windows tools; a small space on the hard drive is allocated for the function, where a copy of the original version of the system is stored.
What is this function
The function is called Recovery or Reset. After using it, Windows returns to the state it was in when it was first turned on.
On Windows 8, 8.1
In these OS versions, the function was divided into 2 options: Reset and Refresh. The first rolls back the system to factory settings in cases of critical errors, malfunctions or failures. The second option completely reinstalls the system, erasing all user data.
On Windows 10
In the latest version of the window operating system, both function options have been combined under one button. The user just needs to select the appropriate option in the appropriate menu.
What happens when a function is executed
As mentioned above, there are several options for performing a reset. The user is offered the choice of saving or deleting his files on the disks. Data from the system disk is completely erased in any case. This means that all programs and drivers installed before will be erased.
In what cases should it be used?
Factory reset on Windows is extremely useful in a number of cases:
- The OS is infected with viruses;
- The system has been in use for a long time and is heavily clogged with software junk;
- Installing software or drivers leads to a blue screen of death and other critical errors;
- The user wants to restore smooth, stable operation of Windows and increase productivity.
How to activate the feature
The method for launching a rollback is almost identical on all new versions of Windows. However, there are several important nuances and differences when using the function.
On Windows 8
Rollback of Windows 8 and 8.1 is carried out as follows:
- Press the key combination Win+C;
- Click “Settings” or “Change computer settings”;
- Section "General";
- On the left side of the “Recovery” menu;
- Select the rollback option, with or without data deletion;
- Confirm selection;
- Wait for the procedure to complete.
The procedure takes about half an hour, depending on the amount of data being processed. After the final boot of the device, the user will be prompted to configure the system.
On Windows 10
Here the algorithm of actions will be different:
- Launch the options menu via the Windows button or the Win+I key combination;
- Select the “Update and Recovery” section;
- Recovery subsection;
- Select the item “Return PC to its original state”;
- Confirm your choice.
After launching the function, the system will offer the choice of deleting or saving user data. Upon completion of the procedure, as in the case of Windows 8, all that remains is to adjust the OS to your taste.
If there were pre-installed programs on the PC
Most modern computers are sold with a certain set of pre-installed programs. If the user liked such software and is worried that the applications will disappear, this is not the case. The computer returns to its original state, which means that all pre-installed programs will return to their original place. If the owner does not want to use them, you can simply remove unnecessary utilities.
In the boot menu
If the operating system cannot boot for some reason, returning to factory settings is possible without completely loading Windows. A computer with a licensed pre-installed Windows has the same recovery or rollback tool in its memory.
When the system boots, you need to press one of the hot keys to exit to the function menu. Manufacturers have different keys; they may be F1, F2, etc. After entering the recovery environment, the user will be able to use the menu:

The method is suitable if the system is stable starts And included the function of creating points without user intervention or there is a backup collected by the system itself.
To start the process, you need to open a special software utility. To run it, use the instructions:

In the window that opens select drive protected against data loss. Usually the volume on which the OS is directly installed is selected.
Afterwards, you need to press the button "Recovery…"
A program will open to restore the previous state of the OS. Click the button " Further" and we see a menu that requires select a point recovery. The menu presents those that were created by the operating system itself.
To see all available rollback points, check the box " Show other restore points»
We follow further instructions and agree with reboot system and the fact that it will be impossible to cancel the restoration in the future. System will reboot and there will be a rollback.
It should be remembered that after the rollback the password, which was in use at the time. To avoid problems with logging in, make sure you have utility password reset. When will it happen return OS to the previous state, the previous points will disappear, but a new one will appear, created immediately before the reset attempt.
Returning the original settings
If items recovery are missing, or returning to previous states did not help, then you should try returning the PC to factory condition.
Often, most Windows laptops have this option, regardless of the version; instructions can be found from the manufacturer.
If you are the owner stationary PC with Windows 7 installed, then the method is unlikely to work, since usually in this case the OS requires a disk.
For the newest Windows starting from the eighth version, you can use the following algorithm:
Open the menu " Options" - Go to the section " Update and Security» — « Restore your computer to its original state» → Button « Begin» 
System rollback using disk
This option is suitable if the operating system categorically refuses to start. The disk can be almost any external data storage device, even a USB flash drive. 
For creation recovery media you will need to go to control Panel and in the category " system and safety» select the item « Backing up computer data". After that, click on the inscription “ Create a recovery disk". In the new window, select the drive you want to use, then click " Create disk».
Now you will always have the opportunity to fix a system problem without resorting to a complete reinstallation.
Creating an image
This method is also suitable for those who have lost the ability to start the OS, important honors this option from the previous one is that using full image disk, absolutely all user settings, files and applications are restored. Recommended make an image at a time when the PC has all the basic drivers and programs, but no unnecessary software. 
To create an image, follow the same instructions as described in the previous method. Only at the last stage should you follow the link “ Creating a system image«.
In the window that opens offered select a location to save the image. A typical save location is DVD, as it can be used if the hard drive is damaged, which is quite convenient. The best way is to write to network storage, it would be better to use this particular point, since in this case, the probability of losing the image will be reduced to zero. 
The recovery itself begins in the following way when the computer is rebooted: “ Diagnostics» — « Extra options» — « Restoring a system image».
System Restore is an important feature of Windows as it allows you to return certain items to working condition.
It greatly worries active users of the opportunity, because then the backup copy becomes useless, and a solid hope is relied on it.
System restore does not work: reasons
If system recovery does not work, most likely the reason is at one of the stages of the procedure. Often the recovery points themselves are unusable if they are damaged due to a virus or incorrect user manipulations.

It is also likely that the function itself has some glitches, they should be corrected; the problem is periodically observed during Windows updates; over time, the situation is resolved by the manufacturer.
Windows System Restore does not work due to a lack of system integrity if it contains incorrect registry settings, broken keys, corrupted or conflicting files.
The Windows 10 system recovery error has become widespread recently, so Microsoft has posted a fix for this situation. Let us immediately note that this action is somewhat difficult, since it is quite lengthy; you must strictly follow the instructions.
- This problem is usually accompanied by the code E_UNEXPECTED (0x8000FFFF). So, you need to manually fix the following components:

- You must download and install Windows AIK on your computer;
- Now you should create an image of the Windows RE environment, the action is performed as follows:
- Find the installed item in the “All programs” list;
- Win + R and enter cmd;
- You need to duplicate the Install.wim file, take it from the installation disk. You can perform the procedure using the commands:
- md C:\OS_Duplicate
- md C:\OS_ Duplicate\mount
- copy D:\sources\install.wim C:\OS_ Duplicate, here D – should be replaced with the letter of the media with the installation system.
- Using the ImageX command, you should use the file just created; to do this, insert ImageX /mountrw C:\OS_ Duplicate\install.wim 1 C:\OS_ Duplicate\mount into the console;
- The Windows RE image must be copied from the installation image. The procedure is easy to perform:
- md C:\WindowsRE
- md C:\WindowsRE\mount
- copy C:\OS_ Duplicate\mount\windows\system32\recovery\winre.wim C:\WindowsRE\
- You can remove the generated image using the command ImageX /unmount C:\OS_ Duplicate\mount, but only after completing the procedure described earlier.
- The image created earlier should be launched using the command ImageX /mountrw C:\WindowsRE\winre.wim 1 C:\WindowsRE\mount;
- The fix must now be installed using
- Dism /image:C:\WindowsRE\mount /Add-Package:c:\TEMP\Windows6.1-KB2709289-x64.msu
- The procedure should go without complications, you can verify the correct result using
- Dism /image:C:\WindowsRE\mount /Get-Packages;
- You should save the changes thanks to ImageX.exe /unmount /commit C:\WindowsRE\mount.
- The final stage of formation of the RE environment carrier is:
- A new file is needed to help create the image, generated using
cmd amd64 C:\WinREx64; - The Winre.wim file must be duplicated along the ISO\sources path and its name must be changed to Boot.wim. This is done copy C:\WindowsRE\winre.wim C:\WinREx64\ISO\sources\boot.wim;
- You should mount the image on any virtual or physical disk.
- A new file is needed to help create the image, generated using
Solution to error 0x800070091
Another kind of problem that will probably be fixed in subsequent system updates. The error is especially often caused by a preliminary Windows update. Often, between the backup point and the current moment in the top ten, an update was made, and its rollback causes an error. Fortunately, it is not difficult to fix such an error.
To return the function to a working state, you just need to delete the WindowsApps folder, but it is protected by the system from being changed. So you must first change the access rights, the easiest way to do this is with the command TAKEOWN /F “C:\Program Files\WindowsApps” /R /D Y - this way a group of users with administrator rights will be able to edit the folder and the data in it. Sometimes the procedure takes a long time.
Now you should enable the display of system and hidden folders. This is done in the “Folder Options” section in the “View” tab.

Then you can manually go to the folder, it is located in Program Files and you need to remove it, it’s better to rename it first. Alas, the folder contains files used by the system, so you will have to use Unlocker, select the Rename function and add any letter or number to the folder.

System check
You need to run a tool that will check your system components. In Windows, this function is already built-in; you just need to use it through the console.
- Press Win + R and cmd;
- Type sfc /scannow.

A comprehensive check of the integrity of system components, including the recovery function, will be carried out. Often this option has a positive effect, but sometimes you have to manually restart the function. You need to delete all previous points and create a new one, then try to roll back to it.

As a last resort, you will have to reinstall or update the system, if such a function is present. In some cases, the Microsoft Fix It utility helps.

Laptops have a built-in Recovery Manager, so you can use it to roll back to the factory state.
Usually, the above actions quite help to restore the correct operation of the functionality and only as a last resort will you have to resort to a rollback or reinstallation of the system.
If you still have questions on the topic “What to do if an error occurs when restoring the Windows system?”, you can ask them in the comments
if(function_exists("the_ratings")) ( the_ratings(); ) ?>
Mar 3 2015
How to restore Windows 7 on a laptop, a black screen appears when booting, the recovery environment does not work, I deleted all hidden partitions, there is no original disk with Windows 7.
I spent a lot of time, tell me what to do now, or at least how to insure myself against such situations in the future, preferably without using paid data backup programs.
How to restore Windows 7 system
Unfortunately, there are many reasons for this problem, ranging from incorrectly written drivers, the harmful effects of a virus, file system errors and ending with our erroneous actions when working with a computer. There is no need to be afraid of such problems, you need to learn how to deal with them effectively.
Let's think about how to restore a Windows 7 system, and also insure ourselves in the future against possible troubles using the backup and recovery tools built into the operating system.
We will learn how to restore Windows 7 without using third-party backup programs, even when System Recovery Options do not load and the F-8 button is useless.
It has in its arsenal a fairly powerful and good tool -> Recovery Environment, which is created automatically when installing Windows 7 in a hidden partition and contains five other tools that solve numerous malfunctions and problems.
Note: If you learn how to use Windows 7 recovery tools correctly, and this is not difficult, then you can do without additional and paid data backup programs.
You can launch the recovery tool by pressing the F-8 button on the keyboard immediately after starting the computer. After this, the menu Additional boot options will open in front of you: Troubleshoot your computer, then Safe Mode, Safe Mode with loading network drivers, etc.
A small digression: Before selecting Troubleshoot your computer, try the simpler option - Last Known Good Configuration - in simple words, the operating system always remembers the last successful boot of the computer and enters this information into the registry.
If there are problems loading, Windows can remember the registry settings and driver settings that were used when the system was last successfully booted and use them if you select the Last Known Good Configuration option.

If this tool does not help, select the first -> Troubleshoot computer problems.

Next, we get to the Windows 7 System Recovery Options menu, this is what we need, this is where we can select the System Restore Tool we need, there are five of them in total, let’s take a closer look at how they all work.
The first thing to do is apply Startup Repair (Automatically fix problems that prevent Windows from starting).

Required digression: After pressing the F-8 button when booting the computer, you may not have the item > Troubleshoot your computer, but only Safe Mode and so on, the question arises why.
When installing Windows 7, a recovery environment partition is created automatically and is located in the root of the drive (C:) in the Recovery folder. You can also see in the Disk Management window - a separate, hidden partition of the hard drive, its volume is only 100 MB, it is used to store boot configuration files (BCD) and the system bootloader (bootmgr file).
You can see it under Computer->Management->Disk Management. Under no circumstances should you delete this partition (many people delete it out of ignorance), otherwise you will not have the recovery environment start, that is, you will not have the Troubleshoot your computer option, and in more severe cases, you simply will not boot the system.

In the lower screenshot you can see another hidden partition, with a capacity of 9.02 GB, this is a hidden recovery partition with factory settings on my laptop, yours may be larger or smaller. It’s also better not to delete it; if necessary, you can always restore Windows 7 from it.

What should you do if you do not have a partition with a recovery environment and when you press the F-8 button in the Additional boot options menu, the Troubleshooting computer option does not appear? How then to restore the Windows 7 system?
An installation disk with the Windows 7 operating system can help here. You can run the recovery tool by booting from the original Windows 7 installation disk, selecting System Restore at the very beginning.
If you don’t have an installation disk, then you can use the Windows 7 Recovery Disk (you can make it in any running Windows 7) in five minutes, then you can also boot from it and do the same.


So we finally got to the System Recovery Options, either using the F-8 button and the Troubleshooting item, or the Windows 7 installation disk or the Windows 7 Recovery Disk.
In the System Restore Tools Selection menu, select the first one:
Startup recovery-> there will be an analysis of faults that interfere with the normal loading of Windows 7 and their further correction for the normal loading and functioning of the operating system.
During the process, we may be warned that problems have been detected in the boot parameters, click Fix and restart.


System Restore-> using this function we can select a previously created system restore point, if we have it enabled, and roll back to the time when our Windows 7 worked and loaded perfectly, everything is simple here.


Restoring a system image-> I personally use this tool; if used skillfully, it can replace paid data backup programs. If you are interested, read on.

What's good about it? It will help when you don't have the original Windows 7 installation disk and you've deleted the hidden partition with your laptop's factory settings, but that's not all.
Sometimes there are situations when, for various reasons or due to the actions of a virus, you will not be able to boot the operating system at all, or many people ask How to restore the Windows 7 system, even if the menu with Additional boot options is also unavailable. Should I reinstall the operating system again?
Therefore, immediately after installing Windows 7 on your laptop or computer, using this function -> Restore system image, we create an archived image of our Windows 7 on the hard drive, and take care of it.
You must create a Windows 7 Recovery Disk (read below), it will help you use the System Image if the Advanced Boot Options menu does not load.
Go to Start -> Control Panel -> Back up computer data.

Select “Create a system image”.

In my case, Local disk (E:), if you have several hard drives in the system unit, then of course it is better to place the backup on the hard drive where the operating system is not installed.

By default, the data archiving program will automatically select a partition with the Windows 7 operating system; if you wish, you can add Local disks for archiving, as long as you have enough space.

Note: You may notice that I have two operating systems installed on my laptop, so the archiving program selected two Local disks.

Click Archive and the process of creating an archive with our Windows 7 will begin.
Created, it will look like this.

Now, if necessary, you can deploy the archive with Windows 7 to your computer in 20-30 minutes. It would be better if you additionally copy the archive with the system onto a portable hard drive, this will doubly protect you.
Let's imagine that we can't start Windows 7 and deploy the backup we created, let's do it together.
We launch the Windows 7 Recovery Tool by pressing the F-8 button on the keyboard immediately after starting the computer.
The Advanced boot options menu opens, select Troubleshoot your computer.

Restoring a system image


Use the latest available system image.


Of course, all our data on the Local Disk, where the operating system is now being restored, will be deleted, so you can first boot from any Live CD and copy what you need.
How else can you restore your Windows 7 system? Of course, using the Windows 7 Recovery Disk.
Let's create one that can be used to boot the computer; it will contain recovery tools that can be used to repair Windows 7 boot problems, as well as restore the operating system from the backup copy that we created in advance.
Important: For a recovery disk, the bitness of the system is important, you can use a 32-bit recovery disk for any 32-bit Windows 7, and a 64-bit recovery disk for any 64-bit Windows 7.
Let's go again Archiving computer data.

Create a system recovery disk, insert the DVD into the drive, click “Create disk”.


When the Windows 7 Bootable Recovery Disk is ready, put it in a safe place.
To restore Windows 7 from a Recovery Disk, you basically don’t need any working operating system at all.
You will only need to change the boot priority to the disk drive in your computer’s BIOS, insert a recovery disk into it and restore your Windows 7 using the archive.
Many here can draw an analogy with data backup programs, and this is correct, they work on the same principle, only their functionality is, of course, more convenient.
Recovering Windows 7 from a Recovery Disk. I show you how to do it. Let's say we're in trouble, we can't start Windows 7, when we press F-8 on the keyboard immediately after starting the computer, nothing happens.
We cannot get to the menu with Additional boot options and an error message is displayed. In this case, the system archive on the hard drive is not available to us. This is exactly the kind of trouble that happened to our reader Ilya, who wrote us a letter asking for help.
In this situation, many people reinstall Windows 7 from scratch, but not you and me, because we have a System Recovery Disk.
We insert it into the drive and reboot, set the BIOS to boot from the drive, as I said, the disk is bootable, the System Recovery Options program starts.
Press Enter until the prompt to boot from the disk disappears.


Automatically, the recovery tool running from the disk will try to restore Windows 7 to start.


If nothing works, select any tool, for example, try Restoring your computer using a previously created operating system image.


We use the latest available system image.


What other ways are there to restore Windows 7?
There is another little-known way to restore Windows 7 boot after a failure, and I’ll tell you about it. At first glance, it may seem difficult to many, but nevertheless it often helps me out.
The fact is, friends, that a very large part of the problems due to which you cannot boot Windows 7 lie in registry errors. And Windows 7 would not be Windows 7 if it did not have a mechanism that protects registry files. Such a mechanism exists and creates backup copies of the registry in the RegBack folder every 10 days, regardless of whether you have system recovery enabled or not.
If you cannot solve problems loading Windows 7, you should try replacing the existing (and apparently damaged) registry files from the Config folder with archived files from the RegBack folder. To do this, we will have to boot the computer from the Windows 7 installation disk or the Windows 7 recovery disk.
Boot into the recovery environment and select the command line.

We type in it - notepad, we get into Notepad, then File and Open.

We go into the real explorer, click My Computer. Now we need the system drive C:, pay attention, the drive letters here may be mixed up, but I think you can recognize the system drive C: by the Windows and Program Files system folders located inside.

We go to the folder C:\Windows\System32\Config, here are the active registry files, specify the File Type - All files and see our registry files, we also see the RegBack folder, in which every 10 days the Task Scheduler makes a backup copy of the registry keys.

So, we will replace the current registry files from the Config folder with backup registry files from the RegBack folder.
So, first of all, let’s delete from the C:\Windows\System32\Config folder the files SAM, SECURITY, SOFTWARE, DEFAULT, SYSTEM, which are responsible for all registry hives (my advice is to copy the registry hives somewhere before deleting, just in case).

In their place, let's copy and paste files with the same names, but from the backup copy, that is, from the RegBack folder.


Note: The SAM, SECURITY, SOFTWARE, DEFAULT, SYSTEM files cannot be deleted all together; delete them one by one. Then copy the same files from the RegBack folder in their place.
Friends, if this does not help, use Windows 7 file integrity recovery; if the operating system does not boot, it is done in exactly the same way as in Windows 8.
What else do we have left of Windows 7 recovery tools?
Memory diagnostics 7-> checks system memory for errors. Command line-> using it you can delete files that interfere with loading Windows 7.
I hope our article on how to restore Windows 7 system helped you.