Connecting a tp link tl mr3020 router. Setting up and flashing the TP-Link TL-MR3020 router. Setting up an L2TP connection
You can purchase the TL-MR3020 router only in one case. If the provider uses an Ethernet cable, and the protocol it works on is called DHCP or PPPoE.
A 3G modem can be used as a backup connection. The wireless WiFi router of the model in question will provide stable communication to several subscribers at once. They must connect to the device via Wi-Fi.
Router TL-MR3020
Note that now another revision of the device has appeared (it is called “V2”). Different hardware revisions are not compatible with each other. In the considered version of the router, TL-MR3020 V1, a combined processor is used, which includes a microcircuit Wi-Fi controller. This is what the device looks like without the cover:

Router board
By the type of board we can say the following:
- Wi-Fi antenna - made in the form of copper tracks
- The “mini-USB” port is simply a power connector designed like this.
Operating mode switch (3G, WISP, AP) – duplicated as one of the settings tabs. However, to access the web interface via Wi-Fi, we recommend switching the toggle switch to the “3G” position.
To conclude this chapter, here is a list of compatible modems (3G and LTE):

List of modems compatible with TL-MR3020
Let's configure the router like this. Let’s switch it to “3G” mode, go to the one he created wireless network(without a password), open the web interface. Provider cable - you can immediately connect it to the router port.
Pre-configuration steps
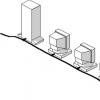
Router hardware connection
Let's look at how the router is designed externally. On top of the case there is a “wps/reset” button:

Router appearance
We will connect like this:
- We move the toggle switch to the “3G” position.
- We connect the provider’s cord to the “WAN/LAN” port.
- We connect (if required) a 3G modem.
- Turn on the power (using the standard adapter).
A minute after switching on, you can look for a new one Wi-Fi network. Its name: "TP-LINK_POCKET_3020...". The default password is not used. 802.11 protocol: mixed B/G/N, so any device can connect. The wireless network card must be set to "auto" IP and DNS.
It is important to know: if the wireless network does not appear within 2 minutes, or a different name or password is set, then do the following. When 2 minutes have passed after turning on, press “wps/reset” (hold for 12-15 seconds). After a minute, a network with the “correct” parameters should appear.
What is “Internet reservation”?
Provider cord – connected to WAN port. When the connection on it is lost, the router automatically switches to the Internet received via a 3G modem. Of course, both connections (wired and wireless 3G) must be configured correctly.
In addition, you need to indicate to the router that the main communication method is “wired”, and the 3G channel remains a backup (it is possible, by the way, to do the opposite).
How to log into the web interface and switch the operating mode
If you were able to log into the wireless network “TP-LINK...”, then enter the address value in the browser: 192.168.0.254. Authorization will be required (admin pair is suitable).

After clicking the “OK” button, the “setup wizard” tab appears. From automatic settings we will refuse by forcefully going to the “Network” -> “Internet Access” tab:

Tab switching menu
By default, none of the operating modes is selected. If necessary to wireless Internet the router distributed, mainly receiving it via cable, set the “Preferably WAN” mode:

Internet Access Tab
Setting up an Internet connection
DHCP option (wired Internet)
In TP-Link routers, a connection of this type is configured “in two steps.” First, on the “Network” -> “MAC Address Cloning” tab, you need to set the MAC address that is currently registered with the provider:

MAC Address Cloning Tab
Look MAC address, belonging to network card computer, you can go to the “Connection Status” by going to the “Support” tab (and clicking the “Details” button).
If the provider does not “verify” the MAC address, then this step can be skipped. In the second step, go to the “WAN” tab:

WAN Port Settings Tab
Here the default setting is for “DHCP” connections. All that remains is to click “Save”. And, wait for the “Earth” (Internet) indicator on the router case to light up.
Setting up a 3G backup connection
First of all, on the “Status” tab, make sure that the modem is detected (if the message “Not connected” remains, then the configuration cannot be performed):

Status Tab
To set 3G/LTE parameters, go to the “Network” -> “3G/4G” tab:

"3G/4G" tab
You need to select the connection mode: “Connect automatically”. The modem will maintain a connection with the provider all the time (but the traffic will still mainly go through the WAN cable). This is the most “difficult” moment, and then everything is set up as usual. To access the settings, click the “Advanced settings” button:

Configuring 3G/4G settings
To change the APN value, as well as login and password, first check the “Specify dialing number...” checkbox. Finally, click “Save”. That's all that can be said about setting up the connection.
It is important to know: the modem maintains a connection to the Internet all the time, connecting automatically. However, traffic through the 3G/LTE modem (if there is a WAN connection) remains 0 Mbit/s.
All operating modes of the router (and how to configure them) are discussed in the following video:
Authorization
In order to get to the router’s web interface, you need to open your Internet browser and type 192. 168.1.1 in the address bar, Username - admin, Password – admin(provided that the router has factory settings and its IP has not changed).
Changing the factory password
To ensure that no one but you can enter the router settings, you need to change the password to enter the settings.
To do this, select from the menu on the left System Tools(System Tools) – Password(Password) and enter the settings:
- Previous username: old username, enter admin
- Previous password: Old Password, enter admin
- New username: enter a new username, you can leave admin
- New Password: enter New Password
- Confirm new password: confirm the new password

Setting up an Internet connection
Let's go to Net(Network) - Internet access(Internet Access). Here you choose how (by what technology) you will connect to the Internet:
- Preferably 3G/4G- Use 3G/4G as the main connection, and WAN as a backup connection.
- WAN preferred- Use WAN as the main connection, and 3G/4G as a backup connection.
- WAN only- Use only WAN to connect to the Internet.
- 3G/4G only- Use only 3G/4G to connect to the Internet.

Setting up 3G/4G Connections
1. To set up the Internet via a USB modem (3G/4G), go to Net(Network) - 3G.
- Region: Russia
- Mobile Internet service provider: Choose your communications provider
- Connection mode: Connect automatically
- Authentication Type: Auto

2. If your telecom operator is not among those offered, go to Additionally(Advanced Settings). Put a dot on " Specify manually Dial number, APN, username and password". Here we enter data from your telecom operator. After entering the settings, click Save(Save).

3. To set up an Internet connection via a WAN port, go to Net(Network) - WAN. Here in the column WAN connection type(WAN Connection Type) select the connection type that is used by your provider.

Setting up a PPPoE connection
- In field WAN connection type (WAN Connection Type): select PPPoE/Russia PPPoE
- Username
- Password ( Confirm the password(Confirm Password)
- Secondary connection(Secondary Connection): Disabled
- WAN connection mode(WAN Connection Mode): Connect automatically(Connect Automatically)
- Save(Save). The Internet is configured.

Setting up an L2TP connection
- WAN connection type L2TP/Russia L2TP
- Username(User Name): your login according to the contract
- Password ( Password): your password according to the agreement. In some firmware it asks a little lower Confirm the password(Confirm Password)
- We put a point on Dynamic IP(Dynamic IP)
- IP Address/Server Name
- MTU size (in bytes)
- Connection mode(WAN connection mode) - Connect automatically(Connect Automatically)
- After entering the above settings, click Save(Save). The Internet is configured.

Configuring PPtP (VPN) while automatically obtaining a local IP address (DHCP)
- WAN connection type(WAN Connection Type): Select PPTP/Russia PPTP
- Username(User Name): your login according to the contract
- Password ( Password): your password according to the agreement. In some firmware it asks a little lower Confirm the password(Confirm Password)
- We put a point on Dynamic IP(Dynamic IP)
- IP Address/Server Name(Server IP Address/Name) - server address or name (specified in the contract)
- MTU size (in bytes)(MTU size) - change the value to 1450 or less
- Connection mode(WAN connection mode) - Connect automatically(Connect Automatically)
- After entering the above settings, click Save(Save).

Setting up PPtP (VPN) with a static local IP address
- WAN connection type(WAN Connection Type): Select PPTP/Russia PPTP
- Username(User Name): your login according to the contract
- Password ( Password): your password according to the agreement. In some firmware it asks a little lower Confirm the password(Confirm Password)
- Choose Static IP(Static IP address)
- In the fields IP Address/Server Name(Server IP Address/Name), IP address(IP Address), Subnet mask(Subnet Mask) Main gate(Gateway) enter the data from the contract. In field DNS you can enter DNS your provider's address
- Connection mode(WAN connection mode) - Connect automatically(Connect Automatically)
- After entering the above settings, click Save(Save).

NAT when automatically obtaining an IP address (DHCP)
- In the WAN connection type field ( WAN Connection Type): select Dynamic IP(Dynamic IP)
- Click Save(Save). The Internet is configured.

Setting up Wi-Fi on the router
Setting up a Wi-Fi connection. In the side menu, go to Wireless mode(Wireless). In the window that opens, enter the following settings:
- Field Wireless network name(SSID): enter the name of the wireless network
- Region(Region): Russia
- Channel (Chanel): Auto
- Mode: 11bgn mixed
- Channel width(Channel Width): Automatic
- Enable wireless broadcasting And Enable SSID Broadcast- put a tick
- Click the button below Save(Save)

Setting up Wi-Fi encryption. In the side menu go to Wireless Protection(Wireless Security):
- Selecting the encryption type WPA-PSK/WPA2-PSK
- Version- Automatically
- Encryption- AES
- PSK Password: enter the password for the Wi-Fi network. The password must not be less than 8 characters
- Click the Save button at the bottom. After saving the settings, you will be prompted to reboot the router; ignore this requirement (red inscription below).

Port forwarding/forwarding
This function automatically redirects requests for certain services from the Internet to the appropriate host of your local network, located behind the router's firewall. Use this function should be done if you want to create a server (for example, a Web server or mail server) on the local network behind the router’s firewall. Let's go to Forwarding (Forwarding), press Add (Add New).

IP address- network address of the device to which the request will be redirected. Service Port and Internal Port- port number that needs to be opened Protocol- Select the required protocol State- On. Click Save.

On the market wireless routers Today there are a lot of companies playing, and there are simply too many device models to count. So manufacturers have to create and develop new niches to succeed. One of the distinctive characteristics, the interest in which has noticeably increased recently, is support for USB modems for providing access to the Internet through the networks of mobile providers. This type connection can be used as a backup for a wired channel or the main one for a summer residence, as well as for organizing mobile access points. Despite the fact that the majority modern smartphones and tablets are able to independently use 3G networks, the option of working through a single access point still has its advantages - the operation of several devices in unified network, own tariff, autonomy (for example, installation in a car). And the ability to use provider-independent equipment will allow a more flexible approach to choosing an operator.
We have already considered several options for such solutions, and in this article we will talk about the product of TP-LINK, which positions itself as the world leader in the wireless communications market. The TL-MR3020 model is a compact router that supports connection to your provider via cable, 3G modems or Wi-Fi. At the same time, for clients, depending on the settings, Wi-Fi and/or a wired port remains. The device has a uniquely compact size and attractive design.
Scope of delivery and support
Most of all, the packaging was reminiscent of the latest generations of Apple TV. Decorated in light colors, the cardboard box with dimensions of about 11x11x8 centimeters looks very light and stylish. It contains a photograph, description and characteristics of the device. There are only literally a couple of words in Russian.

In the box, the user will find the router itself, an external 5 V 1 A power supply for the USB connector, a Y-shaped miniUSB cable for power from a PC or PSU, a flat network patch cord, a mini-CD with an electronic version of the user manual, a leaflet on quick start to work for English language. Note that all components are white, matching the router itself, and the cables are relatively short.

TP-LINK has websites for most markets, including Russia. On the Russian website you can view the characteristics of the devices and download updates software, familiarize yourself with the web interfaces and settings of some models, contact technical support at e-mail and find out her phone numbers. We also note the presence of a Russian product forum.
The device has a one-year warranty.
Appearance
The plastic case of the router has dimensions of 74x62x22 mm. Most surfaces are white and glossy, only the top panel is light gray. The case does not have any rubber feet or mounting holes. Apparently, it is assumed that the device is so compact that it will simply lie wherever it happens. But this approach will quickly lead to loss of gloss, and the fact that the device is very light will be more likely to hinder than help. In our opinion, it would be worthwhile to provide some more reliable options for placing the router.

On the top panel there is a button for establishing a connection via WPS and resetting settings (long press), as well as four green color operation indicators - power, Internet activity, WLAN and Ethernet. On one of the sides there is a USB port for connecting modems; its location allows you to use models of any size and format without extension cords.

At the second end there is an operating mode switch, a network port and a miniUSB input to provide power to the device. Changing the switch position causes the device to automatically reboot. The RJ45 input, depending on the mode, can perform LAN or WAN functions. Installing miniUSB to power the router looks like an anachronism. It was worth using microUSB, both for reasons of prevalence and the thinner thickness of standard cables.
Generally appearance not bad, but not at all practical for a mobile device.
Hardware configuration
The case does not allow simple tampering, so information was obtained from the manufacturer and an Internet search. The main processor of the router is Atheros AR9331, which contains all the elements, including the network controller (10/100 Mbit/s), radio unit (1T1R, 2.4 GHz, up to 150 Mbit/s), USB controller(one port version 2.0). It operates at a frequency of 400 MHz. Additionally installed microcircuits random access memory 32 MB and flash 4 MB.
Despite the high degree of integration, the device heats up little during operation. So the absence of a heatsink on the processor and ventilation holes on the case is understandable. The official power supply is rated at 1 A, but in tests the device also worked when connected to one USB port desktop PC.
On printed circuit board, having dimensions less than 6x6 cm, a console connector is provided. Note that for this model there is already an alternative firmware from the OpenWRT project.
The device was tested with official firmware version 3.12.11 Build 120320 Rel.42138n.
Settings and features
This model allows you to implement three different work scenarios. Firstly, it can work as a router, providing several users with access to one Internet channel via 3G or cable. The second option is to connect to a provider that provides Internet access services via Wi-Fi. Here the device connects to an existing wireless network and at the same time organizes its own. In this case, you can also connect clients to the network port. The last scenario is a wireless access point. Changing the mode is possible using a switch on the case and then automatic reboot. It is possible to activate the “software switch” via the web interface. In this case, the hardware stops working.
The device's web interface is presented in English only. According to information from the developers, it is planned to release a Russian version. The structure is standard - a column with a drop-down menu on the left side of the window, a settings page in the center and built-in help on the right. Note that some parameters, for example, wireless point access, are saved when switching modes.

Let's start describing the settings with the last, simplest mode. For check current state The router traditionally uses the “Status” page. Next comes the “Quick Setup” item, in which we can find out that when the “AP” switch is positioned, in reality the device can also work in WDS mode and as a wireless client. Given the USB power supply, the latter option may be interesting for media players and TVs. "WPS" is responsible for setting up the appropriate technology. By default it is disabled. Here you can clarify and change the PIN or start connecting a new client.
There is only one item in the “Network” group - setting your own access point address. In our opinion, factory setting– fixed address – not very convenient for an access point. It is worth changing it to obtain an address via DHCP from the main router. The main settings for this mode are the wireless network parameters. In addition to the usual items with the network name, region, channel number, mode (b, g, n, b/g or b/g/n), we note the presence of a choice of channel width and hiding the SSID.

The device supports all modern modes - open networks, WEP, WPA/WPA2 with password and RADIUS server. There is also a built-in MAC address filter for wireless clients. IN additional options there are checkboxes for allowing WMM, selecting a short interval (helps increase speed) and enabling isolation of wireless clients (in this case they will not be able to communicate with each other via the access point). On separate page You can see a list of current clients. Unfortunately, the table does not provide information on connection speeds. To activate most of the parameters in this section after changing them, a reboot is required, but it is enough to do this only once - after setting all the necessary options.
Built-in DHCP server can also be used in this mode. Conveniently, in addition to the address range, you can also specify parameters such as the default router and addresses DNS servers. A table is provided for reserving IP addresses for clients.

The most voluminous group in this operating mode is “System Tools”. Here you can find the clock setting, firmware update, configuration save/restore/reset, reboot, change of administrator name and password. Built-in diagnostic tools include ping and traceroute utilities. The log file is saved in the device until rebooted. There is no option to send it to email or syslog. When displaying a list of events, it is possible to set filters. Note that the moment the wireless client connected to the access point is not displayed in the log. The built-in function for collecting statistics on data reception and transmission will help identify the most “gluttonous” clients.

The manufacturer calls the second operating mode of the device WISP. In it, the router connects to the provider’s wireless network, and over this connection you can also use a VPN to access the Internet. Next, access is distributed through a wired port and the created own access point, and network address translation technology is used. The third, main, mode is similar to the second, only a 3G modem and/or a wired port is used to connect to the Internet provider. So their settings and capabilities are almost the same.

Many menu items (“WPS”, “Wireless”, “DHCP”, “System Tools”) are similar to those already described above, so we will not repeat them. To set up an Internet connection in WISP mode, you first need to set up a connection to the provider's network. The easiest way to do this is through the built-in network scanner. In “3G” mode, you can use several options:
- Internet only via 3G, a wired port can be used to connect clients;
- Internet only via WAN;
- both connections, 3G has the advantage;
- both connections, WAN has the advantage.
The last two scenarios allow you to implement Internet channel reservation. Loss of a WAN link can be determined by physical disconnection of the cable, loss of communication with the DHCP gate, loss of VPN connections. In all these cases, the device quickly (in less than a minute) switches to working via a modem. But getting the cable connection back was not always possible. The only one reliable way– reboot the device. So the router will not be able to respond to such “troubles” as financial blocking. Perhaps it would have been worthwhile to provide for the user to indicate his own external server to check the connection, but that is a completely different story. In our opinion, similar automatic systems in the class of routers under consideration are not very relevant. It would be simpler and more convenient to use another switch position on the body to select exactly wired connection.

Dealing with the reverse scenario (the main connection via 3G) is much more difficult. But disconnecting the modem works here, and when you connect it back, the device instantly switches to it. Specifying incorrect parameters has a similar effect. mobile internet. It's hard to imagine that anyone would need a reservation mobile connection cable, but you can come up with another application - use a device with 3G and cable alternately without reconfiguring, simply connecting only required cable. Options for configuring the operation of the modem include choosing a provider and a connection method - on demand or manual. If your operator is not on the list, you can set the network parameters yourself. For reliability, it is advisable to first switch the USB dongle to modem only mode. But you will have to figure out how to do this yourself. The company claims to support 120 modem models, but there are only 21 devices in the compatibility list on the website. The secret of such a difference in numbers is that the first applies to the whole world, and the second only to the local market and equipment tested with domestic service providers. In fact, other devices may well work, since it is almost impossible to check all possible options. In ready-made profiles you can find three large domestic GSM providers.

To configure WAN, you must first select the desired connection type on the appropriate page. Fixed and dynamic address, PPPoE, PPTP and L2TP are supported. When working with PPPoE, PPTP and L2TP, the connection to the provider’s local network is not lost. It is also possible to change the MAC address of the WAN port. The device has a built-in DDNS client with support for three service providers. Additionally, it is possible to program your own routes.

In this mode, there are also such familiar router functions as port translation, port switching, DMZ and automatic forwarding via UPnP. Note that the rules can use port ranges, and the external and internal numbers may differ.
In the “Security” section there are items to enable firewall, allowing PPTP/L2TP and IPSec, enabling ALG for FTP, TFTP, H323 and RTSP protocols. The device has built-in protection against DoS attacks, but it is disabled by default. Here you can also set a filter for the addresses of computers from which you are allowed to use the administration interface and enable remote access to him.

The “Parental Control” section can be used to restrict access to web resources based on client MAC addresses. The rules indicate the permitted domain names, and all others will be blocked.

A more flexible control option is to use the “Access Control” settings. They allow you to block or allow access only to certain resources. The rules use IP or MAC addresses of local clients, IP addresses or names of remote systems indicating port numbers and protocols, and work schedules.
The “Bandwidth Control” function in the model under review seems to us not very relevant, given the positioning of the device. Even in more powerful routers, it rarely implements the capabilities required by the user and in most cases it is more effective to properly configure client computers.
Testing and Performance
To test the device, we used the ZTE MF192 modem with the MTS operator. With it we were able to test different operating modes and WAN-3G switching options. But the connection was unstable. After a certain period of time, an entry appeared in the log that the modem was disconnected, and restoring communication required rebooting the router or reconnecting the modem. In this case, there is no point in talking about the speed of operation - everything is determined by the provider and the quality of the signal, and not by the router itself. It is difficult to say what was the reason for the incompatibility of the modem, but on alternative firmware and with another modem for the Sky Link operator, the device worked flawlessly.
The router was also tested with a connection to Beeline Internet in L2TP mode at a speed of 30/15 Mbit/s. The channel speed was fully used. The p2p client worked stably, providing performance close to the channel's capabilities. While it was running, it was possible to use the Internet; the router’s web interface was accessible.
The first option for checking the performance of the router's wireless module is to work in access point mode with different clients. This time we used D-Link DWA-140, LevelOne WUA-0603, NETGEAR WNA1100, NETGEAR WNDA4100 and TP-Link TL-WN821N USB adapters. Setting up the router – 802.11n, WPA2-PSK AES, automatic selection of channel number and width (in reality, the 40 MHz option worked). The distance between the tested devices is about 5 meters without obstacles. Several neighboring networks were present on the air.
The results show that the device performed quite well for its configuration. With most adapters, speeds are over 50 Mbps, which is about twice the actual performance of the previous generation standard. Interestingly, NETGEAR's 3T3R device showed the maximum speeds, which suggests that multi-channel can be useful in a "one-way" manner.
We also tested the wired router mode with the same adapter. Wireless connection– the only way to work if the wired port is used to connect to the provider. So in reality it is impossible to determine the performance of routing speed. Considering relatively fast processor devices, performance will most likely be limited by Wi-Fi.
The numbers confirm that if another network port had been implemented, better results could have been seen on it. So there are no comments on routing - the TL-MR3020 can easily cope with tariff plans 50 Mbit/s or more. The main thing is that the client has a good adapter and a high signal level.
The router supports working with the provider's local network for PPPoE/PPTP/L2TP connections. Testing this mode in the scenario of simultaneous downloading of two streams (from the local network of the provider and the Internet) showed that the speed is quite high, as can be seen from the following graph.
In general, there are no comments on the performance of the router. In most scenarios the speed will be determined wireless connection– Wi-Fi or 3G. It's a pity that a more powerful chip with support for 2T2R and speeds up to 300 Mbit/s was not used. But its power requirements would be higher, which is not very good for a mobile router.
conclusions
Reviewed TP-LINK router The TL-MR3020 is positioned for several use cases. It provides mobile access via 3G and works as a compact wireless router for a wired connection. But covering these categories with a single hardware configuration is not easy. In the first case, low consumption is important, and in the second, a faster wireless network would be useful. The firmware, in our opinion, is unnecessarily complicated and many of its functions will not be in demand.
The device looks good as a mobile 3G router. It is compact, powered by USB port, supports quite a lot of modem models (although it is better to check compatibility in practice) and implements an entry-level 802.11n wireless network. The absence of a battery in the kit reduces the cost and allows the user to independently select the option required in terms of format and capacity. The setup is not complicated, although it could be simplified even further by automatically selecting a provider based on the modem’s SIM card.
The access point mode, it seems to us, is not very interesting in this device due to the implementation of only 150 Mbit/s version of 802.11n. WISP also seems to be a fairly rare option. In addition, it uses sharing ether, which reduces overall productivity. Working in an Ethernet router scenario can be useful for those users who do not require maximum performance and just need a small router to connect several mobile wireless devices to the Internet.
Let us mention another scenario implemented by this device - working in bridge mode with a connection to Wi-Fi for Ethernet devices that do not have a built-in wireless controller. Considering how much TV manufacturers usually ask for branded adapters, the TL-WR3020 has a good chance.
Thanks to its compactness, USB power and OpenWRT support, the device may be of interest to enthusiasts network technologies. In addition, with alternative firmware The router is capable of supporting other modem models. An attractive side of the device is its low cost. At the time of writing, it was about 850 rubles, which is close to the lower limit of mass-produced wireless routers without 3G support. Average retail price in Moscow, current at the time you read this article: $22().
Now various manufacturers There are a huge number of models of wireless routers, so device developers are forced to find their niches in the electronics market. A striking example of the successful implementation of this task were routers with support for USB modems. Moreover mobile network It can be used either as a primary or as a backup. Such models are popular among users in the country and in cars, due to their provision of significant mobility. This article provides a description and instructions for setting up the “tp link tl mr3020” portable router.
Mobile router
The Chinese manufacturer has provided its “Tp link tl mr3020” device with a very laconic and attractive design, without forgetting maximum practicality. Many will say that a simple copy was made from Apple devices, but this is only externally, because... The big advantage of the rather powerful hardware of the device is its versatility and adaptability (the device, despite its exceptional compactness, works perfectly with almost all major operators and mobile Internet providers).
Brief description of the device
The front part of the tl mr3020 router has 5 indicators of device operating modes.
 The side panel contains miniUSB and Ethernet connectors (for supplying power to the device and connecting to a network or computer, respectively). The manufacturer also installed a mode switch here.
 There is a USB connector on the other side of the device. This is where the USB modem should be connected.
Contents of the box with the router (device included)
 The small light box contained the following:
- The router itself is “tl mr3020”;
- Flat Ethernet cable;
- Power supply adapter;
- USB-miniUSB cable.
 The cords are short and justify the portability concept. Everything is done in white and light colors.
Functionality and settings
The functionality of the “tl mr3020” is no different from routers used at home. It can be successfully used in an apartment by connecting a network to it via an Ethernet connector, after which this “little thing” will provide the entire house with Internet.
However, the main advantage of the device in question is the ability to use a USB modem, because hardware filling and firmware “tp link tl mr3020” allows you to easily “digest” everything sold in Russia by the three main operators mobile communications USB modems.
Operating modes
The device is capable of operating in the following 3 modes:
- Broadcast the Internet via Wi-Fi using a USB modem;
- It can use the existing Wi-Fi network and distribute its own Internet, and also use the incoming signal using the Ethernet connector for this;
- Use as an access point.
Setting up a router is not difficult and does not require much time. It is necessary to use the cord provided in the box to connect the router to the PC and, through a browser, by logging into the “admin panel”, make the necessary settings. 
Authorization procedure
You need to do the following 2 steps:
- In the browser, type “192. 168.1.1" and press "Enter";
- Next, in the window that opens, type “admin” in both columns “Name” and “Password” (if the router is new and has not been used before).
How can I change my access code?
In order to ensure security and inaccessibility of the router settings to strangers, you need to change the password.
 For this purpose, you need to click on “System Tools” and then “Password”, then the settings are performed according to the following algorithm:
- In the lines of the previous code and name, type admin;
- Next, in the new name section, you can again type “admin”;
- Then you need to come up with your own code and type it in the new password column;
- Then confirm that the password is entered correctly (depending on the device firmware).
Internet setup procedure
Open “Network” and then enter “Internet Access”, where you define one of the following methods for connecting to the global network:
- Use as a priority 3G or 4G connection (WAN - backup);
- Use as a priority WAN connection (mobile network - backup);
- Use WAN without alternative;
- Use a mobile network (3G or 4G) without an alternative.

Setting up a connection via a mobile network
Below are two configuration options via 3G/4G:

Configuration via WAN
Open “Network” and then go to the “WAN” tab, where in the “WAN Connection Type” item, determine the connection type used by the provider.
Setting up a PPPoE connection
- Set the checkbox in the “Secondary Connection” column to “Disable”;
- In the “WAN Connection Mode” section, check the “Automatic connection” item;
- Next click on “Save”.
Setting up an L2TP connection
To do this, you need to take the following steps sequentially:

Procedure for setting up PPtP (VPN), if the IP address (DHCP) is issued automatically
To do this, you need to take the following steps sequentially:
- In the “WAN Connection Type” line, indicate “PPPoE/Russia PPPoE”;
- In the “User Name” item, enter the name written in the contract with the provider;
- In the “Password” column, enter the code from the contract. Then sometimes you need to enter “Confirm Password” - it depends on what firmware the device is;
- Check the “Dinamic IP” box;
- In “Server IP Address/Name” enter the server IP (extract from the contract);
- In the “MTU size” item, change the number to 1450 (you can specify a lower value);
- Click on “Save”.
Procedure for setting up PPtP (VPN) if the IP is static
To do this, you need to take the following steps sequentially:
- In the “WAN Connection Type” line, indicate “PPPoE/Russia PPPoE”;
- In the “User Name” item, enter the name written in the contract with the provider;
- In the “Password” column, enter the code from the contract. Then sometimes you need to enter “Confirm Password” - it depends on what firmware the device is;
- Check the “Static IP” box;
- Next, fill in the fields (copying them from the contract): “Subnet Mask”, “IP”, “Main Gateway”, “Server IP Address/Name”. In the “DNS” item, you can enter the DNS of the user’s provider;
- In the “WAN connection mode” section, set a dot on the “Automatic connection” item;
- Click on “Save”.
NAT in case of automatic IP assignment
To do this, you need to take the following steps sequentially:
- In the “Type of WAN connection” column, indicate “Dynamic IP”;
- Click on “Save”.
The process of setting up Wi-Fi on a router
 To set up Wi-Fi, you must first open the “Wireless” window. Next, in the menu that appears, perform the following steps:
- In the “SSID” section, enter the network name;
- In the “Region” column indicate “Russia”;
- In the “Channel” item set “Auto”;
- Field “Mode” define “11bgn mixed”;
- Then set “Channel Width” to “Auto”;
- Then check the “Enable wireless broadcasting” item;
- Next, check the box “Enable SSID broadcasting”
- Click on “Save”.
Setting up Wi-Fi protection
Enter the “Wireless Security” window, where you perform the following steps:
- Specify the type “WPA-PSK/WPA2-PSK”;
- In “version” enter “WPA2-PSK”;
- In the “Encryption” line, select “AES”;
- Next, come up with a code in “PSK Password” that contains at least eight characters;
- Click on “Save”;
- Then a recommendation will be displayed stating that you need to restart the router; you need to ignore it.
TP-Link TL-MR3020 - compact wi-fi router, designed for accessing the Internet using an external 3G modem. Works great with Tandem 3G modem running OpenWRT firmware
|
Interesting:
|


Attention! Firmware is not installed on version 1.9!
You can download OpenWRT firmware for the TL-MR3020 router here: [download]
Router setup:
- Connect the router to your computer using network cable(WAN\LAN socket) or connect to a Wi-Fi network.
- Connect the 3G modem to the router using a USB cable
- Open your internet browser and enter the address: 192.168.0.254

- Enter your username and password to log in to the router management. Default login: admin password: admin
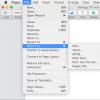
- In the router management console, go to the System Tools section, then to Firmware Update. Select the firmware file downloaded from the link above and click the update button.

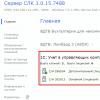
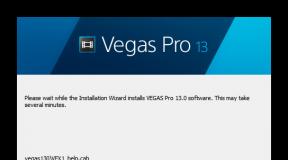
- The firmware will take no more than 3 minutes. After flashing the firmware, the router will reboot. Enter 192.168.1.1 in the address bar of the browser - now you can log in to the router management console at this address. If a window appears like the one below, click Manage and Settings Luci.

- The login to enter the console is root, the password is not set, you can set it later yourself. Click Login.

- Go to the menu Network -> Interfaces, click the add button new interface.

- Enter the name of the new interface without spaces, using only letters and numbers. Select UMTS/GPRS/EV-DO for the new interface protocol. Click apply.

- A window for detailed settings of the new interface will open. Fill in the fields as shown in the figure, fill in the APN field in accordance with your operator. Click save and go to firewall settings.

- Check WAN and click Save and Apply.

- If everything is configured correctly, a new WAN interface will appear in the interfaces menu and after a while it will connect to the Internet. The number of packages will increase. You can already check the functionality of the Internet.

- For Wi-Fi settings go to the corresponding menu item. Go to Interface Configuration and enter the name of your network in the ESSID field. Leave the rest of the settings unchanged and go to the Wireless Security tab.

- Select the encryption type - WPA2/PSK - the most common and reliable encryption mode. In the key field, enter the password for your Wi-Fi. Click Save and Apply

This completes the router setup. Don't forget to leave your feedback on our website in the Projects menu.
Reviews
0 12/11/2018 05:07 Stas
I asked and why now my router doesn’t enter the interface, it’s become a brick to throw away, well done, you have nothing to say, it was impossible to write that the firmware does not support version 1.9
0 11/21/2017 12:16 Oleg engineer
Hello, the number can be changed to any other, perhaps there is a glitch in the firmware that the change is not displayed in the number entry field, but if you enter new number and save - the changes will take effect. You can put it back factory firmware, downloading it from the official TP-Link website and installing it via the web interface
0 03.11.2017 10:14 Andrey
Good afternoon. In the 3G settings it is not possible to change the intent, it hangs *99***1#, so nothing works, and it is not possible to roll back the firmware.