Editing boot ini windows xp. Repairing the bootloader using the recovery console in Windows XP. Change operating system menu order
Some users require multiple versions of operating systems on their computer to work. Switching between them in the standard version is carried out upon reboot. But the PC is configured in such a way that the time for selecting an OS to launch is strictly limited. If the user does not make it in time, the system will turn on by default.
boot.ini file
In Windows XP, the boot ini is responsible for the boot order. This system file, located in the main directory. The document has a hidden attribute, so you can’t just open it from Explorer. It lists all operating systems available for entry. From there you can change their order, the default option, as well as the waiting time.
File access options
There are many options for accessing a file, including indirect ones. This article will discuss four simple ways, which will work in any case, regardless of the version of XP.
Option 1: System Properties
This method is considered the most popular. Go to category "My computer" Conductor. Move the mouse cursor over the free area and right-click. Open the folder properties.
There needs to be a section "Additionally". Click on the last (third from the top) button "Options".

Now select "Edit". This will open boot ini in a standard text editor. You can make any changes to it, but do not forget to exit and save.
Option 2: Run Window
Dialog window "Run" designed for access to a large number of Windows components. It starts from the menu "Start" or by simultaneously pressing Win + R. Paste the query into the text window msconfig and confirm it.

The system settings window will open. There, select the BOOT.INI section and proceed to making changes.
Option 3: Windows Explorer
As already mentioned at the beginning of the article, boot.ini is physically located in the main directory logical drive from Windows. He is disguised not only by the attribute of secrecy, but also system protection. This was done to prevent access to it by unprepared users who could make incorrect changes. But now we will consider the option of opening a document through Windows Explorer.
Open the system partition (usually the local drive (C:)). On the Browser toolbar, click on the item "Service". There select "Folder properties…" and immediately go to the tab "View". Scroll to the very bottom of the list. Activate the last item "Show hidden..." and uncheck "Hide protected...", then click "OK".

The result of the described actions will be the appearance of many elements that look more transparent than usual. Among them you will find required document. Double click on it and start editing.
Important: when all actions are completed, it is advisable to turn on hiding system elements again. This will increase your computer's protection against virus threats.
Option 4: Command Line
You can also edit boot ini in Win XP using the command line. In this case, you don’t have to open the document itself; all actions are performed through the command bootcfg with the following notes:
- /timeout “digit” - the time that is given to the user to activate independent choice.
- /add - activates a search for versions of Windows present on the computer. When the procedure is completed, the user will be able to add them to the general list.
- /list - calls the contents of boot.ini for viewing. In this case, editing is not available.
Launch the command line from the section "Standard" full list Start elements.

Content
Initially, the boot file contains only a few lines.

The first one after the opening one indicates the time during which the selection window hangs for the user operating system. Then comes the indication of the standard OS to boot.
Next you can find the column «» . She opens a list of everyone Windows versions installed on your computer. Note that there are four options available for each element: partition, disk, multi, and rdisk. There is also one optional one - scsi. They all serve to describe the system record. Let's look at two of them in a little more detail:
- Partition is used to designate the partition of the physical disk on which the OS is located.
- rdisk records the number of the hard disk itself.
The remaining parameters will only be of interest experienced users, since they are associated with different options for operating the equipment in the BIOS. To change the default OS when you start your PC, you only need to configure the two mentioned.
By default, the BOOT.INI file is located in the root local disk"C", but this is only in operating rooms Windows systems no higher than XP. This file is hidden, to see it you must turn on display hidden files on Windows like this:
- Click on the button Start", go to " Toolbar", then find the item " Folders settings" and open this element.
In the window that appears, go to the “ View", then in the list that appears, check the box next to the item " Show hidden files and folders«.
Now hidden Windows elements will be displayed.
The BOOT.INI file is editable.
As for Windows 7 and higher, the BOOT.INI file is missing, it is replaced by some more flexible and the best alternative, called BCD. This new technology allows you to use systems that require not only BIOS, but also others to boot.
Editing the BOOT.INI file
The BOOT.INI file consists of sections.
timeout=30
default=multi(0)disk(0)rdisk(0)partition(3)\WINDOWS
multi(0)disk(0)rdisk(0)partition(3)\WINDOWS="Windows Server 2003, Enterprise RU" /noexecute=optout /fastdetect
multi(0)disk(0)rdisk(0)partition(2)\WINDOWS="Microsoft Windows XP Professional RU" /noexecute=optin /fastdetect
C:\="Microsoft Windows"
Where is the section:
- timeout= — Waiting time for the user to select an OS. Set in seconds
- default= — Standard OS. Will be selected if the time specified in the timeout parameter expires and the user still does not select an OS
- redirect= — Port name
- redirectbaudrate= — Port speed
Section - information about installed operating systems.
Also, there are two more sections:
- And
They are stated in C:\NTLDR, but little is known.
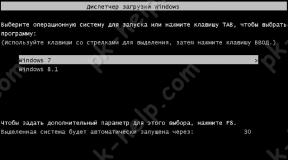
It happens that more than one operating system is installed on the hard drive. When you turn on the computer, the screen appears list of operating systems, in which you can select one or another OS to boot within 30 seconds. But what if you want to choose within 10 rather than 30 seconds? Or let’s say what to do if something went wrong during the installation of the second system, Windows was not installed properly, but managed to register itself in the bootloader and is now hanging on the list as a dead weight? By selecting this item from the list, the screen will only display a message stating that the bootloader cannot load the OS. In this note we will look at how the list is edited in Windows XP; changes to the list of Win7 systems are made differently. We will also consider how to solve problems that arise with it (the list).
List of operating systems in the boot.ini file
The list that we see during system boot is written in the boot.ini file. In Win 7 this file is not there, everything is different, so for now we are considering editing the list in XP.
First, let's determine in what cases editing the list may be necessary.
- Not happy with the time ( default 30 sec.) during which you can select the system to boot.
- During the installation of the second OS there was a failure and now something is needed remove selection this system at boot computer.
- There is a need to change system boot order. Let's say you have Win XP Pro first in the list, and you want Win XP Home to be first.
- I really want the non-standard system name to be displayed in the list. For example: My Windows.
Editing the list
To open the boot.ini file for editing, do the following:
Move the mouse cursor over My Computer, right-click to bring up a menu in which we select Properties.

In the window that opens Properties of the system, select a tab Additionally, then Boot and recovery - Options.

- The default bootable system. She will be first on the list.
- The time during which you can select a system.
- If you uncheck the item - Display OS list, then it will not appear at all.
- Edit the download list manually by clicking the button Edit. This is our boot.ini

Before editing boot.ini, copy its contents and save it somewhere safe. Because in case of problems, it will be possible to restore the original version.
So, if one OS is installed on the PC, then after clicking on the Edit button the following window will appear:
timeout=30
default
multi(0)disk(0) rdisk(0)
partition
As you can see boot.ini is nothing more than normal text file, which can be safely edited. And what do all these kryakozyabra mean?
- timeout– time during which the OS list is displayed
- default– operating system loaded by default
- rdisk(0)– physical disk number. (0) is the first hard drive, (1) is the second
- partition(1)– this is already the partition number on the physical disk where the system is located. For example (1) – drive C, (2) – drive D
- Microsoft Windows XP Professional RU– name of the system. This is where you can write My Windows.
To be honest, when I first became acquainted with the syntax ( with these very quackers) of the boot.ini file, I didn’t understand what was what the first time. And he even made a couple of mistakes after which the system did not boot. So I’ll try to show what’s what with an example.
Let's say in my building system unit installed two hard drives rdisk(0) and rdisk(1). The first one has Win XP Pro installed in drive C: partition(1). On the second hard drive in the first partition partition(1) Win XP Home. By default, Win XP Pro is loaded.
The file syntax will be like this:
timeout=30
default=multi(0)disk(0)rdisk(0)partition(1)WINDOWS
multi(0)disk(0) rdisk(0)partition(1)WINDOWS=”Microsoft Windows XP Professional RU” /noexecute=optin /fastdetect
multi(0)disk(0) rdisk(1)partition(1)WINDOWS=”Microsoft Windows XP Home” /noexecute=optin /fastdetect
If we have one hard, physical disk and systems are installed on it in different logical partitions, then the syntax is already like this:
timeout=30
default=multi(0)disk(0)rdisk(0)partition(2)WINDOWS
multi(0)disk(0) rdisk(0)partition(1)WINDOWS=”Microsoft Windows XP Professional RU” /noexecute=optin /fastdetect
multi(0)disk(0) rdisk(0)partition(2)WINDOWS=”Microsoft Windows XP Home” /noexecute=optin /fastdetect
Here we see that by default the system will boot from drive D:
At first glance, all this seems like a dark forest. I understand you. Read the syntax description several times, think about it and everything will fall into place.
And finally, I want to clarify one point. If, while editing a file with one system, you suddenly accidentally register the wrong disk or partition, and then save and restart the PC, then your system will no longer boot. Why? Let me give you an example again.
On your drive C: system. The file looks like this:
timeout=30
default=multi(0)disk(0)rdisk(0)partition(1)WINDOWS
multi(0)disk(0) rdisk(0)
partition(1)WINDOWS=”Microsoft Windows XP Professional RU” /noexecute=optin /fastdetect
For example, you did it by mistake partition(2). During boot, the boot loader accesses the Boot.ini file and reads in it that the boot Win files are located on drive D: Here's your problem. If this happens, the error can be resolved as follows:
- Boot from Alkid live CD. This is special boot disk with which you can recover errors in the system. Having booted in this way, you need to get to the boot.ini file and fix it there incorrect settings. Where is the boot.ini file located?? It is located in the root of drive C:
- And the second way is to connect HDD with a damaged system to another PC. Find our file on it and correct everything we screwed up there.
In general, something like this. Try it, but be careful.
Editing BOOT.INI It is not difficult to perform on a running operating system; you can find it in the root directory of the system drive C:\; you will not see it right away, because the BOOT.INI file is assigned the hidden attribute. You can read how to find the BOOT.INI file in our article. But I suggest something else, let's make it more difficult for ourselves. Let's say you were unable to load Windows XP as a result of an error you made when editing the BOOT.INI file or it was corrupted by some program. How can we now get to our BOOT.INI file and edit it?
Editing BOOT.INI
We will need either a boot floppy disk, how to create and boot Windows XP from it, read Or you can use the Windows XP distribution kit to change the BOOT.INI file directly in, or a simpler option: Live CD - an operating system that boots from removable media ( CD, DVD, USB drive, etc.), which does not require installation on a hard drive to function; if you still don’t have one, you definitely need to get one; such Live CDs are very easy to find on the Internet. We exhibit in BIOS loading from the disk, if you don’t know, read and boot from the Live CD, go to the root directory of drive “C” and find our file there. We open it using any text editor, for example Notepad, it is located in the root directory of the system drive C:\. Here I have provided the transcript and contents of a typical BOOT.INI file and, for clarity, attached a photo of the computer controls.
timeout=20
default=multi(0)disk(0)rdisk(0)partition(1)\WINDOWS
multi(0)disk(0)rdisk(0)partition(1)\WINDOWS="Microsoft Windows XP Professional RU" /fastdetect
Explanation:
Controls the download process.
timeout=20 time given to the user to choose a system, in this case 20 seconds
multi(0) disk controller, must be set to 0
disk(0) this parameter must also be set to 0
rdisk(0) determines the serial number of the disk that contains the boot partition, note that the numbers start from zero, that is, if you have two hard drives and the operating system is on the first hard drive, then it should be indicated like this rdisk(0), look at photo Disk Management, I have three hard drives

The countdown does not start from one, but from zero, the operating system is located on the disk designated as zero, that is, on the first one. In the photo it is 232.88GB in size.
partition(1) number boot partition hard drive, the numbers start with one, in the photo you can see that the operating system is located on partition(1) or, in other words, on system partition"C" with a capacity of 92.29 GB.
And lastly \WINDOWS="Microsoft Windows XP Professional RU" /fastdetect.
WINDOWS = path to the directory or, more simply, to the folder where the operating system is installed.
" Microsoft Windows XP Professional RU"the name of the operating system, by the way, here you can write any name.
/fastdetect is a special key that disables recognition of devices connected to serial and parallel ports.
At the beginning of the article, we wanted to also edit the BOOT.INI file on a working Windows XP, but it seems to me that after reading everything described above, editing the BOOT.INI file on a working Windows XP will not be difficult for you.
Here I have provided similar parameters key/fastdetect : If you have little experience, be very careful with these parameters.
- /basevideo the system will use the standard VGA driver, used if you have problems with your video card
- /fastdetect The system does not detect Plug and Play devices during the boot process.
- /maxmem apply if RAM works unstable.
- /bootlog is used to find the reason why the system can only boot in safe mode.
- /safeboot When installed, the system will boot into safe mode.
- /sos includes a list of loaded drivers on the screen, which will help you find out what the system is struggling with when loading.
- /crashdebug loads the debugger and remains inactive until a kernel error occurs.
- /nodebug does not display debugging information on the screen.
- /hal specifies the file that is used as hal.dll after loading.
- /kernel specifies the file that is used as ntoskrnl.dll after loading.
Look carefully at where you made a mistake and what you entered incorrectly, make the correct changes and try to reboot and log into your operating system.
File boot.ini is located in the root directory of the hard drive, or rather, in its
system partition. There are also other files necessary for correct
operating system loading: ntdetect.com, ntldr, ntbootdd.sys,
bootsect.dos. File boot.ini is responsible for choosing the operating system, sets
parameters of its functioning, while the PC boots, it also controls
the download process itself.
The boot.ini file is edited in a regular text editor. Actually,
the need for editing may arise if this file is damaged,
to restore in case of accidental deletion, to add disks or their
partitions into the system, as well as deleted.
Before editing boot.ini turn on viewing hidden files, otherwise you will
If you don’t find it, then be sure to make a backup copy of it in its properties
uncheck "read only" otherwise you won't be able to save
result of editing, be sure to make a backup copy of the file.
Partially editable via: System properties Loading
operating system Boot and recovery, or through the utility Windows
msconfig.exe.,and also through third party programs, but full editing
only possible manually.
1
.Create a backup copy: My computer, right click, Properties
- Additionally
-
- press
operating system
click Edit
. It will open for you text editor
Notebook, your saved file has opened for editing. Here
click on File
-save as in the empty space of the dialog box
right click and select Create
- Folder
enter the folder name,
for example, file and press enter. On the created folder, double-click and
press Save
, backup copy created.
2
.Editing
: we do everything as in the previous paragraph. The file will open in Notepad.
Here's an example of what you'll see (sample boot.ini file for Windows XP
Professional):
timeout=30
default=multi(0)disk(0)rdisk(0)partition(1) \WINDOWS
multi(0)disk(0)rdisk(0)partition(1)\WIND OWS="Microsoft Windows XP
Professional" /fastdetect
You can use the window for editing, Where are you
you can select the default operating system, set the timeout
choosing an operating system. Edit manually, possible with command
lines, via command Bootcfg.exe.("this utility program available
only in Windows XP Professional, not available in the home version):
Start
- Execute -
enter cmd, a command line will open, enter
bootcfg/?.Editor options and help open here.
To select the default operating system, command line enter
bootcfg/default/ID#
, # - serial number of the operating system in the list
operating systems.
To remove an operating system, from the operating systems section of the file
Boot.ini:
enter bootcfg/delete/ID#
, where # is the operating system serial number
on the list.
To add OS: enter bootcfg/copy/d @@@@/ID#
, Where @@@@
- text
operating system name, e.g. Windows Vista, # - OS number in the list.
Set the OS selection wait time: enter into the command line:
bootcfg/timeout#
, where # is the time in seconds after which it will be
the default operating system will load.
Next, save the editing results: do everything as in point 1, only
don't create a folder, just save the file, this way you save
changes to the file.
There are other possibilities for editing this file, but for an inexperienced user it is better to stop here so as not to cause harm due to inexperience.
Note: To open My Computer properties, do not click on the shortcut, here
the properties of the shortcut and not the computer will open, go to the Start menu and select there