Creating an efi partition. What is an EFI system or UEFI partition? Computer help from Serty. I have an MSR partition
When installing/reinstalling an operating system Windows systems Many may have noticed one or several small partitions (from 100 to 500 MB) located among the familiar and familiar local drives C, D, etc. Typically this is the “System Reserved”, “Recovery” and “MSR Reserved” sections. When breaking down hard drive When installing the OS, you can note that local partitions are created automatically.
In this article we will take a closer look at the MSR (reserved) section. You will find out what it is, what it is for, when it is created and whether it can be removed.
Purpose of the sectionToday, there are two main file markup standards under Windows OS: hard drives. These are MBR and GPT. We talked about them in previous articles. So the MSR (reserved) section is found only on GPT.
This is a hidden system reserved area of the hard drive that can be used for various needs of the operating system and its file storage. For example, to convert a simple volume to a dynamic one.
Many people mistakenly believe that the MSR partition contains the bootloader/bootloader. Windows entry(similar to the hidden “ ” section on the MBR markup). But that's not true.
How did he appear?MSR (reserved) is created automatically when you partition your hard drive into local partitions in the standard Windows installer. But only if you booted in EFI/UEFI mode from the media, .
Automatic creation hidden partitions when partitioning a hard drive standard means Windows installer
Is it possible to delete?Despite the fact that this hidden system partition does not contain the operating system loader, and if you remove it, Windows will still start normally, we strongly do not recommend doing this. This is due to the fact that it is possible in the future, when you need to do something with your local disks, for example, or vice versa, it may not be possible to compress any of them due to the missing MSR (reserved).
And what’s the point of deleting it if in the “Computer” window it is not displayed among the local drives (that is, it does not interfere in any way), and its size is no more than 500 megabytes, by freeing which you will gain practically nothing.
The best way thank the author of the article - repost it on your page
On hard drives most computers running Windows control traditionally there are two sections - system and user, at least that's what Explorer shows. In fact, there are more partitions, just some of them are hidden and do not have a letter, which is easy to verify by opening the standard disk management snap-in. The meaning of hiding them, we hope, is clear to everyone. They contain important data.
Deliberate or accidental deletion of which can lead to Windows not working correctly or even being unable to boot.

Another thing is a healthy interest in them, many people would probably like to know what the service partitions of the system are hiding and what the risk is for a user who wants to delete them, say, for the sake of increasing free disk space. By the way, you can still delete service partitions, but you need to do it correctly and only when it is really necessary. It should also be remembered that in any case this will lead to a decrease in the overall fault tolerance of the system, which is ensured by separate storage of important system and boot files. However, offline storage of the bootloader is far from the only purpose of hidden partitions; they may contain BitLocker encryption data, image "factory" system, recovery environment, and so on.

Hidden sections first appeared in Windows 7, V XP there was nothing like that; if the system stopped booting, it was simply reinstalled. On Windows Vista a more advanced mechanism was used, in this OS the user could create on DVD-disk recovery environment and use it to bring the system back to life if it could not boot. But in Windows 7 could already be seen on the disk alone, and in OEM-systems have two service partitions - “Reserved by the system” size 100 MB and an untitled volume ranging in size from 6 before 15 GB, containing an image of the original operating system divided into several parts with "factory" settings - analogous to a full backup, created by programs like Acronis True Image.
If you mounted the first one, you would see the Boot folder storing boot configuration files and the boot manager file bootmgr , on the second volume you would find the standard Recovery program and several files of the original system image. With the exit Windows 8.1, and then Windows 10 everything has changed a little. The “System Reserved” section has become larger, UEFI support has appeared, and with it several more service volumes have been added to the disk, including the one required for GPT-Disk MSR partition not visible in Disk Management. You can view all hidden partitions on your computer using third-party disk managers or the most common command line. Run it as administrator and run the following commands:
list disk
select disk 0
list partition


On our PC There are two hidden service sections, you may have more. Let's try to enter them, for which we will mount the volumes that interest us using the command. Without leaving the utility, run the following commands:
list volume
select volume 2
assign or assign letter=x

2 in in this example this is the number of the volume being mounted, and X is the letter assigned to it (if you do not specify a letter, it will be selected and assigned automatically). After that, go to the section through Explorer and look at the contents, having previously turned on the display of hidden objects.

However, this method has a drawback - folders may not be viewable due to your lack of necessary rights, so we still recommend using third-party file managers, best included in "alive" disks.
So, what do our hidden sections actually contain?
On the "Recover" disk size 498 MB there is a Recovery folder.

Which in turn contains the WindowsRE folder.

With Wednesday Windows recovery.

If you remove it, Windows will still be able to boot, however, all disaster recovery tools will become unavailable.


Second service partition (EFI encrypted) size 99 MB contains the EFI folder.

In which the Boot and Microsoft directories with download files are stored.

In addition to these two volumes, you may have one or two more service partitions. MSR partition size 128 MB marked "Reserved" is not as important as the EFI partition, but deleting it can also lead to disastrous consequences. It usually stores data responsible for GPT markup, but it can also contain boot files. Biggest hidden section (more than 5 GB) marked "Recovery" contains an image "clean" Windows with original settings. This section appears on OEM-devices with pre-installed OS.
If there is little space left on the disk, you can delete it, but at the same time you will lose the ability to restore the system to "factory" settings. Finally, the fifth hidden section labeled "Recovery" is sized 400-600 or a little more than a megabyte can be found on computers updated with Windows 8.1 before Windows 10. It stores the recovery environment previous version systems, that is Windows 8.1. You can format it without any negative consequences.
And that's all for now.
If you suddenly want to delete "extra" service section, first think carefully about whether this is really necessary and only then proceed with what you have planned.
So you pointed in BIOS settings booting from a CD/DVD or from USB, and when booting from Ubuntu LiveCD, instead of a purple screen with icons of a keyboard and a man, we got this screen:
It's okay, it happens. In this case, you need to take into account a number of points, which will be discussed in this section. By the way, the presence of a purple screen during boot does not mean that you do not have UEFI; it’s just that with a black screen all the features of UEFI are most clearly visible. So, in any case, reading this section will be very useful. In the meantime, feel free to select the top line “Try Ubuntu without installing” and press Enter. After a short wait, you'll be taken to the Ubuntu desktop, and while you wait for Ubuntu to load, let's talk about UEFI.
Introduction to UEFI and GPTYou probably remember that one of the objectives of this manual is to teach the reader to use all the main tools of the system effectively and easily. But to do this, you need to dig deeper and talk about the hardware of your computer, and how this hardware works with the system. Therefore, again there is a theory, you cannot do without it.
What happens when you turn on your computer? First of all, the computer must correctly initialize itself, that is, its own hardware, and transfer control to the operating system loader. This process is handled by the Extensible Firmware Interface (EFI) - an interface between the operating system and the firmware that controls low-level hardware functions. Previously, BIOS was responsible for this, and now EFI, which, after another change in the standard, became known as “Unified Extensible Firmware Interface” (UEFI) - this name will be used in the future. It should be noted that UEFI, as a more modern interface, fully supports all BIOS functions; the opposite, unfortunately, is not true. In the settings, the BIOS support mode is most often called “Legacy” (“legacy” or “traditional” in English) or simply “UEFI Disabled” (“UEFI disabled”, as you might guess). For now, however, we are interested in the enabled UEFI mode.
So, when you turn on the computer, UEFI begins to initialize the hardware and finds some kind of block device, say HDD. You probably know that the entire hard drive is almost never used - the disk is necessarily divided into sections, including for ease of use. But today you can break it into sections in two ways: using standard methods: using MBR or GPT. What is their difference?
MBR (Master Boot Record) uses 32-bit identifiers for partitions, which are located in a very small piece of space (64 bytes) at the very beginning of the disk (at the end of the first sector of the disk). Due to such a small volume, only four primary partitions are supported (you can learn more about this in this article). Since 32-bit addressing is used, each partition can be no more than 2.2 TB. Additionally, the boot record does not have any spare MBR, so if an application overwrites the primary boot entry, then all information about the partitions will be lost.
GPT (“GUID Partition table”) already uses 64-bit identifiers for partitions, so the piece of space in which information about partitions is stored is already more than 512 bytes, in addition, there is no limit on the number of partitions. Note that the limit on the partition size in this case is almost 9.4 ZB (yes, you read everything correctly - a zettabyte, one followed by twenty-one zeros!). And at the end of the disk there is a copy of GPT, which can be used to restore a damaged master partition table at the beginning of the disk.
So, when communication between the hardware and the operating system is carried out through the enabled UEFI mode (and not Legacy BIOS), using GPT for partitioning is almost mandatory, otherwise compatibility problems with MBR will likely arise.
Well, it seems that the block devices have been sorted out, UEFI has initialized everything correctly, and now it should find the operating system bootloader and transfer control to it. To a first approximation, it looks like this: since UEFI is the successor to the BIOS, it searches for the bootloader in strict accordance with the established rules. If it finds an operating system bootloader that does not support UEFI, then BIOS emulation mode is activated (this is true, even if Legacy BIOS is not explicitly specified). And it all starts all over again, with the only difference that now emulated The BIOS checks the hardware status and loads firmware - simple drivers for individual hardware components. After that emulated The BIOS again searches for the OS boot loader and activates it. That, in turn, loads the operating system or displays a list of available operating systems.
But in the case of UEFI, everything happens a little differently. The fact is that UEFI has its own bootloader operating systems with integrated launch managers for installed operating systems. For this purpose, for it - for the UEFI bootloader - a small partition (100–250 MB) must be created on the disk, which is called “Extensible Firmware Interface System Partition” (extensible firmware interface system partition, ESP). In addition to the specified size, the partition must be formatted in the FAT32 file system and be bootable. It contains drivers for hardware components that can be accessed by the running operating system. And in this case, the download occurs directly from this section, which is much faster.
So, let's summarize: in order to fully use the UEFI functionality, the disk must be GPT, and it must have a special ESP partition. Pay attention to the phrase “in order to fully utilize the functionality” - there are many ways to install Ubuntu on a system with “stripped-down” UEFI to one degree or another, and they all depend on the presence or absence of pre-installed operating systems on your computer. For example, you want to leave Windows pre-installed. Which Windows - “Seven” or the newfangled 8.1? Or maybe, God forbid, you have “Peratian Windows” installed, activated with MBR, and does not want to run with GPT, and you, nevertheless, want to study it further? In addition, a lot depends on the bit depth of the operating systems - without dancing with a tambourine, it is impossible to make a 32-bit system work with UEFI. And there are quite a lot of such examples. Therefore, in this section we will only talk about installing Ubuntu in the “maximum full” mode of using UEFI capabilities, although even after reading this introduction, you will already be able to imagine the device of your computer and, if desired, implement your own installation script.
Well, shall we get started?
Disk partitioningSo, you booted into Ubuntu from a LiveCD in UEFI mode. Open the “GParted Partition Editor”, but for now let’s talk about very important features that you need to pay attention to.
The most important thing is that you must have a plan for your actions, believe me - the list of steps and the order of their implementation is quite extensive, so it is advisable to write down the main points of the plan somewhere on a piece of paper and periodically check them. So what do you know? For a normal installation of Ubuntu in UEFI mode, your computer's hard drive must be properly prepared, namely:
The disk must be GPT;
The disk must have a special ESP partition;
The disk must have standard partitions: system, swap, and a partition for the home directory.
In addition, you need to decide on the operating systems on your computer - whether Ubuntu will be the only system, or whether there will be other systems supporting UEFI mode nearby, will determine the layout and installation plan.
Let's start by answering the second question: about the availability of other operating systems. If your computer already has operating systems that support booting in UEFI mode (for example, Windows 8), and you do not intend to give them up just yet, then the first two points of the plan have already been completed: the ESP partition probably already exists, and the disk, of course, with GPT. Let's check that this is indeed the case.
Let's assume that after launching the GParted partition editor, the following window opens:

What information can be obtained by carefully studying this window? First, look at the "File System" column: all partitions are formatted in ntfs, except for one partition with a fat32 file system - this appears to be the ESP partition. Windows 8 is already installed on the disk (partition /dev/sda4 - in Windows this is drive C:) - this indicates label disk (column “Label”). Secondly, there are a number of Windows service partitions on the hard drive - you can find out about this not only by the labels (WINRE_DRV and LRS_ESP), but also by flags(Column "Flags") - all of these sections are hidden because they have the hidden flag set, which hints at the special nature of the information on them. And finally, take a closer look at the /dev/sda5 partition - have you accidentally lost the D: drive in Windows? Here he is, safe and sound.
So, the first two points of the plan have already been completed, and the implementation of the third point: creating partitions for Ubuntu is described in sufficient detail in the example of using GParted to repartition a hard drive. Let us briefly remind you that you need to “cut off” sufficient space from the data disk (in the example this is /dev/sda5, or drive D: in Windows) and in its place create three partitions: swap, system and a partition for the home directory. Please also note that your disk is GPT, so the extended partition containing logical drives, it does not, therefore, when creating partitions, select Primary partition.
Do not perform any operations with Windows service partitions - they are intended for the normal functioning of this OS. Accidental or deliberate modification of these partitions is guaranteed to lead to problems in Windows, including its complete inoperability.
The end result should be something similar to this picture:

The additional sections created are shown here:
Please write down the purpose of the sections. In the example shown:
/dev/sda2 - EFI partition (ESP)
/dev/sda6 - system partition (partition for the “root” of the system)
/dev/sda7 - swap partition
/dev/sda8 - section for user data.
This information will be very useful in the future when installing Ubuntu, because due to the large number of partitions, you can very easily get confused and assign the required mount point to the wrong “number”.
Nevertheless, we continue to work with the GParted editor. Your task is to delete all partitions and use the free space to create the disk configuration necessary for Ubuntu. To do this, you can right-click on each section and select “Delete” from the drop-down menu. But it’s better to do it differently: find the “Device” item in the menu bar of the GParted editor and select “Create Partition Table...” from the menu. A warning will appear:
WARNING: This will ERASE ALL DATA on the ENTIRE DISK /dev/sda
(WARNING: this will DELETE ALL DATA on THE ENTIRE /dev/sda DISK)
Don't worry, you took care of backups, right? Look just below - at the inscription “Advanced” (Details). Click on the triangle on the left and select gpt from the menu:

The entire disk space will turn gray. Right-click on it and start creating the necessary partitions by selecting “New” from the drop-down menu. The first of the new partitions is a special ESP partition, required, as you remember, for UEFI to work. Since it is formatted in a non-native Linux file system, and in addition, it must be bootable, then it must be located at the beginning of the disk space. Define its size in the field “New size (MiB)” (New size in MiB) 100 MB, and the file system - fat32:

In the same way, create partitions for the future: system (15 GB with the ext4 file system), swap partition (4 GB with linux-swap) and for the home directory (all remaining space in ext4). As you remember, GParted does not apply changes immediately, but simply queues them for execution. So click on the green checkmark “Apply All Operations”:

Yes, it is not at all necessary to manage the boot flags at this stage - the Ubuntu installer will do everything as it should. Now read carefully about how to install Ubuntu, and when you are ready, we will continue.
Installing UbuntuAfter this preparatory work installing Ubuntu will not be difficult, especially if you have carefully read the installation rules. Just take out a piece of paper with a list of partitions and note that for the special EFI partition (/dev/sda2 from the example about installing Ubuntu and Windows together) you need to accurately assign the property to the EFI boot partition, and not the BIOS backup boot area:

If you do not do this, the installer will show you this notification:

Correct the error, and if it doesn’t work, exit the installer, launch the GParted editor and check that everything described above has been completed.
The assignments for all other partitions required when installing Ubuntu are described in great detail in this section, so there is little point in going into more detail here.
Possible problemsSometimes it happens that after installation one of the operating systems preinstalled on the computer does not start. Well, without going into rather complicated ways of bringing everything back to normal, we note that there is comprehensive solution possible problems with loading. The name of this solution is Boot-repair.
This small program is a very powerful tool that allows you to fix almost all errors that may occur when loading Ubuntu and other operating systems after installation.
Follow the golden rule: “Never fix something that isn’t broken”!
Boot into Ubuntu. It doesn't matter how you do it - Boot-Repair works on both LiveCD and installed system. Of course, if you are having difficulty booting your newly installed Ubuntu, then the first method becomes the only one. First, Boot-Repair needs to be installed on your computer; this is done using the terminal. Press Ctrl + Alt + T and in the window that appears, type:
: Change the command closer to the release.
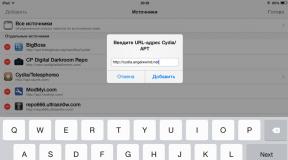
Sudo add-apt-repository "deb http://ppa.launchpad.net/yannubuntu/boot-repair/ubuntu saucy main"
Now, of course, you will say: “What are you doing there, at all? There are so many letters - I don’t understand anything and I’ll definitely make a mistake!” Of course, no one enters the presented command letter by letter into the terminal - just select it completely and click the middle mouse button in the terminal window, or drag the selected text there. Press Enter. If you are already in installed Ubuntu, you will be prompted to enter your password. Please note that when entering a password, no symbols are displayed: no dots, no asterisks - nothing at all - there is probably no need to explain why this is done. After entering the password, press Enter again.
Download the public key of the repository with the program from the trusted key store:
Sudo apt-key adv --keyserver keyserver.ubuntu.com --recv-keys 60D8DA0B
Update the application list with the command:
Sudo apt-get update
Install and run Boot-Repair:
Sudo apt-get install -y boot-repair && (boot-repair &)
After a short scan, the main Boot-Repair window will appear:

: In the process of writing.
Updated: October 2013
Purpose: Windows 8, Windows 8.1, Windows Server 2008 R2, Windows Server 2012, Windows Server 2012 R2
This section describes how to configure disk partitions, including hard disks(HDD), solid-state drives (SSD), and other drives for BIOS-based Unified EFI Interface (UEFI) computers.
In this section
Partition configurations
This section describes the default partition configuration and the recommended partition configuration.
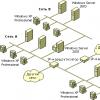
Default configuration: Windows Recovery Environment partition, System partition, MSR partition, and Windows partition
The default Windows installation configuration includes the Windows Recovery Environment Tools partition, the System partition, the MSR partition, and the Windows partition. This configuration is shown in the following diagram. This configuration allows you to enable BitLocker drive encryption and store the Windows Recovery Environment on a hidden system partition.
Using this configuration in a custom Windows installation you can add utilities such as Encryption Windows disk BitLocker and Windows Recovery Environment.
Recommended configuration: Windows Recovery Environment partition, system partition, MSR partition, Windows partition, and recovery image partition
The recommended configuration includes: Windows Recovery Environment partition, system partition, MSR partition, Windows partition, and recovery image partition. This configuration is shown in the following figure.
The Windows Recovery Environment Tools partition and the System partition are added before the Windows partition is added. The last partition to be added is the recovery image. This order of sections will ensure security system partition and the Windows Recovery Environment partition during actions such as deleting the recovery image partition or resizing the Windows partition.
In this article, we will show you how to manually recover accidentally deleted boot partition Windows on UEFI system. Initially, the article described my experience in restoring a bootable EFI partition on Windows 7, but the article is also relevant for modern operating systems Microsoft systems(from Windows 7 to Windows 10). It has helped me out more than once after accidentally formatting or deleting an EFI partition in Windows 10. In this article, we will show you a simple way to manually recreate bootable EFI and MSR partitions in Windows.
So, let's assume that somehow accidentally (or not so accidentally, for example, when trying) the EFI boot partition on a UEFI system (not BIOS) was deleted or formatted, as a result of which Windows 10 / 8.1 / 7 stopped booting, cyclically asking to select boot device(Reboot and select proper boot device or insert boot media in selected). Let's figure out whether it is possible to restore Windows functionality when deleting the partition with Boot Manager without reinstalling the system.
Warning . The instructions assume working with disk partitions and are not intended for beginners. If you misinterpret commands, you may accidentally delete all data on your hard drive. It is also highly recommended to create backup copy important data on a separate medium.
Partition structure on a GPT diskLet's look at what the partition table of a bootable hard drive with GPT markup should look like. At a minimum, the following sections should be present:
- EFI system partition (EFI System Partition or ESP - Extensible Firmware Interface) - 100 MB (partition type - EFI).
- Microsoft backup partition – 128 MB (partition type - MSR).
- The main Windows partition is the Windows partition.
This is exactly the minimum configuration. These partitions are created by Windows Installer when installing the system on an unpartitioned disk. PC manufacturers or users themselves can additionally create their own partitions containing, for example, the Windows recovery environment in the winre .wim () file, a partition with a backup system image from the manufacturer (allows you to roll back to original state computer), user partitions, etc.
An EFI partition with the Fat32 file system is required on GPT disks on UEFI systems. This partition, similar to the System Reserved partition on disks with MSR partitioning, stores the boot configuration storage (BCD) and a number of files necessary for Windows boot. When the computer boots, the UEFI environment loads the boot loader (EFI\Microsoft\Boot\bootmgfw .efi) from the EFI partition (ESP) and transfers control to it. If this partition is deleted, the OS cannot be booted.
An MSR partition on a GPT disk is used to simplify partition management and is used for utility operations (for example, when converting a disk from a simple to a dynamic one). This is a backup partition and does not have a partition code assigned to it. User data cannot be stored on this partition. In Windows 10, the MSR partition size is only 16 MB (in Windows 8.1, the MSR partition size is 128 MB), file system– NTFS.
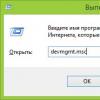
Manually creating EFI and MSR partitions on a GPT diskBecause the system does not boot correctly, we will need an installation disk with Windows 10 (Win 8 or 7) or any other boot disk. So, let's boot from installation disk and on the installation start screen, press the key combination Shift + F 10. A command prompt window should open:
 Let's launch the disk and partition management utility:
Let's display a list of hard drives in the system (in this example there is only one, disk 0. An asterisk (*) in the Gpt column means that the disk uses a GPT partition table).
Let's select this disk:
Let's display a list of partitions on the disk:
In our example, there are only 2 partitions left in the system:
- MSR partition - 128 MB
- Windows system partition – 9 GB
As we can see, the EFI partition is missing (deleted).

Our task is to delete the remaining MSR partition so that at least 228 MB remain unallocated on the disk free space(for MSR and EFI partitions). You can delete the remaining partition using graphical GParted or directly from the command line (that’s exactly what we’ll do).
Select the partition to delete:
Select partition 1
And delete it:
Delete partition override
Let's make sure that only the Windows partition remains:
 Now we can manually recreate the EFI and MSR partitions. To do this, in the context of the diskpart utility, run the following commands:
Select a disk:
create partition efi size=100
Make sure that the 100 MB partition is selected (the asterisk opposite the Partition 1 line):
list partition
select partition 1
format quick fs=fat32 label="System"
assign letter=G
create partition msr size=128
list partition
list vol
In our case, the section with Windows already drive letter C: is assigned, if it is not, assign it a letter as follows:
select volume 1
assign letter=C
exit

Once you have created the minimum disk partition structure for the UEFI system, you can proceed to copying the EFI boot files to disk and creating a bootloader configuration file (BCD).
Let's copy the EFI environment files from the directory of your disk where your Windows is installed:
mkdir G:\EFI\Microsoft\Boot
xcopy /s C:\Windows\Boot\EFI\*.* G:\EFI\Microsoft\Boot
 Let's recreate the configuration Windows boot loader 10 / 7:
g:
cd EFI\Microsoft\Boot
bcdedit /createstore BCD
bcdedit /store BCD /create (bootmgr) /d “ Windows Boot Manager"
bcdedit /store BCD /create /d “Windows 7” /application osloader
You can replace the inscription “My Windows 10” with any other one.
Advice . If only the EFI environment files were damaged on the EFI partition, but the partition itself remained in place, you can skip the process of rebuilding partitions using diskpart. Although in most cases it is enough to restore the bootloader according to the article. You can manually recreate the BCD on regular MBR+BIOS systems.
The command returns the GUID of the created entry; in the next command, this GUID must be substituted instead of (your_guid).

bcdedit /store BCD /set (bootmgr) default (your_guid)
bcdedit /store BCD /set (bootmgr) path \EFI\Microsoft\Boot\bootmgfw.efi
bcdedit /store BCD /set (bootmgr) displayorder (default)
 Further commands are executed in the context (default):
bcdedit /store BCD /set (default) device partition=c:
bcdedit /store BCD /set (default) osdevice partition=c:
bcdedit /store BCD /set (default) path \Windows\System32\winload.efi
bcdedit /store BCD /set (default) systemroot \Windows
exit

We reboot the computer... In our case, it did not boot the first time, we had to additionally dance with a tambourine:
Then in our case (testing was carried out on) we had to add a new boot menu item by selecting the file EFI\Microsoft\Boot\bootmgrfw.efi on the EFI partition.

In some UEFI menus, by analogy, you need to change the priority of boot partitions.
After all the above manipulations, Windows should boot correctly.