How to defragment the game folder. Disk defragmentation: all typical questions from A to Z. Cleaning the disk from debris
Devices for recording information need so-called optimization. First of all, this concerns hard drive computer, which can contain a huge amount of content. In Windows xp, the hard drive optimization procedure is based on 3 pillars: enabling dma mode, disk write caching and defragmentation.
If the first two parameters are already configured in the system by default, then the last of them always raises the question of how to defragment. Since it is this that requires periodic intervention from the user.
Process description
Before considering how to do defragmentation, we will describe the process of this procedure itself. Then let's look at the utilities built into xp and software package auslogics, which also has a separate defragmenter application.
So, the above procedure has the following features. When the user launches it, it expects the result - speeding up the work with the computer and running everyday tasks.
On a hard drive, data is stored in small portions in sectors. A file or folder with files fits entirely within one sector. But over time, with the constant addition of new content to the HDD, these same objects shift relative to their original position in such a way that one part of a file or folder may be in the initial sector, and the remaining parts in other non-adjacent sectors. You end up with scattered pieces of content that take longer to access than usual.
Thus, in order to speed up reading data from disk and, therefore, reduce the time it takes to open an application or document, you need to combine these fragments. We will now look at how to do this using the example of a standard windows utilities xp - defrag.exe programs
This utility has and can be called through the working system management console - MMC. There are two ways to launch this console.
- In the "start" menu, open the "Run" item, then in working window commands to enter mmc, but I recommend doing it more wisely.
- Namely: right-click (touchpad) on the “computer” icon and select the “computer management” option.
- The control panel will open windows console, divided into two parts. In the one that is smaller and located to the left, we will finally see how to defragment.
- Select the item “disk defragmentation” and click on it. A window will open in which you can perform this procedure on specific sections of hard disk.
- Let's say we need to find out if there are additional fragments on the system partition WITH. Select the icon of this section by clicking the mouse and clicking “disk analysis”. The program will analyze Current state partition and will display a detailed summary of whether defragmentation is needed for the selected volume.
- If the disk needs processing, click the “defragmentation” button and wait for the result. After completing the procedure, the application will display a report on the work performed. If some files could not be optimized, it may be missing free space on the section. Then, before defragmenting, free up additional space and then try again.
We use it for optimizationauslogics 5
The above set of programs was created to optimize Windows. The auslogics series 5 also includes a defragmenter. Here's how to defragment with it (assuming that this complex is already installed):
- Launch the application using a shortcut on the Windows desktop.
- Click on the blue ball icon in the tray (near the clock).
- Right-click to sequentially use the submenu list “Tools” - “disk maintenance/defragmentation”.
- In the program window that opens, analyze or defragment partitions. The utility from auslogics has advanced capabilities when compared with the optimizer built into the system. Otherwise, its functionality is similar to the defrag.exe interface
Disk defragmentation optimizes performance file system, which has a positive effect on computer performance. Most Windows OS users prefer to defragment using a standard utility built into the operating system. However, the standard Windows defragmenter does not always cope with its task 100%, and then third-party programs, such as Auslogics Disk Defrag, come to the rescue.
Benefits of Auslogics Disk Defrag
Auslogics Disk Defrag utility is an excellent defragmentation tool and has several significant advantages.
- The program carries out a deep and thorough defragmentation of the logical structure of the file system and optimizes the operation of the hard drive.
- Auslogics Disk Defrag has a built-in scheduler, which allows the program to start and work automatically.
- The program can work with disks of any size without any restrictions.
- Auslogics Disk Defrag has a selective defragmentation feature separate folders or even files on your hard drive.
- In addition to defragmentation itself, Auslogics Disk Defrag can also optimize and consolidate free disk space.
Download and Install
Auslogics Disk Defrag is a completely free program, you can download it from the official website of the developer, which is located at: Auslogics.com

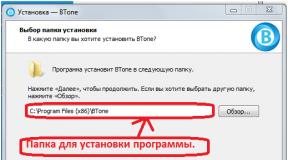
At the end of the program installation process, the installer will offer to install Hamster Free ZIP Archiver, so if you do not need an archiver, do not forget to uncheck the corresponding box.

Working with Disk Defrag
Auslogics Disk Defrag has an English-language interface, but since there are not so many functions in this utility, it will not be difficult to understand it. At the top of the program window there is a list of logical partitions on the computer indicating the size, free space and file system type. By checking the box necessary disks, you should select from the menu located just below, required action: analysis, defragmentation, defragmentation and optimization or fast defragmentation. You can also, if desired, check the box to turn off the computer after the defragmentation process is complete (this can be especially useful if you decide to defragment late at night).

After this, the specified task will be completed. By the way, before defragmenting disks, it is always advisable to first carry out an analysis - the program will analyze the disk and create a map of the file system indicating the level of file fragmentation. Then you can decide whether it’s time to defragment or not yet. The defragmentation process itself looks like this:

Auslogics Disk Defrag Settings
To go to the settings of the Auslogics Disk Defrag program, you need to open the menu Settings and go to point Program settings.

General settings of the Auslogics Disk Defrag utility are located in the section General. Here you can specify whether the program is minimized to the system tray, whether to launch along with operating system, you can also add the Disk Defrag item to context menu Windows.

Several more useful options can be found in the section Algorithms. Here you can configure automatic removal temporary files (delete temporary files before defragmenting), skip fragments larger than specified (skip fragments larger than), move system files to the beginning of the disk (move system files to the beginning of the disk) and defragmentation in VSS compatible mode.

Scheduled defragmentation
The Auslogics Disk Defrag program allows you to defragment not only manually, but also automatically, according to a schedule. To configure the automatic defragmenter schedule, go to the menu Settings and go to Sheduler.

Check the box Defragment automatically and select the time when defragmentation will run:
- When the computer is idle.
- Daily.
- Weekly.
- Monthly.
You should also specify which disk partitions should be defragmented on a schedule, whether to defragment when the laptop is running on battery power, and whether to create a report on the defragmentation performed.

Defragmentation of individual files and folders
If you want to defragment only some folders and files on the disk of your computer, then you need to go to the menu Action, go to section Advanced and select the desired action: Defrag file (defragment a file) or Defrag folder (defragment a folder). Then in the window that opens, specify the location of the folder or file and click OK.

When writing any files to HDD all information is distributed among clusters. If you decide to delete a particular file, the clusters with information will be erased, but instead there will be empty space. This disrupts the order of all files on the hard drive. As a result, when reading information, the hard drive spends much more time searching for the necessary clusters, since they are scattered throughout the media. This leads to a noticeable slowdown of the computer as a whole. This process is called fragmentation.
Defragmentation allows you to restore order in the internal space. This procedure organizes the location of all clusters on the media, moving them close to each other. After this, there is a noticeable increase in performance in resource-intensive applications and games. Let's figure out how to defragment a disk and in what cases it is necessary.
When should you defragment your drive?
If you notice that performance personal computer has fallen significantly, then in this case optimization is required. Long loading of programs, opening files, copying also hint that it’s time to optimize.
What programs are used to defragment a hard drive?
Operating systems XP, 7 and later have built-in software for defragmentation. If you want to perform the procedure one-time, you can use it. However, many note poor performance when using the standard utility. If you decide to use it, then follow these steps:

Let's look at how to defragment a disk using a built-in utility:

Let's look at an example of how to defragment a disk according to a schedule:
- The standard program allows you to set a regular schedule for defragmentation. In the previous window, click the button Set up a schedule....
- In the window that opens, select the frequency, day, time and partitions that need to be defragmented.
- Once the setup is complete, click OK.

Now the turned on computer will automatically launch the optimization procedure at the appointed time.
During this period of time, there may be a drop in performance as the system is busy with a more important process.
According to the instructions presented, you can defragment your hard drive in Windows XP, 7, 8 and 10. Now let's figure out how to defragment your hard drive using a third-party program.
Optimization using defragmenters
Defragmentation programs system disk quite a bit of. Among them there are both options for advanced users and for beginners. For example, consider a simple utility Defragger, full free version which can be downloaded from the official website of the developers. Download the distribution, install the software and run it. The program cleans disks in OS 7, 8 and 10. To do this, follow the instructions:

By using Defraggler not only defragmentation of the system or external drive. You can also get information about the performance of the media, a list of files, or optimize each folder separately.
How to defragment a disk using Auslogics Disk Defrag
Another utility that allows you to quickly or completely defragment your hard drive. The main program window is very similar to Defraggler, so there should be no problems using it.

Let's look at the startup process:

Now you know how to defragment a hard drive, including an SSD, using standard means Windows or through third party software.
Video on the topic
Our hard drive fills up evenly during use, one sector after another. But when we delete files or uninstall programs, the disk begins to fragment - filled areas alternate with empty ones. This leads to longer programs accessing the hard drive, and consequently to a decrease in system performance.
There are now a lot of tools for defragmenting a hard drive. Of course, we will consider a free and very high-quality application, because it is definitely not worth buying a program for these purposes.
Program from the company Piriform Ltd , which brought us a well-known system cleaning product - .
Interface
The graphical shell of the program is very simple and not oversaturated with unnecessary elements. In order to start regular disk defragmentation, you only need two mouse clicks. At the top of the window there is a list of all disks, and at the bottom there are three tabs with defragmentation options. The first tab contains information about the selected disk. The second tab “List of files” is intended for defragmentation separate files on your hard drive, which you need to find in advance. Well, the “Search” tab is used to select individual files and folders for defragmentation.
Functionality
Defragmentation of individual files and directories
The first thing that distinguishesfrom some other applications is the ability to defragment only individual directories and even files. This is done in order to save time that is spent on processing unnecessary areas of the hard drive. For example, if you have a permanent collection of music or videos stored on your hard drive, and you do not delete or move files from this collection, then we can say that there are no fragmented areas in these directories, therefore it is not worth spending time on processing them. Conversely, if some of the directories are actively performing operations to move and delete files, then these directories need to be defragmented first. The Search tab provides several options for searching for files to defragment. You can select files by size, or search for fragmented files only in a specific folder.

If you conduct several searches for files using different criteria, then all the results will be displayed in total on the “List of Files” tab and select necessary files you will be able to defragment them.
Defragmenting an individual folder or file can be easier. In the "Actions" menu, select "Defragment Folder" or "Defragment File", select in Explorer the desired folder and a separate file, and defragmentation will begin automatically.
Such program features, in my opinion, are very useful. Typically, the process of defragmenting an entire disk takes a very long time, often several hours. At this time, the car may “slow down” very much and prevent it from working normally. Therefore, by selecting the very sections of the hard drive and defragmenting them in protected minutes, we are deprived of these problems.
Settings
Defragmentation has two modes - normal and fast. You can specify quick defragmentation parameters in the program settings, as well as set a schedule according to which defragmentation will start automatically.
Another useful program option is automatic shutdown PC after defragmentation. If you decide to defragment the entire disk and, for example, leave it running at night, then after completion the computer will turn off itself.

Bottom line
One of the main advantages Piriform is the possibility of defragmentation separate directories and files, which saves a lot of time. Otherwise, it may seem too simple, but it does its job efficiently.
This is a process during which the location of files on the disk is optimized. This optimization allows you to increase the speed of working with files, and therefore improve the performance of your computer as a whole. In this material we will talk about how to defragment a disk using tools built into Windows, as well as using third-party programs.
Tips for performing defragmentation:
- Do not defragment drives. For SSD drives Defragmentation is an absolutely useless action. It only reduces the work resource SSD drive, but does not provide any gain in operating speed.
- To perform defragmentation, you need free disk space. The more free space, the faster and better the disk defragmentation will be performed. The minimum amount of available space is considered to be 15 percent of the entire disk.
- If you want to get consistently high speed, then use scheduled defragmentation.
- Avoid using a drive that is being defragmented.
How to defragment a disk using Windows
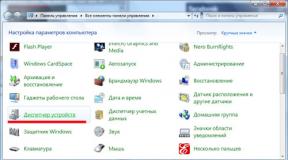
operating room Windows system has a built-in mechanism for disk defragmentation. To use it, open “My Computer” and call the properties of the partition that you want to fragment.
In the window that opens, go to the “Services” tab and click on the “Run defragmentation” button.

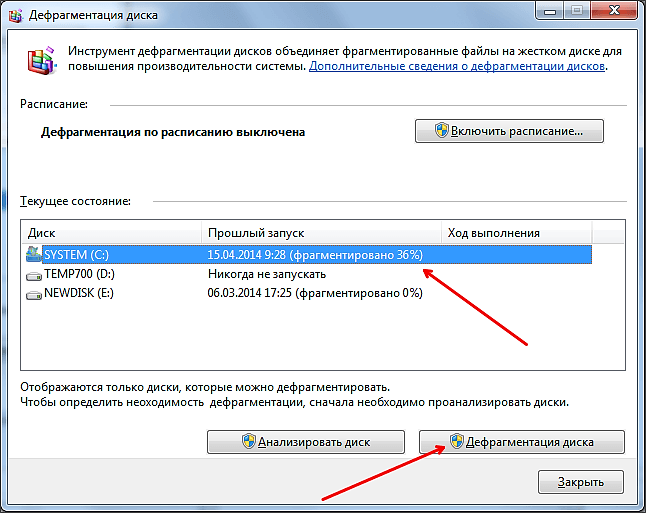
After this, the “Disk Defragmenter” window will open in front of you. Here you need to select the disk that you want to fragment and click on the “Analyze disk” button.

After the analysis of the selected disk is completed, you will see the percentage of fragmented data on the disk. If this percentage is significant, then you need to defragment. For example, I analyzed the “E” drive and the percentage of fragmented data on it is zero. There is no need to defragment this disk. But after analyzing the “C” drive, it turned out that it was fragmented by 36 percent, which means it needs to be defragmented.
In order to defragment the “C” drive, select it in the list of drives and click on the “Disk Defragmentation” button.
After this, the defragmentation process will begin. The time it takes to defragment a disk depends on the amount of data defragmented and the speed of the disk itself. As a rule, this takes at least several hours.
In addition to manually starting defragmentation, you can use scheduled startup. To do this, in the “Disk Defragmentation” window, click on the “Enable Schedule” button.

After this, a small window “Disk defragmentation: change schedule” will appear in front of you. Here you need to enable the “Run on schedule” function and configure the schedule.

Defragmentation can be performed daily, weekly, or monthly. After setting the schedule, close all windows by clicking on the “OK” button.
Disk defragmentation using third-party programs
You can also defragment the disk using third party programs. Now there are many quality ones. The most popular free ones are Piriform Defragger, Auslogics Disk Defrag, MyDefrag, IObit Smart Defrag. Paid programs much more, the most famous of them are: O&O Defrag, Ashampoo Magical Defrag, Raxco PerfectDisk, Auslogics Disk Defrag Professional.
For example, consider the process of disk defragmentation using free program Auslogics Disk Defrag Free.
After starting the program, check the boxes next to the disks that you want to defragment and start analyzing them.

After analysis, the program showed that drive “C” was 46 percent fragmented. In order to defragment this disk, check the box and click on the “Defrag” button.

This is all that needs to be done, all that remains is to wait for the defragmentation process to complete.
Like the built-in defragmentation utility, Auslogics program Disk Defrag Free allows you to defragment disks on a schedule. To do this, open the “Settings” menu and select “Scheduler”.

After this, a window with a defragmentation schedule will open. Here you need to enable the “Defragment automaticaly” function, select the defragmentation time and disks.

After this, Auslogics Disk Defrag Free will defragment automatically at the specified time.