How to burn rw files to dvd. How to properly burn a DVD so that the player can read it. How to burn CD files from a computer to a disc
Subscribe:

In order to burn files to a DVD, you need to use additional burning programs. However, this applies primarily to Windows XP; later versions of Windows: Vista and 7 allow you to burn a removable disk without third-party software.
Despite the possibility of modern operating systems burn discs DVD-R type, DVD-RW internal application, for expansion functionality and increase the visibility of operations, experts recommend installing specialized software.
For reference. There are two types DVD-R discs and DVD-RW. The former allow you to record once, while the latter make this process repeated. Information on DVD-RW can be rewritten or appended. All programs for burning DVDs have the “Burn” and “Erase” functions. The second one refers to the RW format. It is worth remembering that the disc deteriorates over time, so the price-quality ratio of the product in this case plays an important role.
What programs burn DVD-R, DVD-RW discs
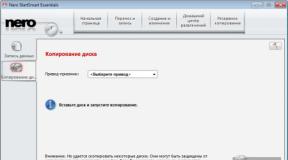
Today the most popular program for burning discs is Nero. This is one of the most user-friendly products that allows you to easily create DVDs.
Nero software package (approx. Nero Express needed for simple recording of discs) is one of the most powerful and functional programs. Unfortunately for developers, when creating and editing various types of information, most users do not use some of Nero's functionality.
If you plan to use Nero, remember that it is a paid product. In addition, it consumes more system resources than built-in operating system applications.
Users who do not want to spend money and violate copyrights can make do with equally high-quality, but free products. For example, CDBurnerXP- simple and free recording program optical disks, which is in no way inferior to Nero. It allows you to create a DVD with information, audio, video or an image with data.
CDBurnerXP does not exclude the possibility of copying discs, erasing recorded information from them, or adding to existing information.
Working with the programs is very simple. The entire sequence of operations is accompanied by intuitive images and comments. You just need to first decide what type of information will be recorded, since the further algorithm of actions depends on this.
Almost all recording programs adhere to the same algorithm of actions. The difference lies in the deeper settings that regular user will be ignored.
Instructions for burning a DVD.
1. Insert a blank DVD-R or cleaned DVD-RW& disc into the drive.
2. Windows will autostart. In this case, click “Cancel”;
3. Launch the recording program and select the type of data to be recorded. It can be text files, photos, audio, video and much more.
4. Next, a functional window will open through which you need to add files to the future disk. Just search for what you need in Explorer, select it and add it to the disk you are creating. At the bottom of the window there is an “Add” button. Most often it is accompanied by a symbolic green plus (note: you can also “drag” files and folders to the area of the recordable disc). Remember that the disk has a limit on the amount of information it can hold; it is displayed with a special bar. Until it turns red, you can add files freely.
How to burn files to disk?

With the advent of new technologies, disks have faded into the background. In their place came flash cards and storage devices. But there are situations in which you cannot do without a disk. This is where the question arises: “How to write files to disk?”
Windows Standard Recording Tools
To burn discs, you can use special programs that are installed separately on your computer, or you can use standard tools Windows entries. There are several ways.
Method 1

Method 2
- Insert the disc into the drive.
- In the AutoPlay window, select “Burn files to disk.”
- The “Burn disc” window will appear, in which we select “As flash - USB drive" Here you can write down the name of the disk in the appropriate column. Then click “Continue”.
- The disk will be formatted.
- In the “Automatic Play” window that appears, we are interested in the “Open folder to view files” tab. Let's choose it.
- Drag files to be recorded into an empty window.
- Select “Burn to CD” and the burning process begins.
- Once copying is complete, click the “Done” button.
- Do not open the drive while recording.
- Do not cancel the burning process, as this will damage the disc.
Programs for burning files to disk
Nero Burning Rom
In addition to the standard ones, there are a number of programs that allow you to burn data to DVD and CD. For example, you can use the Nero Burning Rom program, which can be downloaded by following the link. Recording occurs in several stages:

Windows Media Player
Types of disks
If we talk about the types of disks, the following options are distinguished:

The difference between the “+” and “-” disks lies in the manufacturer. Formats with “-” were developed by Pioneer, and discs with “+” were adopted by Sony and Phillips.
Using our instructions, you can easily burn a CD and DVD.
Hello dear friends, I have long wanted to add this topic to my site and tell you how It is better and more correct to burn the disc.
How to burn files from a computer to disk
So, disc recording can be done in the standard way in Windows or using a special program. And now we will look at everything.
Method 1: How to burn a disc in Windows
1. Launch autorun.
When you insert the disk, a window should pop up that will prompt you to do the following:

- If there is no such window, then go to my computer and double-click on this disk with the left mouse button.

2. You must select a recording method this moment is very important :
You should now see a menu like this:

Now attention!
| Recording format | Recommended drives |
| A). Like a USB flash drive This format is intended for rewritable discs (CD-DVD-RW), do not use this format for regular discs, since your disc after recording may not be readable on other devices, especially if you want to record for audio or video players. And if you choose this format there's no way to go back!The only advantage is that you can use the disk as a flash drive, that is, you can delete at least one file at a time and you can also write at least one file to the disk. But please note, this is only for RW discs (rewritable discs). | CD-DVD-RW(R) |
| B). With CD-DVD player this format is intended for all drives and if you are not going to use the disk as a flash drive and you want your disk to be readable everywhere, select this item. | CD-DVD-R |
If you nevertheless chose the first option, a window will appear in which you will be asked for confirmation to format the disk for this recording type. You will not be able to revert the changes!
If you still agree, confirm and click yes.

3. Now choose what to record.
First way:
You can simply copy the file you want to burn and paste it onto the disk.


Second way:
Right-click on the selected file or folder and select send and select the drive.

4. And finally the recording!
We go to our disk and click burn to CD (burn disc).

A window will appear in which you need to select:
1. Disc title
2. Speed (the lower, the better)
3. By checking the box, the recording wizard will automatically close.

The entire disc is recorded!
Method 2: How to burn a disc using Nero micro
As you probably know, standard methods It's not always good, recording master Windows drives Although it copes well with its function, it still has few advantages. Now let's expand your burning capabilities with the free Nero micro disc burning software.
You can download nero micro for free, and the most important thing is that this is a micro version of nero, with free distribution.


1. Record any data.
2. Record music in various formats
3. Record video in various formats.
4. A useful feature is writing images to disk.
Here I will show an example of how to burn a regular disc to a CD. For this:
Select CD with data. A window will open.

And here we add files.
You can add using the add button or drag and drop with the mouse required file out the window.

Here we choose:
1. Disk name
2. Recording speed (the lower the better).
3. Allow adding files (you can add to the disk if there are any left free place), but the disc may not be readable on some devices.
Click record.
After burning, a window will appear indicating that the disc was successfully burned.
And in the end I will say that everyone has their own opinion on how to record a disc, but these methods have never failed me and discs were successfully written all the time, that’s why I recommend them to you!
August 17, 2015
This article contains instructions on how to repeatedly write to laser CDs and DVD RW discs in Windows 8. To burn CDs and DVD disc ov on Windows 8 do not need any additional programs- There is a built-in laser disc burner.
Laserdiscs are divided into two categories:
- One-time entry. Data can only be written to such a disk once. The designations of such disks are CD-R, DVD-R, DVD+R.
- Multiple recording. Data can be written to such a disk more than once. The designations of such disks are CD-RW, DVD-RW, DVD+RW.
If you insert a blank CD-RW or DVD-RW disc into the drive, then Windows Explorer 8 will automatically prompt you to format this drive when you try to open this drive:
LFS more often called UDF. File system for batch burning to CD and DVD discs. Allows you to use a laser disc in the same way as a regular one. That is, copy and delete files by yourself in a simple way, as if it were not a laser disc, but a regular disc or flash drive. The UDF file system is particularly used on DVD-Video discs.
Mastered This is a disc recording in the ISO9660 file system with the Joliet extension. The ISO9660 file system is the traditional laser disc file system. Audio CDs, MP3 discs, discs with computer programs are written to this file system.
Burning CD and DVD RW discs UDF (LFS)
The UDF file system is used for batch recording on laser discs. Depending on the version, it is supported by different Windows versions. For example, Windows XP supports UDF versions 1.50, 2.0, 2.01.
The UDF file system is also used in video and audio recording and playback systems, such as DVD players(DVD-video discs are made using UDF version 1.50). There are video camera models that record filmed material onto DVD-RW discs.
In order to use such a disk, you first need to format it. If you insert a blank CD-RW or DVD-RW disc into the drive, Windows 8 Explorer will automatically prompt you to format this disc (when you try to open this disc in Explorer):
Formatting into the UDF file system can take quite some time, for example, a 700 mb CD-RW can be formatted in 10 - 12 minutes. DVD-RW discs are formatted faster.
If the RW disk is not empty (there was a recording on it), it can be formatted differently. After the disk is recognized and appears in Explorer, you need to right-click on it and select the “Format” menu item:

Then specify formatting options in the dialog box:

After formatting is complete, you can copy files to this drive directly through Windows Explorer:


However, you need to remember that the writing speed on a UDF disk is much lower than on a regular disk or USB flash drive. In addition, when using file system UDF, there may be compatibility problems with household players. For example, you burn MP3 files to a UDF disc, but this disc will not play on your car player.
If you record a disc for playback on household appliances, it is better to use ISO9660 file system:

Burn CD and DVD RW discs ISO9660
Data of any type (photos, MP3, movies, programs) can be recorded on RW discs in ISO9660 format. The advantages of this file system are that it is supported by home players to a greater extent than UDF. The disadvantage of recording in this format is that the recording must be done in one go. Cannot be recorded or deleted at different times separate files to a disk with this file system.
Re-writing to RW discs is possible, but the entire disc must be erased before doing so.
This is an inconvenience of discs in ISO9660 format. The ability to record only once and the need to erase the entire disk when recording again.
The ISO9660 file system can be used in two ways. If you insert a blank (erased or new) RW disk, then Windows 8 Explorer will automatically prompt you to format this disk (when you try to open this disk) and you need to select the second type (Mastered):
If there is already a recording on the RW disk, then it needs to be erased. After the disk is recognized and appears in Explorer, you need to right-click on it and select the “Erase this disk” menu item:

After that


You can now write files to the disk.
Writing files in ISO9660 format is done in two stages. First you need to copy the files to this disk:

You can drag files with the mouse from another window. Or you can go to another folder, select and copy the necessary files, then open the RW disk again and paste the copied files onto it:

The files are inserted and the disc is ready to be written. If you need to add more files, it's not a problem, just repeat the previous step. Find the files you need, copy them and paste them onto the RW disk.

In the 21st century, DVD players still serve faithfully in many homes. At one time, films were distributed mainly only on discs, but today they most often reach our computers via the Internet. And now the question becomes how to burn a movie to a disc in order to watch it on DVD. We will consider all aspects of this procedure in this article.
So, we have the desired picture on our computer. The end goal is that it should be on media and playable on a DVD player.

Select a disk
The wide variety of DVD discs can be confusing. The following is a breakdown of the disk markings:
- DVD-R and DVD+R. Such media is suitable for write-once use only. It is no longer possible to delete or change the recorded information.
- DVD-RW and DVD+RW. But on discs with such markings you can record and re-record more than one movie.
Any of the listed disks is suitable for recording information. True, if we are talking about the “R” marking, then the media must be blank, but in the case of “RW”, you can overwrite the disc with unnecessary information.
In this article, we will tell you how to quickly and easily clear the Temp folder –
Windows DVD Studio
The developers of Windows 7 have foreseen that users may need to record media files for playback on a DVD. For these purposes they created a DVD studio. You can find it by clicking the “Start” button and selecting “All Programs”.

In the list that opens, you can easily find Windows DVD Studio.

In the window of this utility we add required file via the corresponding button.

After adding a picture, you can set the name of the DVD (the default is the recording date). Click on the “Next” button.

In the next window you can customize the text and appearance menu, and also preview how everything will look in the player. To start filling, click on the corresponding button.
A window will appear showing the DVD creation process. Converting the file format may take some time, especially if your movie is large.
This method is not available to users of Windows 8 and Windows 10, so you will have to resort to using special programs to convert and record information.
Video conversion
Next, we will show you how to record movies onto a disc for later playback on DVD. But the problem is that most films today are distributed in avi format, which many DVD players do not support. Therefore, it is recommended to convert the file before uploading. However, if you are sure that your player will be able to play video with the avi extension, then you can skip this point.
For conversion we will use free program DVD Flick. On the right side of the program window, click “Add title” and add a movie.

Now just click the “Create DVD” button and wait for the conversion process to complete. DVD files can be found in the “My Documents” folder.
You can record a movie on a high-quality medium using Nero or UltraISO.
Nero
Nero includes a suite of utilities for working with CD and DVD discs. To record the picture we will need Nero Burning ROM.
Insert the disc and launch the program. A new project window should open automatically. In the left top corner There is a drop-down menu where you need to select “DVD”. Since we will record a movie, select “DVD video” in the left field.

Be sure to make sure that the appropriate item is checked in the “Record” tab. It is also recommended to set the recording speed to 8. Now you can click on the “Next” button.

On the right side of the window, find and drag all the files received after conversion to the left. Now just click the “Record” button. At the end of the process, the drive with the media will open, on which the picture will be ready for viewing on DVD.

Ultra ISO
Many people prefer to use the UltraISO program for recording.
First, drag and drop the desired file into work area programs. We will use the same converted files. If you are sure that your player will play avi or another format, then you can simply drag and drop the movie.

Now select all the files and click the button in the top panel “Burn CD image”.

In the window that opens, select the drive and click the “Burn” button.

Our detailed article will teach you how to properly open APK files on your computer, .
Don't know how to choose the right one RAM for PC? Our material will help -
Conclusion
Whether a recorded movie will work on a DVD player largely depends on the player itself. Older models usually require conversion to a special format. You can use Nero or UltraISO directly for filling. Windows users 7 can use the DVD studio, but in the case of other OSs you will have to resort to special programs. Now you should have an idea of how to properly record movies and videos onto a disc for viewing on DVD. Good luck!
Read also...
- How to check your phone's certification
- Installing CAB and MSU files for Windows updates manually
- Smartphone Samsung GT I8160 Galaxy Ace II: reviews and specifications The main camera of a mobile device is usually located on the back of the body and is used for photo and video shooting
- How to work in the Sony Vegas program (basics) How to work in the Sony Vegas program