Firmware for Android 4. Smartphone firmware from Samsung
Updating or installing firmware can eliminate many problems related to the operation of Android devices A. During long-term use, the system memory of mobile gadgets becomes clogged with residual files () (“casts” of previously downloaded programs), malicious code() and other unnecessary data. All this leads to a decrease in the performance and speed of the processor and RAM. As a result, the smartphone (tablet) often begins to freeze and reboot on its own. And if factory reset() did not lead to a positive result, the user can only update the software himself. Let's look at how to reflash a phone running on Android OS.
Types of firmware and methods of installing them
Installing Android firmware at home differs in many ways from installing other software. This process is more labor-intensive and associated with many risks. If you select the wrong software version or violate the update process, there is a possibility that your phone or tablet will become useless. However, having learned how much reflashing costs from professionals, many still decide to change the version software
on one's own. For flashing Android there is no single instruction that would fit all models mobile devices
. It all depends on the manufacturer of the device and what software you plan to install.
- All Android firmware is divided into two types:
- Official. Supplied directly by smartphone manufacturers and usually only suitable for a specific brand. Such programs are considered the most reliable, so they should be used whenever possible.
Unofficial (custom). Developed by Android device users and small companies. They are used when reinstalling Android on Chinese devices (for example, Lenovo, Meizu, Xiaomi, etc.).
When using custom software, there is a possibility of installing a low-quality update, as a result of which the gadget will begin to slow down even more. Therefore, you need to download the executable file only after reading its description in detail and reading user reviews.
There are several ways to change the firmware on Android:
Before reinstalling the software on your Android device, you need to make a number of preparatory measures:
- download a software update program to your PC (Odin, Kies or SP Flash Tool and find a high-quality usb cable (if the reinstallation will be done using a computer);
- (if you plan to reinstall Android to an unofficial version);
- charge the gadget's battery to 100%;
Functionality established collateral largely depends on its version and build. To prevent the new firmware from starting to conflict with the hardware after some time, you need to find out serial number mobile device:

For a more detailed procedure for updating Android on your phone, see Samsung example and Lenovo, although these instructions will also work for many other brands.
Smartphone firmware from Samsung
Software updates on Samsung devices are carried out using the Kies program. This utility allows you not only to reflash your tablet or phone, but also to backup copy old system, synchronize personal data with your PC and much more.
Before changing the firmware to the latest software, you need to configure Kies correctly. This is done as follows:
 After setting up Kies, create a backup of the software available on your smartphone. This will allow you to restore the system in case of unsuccessful firmware. To backup Android via a PC, select “Backup” in the initial application window, check the items you want to save, and start the procedure by clicking the appropriate button.
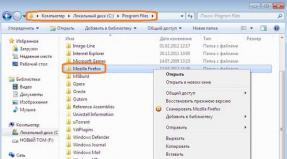
After creating a backup copy, feel free to reflash your phone or tablet via your computer. To do this, open the “Tools” section in Kies and activate the item marked in the figure, thereby starting the update process. 
While the device is being flashed, do not under any circumstances disconnect it from the PC or perform other actions that could lead to a disconnection.
After flashing your Android phone through a computer, check the functionality of all its functions. If nothing fails, it means the software update was successful.
Replacing firmware on a Lenovo tablet via PC
Before flashing a Lenovo tablet, you need to understand that there is no software developed specifically for this brand. Therefore, we have to be content with universal developments. One such application is SP Flash Tool. Let's look at how to update software on Lenovo using this utility:

After you have succeeded in updating the firmware, check that all functions of the tablet are working.
Two weeks ago, on Halloween, Google company promised that factory firmware and binary codes Android 4.4 KitKat for Nexus 4, Nexus 7 and Nexus 10 will be published immediately after these devices receive over-the-air updates.
And despite the fact that not all tablet models have received automatic update up to Android 4.4 KitKat, factory firmware with this version of the system (build Android 4.4 KRT16O) has already been published on the Google server. You can download them and install them on your tablet or smartphone yourself. How to do this, read on.
This news will also please those who would like to return to stock Android after installing custom firmware such as Cyanogenmod, Paranoid Android, etc.

Note: Please be aware that if your bootloader Nexus 7 blocked, during the firmware update there will be a complete loss of all your personal data on the tablet. You can unlock the bootloader using the fastboot program, which will also clear the data. On Nexus 4 and Nexus 10 You can unlock the bootloader without losing data using BootUnlocker.
Note 2: If the bootloader is unlocked, you can install new firmware without data loss, however, in some cases, after this the tablet or phone will not boot, so be prepared for the fact that you will have to flash your device with data loss and take care of backing it up.
Requirements:
First of all, to flash the firmware, you will need a computer with Android SDK, or rather, the adb and fastboot programs that come with it. How to install the Android SDK, read this material.
Also, you will need a MicroUSB cable to connect the tablet to your computer. It is better to use the cable that came with the tablet.
How to unlock bootloader on Nexus 7 using fastboot:
1. Connect the tablet to the computer and boot it into bootloader mode (using the adb reboot bootloader command or turning it off and on by simultaneously pressing the power and volume down buttons).
2. Enter in the window command line(terminal) computer command:
fastboot oem unlock
Confirm unlocking (volume up, then power buttons).
Instructions for flashing Nexus tablets and phones
1. Download the factory image with firmware for your tablet model to your computer (for example, Nexus 7 Wi-Fi 2013 is called razor, and Nexus 7 Wi-Fi 2012 is called nakasi) from this page of the Google website. This image contains the system itself, bootloader, factory recovery, kernel (boot.img) and radio module (not included for Wi-Fi models). Therefore, if you installed, for example, an alternative recovery, after the firmware it will be replaced with the stock one.
2. Unpack the downloaded tgz (tar/gz) archive into separate folder. I use Total Commander for these purposes, but you can use a separate archiver, for example, 7-Zip.
3. This step is needed if you want to avoid data loss during flashing:
With the help of anyone text editor open (Caution! Open and do not run!) the file flash-all.bat (if you have Windows) or flash-all.sh (Mac, Linux) and remove the two -w characters in the line with the fastboot update command. For example, if the line says: fastboot -w update image-razor-jss15j.zip, after editing it should look like fastboot update image-razor-jss15j.zip. Save the file. (It is the –w option that causes the data to be cleared.)
4. Reboot the tablet into bootloader mode, make sure it is connected to the computer and run the flash-all.bat script (or flash-all.sh on Mac, Linux).
Congratulations, you did it!
For security reasons (so that no one can remove your device's screen unlock key or gain access to your data if your tablet or smartphone is lost or stolen), it is recommended to keep the bootloader locked. To do this, there is the fastboot oem lock command (for Nexus 7) or the BootUnlocker application mentioned above for Nexus 10 and Nexus 4.
Root on a tablet or smartphoneNexus after firmwareAndroid 4.4KitKat
Rooting your Nexus is very easy. To do this you will need an unlocked bootloader and modified recovery. I would recommend you to use TWRP. Download latest version TWRP recovery you can from here. To do this, click on the "Get TWRP for your device" button and type the name of the tablet in the window that opens (for example, Nexus 10).
1. Connect the tablet to the computer and boot it into bootloader mode (read above for how to do this)
2. Enter the command in the command line window (terminal):
fastboot flash recoveryFileNameRecovery.img
3. Now you can reboot your tablet into a new recovery using the command:
adb reboot recovery
In addition, Nexus tablets and smartphones can be rebooted into recovery mode by turning it off completely and turning it on by simultaneously pressing and holding the volume up and power buttons.
4. Download zip file With new version SuperSU.
5. Flash the downloaded zip file (without unpacking!) using TWRP
6. Reboot your device, launch Play Store and update SuperSU.
Now even phablet users Galaxy Note first generation (N7000) can enjoy the capabilities and performance of KitKat firmware, as they have already released a stable build of C-ROM 7.1 on Android based 4.4.4 (AOSP).
Features of Android 4.4.4 C-RoM Build 7.1 firmware

Here short list Features that have been added to the new Android 4.4.4 C-ROM build:
- App Bar
- Dark C-RoM
- Active Display
- Floating Windows
- Gesture Anywhere
- On-The-Go Mode
- Animated controls
- Lock screen notifications
- Implement App Sidebar
If you are interested in spicing up your Galaxy Note N7000 phablet, below is step-by-step preparation to flashing and detailed instructions on installing the C-ROM build on your device.
However, we warn you in advance that you are responsible for the consequences of your actions. If your smartphone gets damaged during installation, you are entirely responsible. You perform all actions at your own risk.
Preliminary preparation:
- This manual is intended exclusively for the Galaxy Note N7000 phablet model. Be sure to check your device's model number in Settings (About phone).
- Make a backup of your system using a custom recovery - ClockworkMod (CWM) or TWRP, as in case of any errors you need to be able to restore your phone. In recovery, use the option Reserve copy, and if necessary, then by restoration.
- Make sure everything necessary drivers for your smartphone are installed on your computer, but if you have not done this, then drivers for the Galaxy Note N7000 can be downloaded here: download.
- Enable the option in the settings USB debugging: Settings/Developer Options (Note: Click 7 times on the firmware build number to unlock and open hidden possibilities, including USB debugging mode).
- Make sure your device is charged to at least 80% to prevent unexpected shutdown Galaxy work Note when installing the firmware.
- Make sure that the device is unlocked, that is, if it is not locked to an operator, and you also received root rights along with the latest version of the recovery. If you have never installed CWM recovery, I advise you to watch the video below.
- If your device is stuck while booting or has a problem with constant rebooting, then perform Wipe Cache Partition and Wipe Dalvik Cache before the next reboot.
- After installing the firmware, give it some time to stabilize before working with it.
So now you need to download the following:
- Special package Google applications Apps Android 4.4.4: Google Stock and Full Package
- You also need recovery Philz Touch Recovery v6.07.9 ( CWM Recovery 6.0.4.5 -> install .tar file using Odin v3.09)
How to install Android 4.4.4 KitKat firmware on Galaxy Note N7000 using a custom C-ROM build:
- Step 1. Download custom firmware Android 4.4.4 C-ROM to your computer.
- Step 2. Connect your Galaxy Note to your computer with via USB cable.
- Step 3. Copy the downloaded C-ROM file to the root folder of your smartphone's SD card.
- Step 4. Turn off your Galaxy Note and disconnect USB cable from the computer.
- Step 5. Now turn on your smartphone in recovery mode by pressing and holding the Volume Up and Home buttons.
- Step 6. Once your Galaxy Note boots into CWM Recovery, do a Wipe Data/Factory Reset, but before that you should have backed up your data.
- Step 7 Then you need to do Wipe Cache Partition and wait for the process to complete.
- Step 8 Then also make Wipe Dalvik Cache. To do this, you need to open the “advanced” item and select Wipe Dalvik Cache. This can save you in the future from any errors and constant system reboots that can happen when installing new firmware.
- Step 9 Now go back to the main recovery menu and select the Install Zip from SD card option.
- Step 10 Then select Choose Zip from SD card. Use the volume buttons to find required file firmware that you copied to the SD card earlier. Confirm your selection by pressing the Power button. Confirm on the next screen and the installation process will begin.
- Step 11 After finishing installing the firmware, you need to select “+++++Go Back++++++” and click on Reboot System Now from the recovery menu.
After everything, the Galaxy Note will reboot. Don't worry if the first boot takes longer than usual.
Your Galaxy Note N7000 will now work on latest version Android thanks to C-ROM assembly. To check this, go to Settings/About phone, where you will see installed version firmware.
It still seems that Android 4.4 KitKat is the latest version of the system, but let's remember that the four were introduced back in the fall of 2013! Over all this time, several firmware editions of this android have been released, these are 4.4.1, 4.4.2, 4.4.3 and 4.4.4. The biggest changes affected basic version. There is no point in listing them all; this is a site with firmware, not an information resource for geeks.One has only to mention the quantitative changes in subversions. This is necessary so that you understand exactly what firmware you need to download, and whether it is worth downloading at all.
Android version 4.4.1 received minimum changes, which is very strange, since usually after the first release many bugs appear that are fixed in the next build.
Update 4.4.2 is useful in that it introduces a useful wireless monitor feature. Thanks to it, it became possible to view photos taken on a mobile gadget on big screen smart TV with Wi-Fi. The most useful firmware version with Android 4.4.3. It received the largest number of changes and additions, comparable to the differences between the basic version and the previous generation. Fixed numerous errors with the operation of the Internet, camera and system programs.
 Well, Android 4.4.4 released only due to fixing glitches with security protocols.
It’s up to you to choose which firmware to download, but we recommend downloading only official assemblies in Russian language and preferably not beta. Alternative and others custom firmware may do more harm than good. Although, if you know how to flash a phone or tablet on Android (for example, Odin program), then this will only be an advantage for you.
It would be useful to remind you that before installing the firmware you need to do full backup systems!
Latest 20 added Android 4.4 KitKat firmware
| date | Smartphone | Android | Link |
| 02-10-2017 | Impress_Alfa_SDcard on VERTEX Impress Alfa | 4.4.4 | |
| 02-10-2017 | impress_brainstorm_0.6.2 on VERTEX Impress Brainstorm | 4.4.4 | |
| 02-10-2017 | m942g_v1 on SUPRA M942G | 4.4.4 | |
| 25-09-2017 | 20150126 for Acer Liquid Jade Z | 4.4.2 | |
| 13-09-2017 | m725g.rar on SUPRA M725G | 4.4.2 | |
| 13-09-2017 | m847g.rar on SUPRA M847G | 4.4.2 | |
| 13-09-2017 | 1.0 on Acer Iconia Tab B1-A71 | 4.4.1 | |
| 13-09-2017 | App. Guide_Acer_20150126_A44K_A on Acer Liquid Z410 Duo | 4.4.4 | |
| 05-07-2017 | 20121224_v1013 on Digma Plane 1601 3G | 4.4.4 | |
| 17-06-2016 | Open Source Code at Lenovo TAB 2 A7-20F | 4.4.4 | |
| 01-05-2016 | Miui7 on DEXP Ixion XL240 Triforce | 4.4.2 | |
| 01-05-2016 | XL240_R01_07/25/2015_V1.0 on DEXP Ixion XL240 Triforce | 4.4.4 | |
| 24-03-2016 | Rev.3-4 for CWM recovery on Digma HIT 3G | 4.4.4 | |
| 24-03-2016 | 06.11.2015 on Digma HIT 3G | 4.4.2 | |
| 24-02-2016 | qumo507_(zp780_port) on Qumo QUEST 507 | 4.4.2 | |
| 15-02-2016 | tt1040mg on Digma Optima 10.7 | 4.4.4 |
The Android 5.0 Lollipop system does not run on every smartphone, but KitKat firmware is developed for almost any type of device. The version named above at one time established itself as the best. So why not upgrade your smartphone to this OS? In this article we will talk about version 4.4 from KitKat.
Quick installation of firmware on Android 4.4 KitKat: video
Preparation
The device being updated is a Samsung tablet. First you need to find suitable version firmware for this device. Everything you need can be found on the website. Once on this resource, you will need to select a manufacturer and model. Next, find the firmware you are interested in and download it. As a rule, it comes with separate instructions and basic installation tips. In this case, the standard Android version KitKat is supplemented on the page with drivers for the tablet.Basically, the version can be updated using an SD card, but for the selected tablet you will need to download the flash driver - a utility that helps update the system firmware.
Process instructions
Now the update is in progress: