Win 10 can't see usb drive. Why does windows not see the hard drive? The main causes and their elimination. What are the causes of dysfunction on Windows
Those users who choose to join second hard drive to a Windows 10 computer may experience a problem displaying it. There are several reasons for this error. Fortunately, it can be solved with built-in tools.
First of all, you need to make sure that the disk is free of defects and damage. You can check this by connecting the HDD (or SSD) to system unit. Also make sure you have connected the hardware correctly, it should show up in the BIOS.
Method 1: "Disk Management"
This method involves initializing and formatting the drive with a letter assignment.

Method 2: Formatting with Command Prompt
Using "Command line", you can clean and format the drive. Be careful when executing the commands below.
- call context menu on the button "Start" and find "Command Prompt (Admin)".
- Now enter the command

and press Enter.
- Next, do
- You will be shown all connected drives. Enter
where X is the number of the disk you need.
- Delete all content with the command
- Create a new section:
create partition primary
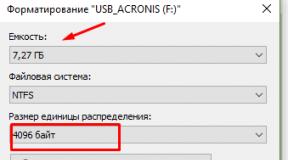
- Formatting in NTFS:
format fs=ntfs quick

Wait until the end of the procedure.
- Give the section a name:

It is important that the letter does not match the letters of other drives.
- And after all, we exit Diskpart with the following command:


Quite often, users of PCs and laptops running the tenth version of Windows are faced with the fact that after installation or reinstallation, the system stops seeing one of the installed hard drives. This makes the normal use of such equipment impossible, and therefore, it is required to find a solution to such an inconvenient and serious problem as soon as possible. This problem still existed in
The problem and its varieties
Today, two types of this kind of problems can be observed at once. The first assumes that Windows 10 does not see HDD in BIOS mode, while the second implies that the connected drive simply does not appear in Explorer.
The approach to troubleshooting in both cases will be different, since the causes of such phenomena also vary.
IMPORTANT! If the mapped drive is not displayed, most likely, the connection technology has been violated. In view of this, it is recommended to check the correct connection of the equipment and the computer.
If the connection is made correctly, and the equipment is still not displayed in the intrasystem menu (BIOS), then there is a high probability that the connected disk is faulty.
Elimination Methods
If the desired volume is not displayed in the OS itself, then the problem can be fixed quite quickly using the tools built into the system. First of all, you need to understand that there are two methods at once that allow you to achieve the desired results. The former assumes that the user will use the GUI to make the volume visible, while the latter involves active use of the command line.

ADVICE! All transactions with command line, Related hard drive, are not suitable for beginners, as they require a complete and deep understanding of the actions performed.
In order to make the volume visible, you will need:
- Press Win + R, and then enter diskmgmt.msc and press Enter;
- If RAW is displayed in the menu that appears, you will need to right-click and format the connected device;
- If No Data is displayed for any disk, then you should run the Volume Initialization process, which will allow you to fix the problem;
- After completing the procedures, the disk area will become unallocated, which is why you will need to select the Create logical volume item and select a letter for it.
This method is very simple and allows you to get rid of an unpleasant problem in a short time.
Problems with definition hard drive can occur in different situations: when installing Windows XP, 7, 8 or 10, connecting a second or external hard drive. Depending on the conditions for the occurrence of an error, the methods for its elimination differ significantly.
Finding a disk during installation
If during installation Windows does not see the hard drive, then the cause of this error is the lack of required drivers. Usually the failure appears on laptops and ultrabooks with SSD. The Windows installation program does not contain the necessary software, so in order to install XP, "seven", "eight" or Windows 10, you must first install the drivers.
Look at the specification of the computer. You need to find out which processor is being used - Intel, AMD. For Intel computers, download the Intel® Rapid Storage Technology driver. If worth AMD processor then look for what you need software on request "SATA/RAID driver + motherboard model".
- Download and unzip the data archive. Throw it on the installation flash drive of Windows. If you are installing XP from a disc, transfer the driver to a USB flash drive anyway; must be connected with installation disk before turning on the computer.
- Start installing Windows 10, 8, 7, XP. When you reach the section selection stage, click on the "Download" link.

- Specify the path to the downloaded driver on the flash drive.

After adding the drivers, you will see the available partitions of the hard drive and will be able to install on Windows computer XP, 7, 8, 10.
External drive detection
If Windows 7 does not see the hard drive that is connected via the USB interface as an external drive, then the first step is to make sure that the drive is assigned the correct drive letter.
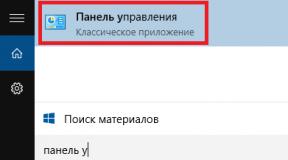
- Open the control panel, set the value to " Large icons' for the View option. Go to the "Administration" section.

- Launch the Computer Management tool.

- In the menu on the left, find the "Storage Devices" section and launch the "Disk Management" tool.
On Windows 8 and 10, the procedure is completely identical, on XP there are some differences: in particular, the "Administration" section is opened through the "Programs" menu in Start. In any case, in the Disk Management window, you should see all the drives connected to the computer: primary, external, second internal.
If the external hard drive is correctly identified by the system, right-click on it and select "Change letter". Assign a letter that is not yet used in the system, such as X or M. 
If the external hard drive is new, you haven’t written anything to it yet, then try formatting it so that the hard drive can be detected in the system. When formatting, all data will be deleted, so you need to be sure that there is nothing important on the media. Unformatted external drive will be labeled "Unallocated".
- Right click on the disk, click "Create Simple Volume".

- Enter the space size of the new volume. If you want the external disk to consist of one partition, then enter the maximum size, that is, the entire volume of the media.

- Assign a letter and click Next. Format the volume to the NTFS file system. Leave the rest of the parameters unchanged.

After formatting is completed, the external drive should be correctly identified by the system and displayed in the "Computer". The indicated steps are the same on all versions of Windows, from XP to Windows 10. If changing the letter and formatting does not solve the problem, then make sure that USB port works without errors - look in the device manager for controller drivers. Make sure the cable used to connect external drive, correct. If earlier the hard was detected without problems, but now it is not detected by the system, then check it with an antivirus.
Problems with the second disk
If Windows 7 does not see the hard drive connected to the system unit as a second drive, then you first need to make sure that this drive is detected in the Disk Management utility.
- Press Win+R and type "diskmgmt.msc" to open the connected drive management tool. The command is relevant for all versions of Windows, from XP to 10.

- Find the second drive among the connected drives. See what status it has - depending on this, the error correction methods will differ.

If there are no error messages, then try first simply changing the letter to a value that is not yet used in the system. As for errors, the disk may not be initialized, not allocated, or simply have a file RAW system. How to troubleshoot these issues.
Most users create partitions on their hard drive for their convenience. They are commonly referred to as C, D, etc. and their usefulness cannot be denied by any means. Let's say you have written to one volume operating system, and on the second all other user files (music, photos, movies). When you reinstall the OS, the partition with your files will not even be affected, which will allow you to save the data and continue using it already in new Windows.
One of the extremely common problems that users often encounter is that the computer does not see sections of the hard disk and cannot find them. This problem occurs unexpectedly and can be caused by a number of reasons that affect the operation of the hard drive. Let's figure out what to do in this situation and how to solve the problem.
If suddenly your desired volume not only disappeared, but the format changed to RAW, then to solve the problem, I recommend that you familiarize yourself with.
Letter assignment
If your PC or laptop does not see one of the hard disk partitions, then the first step is to go to special menu control and check if it is displayed in the corresponding list. If it is there, then it needs to be assigned a letter.
Let's go through the process one by one:

The requested information will be instantly displayed on the screen. Must View local drives, and if there is a missing one, then you need to specify a letter.
To do this, you need:

For the changes to be successfully applied, you must restart your computer. As soon as the operating system boots up, check if the partition is visible, it should appear under the letter you specified.
Create a new volume
It is likely that by going to the management menu you will not find the missing area, instead of it there will be an unallocated part that cannot be assigned a letter, you can only create a new volume:

But at the same time, you will completely lose the files stored on it. Therefore, if you do not value them, then feel free to use this method, in other cases I recommend using the method discussed below.
All processes are analyzed using the example of Windows 7, however, in other versions, Windows XP/8/10, they will be similar.
Create a new section
If the first method did not help and the computer still does not see the hard disk partitions, then the problem may be that the OS itself cannot see it due to the loss of the file system, as often happens, while the data on it will still be saved.
In this case, to correct the situation, we will use one very effective tool, namely Acronis software Disk Director. With its help, we will recognize the disappeared local partition of the hard disk, separate a small part from it, from which we will make a new area with file system NTFS and then just merge them.

This may seem very difficult to some, but if you stick to next instruction, which describes in detail what to do in this situation, you can easily cope with this task:

After you create a partition, all that remains is to merge the problematic and new sections using the "Combine" function.
Now you need to save the changes and reboot the system. To do this, you need to enter the BIOS again and return the boot to its original place - from the Hard Disk. After exiting the BIOS, the system will automatically boot into Windows OS. We check the disk partition again, now it should definitely display correctly.
Partition Recovery
In almost all cases, when a logical partition of a hard drive disappears, it can be returned. For recovery, we will use the same Acronis Disk Director.
So how to do it:

The procedure for recovering information from a partition that the PC has stopped seeing can take a significant amount of time. The duration of the process depends on the amount and amount of data available on the disk. Therefore, you should be prepared for the fact that it is possible that the computer will work for a long time.
We hope that the solutions we have listed are easy to perform, and you can use them to fix the problems that have arisen.
To which I will write soon small review, most likely. But today the topic is a little different. During Windows installation 10 on it, I split the hard drive into two volumes: one for the system, the second for all sorts of multimedia nonsense. I've always done this because it's convenient, because you can completely format one volume without hurting your photos and music collection. I think a lot of people do the same. And after installing Windows, it turned out that the second volume (800 GB) is not visible, it simply does not exist! I don't know, it's just Windows 10 does not see the second hard drive volume after installation or the same happens with others Windows versions. There is a problem and it needs to be solved.
It may be useful for you to know. Bad sectors on a hard drive can be the cause of many unexpected computer problems. If they are, then this is not a sentence, because you can.
By the way, if you have two hard drives, then it is likely that Windows does not see the second hard drive, and not the second volume of the first hard drive. It is solved in the same way as in my case.
What to do if Windows does not see the second hard disk volume on the computer?
In general, if your Windows does not see a second hard drive or a second disk volume, like me, then follow this simple instruction. Everything about everything will take you no more than 3 minutes. I will write 2 options in parallel - for Windows 7 and for Windows 10.
Here, in general, and all. As I promised, it didn't take long. But from now on, if one of your friends says that his Windows does not see the hard disk partition, you will be able to explain to him with a smart look how to fix it.