Wireless router TP-Link TL-WR841ND. It is advisable to do this before setting up. VPN L2TP connection
TP-Link is well known to Russian users as one of the major players in the network devices market. Like most companies producing network devices for offices and home users, it has released several new models, the main advantage of which is support for the latest standard wireless communication- 802.11n. And although this protocol has not yet been officially certified, laptops based on the Santa Rosa Refresh platform, which includes the Intel 4965AGN wireless module that meets this standard, are already being sold. For many devices that support this wireless protocol, the technical specification states: “802.11n draft standard or 802.11 draft.” New standard is aimed at the user segment of the market, since most devices belong to the SOHO class, and therefore is not a competitor to the gradually deployed WiMAX network. Distinctive feature this standard - extended network coverage area and b O longer range, as well as a significant increase in data transfer speed - up to 300 Mbit/s.
Router TP-Link TL-WR841ND
In this article we will look at wireless TP-Link router TL-WR841ND, which is aimed at end users and working with a wide range of modern communication providers that provide Internet access services via a local network or DSL modem.
Specifications TP-Link TL-WR841ND
The new TP-Link TL-WR841ND model is positioned by TP-Link as an excellent solution for deploying wireless or wired network at home or in a small office. It belongs to a series of high-performance routers and can effectively work with both office and online gaming applications, providing high speed and reliable connections. This model has numerous settings and advanced functionality for organizing Internet access for both wired and wireless clients.
All new lines of TP-Link devices have an uncharacteristic for this company new design(previously the main color scheme was dark blue). Almost the entire body of the TP-Link TL-WR841ND router is made of white plastic, and there is a black lattice edging along the edges. On the front panel, which is made of black glossy plastic, there are nine indicator lights that display Current state device operation. There is also a QSS button, which activates the QSS (Quick Secure Setup) function, or, otherwise, WPS (Wi-Fi Protected Setup). This function allows you to more quickly and easily connect mobile devices with wireless communication modules to the router.
The rear panel contains connection interfaces: four LAN ports, a WAN port, two RP-SMA connectors for connecting external antennas, and a power connector. There is also a small hole for hard rebooting the router and resetting the settings to factory settings.
The router comes with two removable omnidirectional antennas (Omni) with a gain of 3 dBi, as well as a UTP network cable (cat 5), a power supply, and a CD with software and user manual (includes description in Russian).
The TP-Link TL-WR841ND router supports connecting up to four computers via the Ethernet 10/100Base-TX interface via RJ-45 connectors. The model has one external WAN port (as practice has shown, it is also Ethernet 10/100Base-TX), to which a network cable from an Internet provider or a DSL modem is connected. In addition to wired interfaces, the device has a built-in 802.11n (draft) wireless access point. Support for the new standard allows you to increase the data transfer rate over a wireless connection up to 300 Mbit/s and significantly expand the coverage area wireless network. Like most modern wireless routers, the TP-Link TL-WR841ND model supports the latest user authentication and wireless data encryption standards, such as WEP (64/128/152 bit), WPA, WPA2 and WPA-PSK/WPA2-PSK .
As already noted, it is supported new feature QSS based Wi-Fi technology Protected Setup. It allows you to connect mobile devices with a wireless module to the router’s wireless network by entering just a special pin code. This pin represents a profile network connection, resulting in a simpler connection to the network using all methods of security and traffic encryption. Of course, the connected device must also support this technology.
In addition to ensuring the security and privacy of user data over a wireless connection, this model supports client filtering by MAC address network card, blocking protocols and sites, and also has a built-in firewall that protects local clients from hacker attacks. Among other functions, it is worth noting the ability to control the connection speed of certain network clients, create virtual servers and support for demilitarized DMZs. The router also allows you to work in IPSec and PPTP VPN-Pass-Through modes, that is, in the modes of passing encrypted VPN traffic, it supports passing traffic of the IPSec, L2TP and PPTP protocols.
The router's external WAN port allows you to connect to the Internet using the three most well-known methods: Static IP, DHCP and PPPoE. Unfortunately, this model does not support connecting to the Internet via tunnel communication channels such as L2TP and PPTP. However, as the manufacturer TP-Link promises, it will be released by the beginning of July a new version firmware that will add support for PPTP and L2TP protocols.
You can't ignore the function parental controls and restricting access to the router functions (control can be carried out either by the user or the administrator). The router has a built-in SPI (Stateful Packet Inspection) firewall, the rules of which can be supplemented and changed by the user.
Testing methodology
The router's performance was tested in several stages. Conventionally, they can be divided into two groups: testing the wired network segment and testing the wireless network segment. The software that comes with the router was also evaluated. In order to evaluate the performance of the access point and the wired segment, some tests were carried out in conjunction with the wireless client. Acted as a wireless client ASUS laptop M50A with built-in Intel 4965AGN wireless network module, which supports the 802.11n standard.
The performance testing of this model was carried out using special software Ixia Chariot version 5.4, developed specifically for testing network equipment. On the network device under study, during testing, the built-in speed control functions for wireless and wired network segments were disabled, since their inclusion noticeably distorted the test results.
In the first test, the router's throughput was measured when transferring data between the WAN and LAN ports, for which client computers were connected to them via a gigabit wired interface, emulating the operation of an external Internet server and a local client.
Then, using the Ixia Chariot 5.4 software package, traffic via the TCP protocol was measured between computers connected to the router, for which the Filercvl.scr and Filesndl.scr scripts were simultaneously launched for 5 minutes, which simulate data transfer in both directions (each script is responsible for its own direction of data transmission). Data was transmitted both from the WAN to the LAN port and in the opposite direction.
Often information needs to be transferred between local network clients, so one test was to measure the maximum data transfer rate between two wired router clients. The computers were connected to the LAN ports of the router and interacted with each other, while data was transferred simultaneously in both directions. Routing speed was measured in exactly the same way as in the previous test - using the Ixia Chariot 5.4 package and the Filercvl.scr and Filesndl.scr scripts.
Test 3. Performance of the built-in wireless access point when exchanging wireless client traffic with the local wired client of the router
This test assessed the routing speed of data transfer between the LAN port and the wireless network segment (WLAN). To do this, via the gigabit interface to LAN port router, a computer simulating local user, and between the built-in access point and the wireless client (ASUS M50A laptop with an integrated Intel 4965AGN wireless network card) that supports the 802.11n protocol, a wireless connection was established using the 802.11n protocol. Then, using the NetIQ Chariot 5.4 software package over the TCP protocol, traffic between these workstations connected to the router was measured, for which the sendl.scr and recvl.scr scripts were launched for 3 minutes. Data was transmitted both from the LAN port to wireless clients and in the opposite direction. At the same time, routing was enabled, that is, the access point worked in routing mode. Then this test was repeated with the same settings with the only difference - data from the wireless client was transmitted over the WAN port.
In addition to testing the performance of the wireless and wired segments of the router under study, the coverage area of the wireless network was determined. For this purpose, the ASUS M50A laptop with built-in wireless adapter The Intel 4965AGN was moved to three specific areas of the office. At the same time, it was connected to the wireless network of the router under study, and at each of these points using special program Passmark WirelessMon 2.013 determined the signal strength of this wireless network. To clearly show the dependence of signal level on speed, at these three points we measured the average data transfer speed between the wired and wireless segments of the router (Table 1).
Table 1. Speed signal level compliance
data transmission
Distance from router |
Signal level, % |
Signal level, dBm |
Average speed, Mbit/s |
|
10 m, wall |
||||
12 m, two walls |
||||
15 m, three walls and a server room |
When testing the signal level, the router was configured to operate on the third channel, while all sorts of functions, such as traffic limitation, encryption and authorization, were disabled.
The result of testing the signal level of the access point built into the router under study is shown in table. 2.
Table 2. Speed signal level compliance
data transmission
Test results
Test 1. Routing speed when working with local provider resources
In the first test, the router's throughput was measured when transferring data between the WAN and LAN ports, for which computers were connected to them via a gigabit wired interface.
In Fig. Figure 1 shows the result of testing the TP-Link TL-WR841ND router when transferring data from the LAN to the WAN port (LAN-to-WAN) and back (WAN-to-LAN).

Rice. 1. Network traffic when transferring data between LAN and WAN network segments
As follows from the test results, the average routing speed from the WAN to the LAN port is 62.3 Mbit/s, and the routing speed in the opposite direction is 22.4 Mbit/s. At the same time, the total maximum data transfer speed is no more than 84.3 Mbit/s. These figures indicate that the router under study allows you to transfer data at a speed almost equal to the maximum speed local network, which usually does not exceed 100 Mbit/s in full duplex mode. We also note that this speed is enough to download information from the provider’s local resources and simultaneously watch high-definition online videos, since in the local network itself the speed rarely exceeds 70 Mbit/s due to the congestion of internal channels.
Test 2. Router performance when exchanging traffic between clients on an internal wired network
For the TP-Link TL-WR841ND router, the maximum data transfer speed between two wired clients of the router was also measured. The computers were connected to the LAN ports of the router and interacted with each other, while data was transferred simultaneously in both directions.
In Fig. Figure 2 shows the result of testing the TP-Link TL-WR841ND router when transferring data between clients of the router’s local network.

Rice. 2. Network traffic when transferring data between local computers
via wired network segment
In this test, the data transfer speed between user computers averaged no more than 65.6 Mbit/s. In the opposite direction, the speed was approximately the same - 63.2 Mbit/s. This result clearly shows that the TP-Link TL-WR841ND router under study successfully copes with this task, and the overall data transfer speed reaches more than 128 Mbit/s. Such high speed is ensured precisely thanks to the use of gigabit LAN network interfaces, and it is more than enough to solve most of the user’s network tasks.
Test 3. Performance of the built-in wireless access point when exchanging wireless client traffic with an external server located behind the WAN interface
This test assessed the routing speed of data transfer between the LAN port and the wireless network segment (WLAN). Then this test was repeated with the same settings with the only difference - data from the wireless client was transmitted over the WAN port.
As follows from the test results (Fig. 3), the data transfer rate for both tests is very high. Thus, when transferring data between a wireless client and a router local network (LAN) client, the speed in each direction was approximately 40.1 Mbit/s.

Rice. 3. Network traffic when transferring data between WLAN and LAN segments
When exchanging traffic between a wireless client and a computer connected to the router's WAN port, the speed was almost identical and did not exceed 39.8 Mbit/s in each direction. The speeds were almost the same both when exchanging traffic between the wireless segment and the WAN, and when exchanging traffic in the internal network of the router (WLAN-LAN). Since the 802.11n protocol in reality provides speeds of no more than 70-80 Mbit/s, it can be argued that in this case the routing speed corresponds to the protocol speed of the wireless network segment.
The editors express gratitude to the Ost-com company (495 721-80-75, www.ost-com.ru) for providing it for testing wireless router TP-Link TL-WR841ND.
Front Panel
LED indicators are located on the front panel (from left to right).

Back panel

The rear panel contains the following items (from left to right):
ON/OFF : Power on/off.
POWER
:
Power connector. Use the power adapter included with the TL-WR841ND Wireless Router
1,2,3,4 (LAN)
:
These ports (1,2,3,4) are used to connect the router to computers on the local network.
WAN
:
The WAN port is used to connect an Ethernet network (provider).
WIFI ON/OFF: Used to enable/disable wireless broadcasting.
WPS/RESET
:
This button is used to enable WPS and to reset the router settings. To turn WPS on/off, simply press this button without holding it for more than five seconds; To RESET settings, press the button and hold it for more than five seconds. .
Wireless antennas
:
are used to receive and transmit data via a wireless connection.
Connecting a router
- Choose a suitable location for the router. It is recommended to place the router in the center of the wireless network.
- Adjust the antenna position. Most often the vertical position is best.
- Connect your computer to the local network via ports Router LAN(if you already have a wireless network adapter and want to use a wireless network connection, you can skip this step)
- Connect the incoming Ethernet cable to the WAN port of the router
- Connect the power adapter to the appropriate connector on the router, and plug the other end into a power outlet. Turn on the router by pressing the ON/OFF button.
Setting up a computer to connect to the router:
- In your computer's TCP/IP protocol settings, select Obtain an IP address automatically.
To access the router configuration, open a web browser and enter the default address http://192.168.0.1 in the browser's address bar.
A login window similar to the one shown in the image below will appear. In the User and Password field, enter admin, using lowercase. Then click the button OK or key Enter.
Setting up the router
After entering your Login and Password, the main Status window and the router configuration menu will open. The equipment can be configured in two ways: Fast And Individual setting.Quick setup
For quick setup you need to select the item in the Main menu Quick setup
This will open a dialog box that allows you to select required parameters connections. In the first window you need to select Further.
Then a window will appear asking you to select your connection type. The router supports the five most common methods of connecting to the Internet - Dynamic IP address, Static IP address, PPPoE, L2TP and PPTP. 
When choosing a connection type Dynamic IP You will be taken directly to the Wireless settings page.
When choosing a connection type Static IP address, the following window will be displayed 
The settings that need to be entered in the appropriate fields are provided by the provider.
IP address– This is the WAN IP address visible to external users on the Internet (including your Internet Service Provider). Enter the IP address in this field.
Subnet mask– Subnet mask used by the WAN IP address.
Main gate– If necessary, enter the IP address.
Primary DNS server– If necessary, specify the IP address of the DNS server.
Secondary DNS Server– If you received a different DNS server address from your ISP, enter it in this field.
When choosing a connection type PPPoE, the following window will be displayed 
Username: Password– Please indicate Username And Password, received from your Internet service provider. These fields are case sensitive.
Confirm password - Re-enter the password you received from your ISP to make sure the password you entered is correct. If the password differs from the value entered when confirming the password, a window will appear in which it will be written that the password does not match the previously entered one.
Dynamic IP address– Use a dynamic IP address provided by your ISP to connect to your local network.
After pressing the button FURTHER A window with wireless network settings will appear. 
Wireless broadcasting– By selecting the appropriate item from the drop-down menu, you can enable/disable the function.
Wireless network name– Specify a value of up to 32 characters. The default SSID is TP-LINK_XXXXXX (XXXXXX is the last six unique characters of the router's MAC address). This field is case sensitive. For example, TEST And test- This different meanings.
Region– Select a value from the Russia drop-down list.
Mode– Router wireless data transmission mode. Allows you to select the broadcast standard b, g, n or mixed. The optimal setting is mixed mode, because it allows you to automatically connect to any device, regardless of the broadcasting standard (device).
Channel width– Select the appropriate value from the drop-down list. Default value Auto in which the device automatically adjusts the channel width for clients (it is better not to change).
Channel– This field specifies the operating frequency to be used. Default value Auto, so the access point will select the appropriate channel automatically. Change channel wireless connection not necessary.
Disable protection– The security function can be turned on or off. When the function is disabled, wireless stations can connect to the router without encryption (without a password - the network is not protected). We strongly recommend that you select one of the options to ensure security.
WPA-PSK/WPA2-PSK– WPA selection based on PSK password.
PSK Password– You can use format characters ASCII or Hexadecimal symbols
When choosing ASCII the key can contain numbers from 0 to 9 and letters from A to Z and its length must be from 8 to 63 characters. When choosing Hexadecimal, the key can consist of numbers from 0 to 9 and letters from A to F, and its length must range from 8 to 64 characters. Please note that the key is case sensitive. This means that the use of capitals and lowercase letters affects its meaning. You should write down the key and other wireless data security settings somewhere.
Without changes– When selecting this option, the wireless data transfer configuration will remain unchanged!
By pressing the button Further, You'll find yourself in the window Completion. Click the button Complete to complete Quick settings. 
The router is configured and ready to go.
INDIVIDUAL ROUTER CONFIGURATION
hAfter successfully logging into the router, you will see fifteen main menus on the left side of the web utility. The right side contains reference Information and instructions. 
First menu item STATE. It displays general information about the device status. The information in this window is read-only and cannot be edited. 
To individually configure the router, you need to select the item in the menu NET, and select a section from the pop-up menu WAN.

By selecting Network - WAN you can configure network settings.
Setting up a DHCP connection
If you are using DHCP to obtain an IP address (automatically obtain settings), select Dynamic IP, and the router will automatically receive the IP parameters.
This window shows how WAN settings, including IP address, subnet mask, default gateway, and so on, are dynamically assigned by your ISP. To update the settings, you must click the button Update. To reset the values, use the button Release.
MTU size– Usually meaning MTU(maximum package size) for most Ethernet networks is 1500 bytes. We recommend that you do not change this value.
Primary DNS and Secondary DNS are assigned automatically. Use this function It is not necessary when assigning IP addresses dynamically.
Node name- This option allows you to assign a hostname to the router (not used on your network).
Get an IP address using Unicast DHCP– Some ISPs' DHCP servers do not support broadcast applications ( this option not used on your network).
Click the button Save to save settings.
Setting up a PPOE connection
If you are using a connection via the PPPoE protocol, then you should select the WAN option: PPPoE/Russia PPPoE. 
When setting up a connection via PPPoE, you must specify the following parameters:
Username: Password– Enter the username and password you received from your provider from your provider. These fields are case sensitive.
Secondary connection– In this field you must select the connection type Dynamic IP.
Connection modeWAN– In this section you need to select the item Connect automatically ( If the connection fails, it is automatically restored).
After selecting the parameters on this page, you must click the button Save.
Setting up a wireless connection
On the menu Wireless mode need to choose Wireless Settings. 
This menu item performs basic parameter settings. 
Network name– At this point you need to enter the name of your network to which you will connect. Enter a value of up to 32 characters. The default SSID is TP-LINK_XXXXXX (XXXXXX is the last six unique characters of the router's MAC address). This field is case sensitive. For example, TEST And test– these are DIFFERENT meanings.
Region– At this point you must select Russia.
Mode– Select mode 11bgn mixed. This mode allows all wireless stations of the 802.11b, 802.11g and 802.11n standards to connect to the router.
Channel width– Select channel width Automatically.
Channel- In this field you set the operating frequency that you are going to use. The default mode is Auto, thus, the access point will automatically select the most suitable channel .
This parameter should be left in Auto mode.
Maximum transfer rate (Tx)- In this field you can limit the maximum data transfer speed of the router (Tx).
Enable wireless broadcasting– The router's wireless mode can be enabled or disabled to allow access to wireless stations. Wireless broadcasting can be turned on/off using the WIFI ON/OFF button on the router. By default, this item should be enabled.
Enable SSID Broadcast- When wireless clients search for the wireless network they want to connect to, they will see the SSID (network name) sent by the router. If you check the box Enable SSID Broadcast, then the wireless router will openly broadcast its name (SSID). If the checkbox is not checked, the network name will not be displayed in the list of networks and to connect you will need to manually enter the network parameters for the connection.
WDS- This field should be disabled (blank).
Click the button Save to apply your settings.
Setting up wireless network security.
By selecting from the menu Wireless mode- Wireless Security, you can configure the security settings of your wireless network.

Disable protection– If you do not want to use wireless security, click on the appropriate option. In this case, your network will not be protected and it will be possible to connect any WiFi device without a password. (Not recommended)
Version– You must select the WPA-PSK encryption algorithm version from the drop-down list. The optimal mode is type WPA-PSK(WPA shared key).
Encryption- When choosing WPA-PSK or WPA You can specify one of the following values for the Authentication Type: TKIP or AES as an encryption algorithm. ( Not recommended enable encryption type TKIP, because this encryption is not supported by the 802.11n broadcast standard). In this setting item you need to select a standard AES.
Wireless password– Here you can specify a password of length from 8 to 63 characters in ASCII encoding (that is, it is acceptable to use uppercase and lowercase letters and numbers of the Latin alphabet).
Group key update period– This field must contain the value 0.
This completes the setup of your router and it is ready to use.
Complete information about the technical specifications of an entry-level network device from one of the leading manufacturers, its strengths and weaknesses, user opinions and real reviews. TP-Link TL-WR841ND: it is this router that will be discussed in detail in this material. It's perfect for creating a small computer network with Internet access and extended Wi-Fi coverage area.
Strengths and weaknesses of this router
For two significant shortcomings Reviews indicate this router. TP-Link TL-WR841ND is not equipped USB port. Accordingly, it cannot perform the functions of a file server (because of this, you cannot connect to it external storage), a print server (for this reason it is impossible to attach a printer to it and organize the output of documentation) or provide the possibility of alternative data exchange with the global web (it is impossible to install external modem to connect to cellular networks). The second disadvantage is the lack of support for the most advanced information transfer standard - 802.11ac, which allows you to transfer data at speeds above 1 Gb/s.
But if you take into account the positioning of the device and its cost, it becomes obvious that for this niche all the previously mentioned disadvantages are not so relevant. These options are available on more expensive routers aimed at creating large wireless networks with an even greater range. Reviews also highlight a number of advantages of this network device. TP-Link TL-WR841ND boasts the following strengths:
High transmission speed, which in 802.11n mode can reach 300 Mbit/s.
The presence of two removable antennas at once allows you to significantly increase the range of your wireless network. According to the documentation, outdoors it can cover a circle with a diameter of up to 150 meters.
Four RJ-45 ports allow you to organize the wired part of a computer network using a compressed twisted pair.
The presence of a special button allows you to deactivate the wired network segment if necessary.
Convenient and intuitive display system on the front panel.

Technical specifications
Quite good technical specifications has TP-Link TL-WR841ND. Its characteristics in this regard are as follows:
Operating frequency range: 2.4÷2.4835 GHz.
Supports passcode encryption up to 152 bits.
Wireless network signal amplification 2x5 dB.
11 possible channels to create a wireless network.
Information transfer speed in the wireless segment is up to 300 Mbit/s.
Increased diameter of the WiFi signal coverage area, which in open areas can reach 150 meters.
The presence of a built-in firewall provides the maximum degree of security for the internal computer network.
Equipment
The TP-Link TL-WR841ND router is equipped as follows:
2 removable antennas.
A quick guide to quickly setting up your router.
Power supply with 9V output voltage and DC 0.6 A.
CD with electronic version of complete documentation and drivers.
1 m long twisted pair cable crimped on both sides.
User manual and warranty card.

Timing connection and setup
This material recommends configuring the TP-Link TL-WR841ND in 2 stages. The setup is greatly simplified, and any owner of such network equipment can do it. First you need to assemble a temporary diagram. Moreover, it is best to do this in relative proximity to a computer or laptop. You will also need a free 220 V socket to connect the power supply of the network device to the network alternating current. The timing circuit in this case, with the equipment completely turned off, is assembled as follows:
Install the power supply into the outlet. Its wire, in turn, is connected to the corresponding socket of the router.
On one side it is connected to any yellow port with a serial number from 1 to 4. The other end is installed in the network card port personal computer or laptop.
We check the correctness of the assembled circuit. After that, turn on the Power toggle switch on the back of the router. We also turn on the computer and wait until it finishes loading.
In the future, you need to perform the following manipulations with the router software:

Although TP-Link router TL-WR841ND is already out of production, I decided to prepare detailed instructions by setting it up. With photos, screenshots, and detailed description setup process. This should be a guide for dummies. Which, it seems to me, will be useful to many not only for setup, but also in the process of solving some problems with the router. Since this is a very popular router, I'm sure that this manual will be relevant for many more years.
TP-Link TL-WR841ND is indeed a very popular model. This router, together with its “little brother” TL-WR841N (which essentially differs only in non-removable antennas) almost always occupied top sales in the most popular online stores. And their popularity is noticeable even from the instructions on this site, and from the questions in the comments. This model has been updated and improved many times. There are 11 hardware versions. Really good router with good value price quality.
Concerning TP-Link settings TL-WR841ND, then everything is very simple. , which comes included, or through the web interface. I will configure it through the control panel (via the browser). As with any router, the main thing is to set correct parameters to connect to the Internet. Then, you need to set up a Wi-Fi network and preferably change the password to enter the control panel. If you have IPTV, then you will also need to make some settings.
I will try to describe everything in as much detail as possible. In some cases, I will provide links to other useful articles. Don't collect all the settings (which won't be useful to many) on one page, and so that the instructions are not very large and confusing.
It is advisable to do before setting up:
How to connect TP-Link TL-WR841ND and go to settings?
You can immediately connect the power adapter to the router and plug it into a power outlet. If the indicators on the router do not light up, check whether the power is turned on with the button located near the connector for connecting the power adapter.
if you have desktop computer, or a laptop, then I advise you to configure the router according to network cable by connecting it to your computer. Use the included network cable to connect the TP-Link TL-WR841ND to your computer.

Then connect the cable from your Internet provider or ADSL modem to the WAN port of the router.

Make sure you have everything connected correctly.
What to do if you don’t have a computer/laptop?
In this case, you can configure the TL-WR841ND from your phone or tablet. It is clear that connecting via a network cable will not work. Therefore, you need to connect to the Wi-Fi network, which the router will distribute immediately after turning it on. The factory name of the Wi-Fi network is indicated (though not always) on the sticker on the bottom of the router. If the network is closed with a password, then the password itself (PIN) is also indicated on the router itself.

When everything is connected, we sit down at the computer, or take mobile device from which we will configure TP-Link TL-WR841ND, open any browser and go to the address tplinkwifi.net. You can also open the settings at 192.168.0.1 , or 192.168.1.1 .
You can see the address for entering the router settings and the factory login/password on a sticker on the device itself.
The address may depend on the hardware version of the router. On the authorization page you need to specify your login and password. Factory settings: admin and admin.

Articles that may be useful at this stage:
- What to do, if .
To configure, you can use the Quick Setup wizard. Perhaps it will be more convenient for you.

I will show you the setup process without a wizard.
Setting up an Internet connection
Once we have logged into the router's web interface, the first thing we need to do is set up an Internet connection. Simply put, in the router settings, select the type of connection that your provider uses, and, if necessary, set the necessary parameters.
To set everything up without any problems, you must have accurate connection information. You need to know what type of connection to specify in the settings. You can check this information with your provider's support. And if you do not have "Dynamic IP", then you will need to set Extra options. Typically this is a username and password. There may also be a server address. This information is provided by the provider. It would also be good to clarify whether there is a binding by MAC address.
Only when you have the necessary information can you start setting up. Otherwise, there may be many unsuccessful attempts.
Dynamic IP (DHCP)
If your provider uses this type of connection, then the Internet through the router should work without additional settings (if the router is at factory settings). Since "Dynamic IP" is the default.
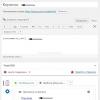
In the "Network" - "WAN" section you need to check whether the required connection type is installed.

If everything is connected and configured correctly, but the Internet does not work through the router, then most likely your provider is binding by MAC address. Please clarify this point. If there is a binding, then you need to clone the MAC address on the router from the computer to which the Internet was previously connected, or register the MAC address of the router with the provider. It is indicated on the bottom of the sticker.
You can clone a MAC on the “Network” tab – “MAC address cloning”.

The router must be connected via cable to the PC to which the Internet was connected.
PPPoE and PPTP on TL-WR841ND (Rostelecom, Beeline)
In the WAN section, select the appropriate connection type PPPoE or PPTP. Please indicate the required parameters below. Typically this is a username and password. Also, most likely you need to set “Dynamic IP”, and be sure to check that “Connect automatically” is set.

After this, you can try to start the connection. And if the connection is established, then save the settings.
PPTP is configured in exactly the same way. Only there you may still need to specify the server address (it, like other parameters, is issued by the provider).
What to do if there is no Internet connection?
Check the cable connection to the WAN port. Make sure you are setting the correct settings. And check if there is a binding by MAC address. You can find out all this from your provider. Also pay attention to how the Internet indicator behaves. On the TP-Link TL-WR841ND it should be actively blinking green. Make sure that the Internet works directly (without a router).
Important! If you started a connection to the provider before installing the router on your computer, you don’t need to do this now. We configured this connection on the router. Now it will establish a connection to the Internet.
If the Internet through the router does not work, then there is no point in continuing the setup.
Useful articles
The products of the No. 1 chain brand in China have long been known to domestic users, and are known as a fairly high-quality product for relatively little money. Not long ago we already looked at one of the top models of routers from this company, TP-Link TL-MR3420, as well as a kit for organizing a local network via an electric TP-Link TL-PA211. Today we received two more devices from this manufacturer in our testing laboratory. They do not shine with technical delights, but they can please the widest range of users, since they are designed for organizing a wireless Wi-Fi network of the 802.11n standard with throughput up to 300 Mbit/s. We are talking about the TP-Link TL-WR841ND router and the TP-Link TL-WN822N USB adapter, which we are starting to study.
⇡ Technical specifications
| Router TP-Link TL-WR841ND | |
|---|---|
| Standards | 10/100 Base-T |
| Ports | 1 x RJ-45 WAN (10/100 Mbps) 4 x RJ-45 LAN (10/100 Mbps) |
| Frequency range, GHz | 2,4-2,4835 |
| 20 | |
| Antennas | 2 x external detachable omnidirectional, 3 dBi |
| Safety | IEEE 802.1x, WEP, WPA/WPA2, WPA-PSK/WPA2-PSK Connection Inspection (SPI) Firewall Access control based on a list of MAC addresses |
| Network protocols | PPPoE/PPTP/L2TP |
| Functions | DynDNS, DHCP, DMZ, QSS |
| Nutrition | External power adapter (9V/0.85A) |
| Dimensions, mm | 200x140x28 (excluding antennas) |
| Warranty, months | 12 |
| price, rub. | 1 250 |
| USB adapter Wi-Fi TP-Link TL-WN822N | |
|---|---|
| Standards | IEEE 802.11b/g/n (300 Mbps) |
| Ports | 1 x Mini-USB |
| Frequency range, GHz | 2,4-2,4835 |
| Max. wireless signal power, dBm | 20 |
| Antennas | 2 x external folding omnidirectional, 3 dBi |
| Safety | WEP, WPA/WPA2, WPA-PSK/WPA2-PSK |
| Operating modes | Ad-Hoc/in infrastructure |
| Additional functions | support Sony PSP, QSS |
| Nutrition | from the computer's USB port |
| Dimensions, mm | 90x68x17 |
| Warranty, months | 12 |
| price, rub. | 800 |
The TP-Link TL-WR841ND model is a classic hundred-megabit router with wireless point access operating in Wi-Fi 802.11b/g/n networks. The device is equipped with two standard detachable antennas with a gain of 3 dBi, which are part of MIMO technology, which provides high performance of the wireless network segment, as well as a wide coverage area and high signal stability. The wired segment of the router has four RJ-45 ports for connecting LAN clients and one external WAN port. All of them belong to the 10/100Base-TX standard.
Model TP-Link TL-WN822N for a regular USB adapter Wi-Fi networks 802.11 b/g/n is not very compact. But it, like the router, has room for two powerful omnidirectional antennas with a gain of 3 dBi, which should provide greater performance compared to internal antennas various devices, including laptops, which do not always cope well with search weak signal Wi-Fi. Among the interesting features of the new product, one cannot fail to note the officially announced work of the adapter with the Sony PSP console.
One of the options for a wireless network structure based on the TP-Link TL-WR841ND router, the TP-Link TL-WN822N USB adapter, as well as other TP-Link network devices
It should be noted that both new products are equipped with a built-in QSS (Quick Secure Setup) function for quickly setting up a secure wireless connection. Simply click on the appropriate button on the body of any device, and the automated QSS tool will automatically establish a connection using WPA2 encryption algorithms. The user will only have to set the desired password. In fact, this function is nothing more than the more well-known WPS (Wi-Fi Protected Setup) technology, just called differently.
Quickly set up a secure wireless connection using the QSS function
⇡ Equipment
The boxes in which the new products are delivered are decorated in the usual light green colors for all TP-Link network devices. The delivery kits are no different. Together with the TP-Link TL-WR841ND router, the user will find:
- a pair of folding antennas,
- power adapter,
- Ethernet cable,
- CD with proprietary software and operating instructions in PDF format,
- printed quick installation guide in Russian.

Packaging of new products

TP-Link TL-WR841ND router delivery kit
The TP-Link TL-WN822N USB adapter has fewer accessories. However, he doesn’t need more:
- miniUSB-USB cable,
- CD with proprietary software and operating instructions in PDF format.

TP-Link TL-WN822N USB adapter included
⇡ Appearance and ergonomics
With the change in design of the entire TP-Link product line, the network devices of this company began to look modern and somehow light. In some ways they even surpass the most beautiful examples from various famous manufacturers. For example, here is one of the heroes of our review today, the TP-Link TL-WR841ND router. This is a rare case when the device looks even better in real life than in the advertising photo.
Firstly, as it turned out upon closer acquaintance, the snow-white body of the new product is made not of easily soiled, easily scratched varnished plastic, but of slightly rough matte plastic. It seems like a small thing, but for many it will be very pleasant. At the same time, a matte router looks no worse than a glossy one! The secret is that the eye is constantly distracted either by the black trim elements or by the original concentric ventilation slots - a beautiful and at the same time practical design concept. By the way, the removable antennas are also made black, thanks to which the appearance of the TP-Link TL-WR841ND takes on very serious shades. A number of standard LED indicators are slightly retracted and are also located on a black insert.

Appearance router TP-Link TL-WR841ND
The bottom of the router is no less attractive. It is all cut up with small ventilation holes, between which there is room for two plastic loops, by which you can hang the router on the wall. In addition to the vertical placement of the device, the usual horizontal installation on four small rubber feet is also provided.

Bottom of the TP-Link TL-WR841ND case
All connectors and interfaces are traditionally concentrated on the rear wall of the router. In addition to the RJ-45 ports specified in the specification, there is a socket for connecting a power adapter, a reset button for all settings, a button for quickly setting up a secure QSS wireless connection, and a pair of RP-SMA connectors for installing antennas included in the package. In addition, on the back panel of the router there was a place for the power on/off button, which developers often “forget” about. Meanwhile, using this button is much more convenient than every time reaching for a plug to the socket, located, as a rule, in the far dusty corner.

Rear of the TP-Link TL-WR841ND case
Although the TP-Link TL-WR841ND router stands out from the crowd of its own kind, it still has a classic layout. In contrast, the TP-Link TL-WN822N USB adapter looks completely unusual. With the antennas folded, it is a small box of varnished white plastic with rounded edges, no larger than a pack of cigarettes. The foldable antennas located on the sides can be rotated independently of each other by up to 180 degrees and thus achieve the best signal.


Bottom view of the TP-Link TL-WN822N USB adapter
The adapter has a single QSS button for quickly setting up a secure wireless connection, as well as led indicator activity. The developers have provided only one installation method - on a table or other horizontal surface. At the same time, it will be connected to the computer with a one and a half meter USB cable.

Appearance of the TP-Link TL-WN822N USB adapter
I must say that the new product not only looks attractive, but is also easy to use. Such a compact and lightweight box is not at all difficult to carry in a bag with a laptop. At the same time, the adapter still takes up little space, and its sensitivity is higher compared to more compact samples that have internal antennas.
⇡ Internal structure
TP-Link is a partner of the world's largest supplier of wireless network solutions, Atheros, so it is not surprising that chips from this particular manufacturer were found inside the new products. For the router, the developers chose the Atheros AR7241 processor operating at 400 MHz. Interestingly, this processor is designed to work with a USB 2.0 interface, but our new product does not provide one.

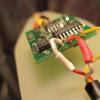
Internal structure of the TP-Link TL-WR841ND router

Atheros AR7241 processor
The processor does not have its own built-in wireless interface, so nearby system board Another important Atheros AR9287 chip is installed, which plays this role. The controller belongs to the fourth generation of wireless ready-made solutions from Atheros and is compatible with 802.11b/g/d/eassets/external/varn standards and 2x2 MIMO enhanced reception technology. Interestingly, on the motherboard around the wireless module there is space for installing a shielding metal casing, but the new product does not have the casing itself.

Radio frequency wifi controller Atheros AR9287
In addition, a module is installed on board the router DDR memory SDRAM Zentel A3S56D40FTP-G5 with a capacity of 32 MB manufactured by Zentel Electronics Corp. The soldering of all components is very neat and does not cause any complaints.

Buffer memory module Zentel A3S56D40FTP-G5
Compact USB adapter built on printed circuit board with one-sided installation of elements. Moreover, the wireless module of this device, unlike the one in the router, is covered with a metal casing, so it is not possible to find out its model. However, we can assume that this is an Atheros AR9102 controller, but we will not say whether this is so. But the USB interface controller is in plain sight - this is the Atheros AR9170 chip.

Internal structure of the TP-Link TL-WN822N USB adapter

Atheros AR9170 USB interface controller
Read also...
- Cadaques in Spain. My review and photo. Cadaques, Catalonia Cadaques Spain how to get there from Barcelona
- Cart for an online store at the front or Writing modular javascript
- Falling snow on jQuery or html New Year greeting card template
- Where to see what version of Android is installed on an Honor and Huawei phone How to find out the Huawei serial number