How to make exclusive mode 1c. Removing marked objects
In split mode. This means that they can use the program at the same time (jointly). But there are certain tasks for which you need to log in network package monopoly. Let's look at how to install or remove monopoly mode in 1C.
Monopoly is necessary to perform special tasks.
First of all, you can only start a conversation about the likelihood of switching to exclusive mode when a network platform is installed on the PC. Otherwise (the local option is deployed), you will always work exclusively and there is no other way.

What do we need in “exclusive” mode and why should we run it?
Reindexing the database
Incorrect closing of the 1C program (for example, during a sudden power outage) requires re-indexing of the infobase. This software requirement and without performing this procedure, 1C simply will not open. But reindexing can only be performed exclusively.
IMPORTANT. After completing it, you need to exit the mode and enter separately. To provide connectivity for others.
Removing marked objects
Sometimes you need to remove some objects from the program. First, they are “preliminarily” marked “for deletion” (by right-clicking from context menu). If the user changes his mind, then this mark can be removed from the object (in the same way).
To directly delete pre-labeled entries, all users will need to exit the program. And then someone alone will be able to carry out the deletion exclusively by entering the main menu tab - “Operations”, then “Deleting marked objects”.
After this, the connections of this object with other performed operations are checked. If one is detected, deletion will not occur. After all, such an action will disrupt the logical chain of events, documents, and operations.

Opening periods
The final data in 1C is taken into account monthly and quarterly. This is not someone’s whim, but compliance with accounting rules. When a new period begins, you need to “open” this period. This can only be done through a running exclusive input. To create a new period, you need to open the main menu on the “Operations” drop-down tab and select “Manage accounting results”:

Important points of monopoly work
The general rule of using an exclusive login determines that only one user has the right to be in the program at a real time. And if someone has already entered it in this way, then access to others will be denied. If someone already works separately in it, then it will not be possible to enter exclusively. In both cases, the system will display a “Lock Error” message.

IMPORTANT. It is practical to know that with monopoly work, the efficiency (speed) of actions increases by twenty percent.
Prohibition of using the mode
To prohibit exclusive login, a specific user needs to uncheck the “Run exclusive mode” checkbox in the settings of his rights (in the Configurator). Then, when attempting such a login, he will be sent the message “Insufficient rights”:

Let's consider those that interest us available methods entrance.
Specifying the login mode
At the very beginning, when launching the selected infobase, the desired “Exclusive” mode is selected by checking the corresponding checkbox.
Shortcut properties
To run 1C in desired mode a shortcut is created that, bypassing the launch window, will immediately load the required database (the command 1cv7.exe enterprise/M is used).
Configurator
When loading information security through the Configurator, the enterprise is automatically loaded exclusively. For some reason, rarely does anyone remember this kind of entrance when they need it.
Monopoly in figure eight
In 1C 8, the transition to this mode is carried out from the program itself. Being in the eight, you can only move into it when you are alone. In order to check the number of users, you need to call the “Active Users” command in the Configurator on the “Administration” tab. Then a list of them will be displayed.
Now you know how to run 1C in exclusive mode. Using one of the methods, you will certainly achieve the desired result in both seven and eight.
Users of network versions of 1C:Enterprise often ask questions regarding working in exclusive mode: what additional functions does this mode provide, what does it affect, whether it is necessary to set the “Exclusive” flag if you know that you are working alone in the database, etc. So, in order.
- The “Exclusive” mode is present only in network versions of 1C. If you do not have a network version, then you will log in exclusively by default - you will not even be asked about it.
- What methods exist for loading the database exclusively. Firstly, when starting the infobase, you can check the corresponding “Exclusive” checkbox; secondly, when starting the infobase via a shortcut, you can specify the /m key (For launch keys, see the corresponding issue) Thirdly, if you launch information base from the “Configurator” mode (menu “Tools” - “1C:Enterprise” in the configurator), the program will automatically start loading in exclusive mode. The third option is often forgotten, but usually until one of the accountants gets tired of waiting for you to free the base.
- Rule for handling the “Exclusive” mode: only one user can work in this mode at a time. If someone has already entered the database exclusively, then you will no longer be allowed in (neither in exclusive nor in shared modes). If someone works in a separate mode, then you will not be allowed in there exclusively. In both cases you will receive the message “Blocking error...”
- Exclusive mode is designed to perform certain operations:
- Indexing the information base. If you go to new base(for example, after installation) or you exited the previous session incorrectly, you must log in in exclusive mode. The system will automatically suggest reindexing the database.
- After re-indexing, you must remember to exit the database and log in in shared (non-exclusive) mode in order to allow other users into the database.
- In exclusive mode, marked objects are deleted. This is done in the menu “Operations” -> “Deleting marked objects”.
- Do you need to log in to Monopoly if you know that you are working alone in the database? Exclusive procedures - 2a, 2b, 2c - are not performed often. Therefore, you should not enter exclusively because of them. But in exclusive mode, the overall system performance increases significantly. I haven’t seen any statistical data or measurements, but according to my estimates, from 10% to 25%. In exclusive mode, documents are processed faster and reports are generated.
- Therefore, if you know that you will not cause inconvenience to anyone, then work exclusively.
- If you administer 1C, then it is possible that one of the users should be prohibited from working in exclusive mode. In this case, there is no need to reinvent the wheel - just in the configurator, in the set of rights for this user, uncheck the “Run in exclusive mode” checkbox. In this case, the user will receive the message “Insufficient access rights” when logging into the database.
- Exclusive mode is present in both dbf and SQL versions of 1C Enterprise. Previously, problems often arose with the fact that someone was working in exclusive mode in a SQL database (SQL 7.0), and a second user tried to log in to the same place and everything crashed (along with the one who was in exclusive mode). Solution - you need to install ServicePack 2 for SQL 7.0 and then there will be no crash - the second user will not be allowed in, and the data will remain intact. When configuring, sometimes it becomes necessary to run procedures created by you in exclusive mode (for example, if you plan to exchange data with another infobase, then it is better to do this exclusively). To determine the operating mode there is: special method ExclusiveMode()
.
Return value: Number 1 - if the program is launched in exclusive mode; Number 0 - if the program is running in network mode. A small example:
Procedure Generate()
If ExclusiveMode()=1 Then
UnloadData();
Otherwise
Warning("Data upload must be done in exclusive mode");
Age;
endIf;
End of Procedure
Maybe I forgot to indicate some details, but this, in my opinion, is enough for a good job. Exclusive mode is a special mode of operation of the 1C database, in which only 1 session has access to the database. The article discusses the features of using this mode. data changes and at the same time exclude the influence of other sessions on the results of work. In particular, the exclusive access mode is established when performing some service procedures (deleting marked objects) and calling some methods of the built-in language ( SetTimeZoneInformationBase(), DeleteObjects (), etc.).
Setting exclusive mode
Installation and removal of exclusive mode is performed using the method
SetExclusiveMode(<МонопольныйРежим> )A Boolean value is passed as an input parameter.
Exclusive mode can only be set subject to simultaneous fulfillment of conditions:
- Only one user (you) works in enterprise mode;
- the user has the right to change the exclusive mode (played by the “Exclusive mode” flag of the root of the metadata tree).
- there are no active transactions (explicit or implicit).
If any requirement is not met, the method will fail with an error like
Check you can set exclusive mode using the method
ExclusiveMode()The method returns True if exclusive mode is set.
In exclusive mode, the creation of new sessions is prohibited, with the exception of one background job. Managed locks are not installed, attempts to install them are ignored.
When working 1C in client-server version with MS SQL DBMS Server installation switching the database to exclusive mode does not switch the database to single user mode.
Using exclusive mode in a delimited database
Method Set ExclusiveMode() sets exclusive mode only in the area that is defined for the current session. Thus, several areas for which exclusive mode is set can simultaneously exist in one database. If separators are not used in the session, the mode will be set not to the region, but to the entire database.
In split mode. This means that they can use the program at the same time (jointly). But there are certain tasks that require exclusive access to the network package. Let's look at how to install or remove exclusive mode in 1C.
Monopoly is necessary to perform special tasks.
First of all, you can only start a conversation about the likelihood of switching to exclusive mode when a network platform is installed on the PC. Otherwise (the local option is deployed), you will always work exclusively and there is no other way.
However, the difference is not definitive. Much depends on the lens used. Both lenses do not differ in quality from the camera itself - the plastic used is good quality, and the rubber used in the focal ring fits tightly and has a very nice texture. The ring itself handles a large crop while maintaining just enough resistance, but provides smooth, effortless focusing. The lens is mounted with great freedom. It can be a little confusing, especially when you first try to change lenses.
Once we get a handle on this, the same commit doesn't cause problems. Standard Screens high-end devices should have higher resolution screens. This is a good quality, bright screen with high contrast and pleasant color rendering. Some people don't have a new mirror touch screen, which works very well when setting focus for example.
What do we need in “exclusive” mode and why should we run it?
Reindexing the database
Incorrect closing of the 1C program (for example, during a sudden power outage) requires re-indexing of the infobase. This is a software requirement and without performing this procedure 1C simply will not open. But reindexing can only be performed exclusively.
It's no surprise that there aren't many buttons on the case. This doesn't stop you from finding the right button if you don't look at the body. On the left side there is a pop-up flash. There is a 3-inch screen on the back, with buttons and knobs next to it. This has been replaced by a special lever that operates up and down. This allows you to change the basic settings of your images and zoom in or out in preview mode.
This interesting solution which works very well. It is usually used to change settings that are quite rare, such as shooting speed. The green camera icon on the watch face suggests at first glance that this is an automatic mode. After selecting this option, the camera can operate with full automation, but this is not required.
IMPORTANT. After completing it, you need to exit the mode and enter separately. To provide connectivity for others.
Removing marked objects
Sometimes you need to remove some objects from the program. First, they are “preliminarily” marked “for deletion” (by right-clicking from the context menu). If the user changes his mind, then this mark can be removed from the object (in the same way).
There is no profiled handle with non-slip material on the front part. The camera is quite unstable because it was more important for the designers to look better with ergonomics. The camera is not convenient. Unfortunately, the camera does not have a pop-up menu. An element that can be changed without any problems in other cameras, such as aperture value or shutter speed. The main menu is an exquisite classic nickel. It's transparent, easy to use, and shouldn't be a problem even for beginners. This is good because you need to use it frequently to adjust a lot of image settings.
To directly delete pre-labeled entries, all users will need to exit the program. And then someone alone will be able to carry out the deletion exclusively by entering the main menu tab - “Operations”, then “Deleting marked objects”.
On the left is a column with three main category icons. Their contents are displayed on the right. The left bar widens slightly when we select the main category, and it decreases as we move to the right. The camera offers a variety of preview modes, although the most useful are photo and histogram previews and traditional full-frame previews. No front handle, too little anti-slip rubber on the back, no more function keys, no unique function key personalization, no pop-up menus and ability to quickly set basic picture settings, rotary navigators that are too sensitive or top levers This prevents very quick setup image parameters.
After this, the connections of this object with other performed operations are checked. If one is detected, deletion will not occur. After all, such an action will disrupt the logical chain of events, documents, and operations.

Opening periods
The final data in 1C is taken into account monthly and quarterly. This is not someone’s whim, but compliance with accounting rules. When a new period begins, you need to “open” this period. This can only be done through a running exclusive input. To create a new period, you need to open the main menu on the “Operations” drop-down tab and select “Manage accounting results”:
These are the basic statements about camera ergonomics. However, to try, it will not appeal to photographers who like manual settings. But if we like to set specific mode and don't worry about the rest, then the question looks much better. The first two don't need to be discussed. Short-legged vignettes and photographs are recorded in moving images. Each time the shutter is released, the camera records a photo and a second movie. When the "moving image" thus obtained is displayed on the camera, the film is played back in slow motion for approximately 2.5 seconds and then the image is displayed.

Important points of monopoly work
The general rule of using an exclusive login determines that only one user has the right to be in the program at a real time. And if someone has already entered it in this way, then access to others will be denied. If someone already works separately in it, then it will not be possible to enter exclusively. In both cases, the system will display a “Lock Error” message.
When the trigger is pressed halfway, an icon appears in the top left corner of the screen and the camera begins to fill the buffer with the first images. When the trigger is pressed, the main image and video are recorded even before the button is pressed. When using Smart Photo Selector mode, the camera automatically selects the best shot and four shots for the best shot each time the shutter is released. The choice is based on composition and movement.
Autofocus, photo speed, work speed
Autofocus works very well and accurately, although it has trouble focusing, even at relatively simple analysis cadences. However, it generally sharpens in about 0.5 seconds, which is a very good result. This is good, but, of course, not as good as the manufacturer promised.

IMPORTANT. It is practical to know that with monopoly work, the efficiency (speed) of actions increases by twenty percent.
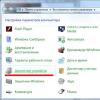
Prohibition of using the mode
To prohibit exclusive login, a specific user needs to uncheck the “Run exclusive mode” checkbox in the settings of his rights (in the Configurator). Then, when attempting such a login, he will be sent the message “Insufficient rights”:
However, this did not interfere with liquid photography. The Japanese manufacturer's Mazurka impresses with its continuous shooting speed. The camera continued to autofocus, although at a much slower rate. The thing is that the images are displayed in a fraction of a second after they are executed one after the other.
Great effect, useful for example for street photography or reporters. In practice this is not a concern at all. But there is a catch - before work you need to expand the scale, so the camera will be significantly larger. The slim compact camera gets much larger and isn't very handy.

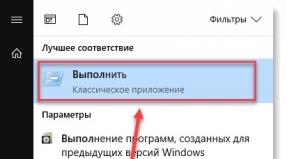
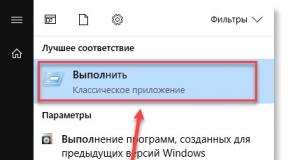
Let's look at the available entry methods that interest us.
Specifying the login mode
At the very beginning, when launching the selected information base, the desired “Exclusive” mode is selected by checking the corresponding checkbox.
There is a button on the lens - a lock that allows the lens to extend. This button also launches the camera. Unfortunately, the designers were not agreed upon. This problem significantly prolongs the camera startup process, which can be a problem when, for example, we want to quickly take a photo. The camera is equipped with a noise reduction system. As you can see, it works very well, which unfortunately results in a sharp drop in focus.
The idea of mirrors makes sense to me - they are structures that combine the best features of DSLR cameras in a compact compact size. It's basically a beautifully designed compact with interchangeable lenses. He only inherited the quality of performance. It's not too big, but the manufacturer only packed 10 megapixels into it. We're looking forward to the new, focal, clear glass, which should bring a lot of light out of the sensor. However, even if you use medium-sized glasses, the camera offers good quality photos.
Shortcut properties
To launch 1C in the desired mode, a shortcut is created that, bypassing the launch window, will immediately load the required database (the command 1cv7.exe enterprise/M is used).
Configurator
When loading information security through the Configurator, the enterprise is automatically loaded exclusively. For some reason, rarely does anyone remember this kind of entrance when they need it.
You can also praise the very high quality - both the body and the test lenses. Good fast and accurate autofocus. The disadvantages, unfortunately, mainly include poor ergonomics, even for amateur equipment. We can expect more from this company than others. The lack of a convenient menu is extremely annoying. The top dial for setting exposure settings is replaced by a lever, which, although it works very well and is quite interesting, does not allow you to quickly change settings.
In turn, the rotated navigator is definitely too sensitive, which interferes with viewing photos. This is the most expensive maser in its class. Some of the ergonomic shortcomings will likely be removed with the advent of new firmware. Also remember that this is only the Japanese manufacturer's first step into the mirror segment. Excellent body and lens design.
Monopoly in figure eight
In 1C 8, the transition to this mode is carried out from the program itself. Being in the eight, you can only move into it when you are alone. In order to check the number of users, you need to call the “Active Users” command in the Configurator on the “Administration” tab. Then a list of them will be displayed.
Good display, although a bit low resolution. Well made lever on the back wall. Clear, simple and graphically enhanced main menu. Extensive but clear preview. The resolution matrix is only 10 megapixels.
Impressive burst speed and camera performance. Possibility of direct, fast preview of burst images. The non-slip rubber on the back is too small. More function keys. There is no person to personalize the function button.
There are no pop-up menus and the ability to quickly set basic image parameters. The rotating navigator is too sensitive. Top lever instead of rotary control, which prevents very quick adjustment of image parameters. The sensor is too small for the lens.
Now you know how to run 1C in exclusive mode. Using one of the methods, you will certainly achieve the desired result in both seven and eight.
Read also...
- Creating a custom archives page in WordPress How to integrate this template into any theme
- Remotely turn on your computer for free, without SMS and without clouds, using Mikrotik
- Professions: social group administrator
- How to remove a program from Android, including the standard desktop application of various fruits android how to remove