Creating a Windows 10 build without audit mode. What is the sysprep utility, in simple words. Making a template installation of Windows in audit mode
Creating a fully customized operating system image with installed applications it is often necessary to corporate environment, and home users will not refuse the installation disk, which contains their favorite set of programs and tweaks. In modern Windows operating systems, creating such an image is much easier than in Windows XP, and you can use the package automatic installation.
This article explains how to prepare and deploy a fully customized system image, and also covers how to back up your operating system to a WIM image.
On this page
You will need
- Deployment Tools from the Windows Assessment and Deployment Kit (ADK)
Of course, you will need a computer to install and configure the OS, as well as a place to save the system image. The installation computer can be a virtual machine (for example, Hyper-V from Windows or VirtualBox). You can save the customized image on a non-system partition of this computer.
For example, during system installation, you can create two partitions - install the OS on one, and subsequently save the image on the second. Also, you can always connect another virtual disk in a virtual machine. Finally, the customized image can be saved to a network share or USB drive. As you can see, there are many options - there is plenty to choose from.
Advantages and disadvantages of using a custom image
In my opinion, the advantages of a fully customized image outweigh the disadvantages.
Advantages
- Quick installation of a system with a set of applications, since no time is spent on installing them. However, compared to a standard image, the customized image takes a little longer to unpack.
- You can further customize the operating system by using a response file used in conjunction with a customized image.
- It becomes possible to deploy an image using the utility ImageX. The standard image can only be used in combination with the installer because not all settings are configured (for example, language).
Flaws
- The image size increases. The final size depends on the number and volume of installed applications. If you plan to continue installing from a DVD, you must be aware of the 32-bit versions' WIM file size limitation of 4 GB (2^32 bytes).
- Versions of applications included in the image may become outdated. To maintain the latest versions of applications, you will have to rebuild the image. Regularly updated applications most likely do not make sense to include in the image. They can be installed separately, automating this process.
Steps to create a custom image
Creating your own WIM image can be divided into the following steps:
- Installing applications and setting up the system
- Preparing the system using the utility sysprep
- Booting into Windows PE and saving the image using the utility ImageX
The resulting image can then be included in the installation disk, installed from a network share, or deployed using ImageX.
A note about customizing settings
In addition to installing applications, audit mode allows you to configure user settings. There are two ways to apply settings to an image.
You can:
- Configure only system parameters, and import custom ones using REG files into the configured WIM image (or into the source image before starting the installation described here).
- Configure both user and system settings, and then use a response file to ensure that the built-in account profile is copied Administrator to the standard user profile.
Importing registry settings
The principle itself is discussed in detail in the article Using registry tweaks. I trust that you have read it and have a complete understanding of importing user and system settings.
Copy a profile using a response file
To copy a customized account profile to a standard user profile, you can use a response file that contains the parameter
Microsoft-Windows-Shell-Setup | CopyProfile
If this parameter is set to true, the profile is copied.
You need to use this opportunity when installing a customized image by including this parameter in the response file. In this case, the profile will be copied on the pass 4 Specialize.
Example universal file answers for 32-bit and 64-bit OS
Why does this article recommend copying the profile during installation rather than pointing sysprep to the answer file when generalizing the image?
In any case, the profile is copied during installation at the Specialize stage. If you use the /unattend option in sysprep, the answer file is cached and then used during installation. At the time of writing the first version of the article, this did not work, despite the documentation.
If you are using MDT or SCCM, the method described in this article is required for the reasons outlined in KB973289:
Now let's talk about everything in order.
Starting the operating system installation from the installation disk and entering audit mode
The first step in preparing a customized image is to launch the OS from the installation disk. You can perform the installation manually, or you can automate the process using a response file.
Manual installation
Manual installation is not fraught with any tricks. If you plan to save the customized image on a non-system disk partition, use Windows Setup to create the partitions.

Advice. When installing the system on a virtual machine, you can connect a second virtual disk and subsequently use it to save the image. This will make it easier to copy the image into your production environment since the VHD(X) can always be mounted on a physical machine.
Continue the installation until the OOBE stage. It is easy to recognize by the prompt to choose an account name and a picture for it.

At this stage, Not while selecting your account name, press CTRL + SHIFT + F3. This key combination will put the system into audit mode with the rights of the built-in account Administrator.
Automatic installation
With an answer file, you can automate all steps of Windows installation, including managing sections of hard disk, entering audit mode and even installing applications in it, as described in the article. You can follow the instructions given in it up to the section “Transferring the system to oobe mode” (the article discusses complete automation of the installation).
Installing updates, applications and system configuration
Once you enter audit mode, you can begin installing updates, applications, and configuring operating system settings. Do not close the utility window sysprep- you will need it at the end of the setup phase.
If installing an application or update requires a system reboot, you can do so. After rebooting, the system will return to audit mode. As mentioned above, the application installation process can be automated using an answer file. You can configure any system and user settings in the Windows GUI. You can also import registry settings from pre-prepared REG files.
On Windows 8 and later, do not update applications from Windows Store, since this will lead to problems when generalizing the image. There is also a science to uninstalling modern applications. See TechNet Library warning and KB2769827.
Once you've finished installing applications and configuring your system, you should prepare it for further use.
Preparing the system using the sysprep utility
After installing applications and configuring the system, preparation is performed using the utility sysprep. Depending on which installation method you chose, the steps will be slightly different.
Manual installation
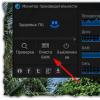
When installing the system manually, the utility sysprep runs when entering audit mode. To prepare the system for further use (in this case, for creating a customized image), you need to set the utility parameters, as shown in the figure below.

With the specified parameters it is produced (in brackets there are equivalent parameters command line sysprep):
- System preparation (/generalize) - remove unique system parameters, clear event logs, reset security identifier (SID), etc. This option is absolutely necessary to create a customized image.
- Putting the system into OOBE mode (/oobe) - this mode will be activated the next time the system starts.
- Shut down the system (/shutdown).
An example of a universal answer file for saving 32- and 64-bit OS drivers
Automatic installation
If you automate entry into audit mode and installation of applications using a response file, as described in Installing applications in audit mode, you need to add the following highest-numbered synchronous command. This command can also be used during manual installation, after first closing the utility window sysperp.
%SystemRoot%\system32\sysprep\sysprep.exe /generalize /oobe /shutdown /quiet
The first three command line parameters are specified in the same order as the utility GUI parameters described above. Parameter /quiet— ensures quiet operation and is necessary for automation.
After sysprep will complete its work, the system will be turned off. Now it is fully configured, and you can create its image using the utility ImageX.
Booting into Windows PE and saving the image using the ImageX utility
Note. Image size install.wim, included in the installation disk of a 32-bit operating system, should not exceed 4 GB (2^32 bytes). Otherwise, the installation will fail. This limitation does not apply to image deployment using the utility Imagex.
If setup files Windows are hosted on a network share, you can copy the customized image and answer file there, and then, by booting into Windows PE and connecting to the network share, start the installation from the command line.
Net use y: \\network_share\distrib y:\setup.exe /unattend:unattend.xml
Deploying a customized image using the ImageX utility
Using Windows PE and utility ImageX, you can deploy the customized image to your computer.
The sequence of actions is as follows:
Note. Deploying an image using ImageX only possible on a volume that has the same drive letter as the volume saved in the image. In addition, using ImageX You cannot deploy a standard (source) image Install.wim.
Let's look at an example of deploying a customized image. It is assumed that HDD computer is not formatted. After booting into Windows PE, you need to use the utility Diskpart Create a partition on your hard drive and format it. I will demonstrate creating one partition on a disk.
Diskpart select disk 0 create partition primary select partition 1 active format fs=NTFS label="System" quick assign letter=c exit
Additional information about the utility commands Diskpart you can get it by running it with the key /? , or from the article Description of the Diskpart program with a command line interface. If desired, the process of creating a partition can be automated.
All that remains is to apply the image.
Imagex /apply E:\custom.wim 1 c:
In this team:
- /apply- application of the image
- E:\custom.wim- the path to the image. When placed on network drive You first need to connect it with the command net use E:\\network_share\images.
- 1 — index of the image saved in the WIM file.
- c:— the letter of the volume to which the image is applied.
After applying the image, you can verify (with the command dir) that is on the section C files unpacked from the image appeared. Now this partition contains the operating system in the state in which it was at the time the image was created. If the image was saved after completing the settings in audit mode, the next time you turn on the computer the system will enter into OOBE mode, giving the user the opportunity to perform initial settings.

If you copied the configured account profile when you prepared the image, all new accounts will have exactly the same settings.
Deploying a Customized Image Using WDS
As with a standard image, you can use Windows Deployment Services (WDS) to deploy a custom image. A detailed description of this method is beyond the scope of the article, so I will limit myself to linking to the WDS manual posted on Microsoft Technet.
Backing up the operating system to a WIM image
The article focuses on installing applications and configuring the system in audit mode and saving the image at this stage of installation. Advantage this approach the fact that the saved image is neutral - it does not contain any accounts (except built-in ones), personal files and confidential data.
You may be wondering whether it is possible to save the system image after finishing complete installation, i.e. after the OOBE stage, the first login and subsequent configuration. This question is relevant if you want to install a system, work in it for a while - install applications, configure various parameters, etc., and then create an image.
Mention that imagex does not know how to use hard links (I checked - it does).
So, after applying the image:
- Extended file attributes are lost. These are NTFS attributes that are needed only for backward compatibility with OS/2 applications.
- Sparse files are captured, but after being applied they are no longer sparse files.
- Symbolic links and connections are automatically updated. In some scenarios (eg SIS) this causes links to go to the wrong place.
In my opinion, in typical scenarios Using the client OS at home, these restrictions can be neglected. But restoring such an image on another PC (even with the same hardware configuration) can lead to serious hardware conflicts.
That being said, there are several points that I would like to draw your attention to.
- Installed programs and personal files can take up a lot of disk space, which will affect the size of the backup WIM image. To store the image, you may need a dual-layer DVD or a high-capacity USB drive.
- You can reduce the size of a WIM image by excluding files and folders from it when the utility captures the volume ImageX. The file used for this is Wimscript.ini, which is briefly discussed in the article on the creation boot disk Windows PE. His detailed description is in the help file “Manual Windows user PE", which is part of ADK.
Recovery
Restoring from a backup WIM image is performed as described in the article section. However, the sequence of utility commands given there Diskpart needs to be adjusted.
For example, if there are several partitions on a disk and the system is installed on the first one, the sequence of commands to prepare this partition for recovery will be as follows:
Diskpart select disk 0 select partition 1 active format fs=NTFS label="System" quick assign letter=c exit
You can include a customized WIM image as part of a boot disk with Windows PE, thereby creating a universal system recovery solution - a recovery environment and a backup image.
Conclusion
Creating and deploying a fully customized Windows system image using the tools included in the ADK is a fairly straightforward task. You can make this image neutral (that is, without personal files or personal data) by installing applications and configuring settings in audit mode.
This approach allows further customization of the image during installation using a response file, and also preserves the ability for the end user to set personal options during the OOBE phase of the first system startup. In addition, you can use WIM image technology to create backup copy operating system.
Hello everyone, today I’ll tell you what the sysprep utility is. The system preparation program (Sysprep) prepares the Windows installation for disk duplication, auditing, and delivery to the customer. Duplicating, also known as imaging, allows you to save a customized image of Windows that you can then reuse throughout your organization. Audit mode allows you to add additional device drivers and applications to your Windows installation. After installing additional drivers and applications, you can verify the integrity of your Windows installation. Sysprep also allows you to prepare an image for delivery to the customer. When the customer starts Windows, the welcome screen appears.
Sysprep should only be used to configure new Windows installations. You can run it as many times as needed to build and customize your Windows installation. However, you can reset Windows activation no more than three times. You cannot use Sysprep to reconfigure an existing, already deployed Windows installation. Use Sysprep only to configure new Windows installations.
Benefits of Sysprep
- Remove from Windows system data. Sysprep can remove all operating system-related information from an installed Windows image, including the computer's security identifier (SID). Then Windows installation can be captured into an image and installed throughout the organization.
- Configuring Windows to boot in audit mode. Audit mode allows you to install third-party applications and device drivers, and check the health of your computer.
- Load Screen Settings Windows greetings. Sysprep configures your Windows installation to boot with a welcome screen the next time you start your computer. Typically, the system should be configured to boot with a welcome screen before the computer is shipped to the customer.
- Reset Windows activation. Sysprep can reset Windows activation up to three times.
Audit mode allows OEMs, system builders, and corporations to quickly customize Windows installations. Audit mode can install applications, add device drivers, run scripts, and verify that Windows is installed correctly. In audit mode, you do not need to apply Windows Welcome settings.
Typically, Windows launches the Welcome screen immediately after installation. However, if you boot into audit mode, you can skip the Windows Welcome screen and directly boot into your computer's desktop. This will allow you to start the setup process as soon as possible.
Also, the audit mode allows you to check the functionality of the computer before delivering it to the client. You can verify that the system was launched correctly the first time, and that all manufacturer- or system-builder-specified settings and support information are present.
There are several ways to boot in audit mode:
For manual installation, press the keys during the Welcome screen CTRL+SHIFT+F3.
For a silent installation, add the Microsoft-Windows-Deployment component to the oobeSystem configuration pass. In the Reseal | Mode specify “audit”. When Windows finishes installing, your computer will restart in audit mode. For more information about this option, see the Windows Silent Installation Reference.
Run sysprep /audit in a command prompt window.
Syntax
sysprep.exe
Options
- /audit
Starts the computer in audit mode. Audit mode allows you to add additional device drivers and applications. You can also test your Windows installation before delivering it to the end user. If Windows silent installation was specified, audit mode runs the auditSystem and auditUser configuration pass. - /generalize
Prepares the Windows installation before creating an image. If this option is specified, all unique system information is removed from the Windows installation. The security identifier (SID) is reset, system restore points are reset, and event logs are deleted. The next time you start your computer, a specialized setup step begins to run. A new security identifier (SID) is created and the Windows activation clock is reset if it has not already been reset three times. - /oobe
Starts the computer in Welcome screen mode. The Windows Welcome screen allows end users to configure operating system Windows, create new accounts, rename your computer, and perform other tasks. Any oobeSystem configuration step tasks in the answer file are processed immediately, before the welcome screen even launches. - /reboot
Reboots the computer. Use this option to audit your computer and verify the functionality of the first system startup - /shutdown
Shuts down the computer after Sysprep has finished running
/quiet
Disables confirmation prompts while Sysprep is running. Use this option when automatic operation Sysprep - /quit
Closes Sysprep after running the specified commands - /unattend: response_file
Applies answer file settings to Windows during silent installation
answer_file
Specifies the name and path of the response file to use
How to create your own reference build of Windows 10 - a distribution kit with system settings, tweaks installed and desktop software installed? This process will be discussed in detail below, but first let’s talk about the features of our own system builds.
1. Pros and cons of native Windows builds
What are the advantages of native Windows builds? Assembling your own system saves time and effort when installing the system. For example, you can prepare a Windows 10 distribution kit with a standard set of programs for a circle of loved ones: a browser, archiver, torrent downloader, cleaner, uninstaller and similar software for a wide audience will be installed along with the system. The benefits compared to a regular Windows distribution are obvious, but what will we get as opposed to other methods of system deployment? Your own Windows build, the reference image of which was created on a GPT disk, can later be deployed on an MBR disk and vice versa. Whereas transferring the system using backup programs or disk space managers will not help when changing the style of disk partitions. Unlike the latter, the native build on the installation media will not be linked to a backup file on a non-system disk partition or removable device, and you will not need to connect the destination hard drive to clone Windows.
Native builds of Windows have three disadvantages. The first is that the distribution kit of its assembly will take up more space than a pure Microsoft distribution kit. But this problem can be solved by using a flash drive with a capacity of at least 8 GB. The second disadvantage is that the Windows installation process will take a little longer than usual, which is due to the deployment of added software. The third disadvantage is the red tape involved in creating the assembly. The effort is unlikely to be worth it if the system is rarely reinstalled.
2. Algorithm of actions
The process of creating your own Windows 10 build will take place in several main stages:
- Creation of a reference image of the system - an ideal state of the system prepared for deployment (with the settings carried out and the software installed, without reference to computer components);
- Capture the reference image into the install.esd file;
- Repacking the original installation ISO image of the system with the replacement of the install.esd file.
3. Windows 10 reference image
You can prepare a Windows 10 reference image different ways, it could be:
- A mature system with remote binding to components using the Sysprep utility (see paragraph 7 of the article);
- New Windows 10 installed on a different disk partition;
- New Windows 10 on board virtual machine.
The established system must be thoroughly cleaned - delete files in the user profile folders, clean the “Temp” folders, etc. Otherwise, the distribution will turn out to be gigantic in size. It’s easier with new systems: firstly, the distribution package based on them will take up less space, and secondly, during the installation process, a reference image of Windows 10 can be created from scratch in audit mode - a special mode of system operation without the participation of a user account. The audit mode is provided by Microsoft for the implementation of corporate settings and software by OEM suppliers and large organizations before delivering computers to customers and hired personnel, respectively. The end result is a properly configured system with installed desktop software, during the installation phase of which you can create new accounts, set regional parameters, disable options for sending data to Microsoft, etc. In this case, the old account will not be hanging around anywhere.
In our case, we will create a reference image of Windows 10 from scratch in audit mode using Hyper-V. This hypervisor was chosen due to its ease of use and ease of transferring large amounts of data from a virtual machine to the main system. VHDX and VHD disks used in virtual Hyper-V machines, are mounted into the main system by means of a conductor. Supporters of other hypervisors - VMware Workstation and VirtualBox can use them. To simplify access to virtual disk data from the main system and not bother with guest OS additions, virtual machines can be created based on VHD disks. Both VMware Workstation and VirtualBox work with VHD disks.
4. Nuances with activation
The concept of your own build of Windows must be distinguished from pirated assemblies of the system that are delivered activated or with an activator on the desktop. The purpose of this article is to simplify the Windows installation process, but not to solve the issue of activating it. The reference image of Windows 10 will be created using tools that do not contradict Microsoft policies - in fact, its own tools. And their use does not guarantee the functionality of activated system builds. Let's remember that Microsoft's requirements are as follows: activation of each copies of Windows, from whatever distribution it is installed, on each individual computer. If the reference image is an activated, established Windows, during the process of removing the binding to components using the Sysprep utility, you must reset the activation (see paragraph 7 of the article).
5. Create a Hyper-V virtual machine
So, to prepare a reference image of Windows 10, we create a virtual machine. Only, unlike the example discussed in paragraph 5 of this article, the choice of generation of virtual machines is not important; you can create a machine of the 1st generation. If we do not plan to introduce resource-intensive software such as games, we can limit ourselves to the volume of the created hard drive VHDX in 50-60 GB. Well, the hackneyed advice for SSD owners is that the path for storing virtual machine files and VHDX disk must be specified on the HDD partition. At the last stage of creating a virtual machine, we specify an ISO image with a fresh Windows 10 distribution, turn on the machine and start the system installation process. The latter will be different from how it usually happens.
6. Installing and configuring Windows 10 in audit mode
We go through the Windows 10 installation process to the stage of selecting the installation type and select the second option.

We will need two partitions - one for Windows, the other non-system, where the install.esd file will subsequently be saved. We create partition C from 30-40 GB.

We give the remaining space to another section.

Installing Windows.

After completing the file copying stage, we do not extract the installation ISO image from the virtual machine; we will need it later. At the installation stage, where you need to set the first settings, we don’t touch anything, just press the Ctrl+Shift+F3 keys.

Let's enter audit mode by connecting a hidden administrator account.

Upon logging into the system in audit mode, we are greeted by the Sysprep utility window. The utility will wait for its fate to unbind the configured system from its components. You can start setting up the system. One caveat: it doesn’t work in audit mode Microsoft Edge, to access the Internet you need to run Internet Explorer.

As for the limits of intervention in the system, in audit mode we can work with everything that does not relate to user accounts. We can install desktop software, change system settings, apply tweaks, leave folders or files on the desktop. But you won’t be able to install universal apps from the Windows Store. Like Microsoft Edge, the store does not work in audit mode. Even if the system is activated, it will not be possible to change the theme or other personalization parameters. To install universal apps and apply personalization settings, you need a user account, not a hidden administrator account.
If you need to reboot the system, for example, this is required to reinstall some programs, this process must be carried out using the Sysprep window: you must set the values “Switch to audit mode” and “Reboot”. Then click “Ok”.

In parallel with setting up the system, you need to do an important thing - format the non-system partition of the disk.

7. Removing binding to components (Sysprep)
So, the reference system image is ready. Now we can begin the process of removing the binding to components. Open the open Sysprep utility window or launch it by pressing Win+R and entering:
The folder that opens will contain the EXE file for launching the utility.
In the Sysprep window, set the action to “Go to the welcome window (OOBE)”. Check the “Preparing for use” checkbox to reset the activation. In the Shutdown settings, select “Shutdown”. And click “Ok”.

We wait until Sysprep finishes running and the virtual machine is turned off.
8. Create the install.esd file
We check whether it is worth starting the virtual machine from an ISO image of installing Windows 10, and boot from it. Installation disk use to access the command line. If the Windows 10 reference image was created on the second disk partition real computer, just go to the main operating system and open the command line there.
At the first stage of installing the system, press the Shift+F10 keys.

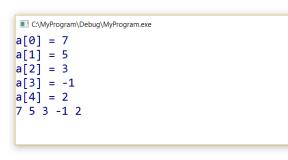
Using the DISM utility, we will capture the reference system image and save it to the install.esd file. But first, let's see what letters the two stand for required sections– system and destination partition where install.esd will be saved. Enter:
In our case, the system disk is listed as D, and the non-system disk is listed as E. Therefore, the command to capture a system image will be as follows:
Dism /capture-image /imagefile:E:\install.esd /capturedir:D:\ /name:windows
In this command, accordingly, in each individual case it is necessary to replace the letters E and D with your own.

Upon completion of the operation, turn off the virtual machine. We won't need it anymore.
9. Mounting the virtual machine disk in the main system
In order for the virtual machine disk to appear on the main system where the further actions, open the disk file of this machine VHDX (or VHD) in Explorer. IN context menu Click “Connect”.

All partitions of the virtual disk will appear in Explorer as separate disks. In our case, we select the last drive M, this is where the install.esd file is stored. After repacking the ISO image, the virtual disk will need to be unmounted; this is done using the “Eject” option in the context menu of any of the added virtual disk partitions.
Understanding Audit Mode
Windows boots either in startup mode or in audit mode. Start when you first turn on your computer is the default initial experience where users can enter their account information, select a language, agree to Microsoft's terms of service, and set up their network.
But you can configure your Windows system to boot into audit mode instead. In audit mode, you can make additional changes to your Windows installation before delivering the computer to a customer or capturing an image for later use within your organization. For example, you can install driver package drivers and applications, and perform other updates that require Windows to be running. When you use an answer file, Windows processes the settings during the configuration and .
When you boot into audit mode, you log in using the built-in administrator account. Once you log in, the built-in administrator account is immediately disabled during the setup phase. The next time you restart your computer, the built-in administrator account remains disabled. For more information, see .
Important
If a password-protected screensaver is activated while working in audit mode, re-entry into the system will not be possible. The built-in administrator account used to log into audit mode is disabled immediately after login.
To disable this screen saver, change the power plan in Control Panel, or configure and apply a custom plan. For more information, see .
The settings in the unattended installation answer file from the configuration pass in audit mode are not displayed.
Benefits of Using Audit Mode
In audit mode you can:
Skip the startup screen when you turn on your computer for the first time. You can access your desktop as soon as possible. In this case, you don't have to configure default settings such as user account, location, and time zone.
Install applications, add device drivers, and run scripts. You can connect to the network and access additional files and installation scripts. You can also install additional language packs and device drivers. For more information, see .
Check that Windows is installed correctly. Before you deploy the system to users, you can test it without creating a user account. You can then configure the system so that the next time it starts in first run mode when you turn on the computer.
Make additional changes to the reference image. This reduces the number of images that need to be managed. For example, you can create a single master image that contains basic settings that apply to all Windows images. You can then load this reference image in audit mode and make additional changes for a specific computer. These changes may include customer-specific applications or specific device drivers.
Booting in audit mode
In audit mode you can download a new or existing instance installed system Windows. For more information, see .
Automatic display of Windows 8 desktop
In some Windows 8 production or testing scenarios, you may want to automatically display the working Windows table 8 instead of initial Windows screen 8 after rebooting the computer. This may be useful when using production tools that display status in a window on the desktop and want technicians to be able to easily identify problems without manually switching from the Windows 8 Start screen to the desktop.
You can display the Windows 8 desktop automatically using %WINDIR%\System32\oobe\AuditShD.exe. The AuditShD.exe program must be run using an account with administrator rights.
We recommend adding this command line to the response file in the RunAsynchronousCommand parameter during the auditUser configuration pass. Use Windows Setup Manager to add Microsoft-Windows-Deployment | RunAsynchronous | RunAsynchronousCommand with meaning %WINDIR%\System32\oobe\AuditShD.exe.
The generated response file will look like this:
Before shipping a Windows 8 computer to a customer, Windows must be configured so that it boots into startup mode when the computer is first turned on and displays home screen. Make sure that AuditShD.exe is configured to run only in audit mode and is not used in startup mode when the computer is first turned on.
Windows has two main startup modes: greetings And audit. As a rule, by default, immediately after installation, Windows starts in Welcome mode, but the user can configure the computer so that the system starts in Audit mode. Managers of computer hardware stores sometimes resort to the latter, installing and configuring a turnkey system taking into account the wishes of the buyer.
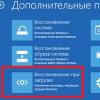
In welcome mode, on the contrary, the setting account, changing time zone settings, etc. is done by the user himself. If you purchased a computer with Windows pre-installed, it is possible that the system was installed in audit mode. You may not be aware of this until you want, for example, to upgrade to Windows 10 or even a higher version. After all, as soon as you try this, you will receive the following message:
Windows cannot be installed while running in audit mode

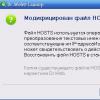
To continue the installation, you need to exit the audit and you can do this in two ways: using the command line And by editing the registry. Open your console CMD as administrator and run the following command:
sysprep /oobe /generalize

Important! Running this command will reset your current Windows activation key. Do not use it unless you have the ability to reactivate the system. After running the command and reactivating, you can continue with the update.
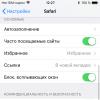
Option to edit the registry seems more convenient. Team regedit open the registry editor and expand the following branch on the right side of the window.