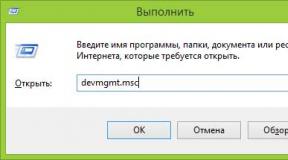
We enable and configure Wi-Fi distribution from an Android device. Video on connecting the router. Access point from Zyxel Keenetic router
Many users who, in addition to desktop computer there are various portable devices(laptops, small netbooks, tablets, smartphones, etc.) that support a wireless connection want to create an access point. This is very convenient, since all of the above devices can work simultaneously and without any cords.
So today we'll talk about access point. I'll tell you how this is done on computers that have Piggy (XP) installed. So, first you need to make sure that your device is equipped with a wireless adapter. To find out, launch the start menu, from where go to the control panel. Select the section to display all yours. If you see what interests us, then read on to learn how to set up an access point. If not, then connect the necessary equipment, otherwise everything further actions will be meaningless.

Next click on local connection right key of the manipulator and select the properties item. There, go to the section called Internet Protocol or TCP\IP and launch its properties. Enter the IP address 192.168.0.1, and - 255.255.255.0. Confirm these settings. Then you need to turn on your router and wait a few minutes. Next, you need to go to its settings through the browser. Depending on the model, this is done differently, see the instructions.
Now about how in the browser. Choose a section quick settings and click "Next". Enter the name of the network (I advise you to remember it or write it down on paper) and the password for access (you should also write it down). Then in the channel field, select any value available to you, click “Next” again. If necessary, you must indicate the login and password that you received from your provider. After this, you should save the settings and restart the router.

We wait for the router to reboot and try to connect to check if you were able to configure the access point. Find yours in the list of available networks, the name of which was written down, and connect to it. When asked to enter a key, indicate the one that you also have written down. That's it, now we wait for the device to identify the connection and report it.
If everything is fine, an icon in the form of a small monitor will appear in the tray. There should not be any on it. If there are any, it means that something went wrong. If everything is fine, launch your Internet browser and try to open various pages. Connection and setup are considered complete when all sites open in your browser without problems.
If this does not happen, check that all settings have been entered correctly. If yes, then contact your provider. It is possible that he or she is not currently connected to the Internet.
Now you know how to configure an access point. There is absolutely nothing complicated about this, the main thing is to do everything correctly and according to the manual that comes with your router.
Let me start with the fact that the router itself, which you want to make an access point, is an access point, only more functional. It runs a DHCP server that distributes IP, most likely there is a firewall, and roughly speaking it builds routes between connected devices, which is why it is a router. So, to turn a router into an access point, you just need to disable some functions in it and connect it via cable to another router, or to a modem.
In the hotel article, I already wrote. You can read it if interested. There I promised to show in detail, using the example of different routers, the settings that need to be made to use the router as a point Wi-Fi access.
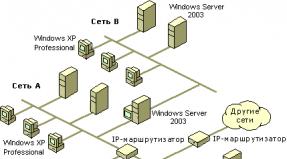
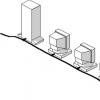
Let's use an example to find out for what purposes this mode of operation may be suitable. Let's say you have a modem or router installed on the ground floor, or at one end of the house. Which may or may not distribute Wi-Fi, it doesn’t matter. So, at the other end of the house, or on another floor, we need to install an access point to distribute Wi-Fi. In this case, the connection between the router and the access point will be via a network cable.
If we install an access point at the other end, the main router will distribute IP addresses, and the devices will be on the same network, which is often very important. Also, the access point mode can be useful for distributing Wi-Fi from a modem that does not have this capability. In fact, there are many possible uses. Otherwise, access points simply would not be sold as separate devices. Because they wouldn't make sense.
Please note that most routers can operate in other modes, which may suit you better:
- Repeater mode– suitable if your goal is simply to expand an existing one Wi-Fi network through another router. On our website there are instructions for, as well as. After setup, there will be one Wi-Fi network, just enhanced. Internet via cable from the “repeater” will also be available.
- Wireless mode WDS bridge – this is practically the same as the access point mode, but here the connection between routers is not via cable, but via a Wi-Fi network. I wrote in more detail about setting up such a connection in the article: . It is shown in detail using the example of popular routers: ASUS, TP-LINK, D-Link, Zyxel. There is also a detailed one.
Sorry that there is so much information and links already at the beginning of the article, but these issues needed to be sorted out.
As for the “access point” operating mode, also known as AP (Access Point), this mode is configured differently on routers from different manufacturers. For example, on routers from ASUS and Zyxel, just enable Access Point mode in the control panel, connect the devices with a network cable, and you're done. But on devices from TP-LINK, you need to manually change the router’s IP address and disable the DHCP server.
Connecting an access point to a router (modem):
We connect both devices with a network cable. On the main router (modem), we connect the cable to the LAN port (Home Network), and on the access point router, also to the LAN port.

From an access point, the Internet via a network cable also works. For many this is important.
Setting up an ASUS router in access point (AP) mode
On ASUS routers, as a rule, the AP operating mode is enabled in the control panel. After which, we simply connect it to the router or modem and everything is ready. On some models, for example on the old RT-N13U, modes are switched with a special switch on the device body. I will show you how to configure an access point using the Asus RT-N12 router as an example.
We connect to the router, and at the address 192.168.1.1, go to its settings. In the settings, go to the "Administration" tab. And at the top is the "Operating Mode" tab. We put the switch next to “Access point (AP) mode”. Read the description of the mode and click “Save”.

In the next window we need to set the IP settings. You don’t have to change anything, just click “Next”. But, in this case, to determine the IP address of the access point, you will need to use special utility"Discovery". Or you can, where “Obtain IP automatically”, put no, and change the last digit. For example, on 192.168.1.2. Now, the settings will be available at this address. DNS, if necessary, can be specified as in the screenshot below. Or, leave it automatic.

In the next window, if necessary, change the Wi-Fi network settings of our ASUS access point and click “Apply”.

The router will reboot and go into AP mode. If you go to its settings, at the address that you may have specified yourself, or which can be determined using the “Discovery” utility (you can download it from the link), then you will see a stripped-down control panel. Where can I change necessary settings, or, for example, return the device to the “Wireless Router” operating mode.
After setup, connect the Access Point to the router or modem via cable (there is a diagram above), and it will distribute Wi-Fi.
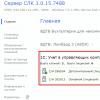
Access point from Zyxel Keenetic router
If I'm not mistaken, only the Keenetic Lite III model has a mechanical operating mode switch on the case. In all other cases, . I immediately advise you to set up a Wi-Fi network (set the network name and password, if necessary), so that you don’t have to deal with entering the AP settings later.
To activate access point mode on Zyxel, go to the "System" tab, and open the "Mode" tab at the top. Select "Access point - Wi-Fi zone extension with Ethernet connection" and click the "Apply" button.

Allow the router to reboot. After this, you can connect it to another router, and it will already work in “Access Point” mode.
To go into its settings, you can first go to the settings of the main router (modem), go to the list of clients, and look at the IP address of our Zyxel there. And then use it to go to the web interface. Or you can simply reset the settings, and the router will work in normal “Internet Center” mode.
TP-LINK router as a Wi-Fi access point
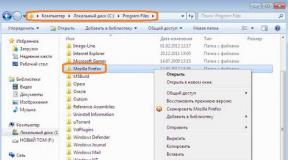
If you have a device from TP-LINK, you will need to manually change several parameters. Since there is no operating mode switch there. Now I’ll show you step by step what and how to do. I will show it using the example of a router.
1 First, go to the one that we want to configure in the mode wireless point access. And change the IP address of the router. To do this, open the “Network” – “LAN” tab. We need to set an IP address the same as that of the main router (can be viewed on the device itself), just with a different number at the end. For example: if the IP address of the main modem (router) is 192.168.1.1, then TP-LINK settings you need to set 192.168.1.2 and save the settings. The router will reboot.

Go to settings again, but at a new address. In my case, it is 192.168.1.2.
2 Setting up a Wi-Fi network. If necessary, on the "Wireless" tab, set the Wi-Fi settings for our access point. Enter the network name and password.
3 Last step. Disable the DHCP server. To do this, go to the "DHCP" tab. Place the switch next to “Disable” and save the settings.

And reboot the router. You can do it through the control panel. "System Tools" tab - "Reboot", "Reboot" button.
We connect it to the main router (LAN - LAN), and we get a Wi-Fi access point.
Setting up Access Point on Netis routers
On my Netis router, I just changed the IP address, disabled DHCP, and everything worked. Go to settings at netis.cc.
Open the “Network” – “LAN” tab. Change the IP address. If the main router or modem has 192.168.1.1, then write 192.168.1.2. What would be different is just last digit. We also disable the DHCP server there. And save the settings.

If necessary, go to the settings again (already at the new address that was specified), and on the “Wireless Mode” tab set the Wi-Fi settings.
We connect our Netis access point to the main device with a network cable (LAN - LAN), and everything is ready.
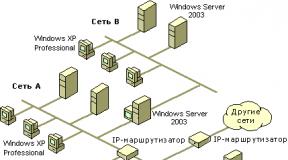
To deploy a wireless network, you first need to configure an access point (wireless router). It is assumed that all computers on the wireless network are using the Windows XP Professional SP2 (English version) operating system.
Setting (changing) the computer's IP address
In order to deploy a local network, it is necessary that all computers on the network have the same IP address of the same subnet. Since the access point is also part of the local network, its IP address must also be part of the same subnet as all other clients on the network.
As a rule, the sequence of actions in this case is as follows: first of all, you need to find out the IP address of the access point and the default password. Any access point or router, being network device, has its own network address (IP address). In order to find out the IP address and password, you will have to scroll through the user manual. Let's assume that the default IP address of the access point is 192.168.1.254.
Next, you need to connect the access point to your computer using a traditional Ethernet network interface (for this, an Ethernet network controller must be installed on your computer). In case of use wireless router The computer is connected through the LAN port of the router.
To configure an access point, it is necessary that the computer to which the access point connects has an IP address from the same subnet as the access point. Since in our case the access point has an IP address of 192.168.1.254, the computer must be assigned a static IP address of 192.168.1.x (for example, 192.168.1.100) with a subnet mask of 255.255.255.0.
To assign a static IP address to your computer, right-click on the My Network Places icon and select Properties from the list that opens. In the Network Connection window that opens, select the Local Area Connection icon ( The local network) and right-click on it and go to Properties again. This should open the Local Area Connection Properties dialog box. network connection), allowing you to customize network adapter(Fig. 1).
Rice. 1. Local Area Connection Properties Dialog Box
On the General tab, highlight Internet protocol Protocol (TCP/IP) and click on the Properties button. A dialog box will open in front of you, allowing you to set the computer's IP address and subnet mask. In this dialog box, check Use the following IP address: and enter in the appropriate text fields IP address and subnet mask (Fig. 2).

Rice. 2. Setting a static IP address and subnet mask
Setting up a wireless connection
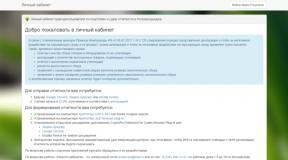
After you have set a static IP address for your computer, you can directly access the settings of the access point itself. To do this, enter the IP address of the access point (192.168.1.254) in the address field of your Web browser. If everything is done correctly, the access point (router) settings dialog box will open in front of you. You may first need to enter your username and password (they are available in the documentation).
Using the access point settings dialog box, you can set a new IP address of the access point (if necessary), but remember that after the end of the communication session with the access point, you must also change the IP address of the computer (otherwise a new connection with access point will become impossible).
If the access point is used only to organize a local wireless network without access to the Internet, then there is no need to change the IP address of the access point. It may be easier to change (or set) the IP addresses of all wireless clients. However, in some cases, changing the IP address of the access point is necessary. For example, to implement shared Internet access using an analog modem, the computer to which the modem is connected is assigned a static IP address of 192.168.0.1 with a subnet mask of 255.255.255.0. In this case, you have to set the IP address of the access point from the same subnet (192.168.0.x). Example with the organization of shared wireless access to the Internet using an analog modem will be discussed below.
In addition to changing the access point's IP address using the access point's settings dialog box, setting up a wireless network requires the following settings:
Wireless network type. If your access point supports multiple wireless standards, you must explicitly specify the wireless network standard (for example, 802.11g+). However, it should be taken into account that a strict standard setting excludes clients that do not support this standard. Therefore, in some cases it is advisable to specify a mixed protocol type, for example, 802.11b/g.
Channel number. For wireless connection access points with network clients can use different frequency channels. For example, in the case of the 802.11g protocol, you can use channels from the first to the thirteenth. You can explicitly specify which channel will be used to establish a connection, or you can set automatic channel selection (Enable auto channel select), and automatic channel selection is preferable.
SSID Each wireless network has its own unique SSID, which is the conventional name of the wireless network. For a wireless network to function, it is necessary that the SSID of the access point and the SSID of the wireless connection profile on the network clients be the same.
Rate. The access point allows you to explicitly specify the speed (Rate) of the connection being established. However, this is not recommended, and it is best to ask automatic detection connection speed (auto/best).
So, after all the basic settings of the access point have been made, you can begin to create a wireless connection profile on network clients.
Create a wireless connection profile
Configuring a specific wireless adapter, of course, depends on the version of the driver and management utility used. However, the configuration principles themselves remain the same for all types of adapters. In addition, there is a general method, independent of the type of management utility for a specific adapter, - to use the Microsoft client (built into the operating system) to configure the wireless adapter Windows system XP wireless adapter configuration utility). Let's take a closer look at both configuration methods. In addition, given the popularity of laptops based on mobile technology Intel Centrino, an integral part of which is the presence of a module wireless communication, we will describe setting up a wireless connection using an example Intel drivers PROSet/Wireless (version 9.0.1.9), used in laptops based on Intel Centrino technology.

So, first of all, you need to install the wireless adapter driver. In the case of a laptop based on Intel Centrino mobile technology, open the Intel PROSet/Wireless dialog box (the icon of this window is located in the system tray), with which you will create a profile for a new wireless connection (Fig. Fig. 3. Wireless connection settings dialog box
Click on the "Add" button to create a profile for a new wireless connection. In the “Create a wireless network profile” dialog box that opens (Fig. 8), enter the profile name (for example, HOME) and the wireless network name (SSID) that was specified when setting up the access point.

Setup using the Microsoft client
When using the Microsoft client to configure a wireless adapter (a universal method that works for all wireless adapters), you should first make sure that you are not using another adapter management utility.
Right-click on the My Network Places icon and select Properties from the list that opens. In the Network Connection window that opens, select the Wireless Network Connection icon and right-click on it and go to Properties again. This should open the Wireless Network Connection Properties dialog box, allowing you to configure your wireless network adapter (Figure 5).

Going to the “Wireless Networks” tab, click on the “Add...” button and in the “Wireless network properties” dialog box that opens, enter the name of the wireless network (SSID) (Fig. 6). Leave the remaining fields (security settings) unchanged for now.

Regardless of which of the following methods is used to create a wireless connection profile, after it is created wireless adapter should automatically establish a connection to the access point.
Choice Wi-Fi router A. The stumbling block for multimedia transmission is always the Wi-Fi standard. You can quickly transfer large files or watch HD videos over a wireless network only if it complies with the 802.11n standard, which supports speeds of up to 300 Mbps. If this is not necessary, then choose a router that meets the 802.11g standard, which provides speeds of up to 54 Mbps - this is more than enough for any high-speed Internet connection. Those who use modern laptops with an integrated wireless network adapter do not need additional equipment. For older laptops, Wi-Fi modules are provided for USB bus
, or Wi-Fi Card-Bus adapters.
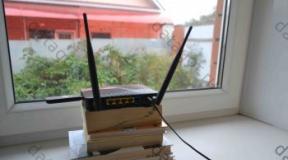
All three Wi-Fi network standards typically operate at 2.4 GHz. In this regard, several problems arise at once. One of them comes down to the fact that not only Wi-Fi equipment operates in this frequency range. For example, microwave ovens, cordless phones, and wireless extenders also use this frequency, which increases interference levels. Another problem is related to the signal transmission environment: the human body and reinforced concrete structures degrade the quality of the signal if they are located along its path. In order for the signal to be available throughout the entire room, it is important to choose the right location. The connection works best if the router is mounted as high on the wall as possible. In addition, the router should not be located directly next to a computer or other device that emits strong radiation or interferes with radio waves due to metal case. Proper placement of the router's antennas is also critical. In most cases, you can get more coverage if you aim them vertically.
Connecting and setting up a Wi-Fi router (access point) for a local (internal) network
Connect the computer and the router with a network cable (use sockets for the external network; there are usually 3-5 of them, they are located nearby and labeled. Make sure that you have established a connection between the computer and your wi-fi router (the connection icon in the taskbar tray lights up) .
- IP address: 192.168.0.2
- Subnet mask: 255.255.255.0
- Default Gateway: 192.168.0.1
- DNS: 192.168.0.1
If you find other parameters in the manual, set them. Open command prompt ( Start - Run- in the window that opens, write “cmd”). Next in the opened command line write: ping 192.168.0.1 . If packets arrive from 192.168.0.1, then you did everything correctly. If there is no response and we see messages about exceeding the waiting limit, it is worth trying to change IP 192.168.0.1 and 192.168.0.2 to 192.168.1.1 and 192.168.1.2, respectively, and then try to “ping” the address – 192.168.1.1 If you If you still fail, then consult the manual to understand what IP address the router accepts on the internal interface.
I also recommend checking again whether the socket is plugged in network cable on the router, is it using a crossover cable? IN manual for wi-fi connection router it should be written how to get into the web interface to manage the router; if you cannot find this section or the manual itself is missing, you should check the addresses http://192.168.1.1 or 192.168.0.1 , depending on which address we were able to ping. Open the router settings page in your computer's web browser. If you have already tried to connect the router, then you need to first reset the settings with the button "Reset" on the back panel. It’s also worth checking the same addresses but with a secure protocol https://, instead of http://
On the page that opens, you will be asked to enter your login and password. If nothing is indicated in the instructions for connecting a wi-fi router, then you should try the admin/admin or admin/password pair - these are the most common pairs and they are found in almost all popular router models. After entering the administration mode, select the Russian language in the interface settings section so that everything becomes intuitive if it is present.
Most often, Wi-Fi routers allow packet forwarding in the intranet interface, so you can already turn on additional PCs and connect them through other sockets for the internal network, and start using the internal network.
How to set up a Wi-Fi router
We will look at how to enter data to access an Internet connection below, using the example of one of the Wi-Fi routers, but for now let’s go to the “Wireless Settings” settings section ( setting up a wireless network) or to the section “Wi Fi”, “Wireless”, etc.
Now give the name of your home Wi-Fi network in “Name (SSID)”. Under this name, the wireless network will appear in the list of available networks on the other device. Select your region (Europe - the American installation has a longer range, which, however, is prohibited here). In the “Channel” column, set the value to “Auto” - then the Wi-Fi router will analyze the air and use the channel with the least amount of interference. Confirm the settings by clicking on “Apply”.
Wireless Security
The network is installed, now it’s a matter of choosing protection. Without a strong password, anyone can access the Internet through your connection. There are three main encryption methods for protecting a Wi-Fi network: WEP, WPA and WPA2. All of them are vulnerable to one degree or another, but with my help your network will be quite reliably protected from hackers. Encryption using WEP is extremely unreliable - we recommend not using it. WPA (Wi-Fi Protected Access) encryption, which is based on the AES encryption method, is quite secure and difficult to crack. To select the keys, a hacker will need many years or a computer that is orders of magnitude faster than current PCs in speed.
WPA2 offers better protection. True, hackers were able to find a loophole here, but the costs of hacking are too high. However, all these security methods require a dedicated authorization server (RADIUS), which, under conditions home network or small office network is not applicable. They are encrypted using WPA and WPA2 with predefined keys. To use them, on the “Wireless Settings” tab, activate “WPA-PSK (TKIP)” or “WPA2-PSK (AES)”. When prompted for “Security Encryption”, specify a password - it is not recommended to use less than 15 characters for it. Confirm your entry by clicking “Apply”.
Optional Wi-Fi router setup
Each network device has its own MAC (Media Access Control) network address. In the router you should register the addresses of only devices known to you - others should not have access to the router. To do this, click in the “Advanced” menu item on the “Wireless Settings” tab and select “Setup Access List”. After this you will receive a list of connected devices. Find out the MAC address of the wifi module on a laptop or wifi network card on a PC it’s simple - in the command line type " ipconfig /all” Select the computers for which you want to open access and click on “Add”. Now check the box next to “Turn Access Control On”, click “Apply” - and the network protected from hackers is ready. Don't forget that it's best to do all this after you've set up a wireless connection on your client computers.
Restart the Wi-Fi router via the web interface and try setting up a network on your device using the following settings:
IP– from the range of free addresses
Mask – 255.255.255.0
Getway – 192.168.(0-1).1
Setting up the Internet on a Wi-Fi router or setting up an external network

If we need to distribute the Internet over the internal network, we need to connect a network cable with the “Internet” to front end on a wi-fi router (the external interface is usually located slightly away from the others and is signed accordingly WAN)
Then in the router settings you need to specify the settings for the external interface of your provider: usually they are in the contract, or call technical support. You should also not forget about DNS - the router probably has a caching DNS server or, as a last resort, a DNS tunnel, configure it. It is also worth checking whether the exchange of packets between interfaces is allowed; if so, then the Internet most likely already exists on your internal network.
By the way, I would like to note that the latest models of wi-fi routers and some of the previous ones (Asus, for example) have the ability to work with the PPPoE protocol - which has recently become more and more common among providers, so at the end of the article you will find a step-by-step instructions for setting up a Wi-Fi router with a connection via the PPPoE protocol . If your Internet is like this, then make sure that you have a router that supports PPPoE. On this page I have described the main types of Internet connections so that you can determine yours.
P.S. Let me remind you once again about the “cherished button” that answers the question “ How to reset a password on a router, if I forgot the old one.” Each router has a “Reset” button - after clicking on it while the router is running, it reboots and all settings are set to their original settings.
Setting up a wi-fi router. Troubleshooting Wi-Fi Networks
Why doesn't Wi-Fi want to transfer data?
You connect to Wi-Fi, but the browser cannot display the site. Let's find ways to solve this WLAN problem: Weak Wi-Fi connection signal. Sometimes WLAN transmits data one and a half, two times slower and the signal is always bad, regardless of the location of the antenna. Reason: Your network is overlapped by another WLAN that operates on the same frequency. To allow multiple radio networks to exist side by side without overlapping each other, the 802.11b/g standard provides 13 channels at 2.4 GHz. Many routers are configured for channels eleven or six. With free app NetStumbler you can find and recognize neighboring WLANs and find out which channels they operate on. Download the app by this link
and start searching. After this, you will see the channels of the networks around you. Now, through the router's web configuration, set your WLAN to one of the channels that is not used on this network and check if the signal has improved. How to increase the range of a Wi-Fi network. If the range of the Wi-Fi router is insufficient, WDS (Wireless Distribution System) technology is usually used. It allows Wi-Fi access points to establish connections not only with clients, but also with each other. Each of them receives the signal from the other and transmits it further. However, this increase in range comes at the cost of another set of hardware for the access point. The next disadvantage: the access point must provide simultaneous connection to both the network and the client - this reduces efficiency by half. Another, less expensive, but often quite To cope with the problem - replace the included antenna of the router with one that has a higher gain or even a directional one.
Wi-Fi Router or Wi-Fi access point loses connection. The network is functioning normally, but the connection is constantly being lost. The problem is most likely in the poor quality of the electrical network. Even a small voltage drop is enough for the router to lose connection. Solution: purchase a small uninterruptible power supply and connect the router through it. If this happens rarely, most users turn the device off/on, but this is not the solution.
Wi-Fi connection disconnects. When the wi-fi router and computer adapter are made by different manufacturers, this can cause some problems. As a rule, updating helps here software. Find the latest version on the vendor's website and install it through the configuration menu. This problem is especially often solved by updating the firmware on D-Link access points and routers.
Common mistakes and setting up a Wi-Fi router
Incorrect IP configuration. In order for two network communication components to exchange files, each needs its own IP address. This network data is distributed by the DHCP (Dynamic Host Configuration Protocol) server in the router (don’t forget to check in the router’s web interface that the DHCP server is enabled). Open Control Panel and select Internet Connection. Select “Settings” from the WLAN connection menu. Next, double-click on “Internet Protocol” (TCP/IP) and activate the “Obtain an IP address automatically” option. Confirm by double-clicking “OK”. If you have several devices that can be DHCP servers, a conflict may arise between them. This leads to real chaos. To track which device is causing problems, use the DHCP Find app. It reports the MAC addresses of the DHCP server. MAC addresses are usually written on the bottom of devices. This way, you can quickly identify the troublemaker and disable their DHCP server. If communication is still not working, your browser's proxy settings may be to blame. Set up your browser: in Internet Explorer, click on “Tools | Internet Options" and go to "Connections". In the “LAN Settings” section, uncheck all the boxes, including “Automatic detection of parameters”. In other browsers, such as Firefox, Chrome or Opera, these functions have similar names.
Programs for setting up and optimizing Wi-Fi networks (WLAN)
DHCPFind - looking for WLAN troublemakers
PuTTY - configures WLAN routers
EasyWi- FiRadar - displays all WLAN connections in the area
Wireshark - finds unprotected data
NetworkShareBrowser - shows all free networks
Wlandscape - creates a WLAN coverage map
Wi fi router Netgear WNR3500L. Easy setup
Using the Chekhov.NET provider as an example
- We connect the cable from the provider to the router (in WAN port- yellow).
- We take another cable (twisted pair crimped on both sides). We connect one end of the cable to the router (LAN port - orange) and the other to the computer.
- We connect the router to an outlet. Let's turn it on.
- Insert the disk from the kit into the drive (Russian interface). Set up step by step. Everything is very clear.
- Next, watch the video (below) and set up a PPPoE connection: go to the web interface - www.routerlogin.net with the admin | password, select the connection type - PPPoE, set the login and password from the contract, IP automatically, change the password to access the router. Apply the settings, reboot - done!
How to set up a NETGEAR JWNR2000 Wi-Fi router with a PPPoE connection
Go to Internet browser Explorer, Mozilla, Opera, Safari and type 192.168.0.1 in the address bar. In the window that appears, enter admin in the “Username” field, enter password in the “Password” field and click the “OK” button.
After this procedure, the router menu will appear:
Setting up a PPPoE connection
Click the "Ok" button in Fig. higher. “Basic settings” will appear (in the menu on the left it is: Installation - Basic settings).
To the question “Do I need to enter connection information when connecting to the Internet?” We answer “Yes”:
In “Internet Service Provider” select “Others” (which corresponds to the PPPoE connection type):
Connection mode – connection setup mode. "Always on" for a permanent connection. “Connection on demand” - establishing a connection when necessary - that is, when traffic directed to the Internet appears, the device will establish a connection, and if there is no activity for more than the time specified in “Inactivity time before disconnecting (in minutes)”, it will disconnect. If you select “Connect manually”, the connection is established and terminated manually
“Internet IP address” leave “Obtain dynamically from Internet service provider” , if the IP is not issued to you by your provider (static) , as well as other parameters (everything must be in the contract):
DNS server addresses can be specified manually, if available from your provider, or you can receive them automatically:
Primary DNS: xxx.xxx.xx.x
Additional DNS: xxx.xxx.xx.x
Leave the “router MAC address” as default:
Setting up Wi-Fi and security using an encryption key
Setting up Wi-Fi network security using MAC address filtering
Setting up a Netgear WG602 access point
Settings wi-fi points Netgear WG602 access is quite simple . Before starting the connection, hold down the “Reset” button, which is located on the back wall of the access point for 20 seconds to reset all settings to standard. Remember that if you are using an Internet connection via a login-password pair, then you need an access point that supports the PPPoE protocol, the connection of which is described above; the Netgear WG602 access point cannot be used with this type of Internet connection.
We connect the Netgear wg602 access point to the computer’s network card using twisted pair cable. In the connection settings of the network adapter (card) of the computer we set IP 192.168.0.2, mask 255.255.255.0, deleting the previous settings if they existed there, but you can also use a second network card on motherboard to configure the access point.
Open a browser to connect to the web interface of the access point, write 192.168.0.227 in the address bar, a dialog box should appear where you need to enter login: admin password: password (these settings are written on the bottom cover of your access point)
Go to the Wireless Settings menu, enter an arbitrary network name - Wireless Network Name (SSID) and region (Country/Region), click “Apply”.
Now we need to go to IP settings and “drive in” the provider’s settings from the contract, unchecking DHCP. This checkbox will not need to be unchecked only for those whose provider assigns an IP automatically or you use a wired router (switch) with an IP assigned to it. Such routers are necessary to connect several devices in an apartment. Leave all other settings as default.
Reboot the access point (go to the Reboot AP menu section), remove the cable from the computer’s network card:
1) If you have an Internet cable connected to the above-mentioned switch with an assigned IP provider, then insert the end of the cable that you pulled out of the computer into the switch and connect to the newly created Wi-Fi network using any device that supports this technology wireless connection by entering only a password (for example, a smartphone). Skip this paragraph if you are not using such a router.
2) If you only have a cable from the provider in your apartment (house, office), then remove the end of the cable pulled out of the computer from the access point and connect the Internet provider cable to it. Check network functionality.
The "Access Point" function, present on smartphones and tablets with operating system Android, allows you to distribute Wi-Fi to several mobile devices and PC ( personal computers). The importance of this option can be appreciated if, for example, when leaving the city, you urgently need to access the network from a laptop, but only mobile phone. How to set it up correctly this function Android?
Which Android smartphones and tablets have modem mode and can distribute Wi-Fi to a computer and other gadgets
To be able to distribute the Internet via Wi-Fi, you need a smartphone or tablet with Android (version 2.1 and higher) and installed SIM card, on which 3G / 4G mobile Internet is connected. The design of the device shouldprovide for the presence Wi-Fi module with support for one of the protocols: 802.11b or 802.11g.
Similar protocols are installed in almost all gadgets manufactured after 2009, but to obtain accurate information you should still refer to technical specification devices.
If support mobile internet There is one from the provider, but the phone does not connect to the network - you need to perform its initial setup. It involves entering an APN address through which the built-in modem will gain access to the World Wide Web. Typically, the device requests this address when it first starts. If problems arise with the setup, it is recommended to make a request to the operator and clarify the reasons.
Owners of CDMA smartphones can also use the Wi-Fi distribution function. In such phones, instead of a SIM, there is firmware with saved provider settings.
How to set up a Wifi hotspot on an Android phone and tablet and turn it on
Set up a mobile hotspot like this:
- Open the “Settings” menu of your smartphone or tablet, then click on “More” in the “Wireless Networks” tab.
- Select "Modem Mode" from the list of functions.
- Set up your future Wi-Fi network: set a password and encryption method for it to protect the device from unauthorized access by third parties. These parameters are set in the “Setting up a Wi-Fi access point” subsection. Users of Android devices have the opportunity to select the Internet distribution mode. There are several options: via Wi-Fi, Bluetooth, USB connection.
- Change the network name (if you wish).
- In the “Security” field, set the “WPA2-PSK” parameter. This method more reliably protects against hacking by guessing keys than others. First make sure that the device that will receive Wi-Fi supports the same encryption method.
- When distributing the Internet to an old device (manufactured before 2005), set the “WPA-PSK” parameter. In the “Password” field, enter the verification code to connect. After specifying all the parameters, tap on “Save”. Next, move the “Wi-Fi access point” slider to the active position and wait until the modem mode on the phone turns on. Please note that this will disable the current Wi-Fi connections
- and mobile traffic will begin to be consumed. To check the operation of the modem, turn on Wi-Fi search
on another device, find the distribution and connect by entering the previously created password. On some older smartphones running on Android based 2.x, instead of the “Wi-Fi access point” item there may be another one - “ Mobile Wi-Fi router" or " Wi-Fi hot spot
" This is the same thing, the setup principle is similar.
Wi-Fi distribution from a mobile router refuses to turn on: possible errors and ways to fix them If the network setup is done correctly, but there is still no access to the Internet, you need to check whether data transmission is disabled. The “ slider” is responsible for this function. Mobile networks
" in the "Wireless Networks" section.
If the connection to the network was successful, but the quality of the Internet leaves much to be desired, then most likely the smartphone is operating in 2G mode. To switch to 3G-4G, go to “Settings” - “Mobile networks” and manually select the required mode. GSM is 2G ( low speed
access), WCDMA - 3G (speed up to 56 Mbit/s), LTE - 4G. The CDMA standard refers to 3G - the maximum access speed is 14.4 Mbit/s.
The user may encounter that the “Set up Wi-Fi access point” menu item is dimmed (inactive). To access this item, you need to set the “Wi-Fi access point” slider to “On” mode.
How to create a hotspot on Android and use it to distribute Wi-Fi: video Distributing Wi-Fi from Android is extremely simple. Using this function, you can access the Internet anywhere there is coverage area mobile operator
. Please note: using such a router quickly drains the battery. On average, a full charge lasts for 3–6 hours of active use.