Windows fast boot. Enable or disable Windows Fast Startup. Enabling or disabling accelerated OS boot
Windows 10 is a new operating system that introduces some features that are missing in previous versions OS. One of these innovations is fast Windows startup 10.
If this mode is set on your computer, the system closes everything open applications, comes out accounts all users.
In principle, at this moment, the state of the system can be compared with its initial launch, when it is already running, but not a single application is running by any user.
However, the kernel of Windows 10 itself is loaded, so the system session continues to work. The OS warns the driver about entering a new “sleep” mode, only after which the computer is turned off.
When you subsequently press the power button to start the OS, it will be much easier for the system to execute such a command.
She will not have to load the kernel or drivers, she will only need to send a command to load the system image into the RAM, indicating the start of the operating system Windows systems 10.
It is for this reason that you can turn on and off a PC with Windows 10 installed, accompanied by this mode, almost instantly.
Enabling or disabling accelerated OS boot
Having realized how important quick start, many strive to quickly do everything so that they have Windows 10 fast boot activated, but they don’t know how to enable or disable it.
It is for this reason that it is important not only to figure out how to enable Windows 10 fast startup, but also to find out how important it is directly for you, as a user.

Reasons for shutdown
According to outside observations, it is safe to say that most users are actively looking for information on how to disable fast startup in Windows 10 than on how to enable it.
This is not surprising since fast loading comes with some significant shortcomings, which many people want to get rid of.
First of all, instant booting prevents your computer from shutting down completely. It may prevent disk images from being encrypted.
Some devices, unfortunately, do not support sleep mode, so subsequent loading of the operating system may be accompanied by serious problems.
Also, disabling fast boot in Windows 10 is important for those users who have two hard drives with different operating systems. Launching in such an accelerated mode simply blocks HDD, so you won’t be able to boot from another OS.
And lastly, some BIOS versions do not support accelerated boot, so if you want to enter it, you will not be able to. Of course, you can use a little trick: do not turn off the computer, but force a reboot.
Now that you understand what problems can arise due to accelerated loading enabled, only you can decide for yourself whether you need it or not. If you don’t need it, study the algorithm of actions indicating how to remove the quick loading Windows 10.
Algorithm of actions
Initially press two keys at the same time: the first key with Windows shortcut, and the second with the English letter X.
The screen will appear context menu, which will list important parameters. Select the “Power Management” line and click on it.
Now a window will open in front of you with many functions and options related to power supply. On the left side there will be an item “Actions of the power buttons”, hover your mouse over it and click on it.

Select "Power Button Actions" and move to the next screen
Will open Next page, in which the phrase “Change settings that are currently unavailable” will be visible at the very top. Click on it to bring up the “Completion Options” section.
Among the listed options, the first place will be the line “Enable fast startup”. Nearby there will be a tempting word “recommended”, which inexperienced users are blindly led to.
Pay attention to the nearby checkbox. If there is a checkmark in it, you can be sure that accelerated startup of the operating system is activated; if it is not there, vice versa. If you want to turn off this mode, uncheck the checkbox.
By the way, you can enable or disable accelerated loading of the OS in the registry. Use this simple method.
Go to the registry editor, find the branch there, going through one by one until you find .
Your goal is to detect such a registry entry “HiberbootEnabled”, opposite which is directly set its value, which looks like this: dword: 00000001.

pay attention to last digit found parameter. The installed unit indicates the activation of accelerated loading. If you want to get rid of it, set zero instead of one. This completes the shutdown process.
In cases where you really want to turn it on, you should do the same steps, only exactly the opposite.
It may happen that in the “Shutdown Options” you will not find a line that allows you to activate instant startup.
This indicates that hibernation mode is disabled on your computer. Connect it and enjoy all the other privileges. The command line will help you with this, write powercfg /h on and wait for the command to complete.
So, the process of enabling and disabling instant loading of the operating system is possible even for a novice user who feels the need for it and, accordingly, has previously armed himself with the necessary knowledge by studying the algorithm of actions.
If you are faced with the task of speeding up Windows startup, and you need to do this without using third-party programs, then you definitely need to read this article. Because it contains simple, and most importantly, effective ways to speed up the loading of the Windows 7 operating system, the impact of which you can feel without a stopwatch.
When starting up any computer, the first thing it does is launch the BIOS (from the English Basic Input/Output System), and therefore you need to start speeding up Windows startup with it. In BIOS(e) we are interested in two things: the boot priority queue, and the Fast boot function.
The latter can significantly speed up system startup by eliminating the search and check of the BIOS(s) of connected devices. However, this function has its drawbacks - by disabling it, the user disables the use of devices connected via non-standard connectors (USB, S-Video, hosts for mobile devices). They will start working after Windows has fully started.
To speed up booting by configuring the BIOS, you must:

Important! The figure shows the "Download Queue" for Dell laptop Inspiron. It may vary slightly on other devices. As a rule, the differences concern only the visual component, while the names of bookmarks and commands are almost always identical (standardized) for all devices.
It should also be noted that Fast boot sometimes works too well. As a result, users do not physically have time to press the required button in time to re-enter the BIOS. This problem can be solved by pressing the opening button BIOS settings(a) before turning on the computer.
Second step
The next step to speed up booting involves connecting all processor cores (if there are more than one) to start the operating system. For this:

The manipulations performed will begin to work the next time the operating system is rebooted.
Step three
The next step is to disable unnecessary programs and services that affect the system startup.
Disabling services

Here it is necessary to disable unnecessary services, since they load the system even if they are not used by the user. Especially when starting Windows. You can read in detail about what can be disabled and what is better left alone on the Internet, however, you can guess about some services yourself. For example, you don’t need Print Manager if you don’t have a printer.
The “service” is turned off by right-clicking on it and clicking “Properties”. After which a window will open, where in the “Startup type” column select “Disabled”. 
Step four
Next, we configure what Windows programs should automatically start when the system starts. Since so many programs like to be registered in autorun, the user not only does not use them, he does not even suspect that they are working.
Setting up Windows 7 startup

The changes you make will take effect the next time you start the operating system.
Step five
The last point of speeding up system startup is organizing the space occupied by files on the hard drive, in other words - defragmentation hard drive. This procedure is reminiscent of organizing the arrangement of books in a library. What is required to make it more convenient, quick search books (in our case files) and their use.
The disk defragmentation service in Windows 7 is launched by a separate command - defrag.exe. It must be entered into search bar Start menu or in the Run window (Win+R). 
By running this command, you will open the “Defragmentation” window, where you should select the disk on which the operating system is installed and start defragmenting it. 
The defragmentation process can take a long time, sometimes several hours.
Also in this window, it is better to immediately enable the function of periodically running defragmentation by clicking “Set up schedule”. 
And choosing the optimal launch parameters for you. After this, you can start defragmenting your hard drive.
Advice. You should not boot your computer during defragmentation; it is best to leave it until the process is finished.
I had to resort to it several times due to problems with the hardware and with insider builds of Windows 10. Time passed, Windows 8.1 and Windows 10 were born, and, to my shame, only now I discovered another, simpler and more universal way to disable fast loading of modern Windows.
There are exactly two problems with the gpedit.msc file. One subjective thing is to remember where it is required section Settings among the list of identical folders in the Group Policy Editor is personally difficult for me, especially if you use this setting once or twice a year. Objective - the group policy editor is missing in editions below “Professional”, which, given current prices and the popularity of the “one language” edition, is a serious minus. And only when I encountered the latter, I found a whole section of the control panel, which, apparently, has existed since the days of Vista.
Call up "Power Management". The closest way to display it is from the menu called up by the Win + X key combination (English), usually this is the second item from the top. On the left side of the window, click on the link “Wake up password request” or “Power button action” - they both lead to the same place.
If you have UAC enabled (and a competent user simply must have it enabled), all the most necessary parameters will initially not work. Click the "Change settings that are currently unavailable" link.

Now let's turn around. Many interesting parameters that are found elsewhere in the system are conveniently collected here. We are interested in the “Enable fast startup” item.

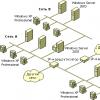
Hybrid boot, also known as Windows hyperboot, is enabled in system settings by default and aims to help operating system load faster after exactly shutdown computer. Windows does this by saving an image of the system kernel and loading drivers into the notorious file hiberfil.sys
immediately after the user shuts down Windows. After turning on the computer or Windows laptop simply unloads the file into memory, instead of loading the system in the usual way, initializing everything sequentially necessary files and processes, loading sequentially necessary . This process can be schematically represented as follows:

Thus, to reboot The quick start function has nothing to do with the system. So sometimes loading “cold” is noticeably faster than trying to get rid of a slow one Windows operation via reboot. Moreover, on computers and laptops with UEFI, you will most likely not see the initial POST diagnostic window at all (provided that the BIOS|UEFI option is enabled Fast boot). This is in theory...
By the way, there is some kind of “Easter egg” buried here: when you try to forcibly speed up shutdown windows command:
Shutdown /s /f /t 0
in the console (directly or to shut down work in this way permanently), the shutdown time from the moment the command is entered until the machine is completely turned off sometimes increases up to two times. And the declared advantages of fast loading may turn out to be “zilch”. At least for your computer.
BY THE WAY
I think many will be surprised, but different options for shutting down or restarting Windows take DIFFERENT times (using the “hard stop” button on the computer panel, the above command from the console or search bar, or using the Start button from the Desktop). Some optimizers installed in startup are configured to display Windows boot time. However, on Windows 10 you can check this without resorting to third party programs. Run Task Manager and open the tab. And here is “it”:

This is according to Windows itself. Some programs, such as antivirus 360 Total Security , show loading times more accurately. Will free time– experiment with the Event Log.
MAIN
The main condition for the hyperboot function to work is that the mode is turned on. If for some reason you have disabled it, Windows 10 fast boot will no longer work. However, there is a little secret here: fast loading may suit the user, but not everyone uses hibernation. In this case, it is recommended that the hiber mode is completely do not turn off, but just decrease minimally the required file size is half.
Why turn it off?
It would seem what required function... But the reasons why you would want to disable hybrid boot lie in its functionality and definition.
Fast loading refers primarily to a specific file, which may be damaged due to errors that occurred in the previous session, or, even despite the integrity, may include errors previous session. This explains, among other things, the appearance of “Windows”, when you have to manually start Windows Explorer by calling Task Manager. However, installing the latest Windows builds 10 or an immediate update after installation often solves the problem completely. However, loading based on previous data is fraught with other pitfalls. So, an attempt (such actions require special rights or the file is locked by a certain process) using, for example, fail-safe will not be successful for the same reason: Windows will invariably return to you “its” workable, in its opinion, state back with the same files that will be locked by the same processes. And so on. etc. A kind of “spontaneous” system recovery: to delete such objects, the system has to TURN OFF, namely REBOOT.
We go into the power settings with the command
Powercfg.cpl
in the search bar or via cmd and select on the left What the power buttons do. Select the button (if the settings checkboxes are dimmed) Change settings that are currently unavailable. Now they are available in settings. Uncheck:

Ready. If for some reason you can’t do this, try doing it through the registry. Go into the bush:
HKEY_LOCAL_MACHINE\SYSTEM\CurrentControlSet\Control\Session Manager\Power
Find the DWORD value HiberbootEnabled and give it a value 0 . Meaning 1 , respectively, enable Fast boot. In any case, you will need administrator rights to carry out the operation.
Read: 943
In addition to the described method of disabling fast launch through the control panel, the same parameter can be changed through the editor Windows registry 10. Meaning is responsible for it HiberbootEnabled in the registry section HKEY_LOCAL_MACHINE\ SYSTEM\ CurrentControlSet\ Control\ Session Manager\ Power(if the value is 0, fast boot is disabled, if 1, it is enabled).
How to enable fast boot in Windows 10
If you need to enable Windows 10 Fast Boot, you can do it in the same way as turning it off (as described above, through the Control Panel or Registry Editor). However, in some cases it may be that the option is missing or cannot be changed.

This usually means that Windows 10 hibernation was previously turned off, and for fast boot to work, it needs to be turned on. This can be done in the command line running as administrator using the command:
powercfg /hibernate on (or powercfg -h on)
After that, go back to the power options as described earlier to enable Fast Startup. If you don't use hibernation per se, but need fast boot times, the Windows 10 hibernation article mentioned above describes a way to make the hibernation file hiberfil.sys smaller for this use case.
Ask questions in the comments if something is unclear to you and I will try to answer them.