Windows 7 theme file. Let's patch system files
Today we'll figure it out how to install a theme on Windows 7, and complete personal customization. Compared to previous versions of operating systems, in Windows 7 you can easily configure many aspects, such as:
- Background used by the theme
- Sound signals
- Window color
- Transparency
- Screensavers and more
You will be able to create your own themes or install downloaded ones, without any technical knowledge in this area. The recommendations are not suitable for previous editions.
Where are the installed Windows 7 themes located?
You need to open the “personalization” item located on the control panel. Right-click on an empty space (where there are no objects) on the desktop and select “personalization” from the drop-down menu.
After which you will see a window with 3 sections:
1. My themes - contains designs created or modified by you.
2. Aero themes – used by default. Aero are characterized by improved appearance, aesthetics and efficiency of the user interface. The most obvious difference between the main themes and Aero is the transparency of windows.

Other interesting features are app thumbnail previews and some additional functions, which are available when working and .
3. Basic (simplified) topics - a set of objects that do not contain special features Aero. They are similar to the themes from Windows XP or Windows 2000 in terms of appearance.

Before as install theme on Windows 7, it is advisable to consolidate your knowledge in the field of personalization.
How to install and customize a theme on Windows 7

2. Window color– used for the standard theme. Here you are given a choice of one of the prepared colors. In addition, it is possible to enable or disable the transparency of windows, as well as set the color intensity by moving the slider.

If you don’t like the preset colors, click on “show color settings” and adjust 3 color properties: hue, saturation, brightness. Play with the 3 sliders and see what colors you get.

You can do more fine tuning windows You will need to click on " Extra options registration". As a result, the “color and appearance of the window” will open. Here you can set the size, color, borders and much more. After making changes, click on the apply and ok buttons. This separate topic will be discussed in more detail in another article.

3. Sounds– in this section you select sound signals for certain actions. Setting them up takes quite a lot of time, depending on what you want to do: change an existing scheme or create a new one.
How to save or delete topics
After completing the settings, be sure to save the changes by clicking on “save theme”.

If you want to delete topic, keep in mind that you cannot delete an active theme. So you'll have to apply another one, then right-click on the one you want to delete and select "Delete topic".

As you can see, it's not difficult configure and install install theme on Windows 7, changing many aspects. You can create your own color and sound combinations. Practice more and success is guaranteed.
Installing a theme for Windows 7 is very simple and does not require any special computer skills from the user. The initial setup will take about 5-10 minutes, since you need to patch the system and learn how to install new designs. If for the first time you carry out the installation strictly according to the instructions, then subsequent installations will proceed quickly, smoothly and smoothly.
Preparing the system to support third-party themes
If this is your first time installing a theme on your computer, you will need to patch the system.
After installing patches, you must restart your computer to make changes. After this, the system will be ready for installation third party themes.
If you want to change the Start menu icon and navigation buttons in File Explorer, you'll need to have permissions to system files explorer.exe(for the Start menu) andExplorerFrame.dll(for navigation buttons in Explorer).
The above steps only need to be done once. The following theme changes do not require re-installing patches or obtaining rights to system files.
Installing a theme
Step 1
In the downloaded archive we find the theme file in the format .theme(example: theme name.theme) and a folder with the same name. The file and folder must be copied to the system directory C:/Windows/Resources/Themes.

Step 2
Go to the personalization panel and in the section " Installed themes"We find our topic.

Step 3
Double-click on the theme name and observe changes in the interface design.

 Demonstration of an unstable Start button and navigation buttons in File Explorer
As you can see in the screenshot, we still have the same Start menu button and navigation buttons in Explorer. To replace these system elements, move on to the next point.
Replacing the start menu button
Find in the archive with the topic an image with a button in the format *.BMP(in our case the image is located in the folder " Orb") and set the button, .
Replacing navigation buttons in Explorer
If the theme archive contains the file ExplorerFrame.dll, copy it to the folder C:/Windows/System32.
- Go to the directory C:/Windows/System32 and find the file ExplorerFrame.dll.
- Rename the file ExplorerFrame.dll V ExplorerFrame.dll.old.
- Transfer from the archive with the theme new file ExplorerFrame.dll to a folder C:/Windows/System32.
- Restart your computer or simply restart File Explorer for the changes to take effect.
If the archive does not contain the file ExplorerFrame.dll, then there are pictures in the format .BMP, which must be installed using the Windows 7 Navigation Buttons Customizer program.
You must have access rights to the ExplorerFrame.dll file. The first paragraph of the article describes how to obtain rights to this file.
- Install the program
In the operating room Windows system 7 you can change the appearance of your desktop. To do this, just change the topic to a more suitable one. You can download such themes online from both official Microsoft sources and third-party resources. Read on to learn how to do this.
Where are the default themes in Windows 7?
Standard Themes Windows design 7 are located at:
- Click “Start”, “Control Panel”, set the view mode to “Small icons” and select the “Personalization” section.

- Let's see what themes are available for installation.

- If you don't like the standard design, you can download other themes.
How to install a theme in Windows 7 from official sources?
The “Personalization” section contains themes for Windows 7. It’s easy to install any of them. Just double click on the topic.
If you don’t like the standard themes, click on the “Other themes on the Internet” link.

Will open new inset in the browser, or rather the Microsoft Store. Select the theme you like and click “Download”.


After saving, double-click to launch the theme file. It will be automatically added and the Personalization window will open.

Now double click on the topic. It's installed.
How to install a new theme from third party developers?
The Windows 7 operating system does not support themes from third-party developers. Therefore, in order to change the design of your desktop, it is worth making a number of changes to the system. Only after this will it be possible to install the left theme.
Windows family operating systems offer their users amazing design options. appearance OS. Various color schemes, styles, sets of buttons, options for windows and panels, as well as everyone’s favorite themes have long been invented at the service of users. This has been implemented on a particularly large scale in the two latest releases from Microsoft - “Seven” and “Eight”.
Despite the fact that many things in Windows operating systems are learned almost intuitively and are done quite simply, many users still face serious difficulties in how to do this or that thing. And installing themes is no exception! Let's take a closer look at it.
Installing official themes in Windows 7
First, click on an empty/free space. table right keyboard mouse and call the option "Personalization".
This way you will instantly be in registration service Windows. As you can see, there, in two sections, the system already offers a wide variety of topics to choose from, both in “aero” and “basic” (simplified) versions. Select any of them by clicking on it with the mouse, and it will be automatically installed immediately.


If you want something “new” or different, then to download additional official themes, use the option "Other Internet Topics".

Clicking on it will instantly take you to official microsoft portal, where you can choose and download many beautiful themes for design. Take advantage search bar and categories to find something faster. The site also has a function for viewing each topic so that you can clearly see what you are going to download.

After downloading the theme you like, find its file on your computer (by default it will be in the folder "Downloads") and launch it by double-clicking the mouse.

The theme will also be installed automatically and appear in "Design and personalization" In chapter "My themes".

Installing third-party (unofficial) themes in Windows 7
It’s hard to disagree with the fact that today the Internet is full of beautiful custom themes that, unfortunately, cannot be installed in Windows using the usual method. Decide this problem possible using special utilities, For example, VistaGlazz, which will patch system files and thereby make it possible to install third-party themes.
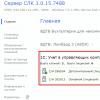
To get started, download the latest version of VistaGlazz and install it on your PC. There is nothing super complicated here. Simply, run the installer file from them administrator and follow further instructions installer.

After VG will be installed, launch it from the “working” shortcut or from the menu "Start" and press the button "I agree" to start using it.

Click on the icon "Computer with white shield", then, on the button "Patch files" to begin the process of patching system files.


After finishing, click on "Reboot" to reboot the machine. Then all the changes made VistaGlazz will take effect.

After restarting the OS, run the program again and make sure everything went well. A green shield should now appear on the “Computer” icon!

That's it, now you can start installing themes!

After that, open "Design and personalization" and look - the topic should be displayed there, in the section "My themes".

That's all. Now you will no longer have problems installing official and proprietary themes in Win7!
On at a certain stage When using a computer, the user often wants to change something, to introduce, so to speak, novelty into the monotony. Alternatively, you can change the standard theme in Windows 7 or install it, but not everyone knows how to do this. But in fact, the process is very simple, and every user can implement it, even with a minimal level of computer knowledge.
Before I talk about how to install a theme on Windows 7, I want to note that the initial setup will take you some time, but only because you will have to patch the system and also learn how to install new themes. In the future, the whole process will go much faster.
How to patch the OS
So, like I said, first you have to patch your operating system, and this is done for only one purpose: to be able to install themes that are not signed by Microsoft. To do this, download one program of your choice:
- UxStyle Core, which does not affect the original files in any way and runs as an add-on to the Themes service from Windows;
- UXTheme Multi-Patcher, unlike the previous version, this application modifies the original files and also makes a copy so that you can later restore them;
- VistaGlazz works the same way as the previous program.
Download any of these programs and install it. After this, you will need to restart your computer for the changes to take effect. I would like to note that you only need to perform such actions once. In order to change themes in the future, you will no longer need to re-install patches.
How to install a theme
Next we move on to installing the theme. To do this, download the archive with the theme and unpack it, then go to the folder. The content of the archive with the theme will be different each time, because each has its own creator, keep this in mind. Next, we do this: in the folder you need to find a theme file in .theme format and a folder with the same name. They need to be transferred to C/Windows/Resources/Themes, because this is the folder that contains absolutely all the themes of your OS.
Now click on a free area on the desktop and select “Personalization”, there find the “Installed themes” category and select the one that you just moved to the themes folder. That's basically all, you have successfully changed the theme to Windows 7. As you can see, the Start button remains the same, and the navigation buttons in Explorer have not changed either.

Nothing complicated to install new topic There is no design in Windows 7. Do all the work described here once, and then you will be able to change themes much faster, literally in a few clicks!