How to enable BIOS on an asus laptop. How to enable BIOS on an Asus laptop. What is BIOS
Hello everyone, dear friends! Just the other day I purchased a brand new ASUS laptop, in which I had to immediately update the BIOS. Therefore, in this article I would like to tell you how to update the BIOS on your laptop and why this procedure is performed on a new laptop.
So, sooner or later the time comes when we can no longer tolerate glitches and slowdowns in our work operating system. Some users prefer to carry their laptop in service center, so that professionals can reinstall the system. Other users choose a more difficult path - independent reinstalling Windows. This article is dedicated to the second category of users. We will figure out how to update the BIOS on Asus laptops. The procedure requires 10-15 minutes, not counting the installation of the operating system itself. Rarely do laptop owners decide to update the BIOS on their own; usually the reason arises - an error that does not allow installing new version operating system. Most often this is error 0x000000A5. If you are well versed in computers, but have not encountered updating the BIOS, then immediately skip to the appropriate section of the article.
Today's material will cover the following questions:
— What laptops are the instructions suitable for?
— When is a BIOS update required?
- How does the process work? BIOS updates?
— What to do if the BIOS is new, but Windows 7 is not installed?
— What should you pay attention to before installation?
Reference! The abbreviation BIOS stands for Basic input-output system; in Russian this is translated as Basic input-output system. BIOS is a set of firmware that helps optimize the operation of computer components and also loads and installs the operating system. Here you can read the necessary information about the BIOS itself.
The base system can even be seen on the motherboard. Look at the photo, the tip of the screwdriver points to the BIOS chip.

For which Asus laptops is it advisable to update the BIOS?
The answer is simple - for those with an outdated BIOS. Usually these are laptops ASUS series X551 and X553. This also applies to older models. In any case, the computer will automatically inform you that you will not be able to install a new version of the operating system on this BIOS. And he will do this with error 0x000000A5. We need to install a new BIOS version that will support ACPI, after which the error will disappear and you can safely install the desired version of the Windows operating system.
I will give an example of updating the BIOS on an ASUS X553 MA laptop. The update procedure follows the same scheme, so owners of other Asus models can also use my instructions. If you have a laptop from another manufacturer, then the only difference will be in the source of downloading the BIOS firmware. I will download it from the official Asus website, but you will need to go to the page of your laptop manufacturer.
What are the general reasons for updating the BIOS?
First of all, you need to check if your BIOS has an “OS Selection” option in the “Advanced” section. If it is not there, then you will need an update. In other cases, simply set this parameter to “Windows 7”, and this will complete the instructions for you.
The following are two main reasons for installing an updated version of the base system:
- Error. The appearance of code 0x000000A5, which is accompanied by a blue screen of death. Most users switch to the updated version precisely because of this error. In some cases, owners of laptops with built-in Windows 8 or 10 cannot install more old version operating system, in this case updating the base system also helps.
- Working with utilities. Some utilities are loaded not from the operating system, but from the BIOS, as is the case with the installation of an operating system. For example, you can take Acronis program, with which you can make adjustments to HDD, change the number and size of disk partitions. There are a lot of such applications, and new versions require that the BIOS on your computer supports the ACPI boot format.

This is what the screen of death looks like with error 0x000000A5; as a rule, this is what reports outdated version BIOS.
The laptop has an updated BIOS, but the error still appears when installing Windows 7. What to do and what to do?
How to update BIOS on an asus laptop?
In this case, the cause of the error is incorrect settings for the “seven” in the BIOS itself. This is especially true for owners of laptops with more modern systems. You can fix the situation as follows (try installing Windows 7 after each step):
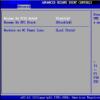
Let's start with the simplest thing - reset the BIOS to standard settings. To do this, we need to go to the “Exit” section and select the item called “Load Default Settings”, as shown in the photo below:

Has anything changed? Then try in the same section changing the position to “OS Optimized Defaults” from “Win8 64bit” to “Win7 OS”. The image below shows the process of changing parameters.
If you are trying to install an operating system from a flash drive, then you should check the parameter called “USB mode” in the “Configuration” section. Try changing the position from “USB 2.0” to “USB 3.0”.

IMPORTANT! If the reason was in the third step, and you successfully installed the seventh version of Windows, then after completing the installation, go to the BIOS again and return the “USB Mode” parameter. Otherwise they will disappear USB drivers 3.0, as a result, everything USB devices will operate at reduced speed.
Updating the BIOS on an Asus laptop - step-by-step instructions
So, you went into the BIOS, opened the “” section for boot settings and did not find the “OS Selection” parameter there. In this case, we will need to update the BIOS. The required parameter looks like this:

To put latest version BIOS, you need to go to the official Asus website https://www.asus.com/ru /At the top of the screen you will see the products tab, select “Laptops” there and indicate your model in a special field.
We are interested in the X series, since this is where the 553 MA model belongs. You can always find out the series on the laptop itself or on the box. A window dedicated to our model appeared in front of us - select the “Support” section, and then click on the “Drivers and Utilities” button.

First, select the type of operating system; here you should put your option. After this, a list of categories with drivers will appear. Everything is simple here - click on the BIOS category, after which a tab opens with latest updates. We select the latest ones, in my case it is version 214. If you read the article later, you will have more recent drivers. In general, you need to choose the highest version.

Install Windows is better all from a flash drive, so it’s best to transfer the BIOS firmware files to a USB drive. Unzip the archive and place the contents in the root folder of the flash drive. We also need the “Start Easy Flash” utility, which is located in the BIOS. Perhaps you already have it. Otherwise, the utility will need to be downloaded; you will find it on the official website.
Insert a flash drive with BIOS firmware into the laptop and launch it. In the first seconds of loading, press the “F2” key on the keyboard to get into the BIOS. Here we are interested in the “Advanced” tab, so go straight to it. Here click on the “Start Easy Flash” button
Now you need to select the firmware file located on the flash drive. It will have exactly the same name as when downloaded. Press the “Enter” key to start updating the BIOS.

After this, a loading bar will appear on the screen; you just have to wait for the process to complete. Do not turn off the laptop while updating the firmware; it is recommended that it be connected to the network. Once the process is complete, the laptop will reboot. Go to the BIOS again and go to the “Advanced” tab. There is now an "OS Selection" option here. Click on it to set the installation mode to “Windows 7”.
If you are going to install the seventh version of the OS, you then need to go to the “Boot” section and select the media from which you will install the system.
If it is a flash drive, then the name will contain the word “USB”; if the disk is “DVD”. It looks like this (in my case a flash drive is used):

Now you can safely insert media from installation files operating system and proceed to install Windows 7. Don’t forget to set the priority to boot from hard drive, otherwise, the computer will try to boot from the flash drive every time.
As you can see, the update process is quite fast. In 95% of cases, updating the BIOS will help solve the problem with error 0x000000A5. You shouldn’t touch the rest of the settings; follow only the steps indicated in my instructions. Experiments may adversely affect the performance of your computer. Done, now you can fully use the seventh version of Windows.
Every year, ASUS products are in increasing demand among consumers. In addition to high-quality assembly, full-fledged work computer system It is ensured by proper configuration of all parameters, the initial stage of which is the correct entry into the BIOS on the Asus laptop.
What is BIOS
The abbreviation BIOS stands for basic input and output system. It acts as an integral part of the computer system software. Therefore, when answering the question of how to enter the BIOS on an ASUS laptop, you need to clearly understand what you have to deal with.
BIOS is on the chip motherboard and has its own energy source - a battery. This system acts as a data storage and guarantees that the necessary information will not be lost in the event of a device failure. All Asus system settings are saved on it. It is a permanent storage device.

The main function of the BIOS is the timely detection and recognition of all constituent elements of the system:
- random access memory;
- video cards;
- processor;
- devices inside the laptop;
- and external connected accessories (flash drive, disk).
The BIOS checks all communications between them and only then proceeds to launch the operating system, transferring control to the bootloader. In other words, it acts as a key link between devices and the operating system.
How to enter BIOS on an ASUS laptop
There are many ways to enter the BIOS using various key combinations. But here you need to take into account the fact that depending on the model or modification of the laptop motherboard, the entire sequence of actions may differ significantly. In most cases, the keys Del, F2, Ctrl, Esc are involved in loading parameters.
Let's look at several ways by which you can enter the BIOS on an ASUS laptop as quickly as possible:

Entering BIOS from OS Windows
IN different versions There is a different way to get into the BIOS on an ASUS laptop, so we’ll look at each one separately.
Windows 7
Separately, it is worth noting the ability to enter the BIOS when the laptop is turned on.
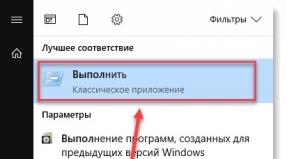
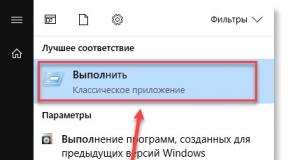
If the Asus is equipped with Windows 7 or version XP, then entering the command “ msinfo32" You can set it in several ways:
- Enter " msinfo32» in the search bar Start and then press Enter.
- Set startup combination Task Manager Ctrl + Shift + Esc or Ctrl + Alt + Delete, go to the “section File" and select " New task (Run...)" In the window that opens, in the input line, type “ msinfo32» and confirm with the OK button.
- Press the key combination + R. In the input line enter " msinfo32" and select the OK button.
As a result of entering the keys correctly using any of the methods, a window will open with all the data about the OS and version of the BIOS used on the laptop. Next, you just need to select the right keys for installed type BIOS. A good hint is the selection of buttons for logging into the system presented below.

Pressing one of these key combinations simultaneously while booting into Windows 7 or XP will open the BIOS main menu.
Windows 8
First of all, you need to make a proper connection external device, since to enter the BIOS menu on an ASUS laptop with Windows 8 installed, it will be correct to use UEFI settings.
To start the BIOS, you will have to perform the following sequence of actions:
- On Control panels desktop select the option " Options» ( Settings).
- At the bottom of the window that opens, click “ Change computer settings» ( Change PC settings).
- In the menu that appears, select “ General» ( General), then press “ Special boot options» ( Advanced startup), and then Reboot now(Restart now).
- After the reboot is complete, you need to select the “ Diagnostics» ( Troubleshout).
- In the window that opens, find “ Extra options» ( Advanced options).
- Next select “ UEFI Firmware Settings» ( UEFI Firmware Settings).
- Finally, in the last window, click on the Restart button.
And if all stages step by step instructions are met, the BIOS will start immediately after the system is rebooted.

Windows 10
In the updated version of Windows 10, it is also possible to enter the BIOS settings by giving such a command to the laptop before rebooting it. It is necessary to hold down the button, after which the OS will go to the BIOS menu.
BIOS partitions
Having figured out how to log into an ASUS laptop software BIOS, a blue partition window opens. Among which:
- Power is responsible for electricity consumption and the presence of constant voltage in the included elements of the system.
- Main contains information about the type, amount of installed memory, date and time.
- Boot determines the order in which system parameters are loaded.
- Advanced includes advanced type settings. For inexperienced users You should not experiment with this section.
- Exit offers to leave the system.
Confirm the selection of any of the sections by pressing Enter. The cursor arrows on the keyboard are responsible for moving between sections. To make changes to the selected type of menu section, use the PgUp or PgDn keys.
Conclusion
If you have recently acquired an ASUS laptop, then basic knowledge will help you answer many of your questions and help you access the system settings. in English and instructions for the computer device that comes with the kit. A competent work with BIOS software will help you make the necessary changes to the system in a timely manner and eliminate possible problems.
Video on the topic
How to enter BIOS on an ASUS laptop
Many ASUS laptop users do not know how to enter the BIOS. You can easily and simply set up your computer yourself with our help. And if you need qualified assistance from specialists, then contact the ASUS laptop diagnostics and repair service center.
In order to enter the BIOS on an ASUS k56c, x553m, x540s, x550c laptop on Windows 7, 8,10, you can use the keys or the system.
It is worth noting that it all depends on the brand of the device. General rule This is: wait for the device to boot and click “Delete”. But ASUS laptops have their own secrets.
How to enter BIOS on an Asus Windows 7 laptop
Most often, you can see the key combination to enter the BIOS on the screen of your device. Most likely the system refers to the F2 key - you need to press and hold it until Windows loads.
If it is not there for some reason, then you can experiment. Hold down "Delete" and the "F2" button at the same time; if this does not help, try the combination of "Ctrl" and "F2". Some of the ASUS laptops enter the BIOS thanks to these keys. If your device is ASUS X552W, then you should simultaneously hold down the “Shift” and “f2” keys in order to enter the BIOS.
You can also use the key combinations “Ctrl+Alt+Del” or “Ctrl+Alt+Ins”, “Ctrl+Alt+Enter” or “Fn+F1”, “Ctrl+Ins”. These combinations are not required very often; in most cases, the above are sufficient. In order to call the boot menu you need to use the following keys: F11, F12, F8, Esc. If it fails to start, it can be disabled directly in the BIOS. To activate it you need to go to Bios, select the “Boot Menu” option, and “Enable”.
How to enter BIOS on an Asus Windows 8 laptop
It is necessary to configure the subsequent inclusion in the BIOS system by changing the computer settings. To do this, go to the general settings menu item and special boot options. Here you need to indicate in the reboot request that you need device diagnostics. Next, in the "Diagnostics" section additional parameters Find UEFI Firmware Settings.

How to enter BIOS on an Asus Windows 10 laptop
The procedure is very simple, you need to set the BIOS entry command before loading Windows OS. While your laptop is running, press and hold the shift key. A window will appear on your screen where you need to select the reboot option.

We hope that we were able to help you and now you feel much more confident as a user of your laptop. The BIOS menu will help you configure your device and will be a good assistant.
This article will be useful for those owners of Asus laptops who need to enter Bios and do not know how to enter BIOS on an Asus laptop. BIOS is often visited during Windows installations when you have to boot from a flash drive or disk, check for viruses or implement other tasks.
In addition, through Bios on a laptop, you can view many different parameters, familiarize yourself with connected devices, or perform software updates.
Often, no matter what Windows version installed, BIOS settings can be opened using the F2 key. This method can be used when the system has not yet been installed. As for Windows 8 and 10, there is another method for them to get to this menu. Let's look at everything in detail.
How to enter BIOS on an asus laptop
It is worth noting right away that the presented method may not work if you - Windows user 10 or 8. Then I’ll even tell you why exactly and how it can be fixed.
We do the following: turn off your laptop, click and hold the F2 button, and then turn on the gadget again.
When the BIOS is open, you can release the button.

Boot steps can be changed using the Boot tab. To do this, you just need to replace the first device with a CD, DVD drive or flash drive, which should already be connected. In my case, the first place belongs to the SSD drive.

Don’t forget to save the settings by clicking on the F10 key. After Windows is installed or certain actions are performed, it is better to again assign the hard drive or SSD the first place in the list of devices.
We go into the BIOS with Windows 10 and 8
The bottom line is that the quick boot function makes it impossible to enter the BIOS after the laptop has been turned off. Verified. I turned off my laptop, pressed F2, turned it on again, and it happened Windows boot 10.
In this regard, for the F2 button to work, you should not turn it off, but only restart the laptop. To do this, in the “Start” menu, click on the shutdown icon and then select the “Restart” option.

Then you should press and hold, or simply actively click on the F2 key.
Another method is to temporarily disable the Quick Start function.
- You need to go to the Control Panel, then select “All Items”, then “Power Options”, and finally select the item called “Power Key Actions”.
- You should uncheck the item called “Enable quick launch”, and then save the settings.
- If the above item is already inactive, the link “Adjusting parameters that are currently unavailable” will be located above. Click on it.

Then you can turn off your laptop, turn it on again and go to the BIOS, as was shown at the very beginning of the publication. When everything is done, I recommend activating the “Quick Start” function again.
I hope that, thanks to my advice, you now know how to enter the BIOS on an ASUS laptop. Everything works for me without any problems. Just be extremely careful and not change absolutely all settings indiscriminately. You can configure it so that you will have to change your laptop afterwards.
By the way, if something suddenly doesn’t go as planned, you always have the opportunity to return the BIOS settings to factory settings by clicking on the F9 key.
A component such as the BIOS on an Asus laptop is an extremely complex memory component that monitors general condition the entire computer and promptly informs the user about all problems in its operation. The abbreviation itself stands for basic input and output system. It is present on every laptop, regardless of the model and country of origin. It is this software that checks all its components before starting the computer, and if one of the components in the laptop is faulty, then it simply stops starting. Naturally, the user is not happy with this scenario, but the BIOS itself on the laptop works properly. After all, it was created to track problems with component devices.
How to access BIOS?
Answering the question about how to enter such a component as, I would like to note that absolutely all computers are individual.
That is why each BIOS on a laptop starts differently and the question of how to enter it can only be explained superficially. If we look at the BIOS on a laptop in more depth, we will have to go through a lot of options before we can find the answer to the question of how to enter it.
So, what is the initial algorithm of actions when answering the question of how to enter the BIOS component:
For those who, for some reason, were unable to enter the BIOS, it makes sense to consider each step separately.
*When you turn on the computer itself, problems are unlikely to arise and the first step towards entering the BIOS will already be overcome. In fact, anyone can press the power button.
Continuing to answer the question of how to enter this component, I would like to dwell in more detail on the second point. After all, it implies a fairly quick reaction, the absence of which may be observed among novice users. In order to press the appropriate button in time, you must carefully monitor the signals of the device itself, which will definitely show you how to enter. In particular, if you find a screen saver with the manufacturer of the motherboard on the monitor screen, which will appear in any case, you need to immediately press the button. And this, in fact, is the end of the question of how to enter this component.
The third point implies such a crucial moment as setting up this component on an ASUS laptop. Its configuration, of course, is not required at all, because the factory parameters are already set properly. And yet, in some cases, setting up some modules is simply necessary. For example, tuning the processor parameters module may be required when overclocking the latter to certain parameters. The setting can also come in handy when you need to set download priorities. In other words, make sure that the disk or flash card is loaded before the main system boot. It is in such cases that sometimes even detailed configuration of modules is needed.
Some important points when working with BIOS
As practice shows, the question of how to enter the BIOS cannot be called problematic, because there is nothing particularly complicated here. Of course, the average user may not be able to enter the BIOS, however, with proper mastery of the program, this process can be easily learned.
It also happens that you cannot enter the BIOS running on an ASUS laptop due to the lack of standard buttons in the settings for calling this component. In this case, in order to enter the BIOS, you need to try all the F buttons on the ASUS laptop. After all, the BIOS must be present on the laptop, so you can access it.
It should be noted that entering the BIOS is usually done only through the standard buttons listed above, and not only on an ASUS laptop. Naturally, as already noted, the laptop buttons for calling a component can be changed, but, as a rule, device manufacturers do not resort to this kind of upgrades, realizing that it will be much more difficult for users to configure modules in this case. That is why problems with BIOS practically do not arise, especially if we are talking about experienced users. 
And, of course, I would really like to remind you that in this component you should not change the parameters of anything that is not clear. The fact is that BIOS is a rather complex and balanced system, where absolutely all components are responsible for some part of the computer’s support. It is not difficult to guess that if you change any module, all the others that depend on it may simply stop starting and ultimately the device simply will not boot. Naturally, no one needs such a development of events, because in this case you will have to take your device to special workshops that can. And this will cost its owner quite a considerable amount. Moreover, no one can guarantee that such a procedure will end successfully.
Read also...
- Creating a custom archives page in WordPress How to integrate this template into any theme
- Remotely turn on your computer for free, without SMS and without clouds, using Mikrotik
- Professions: social group administrator
- How to remove a program from Android, including the standard desktop application of various fruits android how to remove