Automation of work in Microsoft Excel documents. Excel Automation: Automate routine operations in Excel without macros. Initial data for automation
We continue to publish materials from the Milling Machine Operator's Handbook edited by V.F. Tongueless. This time we will analyze the main components of milling machines.
Despite the variety of types and sizes, milling group machines have common components, which include: machine base, bed, slide, spindle, speed and feed boxes, console (for console machines).
bed Designed for fastening all components and mechanisms of the machine. Depending on the type of machine, the bed can be horizontal or vertical. Horizontal beds of large-sized machines, for example longitudinal milling machines, are installed on the foundation with the entire supporting surface. Vertical frames are mounted on the base of the machine, which is installed or secured to the foundation. For most machines, the beds are made of gray cast iron.
The milling machine spindle is used to transmit torque to the cutting tool from the gearbox. The precision of the spindle rotation, its rigidity and vibration resistance largely determine the processing accuracy. Approximately 50% of all accuracy checks performed during the manufacturing, assembly and repair of a machine tool occur on the spindle assembly.
Gearbox is the main drive unit for the main movement of the machine and is designed to transmit various rotation speeds from the drive motor to the machine spindle. The gearbox is located inside the frame. The box is controlled using a spindle speed switching mechanism.
Gearbox ensures the receipt of working feeds and rapid movements of the table, slide, console (for console machines).
Machine table mounted on guides and moves along them in the longitudinal direction. On console machines, the table guides are mounted on sled, which are an intermediate element between the table and the console. The lower part of the slide is mounted on the transverse guides of the console and can move in the transverse direction together with the table.
Console– element of cantilever box-shaped milling machines with vertical and horizontal (transverse) guides. The console is connected to the frame by vertical guides and can move along it. The slide moves along horizontal (transverse) guides. The console can be fixed to the height guides of the frame with special clamps and is the basic unit that combines all other nodes of the feed chain and distributes the movement into longitudinal, transverse and vertical feed. The console is supported by a stand, which has a telescopic screw for raising and lowering it.
Chapter VI gives detailed description milling machines. In this article, we will look at the main components of cantilever milling machines and the rules for caring for them. Depending on the location of the spindle, cantilever milling machines are divided into horizontal and vertical.
Horizontal milling machines are characterized by a horizontal spindle arrangement and the presence of three mutually perpendicular movements of the machine - longitudinal, transverse and vertical. Horizontal milling machines are divided into two types - simple and universal. In universal horizontal milling machines, in addition to the indicated movements, the work table can also be rotated around a vertical axis at an angle of up to 45° in each direction. To set the table at the required angle to the spindle axis, there is a rotating part between the slide and the work table, on the periphery of which degree divisions are marked.
In Fig. Figure 16 shows a general view of the 6M82GB horizontal milling machine. The main components of the machine are: base 1, bed 2, trunk 4, console 7, slide 6, table 5, gearbox with working spindle 3, feed box.
The machine bed is used to fasten all components and mechanisms of the machine. The trunk moves along the upper guides of the frame and serves to support the end of the milling mandrel with the cutter using an earring. It can be fixed with different reach. To increase the rigidity of the trunk attachment, supports are used that connect the trunk to the console
The console is a box-shaped casting with vertical and horizontal guides. It is connected to the frame by vertical guides and moves along them. The slide moves along horizontal guides. The console is fixed to the guides with special clamps and is the basic unit that combines all other nodes of the feed chain and distributes the movement into longitudinal, transverse and vertical feeds. The console is supported by a stand, which has a telescopic screw for raising and lowering it.
The table is mounted on the guide rails and moves along them in the longitudinal direction. Workpieces, clamping and other devices are fixed on the table. For this purpose, the working surface of the table has longitudinal T-shaped grooves.
The slide is an intermediate link between the console and the machine table. The table moves longitudinally along the upper guides of the slide, and the lower part of the slide, together with the table, moves transversely along the upper guides of the console.
The milling machine spindle is used to transmit rotation to the cutting tool from the gearbox. The precision of the spindle rotation, its rigidity and vibration resistance largely determine the processing accuracy.
The gearbox is designed to transmit to the machine spindle different numbers rpm The machine engine is located on the bed.
The feed box is used to transmit various feed amounts to the table in the longitudinal, transverse and vertical directions. The feed mechanism drive is located inside the console and is driven by a separate electric motor. Unlike main motion drives, feed drives are low-speed.
Vertical milling machines are characterized by a vertical spindle arrangement and are designed primarily for working with face, end and key cutters.
The main components of vertical milling machines model 6M12P are: base, bed, rotary spindle head, console, table, slide, gearbox with working spindle and feed box. The purpose of the units is the same as for horizontal milling machines. Vertical milling machines do not have a trunk. The rotating head is attached to the neck of the frame and can be rotated in a vertical plane at an angle from 0 to 45° in both directions.

Figure 17 shows the controls of the 6M12P vertical milling machine. The machine provides duplication of control. The controls are located on the front panel of the machine and on the left side. Turning on the spindle rotation is carried out from the front with button 15, and on the left side - with button 5, turning off spindle rotation - with button 6. Pulse (short-term) turning on of the spindle is done with button 3. Switching the spindle to the required number of revolutions is done with handle 1. The required number of revolutions is set by turning dial 4 , focusing on the arrow indicating the spindle speed. The direction of rotation of the spindle is changed by switch 26. The machine spindle is mounted in a rotating head, which rotates in a vertical plane at an angle of 45° in any direction. The spindle is a two-support shaft mounted in a retractable sleeve. The sleeve is extended together with the spindle using the handwheel 9, and the clamping is done using the handle 10.
The machine lighting (lamp 8) is turned on by switch 7, and the cooling pump is turned on by switch 27. The movements of the table are controlled by handles, the direction of rotation of which coincides with the direction of movement of the table. Feed switching is carried out using the fungus 20 and the feed switching dial. At the same time, the fungus button is pressed, and the plastic fungus is pulled back all the way. Then rotate the dial by the fungus and set the required feed amount. The dial can be rotated in any direction. The longitudinal feed of the table is turned on using handle 12 or 23 (duplicate).
The vertical and transverse feed is turned on using handle 21 or 24 (duplicate). To set up the machine for automatic cycles of table movement, cams 11 are used. Rapid movement of the table in the longitudinal, transverse and vertical directions is carried out by button 2 or 16 (duplicate). Manual movement of the table in the longitudinal direction is carried out by handwheels 13 and 25 (duplicate), and in the transverse direction - by handwheel 17.
Manual vertical movement of the table is carried out by handle 18. The console on the supporting stands is secured by handle 19, the slide on the console by handle 22. When you press button 14 (stop), the motor is disconnected from the network and the spindle is braked. The machine is turned off from the mains using the main switch 28.
Horizontal milling machines are the most common equipment in the entire milling group of machines due to their functionality, versatility and wide range of applications. The scope of their application is both single and mass production. This equipment allows processing parts made of ferrous and non-ferrous metals, as well as their alloys.
Operating principles of horizontal milling machines
As with all other milling machines, the operating principle of horizontal models is based on the rotation of a cutter that processes a part (workpiece), which is fixed on a movable table. Such equipment can be console or non-console.
Using horizontal milling machines, you can process parts of small size and weight using the milling method. The machines are equipped with a table that moves transversely and longitudinally, a spindle placed horizontally and are designed to work with various cutters: cylindrical, end, shaped, etc. Allows you to process surfaces in both horizontal and vertical planes, including corners, grooves, and shaped surfaces. Special dividing devices make it possible to process workpieces that require periodic division with high precision.
A simple visual inspection of a horizontal milling machine allows you to see that all its main components are mounted on a frame, inside of which there is a gearbox and a mechanical spindle assembly. The mandrel with the cutter is supported by a special trunk.
Some models of horizontal milling machines have the status of widely universal ones, because... their equipment includes not only a convenient large-area work table, but also a rotating milling head, which creates maximum convenience in work and guarantees high accuracy of drilling, boring, and countersinking. Such equipment is controlled using a dashboard located in a place convenient for the operator. In some models, such panels are located on both sides of the bed, which creates additional comfort for the worker.
Templates are a convenient and useful thing! They allow you to save time when drawing up “template” documents, of which a good half are used in everyday work.
Perhaps your business requires documents or tables in which the main part is immutable, but some fragments can take one of several pre-known values. Good examples- power of attorney, contract for the provision of services, protocol of x-ray or ultrasound examination. In the pre-computer era, typographical forms were prepared, in which it was necessary to “underline what is necessary, cross out what is unnecessary” and write in very little.
IN Word documents Combo boxes play this role. Idea: click the mouse on a certain place in the document, in response a list with several options will open, select the one you need with the mouse - it appears in this place. It is logical to create such elements in document templates. Let's say you are engaged in ultrasound diagnostics and decide to stock up on templates for conclusions on basic studies. There aren't that many of them, and each one uses the same phrases stereotypically.
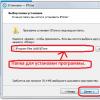
Tools for working with fields are concentrated on the tab Developer. By default it is hidden. To make the tab appear, right-click on the ribbon and context menu select team Customize the Ribbon. A dialog box will open Word Options , in which in the group Main Tabs you need to check the box next to the element Developer. Click OK and the named tab will be added to the ribbon.
- Place the cursor where you want to insert the control. Go to the tab on the ribbon Developer and press the button Control element"drop-down list". This control will be inserted at the specified location.
- On the tab Developer Click the Control Properties button. A dialog box will open.
- In the dialog box Content Control Properties click the button Add. A child window will open Add an option.
- In the dialog box Add an option In the Short name field, enter the text that you want to see as the first choice in the list. Click the button OK. The value will be added to the list.
- Add other options to the list in the same way. For the last one, enter just one space - I’ll explain why later.
- After adding all options to the list, click in the dialog box Content Control Properties OK button. The dialog box will close. The dropdown list is ready!
How does he work? When you click on such an element in a document, a list appears. You select the appropriate option from it, and this value is displayed in place of the field. Choose ready-made options much faster than typing something in or even erasing it. If suddenly you discover a completely casuistic picture, and there is no suitable description among the blanks, select the “blank” option (space). To the right of the field, enter what you want - this is why you need the option consisting of one space.
Control element Combo box works almost the same, but with one difference - the list elements can be edited directly inside the field. Which of the two controls best suits your task depends on the situation.
In electronic Excel tables Something similar is also provided. Only there it is easier to create cells with a choice of one of the possible values using data validation - necessary tools located on the tab Data in Group Working with data. Using controls in the document template, we create a simple form. However, you can go further. In addition to the example fields, in documents and tables Microsoft Office Other controls are also provided: buttons, checkboxes, switches, scroll bars. We are used to seeing them in dialog boxes, but such elements can be embedded directly into the document.
The point of working with a form is that checkboxes are checked, buttons are pressed, something may be entered into the input fields, and as a result the text of the document or the contents of the table are formed. In such “automated documents”, macros (macro commands) handle user actions.
Macro- short simple program written in language Visual Basic for Applications(VBA). IN Microsoft applications Office support for this language is built in from the very beginning, and there are all the necessary tools. For example, to begin with, you can simply record a macro without delving into it internal organization. Schematically:
- On the tab Developer in Group Code click the button Record macro. Your actions with the table or document begin to be tracked.
- Immediately in the dialog box that opens, you are prompted to give a name to the macro and assign a keyboard shortcut that will subsequently launch this macro for execution.
- Follow the steps you want to include in the macro one by one. Office application remembers them as a sequence of commands, because in VBA, any operation with text or tables corresponds to a specific code.
- After completing all the necessary operations, press the button again Record macro.
The macro will be saved in the template or document. Now, if you press the keyboard shortcut you specified in step two, Excel or Word will execute that macro. The program will repeat all the actions recorded in it automatically.
If necessary, the contents of macro commands can be viewed, edited, and supplemented in the Visual Basic editor. It is a required part Microsoft package Office. Typically, the macro you just recorded is a linear sequence of commands. When editing, logical functions of the form “if... then”, “and”, “or”, etc. are often inserted into macro commands. By executing them, the macro command checks and compares the values of different cells, the position of controls, and, depending on this, builds further behavior .
Any macro can be easily associated with form controls, such as clicking a button or selecting a specific value in a list. For example, when you create a Button element, you are immediately prompted to assign a macro command to it. Many people sometimes need to insert “amount in words” or “number in words” into documents. There is no such function among standard Office tools, but the task is easily solved using a macro. This is one of the favorite exercises for those starting to learn Visual Basic. On the Internet you will find thousands of examples of ready-made macro commands, as well as detailed analyzes how to write a similar macro yourself.
Thanks to forms and macros spreadsheet manages to turn into a rather “smart” and elegant “mini-application”. It will work on any computer on which it is installed Excel program. For example, this is how price lists are made, which the client turns into an order by marking the required items. Or, for example, a form for calculating plastic windows. The initial data (list of parts and prices) is contained on one of the sheets Excel workbooks. On another sheet is a form. We enter the dimensions, select the number and type of sashes, the manufacturer of the fittings, and mark the necessary options with checkboxes and switches. As a result, the third sheet will display the full specification for the order, already with prices. A person who has mastered working with VBA will spend only a few hours creating such a form.
VBA tools are designed from the very beginning to be "programming for ordinary users" Many interesting examples and techniques for working with Word and Excel are given on the websites ladyoffice.ru, www.excel2010.ru, excelexpert.ru, etc. And, of course, first of all it is useful to refer to help system Microsoft Office and sections of the official Microsoft website dedicated to working with this package.
Knowing what Word and Excel can do in principle, you can challenge someone to develop smart templates with ease and pleasure. There are people everywhere who want to do this type of programming. Students and any people for whom programming is a hobby willingly take on the development of “small automation”. A good solution is to puzzle the schoolchildren you know! They - interesting, and, moreover, real, topics for abstracts in computer science, and for you - useful tools for work.
Details Category: Excel Published: December 28, 2017Automation of drawing up as-built documentation for construction in Excel
Often, when they talk about working in office applications, this implies using a PC as a typewriter and, to be honest, this is a rather expensive replacement for physical mechanisms if you do not take advantage of the capabilities that a PC gives us. Let's talk about this.
Introduction.
In my opinion, the PC appeared as a tool for solving the principle of automating routine processes, and it is damn good at this. In addition, development functional programs there is a history of creating tools for translating emergency tasks into routine actions, as a consequence of deepening the division of labor. However, there are areas, incl. and document flow, where today a PC is used precisely as a typewriter, incl. and because no serious developments were carried out due to the fact that people’s salaries sit in overhead costs and, as a result, are not large, which cannot be said about the increasing volumes of document flow.
So, let's talk about construction, specifically about the preparation of Executive Documentation (hereinafter ED).
about the Executive documentation
More precisely about its textual component. In short, an ID is a set of acts, journals and other documents, drawings, diagrams that are compiled for each stage and even an operation (group of operations) in construction, to confirm/reject the work being performed for the project. Such documents are completely template, their list, depending on the type of work, is regulated, and they are maintained according to the actual schedule of work performed, formalizing the correctness/deviation of the work to the project approved by the commission.
Most of the work is closed in the form of a Hidden Work Inspection Certificate (approved by order Federal service on environmental, technological and nuclear supervision dated December 26, 2006 N 1128 (As amended, put into effect on March 6, 2016 by order of Rostechnadzor dated October 26, 2015 No. 42. Hereinafter referred to as AOSR).
Initial data for automation.
Therefore, we will take the AOSR form as a basis. So, we have a document template in which the following information is entered:
Act number postfix;
- name of the capital construction project;
- legal data about construction participants (Developer or Customer; Person carrying out construction; Person preparing project documentation;
The person carrying out the construction who performed the work subject to inspection; other persons.)
- a list of persons with the names of organizations, positions and orders confirming their powers;
- name of the work performed;
- turnaround time;
- list of works included in the work performed;
- links to technical documentation and sections of the project/technical documentation;
- links to executive diagrams, test reports (if required);
- a list of materials used with links to documents confirming their compliance (passports, certificates, etc.)
Thoughts on fundamental methods for solving the problem
So, as a first approximation, you can simply create visual table, in which by assigning the corresponding fields of the same type to each act, we will get a visual footcloth of the scheme for performing work at the facility. And this is nothing new. So, we need to link the form with cells in the data tables and there are 2 options:
1. Merger with Word file
2. Filling out templates based on Excel using macros.
Each of these methods has its pros and cons, but... the merger makes a replacement in real time, then I decided to select the second item, which the merger does not provide in real time and each time it will be necessary to output acts, in case of data correction, again. This is due to the fact that I often need a history of my actions.
So, now we are faced with 2 tasks:
1. Filling out a template based on tabular data
2. Which fields need to be entered once, which will change from time to time and which fields will be different in each act.
Solving problem No. 2, we will take out separate sheet the data that will be unified within the object/section of the construction project is:
Spoiler
On the current sheet we will fill in only once, and for the remaining acts we will simply put links to these values:
Spoiler
And the fields that will change in each act:
Spoiler
Now about the conveniences, if you write down the names of the responsible persons, their organization, the order of appointment with the date, then using the “data check” tool you can enter their names in the spoiler, and use the formula to pull up their regalia.
IFERROR(INDIRECT(CONCATENATE( ""Data for the project"!";ADDRESS((MATCH(E30 ; "Data for the project"!$G$15:$G$34;0 ))+14 ;6 )));"-" )
Those. on the “Project Data” sheet in the range $G$15:$G$34, in the 6th column we look for the value in cell E30, and as soon as we find it using a simple method we convert it to an address that will be converted into a link using formulas.
The new problem already rests on the length of the line; if you use the Times New Roman font No. 10, then the length of the text that will be printed does not exceed 105 characters. Those. we run into the need to create a crutch for transfers. So the function code in VBA:
Those. We first take the text, then cut out 105 characters, look for the first space character from the end, and when we find it, we put the text in the first line of the array, the length from the first character to the number of the space found. Then we continue the operation until the text runs out or the output array becomes full. At this stage it is limited to 10 lines of memory. Then we display the contents of the desired line from 1-10 using the link. One of the disadvantages of the solution is that memory is clogged, and for each new request a recalculation is carried out. But the crutch works.
Now the output is in a standard AOSR template. There are again 2 options, either manually assign a comparison to the column (/row in the case of horizontally located data for each act), then this will be time-consuming and resource-intensive to adjust each new template or changes to data tables. That's why we do optimization. The data for each act will be arranged vertically, and the comparison of the control combination of characters (in Latin, since the acts themselves are entirely in Cyrillic) will be lines with information in these acts, thus in a double nested loop, searching for control characters in the text, we will compare desired value from the column.
Well, the last point at this stage is that we are limited by the performance of the system and with a large number of acts, their output will take hours. To speed up the process, I use the following option: I copy the contents of the data sheet into a new sheet using a macro, it receives a number (2) in its name, then another macro is launched, which speeds up Excel, but disables a number of functionality:
And after displaying all the data from the forms, I run a similar macro where I assign the value true to the same variables and delete the duplicate sheet so that it doesn’t get in the way.
(based on materials from https://habrahabr.ru/post/344956/)
Read also...