Digital tuner AstroMeta Digital TV Dongle. Digital tuner AstroMeta Digital TV Dongle Digital dvb t2 usb tv stick tuner
with USB interface and support for DVB-T2, DVB-C, DAB, FM radio and SDR
"Quality is doing something right, even when no one is looking"
Henry Ford
The gradual transition of terrestrial television broadcasting to the DVB-T2 digital standard and the spread of the DVB-C standard among cable operators have caused the appearance of computer TV tuners on the domestic market that support modern standards. We recently looked at the products of first-tier manufacturers using the example of AVerTV Hybrid Volar T2 (H831), AVerTV Nova T2 (A757) and AVerTV Nova T2+C (A757), but the price level and the current state of the domestic market force us to take a closer look at remote purchases, which are already mastered, for example, by inquisitive and thrifty users mobile phones Chinese brands.
The TV tuner discussed below, produced by a company unknown to Russian buyers, is characterized by immodest functionality (the device supports digital television of DVB-T2, DVB-C standards and analog FM radio) at a modest price (less than $30 at the time of preparation of the review).
Contents of delivery
As befits a budget device, the AstroMeta Digital TV Dongle comes in a regular plastic bag; the integrity of its additional packaging depends entirely on the seller.
Package Included:
- tuner;
- remote control;
- portable antenna;
- installation CD with drivers and software.
Design and specifications
According to the user manual available on the website along with drivers and software, the list of capabilities of the TV tuner and standard software is:
- DVB-T support, DVB-T2 and DVB-C;
- DAB/DAB+ (Digital Audio Broadcasting) and FM support;
- watching HD channels and electronic program transmission (EPG);
- MPEG4 H264 HD/SD support with hardware video acceleration (DXVA2);
- touch screen support;
- distinguishable from long distance interface with big buttons(“Clear 10-foot user interface with big buttons for easier operation” in the original);
- multilingual interface;
- remote control;
- channel search;
- Scheduler support for hibernate/sleep energy-saving modes;
- frame capture;
- direct or scheduled recording;
- playback of files with search and rewind;
- additional menu for recorded files;
- support for multiple audio tracks;
- teletext;
- delayed viewing mode Time shifting.
Externally, the AstroMeta Digital TV Dongle is a typical compact TV tuner with a USB interface, the connector of which is closed with a lid.

On the opposite side there is an IEC antenna connector, next to which there are transparent plastic inserts on both sides that provide operation of the IR sensor for controlling the remote control.

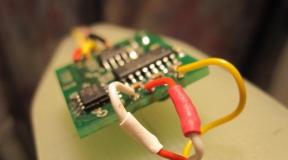
Signal reception is provided by the Rafael Micro R828D RF unit from Rafael Microelectronics, the RTL2832P microcircuit produced is a DVB-T COFDM demodulator with a USB 2.0 interface, support for FM/DAB/DAB+ and remote control.


The RTL2832P differs from the RTL2832U in the presence of an additional interface for the transport stream (TS, transport stream), which allows you to use another demodulator, which was the company's MN88473, which added support for DVB-T2 and DVB-C.
Test computer configuration
- CPU Intel Core i7-970
- System Gigabyte board X58A-UD3R (rev. 1.0)
- Gigabyte video card GeForce GTX Titan
- RAM 16 GB (4x4096 DDR3 Samsung M378B5273DH0-CH9)
- Creative Sound Blaster X-Fi Titanium PCIe sound card
- SSD 64 GB OCZ Vertex 4
- SSD 256 GB Samsung 840 EVO
- SSD 512 GB OCZ Octane
- Hard drive 2 TB Toshiba (DT01ACA200)
- Hard drive 2 TB Seagate Barracuda LP (ST32000542AS)
- Hard drive 1 TB Seagate Barracuda 7200.12 (ST31000542AS)
- Hard drive 1 TB WD Caviar Blue (10EALX)
- DVD ReWriter Asus DRW-24B1ST
- Operating systems Windows XP Professional (SP3) Rus, Windows 7 Ultimate x64 Rus and Windows 8.1 Pro x64 Rus
List of broadcast channels during testing
Digital broadcasting is carried out at a frequency of 522 MHz with M-PLP (Multiple Physical Layer Pipes) technology, which allows different modulation schemes and different levels of error tolerance for different streams in a multiplexed DVB-T2 signal.
To test digital cable broadcasting, the cable signal of the operator Dom.ru, a branch of ER-Telecom Holding CJSC in Samara, was used.
Connection
AstroMeta Digital TV Dongle does not support analogue broadcasting or capture from external sources, however, typical for most compact computer TV tuners, connecting to a single IEC connector can cause certain difficulties when using DVB-T2 and DVB-C or FM and DVB-C at the same time.
Settings
I am pleasantly surprised by the regular updates of drivers and software. Two types of drivers are available on the manufacturer’s website (during testing, drivers version 64.4.108.2015 were used), one of which is intended for use with third party programs when working with DVB-C, the standard software in the form of TVR and DVBC TVR programs for DVB-T2 and DVB-C, respectively (versions 4.6.1 were used during testing) equally supports both.
After installation in the section Sound, video and gaming devices device appears Astrometa DVB-T2 Device,

and in the section HID devices (Human Interface Devices)- device HID Infrared Remote Receiver.
The program icon is placed in the system tray RC.exe, responsible for the operation of the scheduler and remote control.
![]()
It is puzzling to use two programs that are completely identical in appearance and functionality: TVR and DVBC TVR for DVB-T2 and DVB-C modes. Programs can work independently of each other, however, by default, Windows is included in the standard startup RC.exe from folder , due to which it is the DVB-C application that responds to the operation of the remote control and is launched to perform tasks. This can be changed by replacing RC.exe from folder Program Files (x86)AstrometaDVBC TVR on RC.exe from folder Program Files (x86)AstrometaTVR in startup, but simultaneous work with DVB-T2 and DVB-C is not provided.

The TVR and DVBC TVR programs are a type of multimedia shell; all operations, including settings, are performed on the main screen. Devotees of correct translation can edit files themselves Language.ini in folders with programs for any of the supported languages.
Both forms of the program greet the user with a channel search window with a choice of region.

The search results in both cases coincided with the existing channel lists.

The search settings do not allow for skipping encrypted channels; they do not appear in the list additional information status, selecting such a channel may result in a black screen with a padlock image.

The “Guide” button on the panel opens the list of channels.

Stylized double right arrows (left arrows return to the previous menu) on each channel bring up the program guide for that channel,

in turn, clicking on a specific program opens a description and a button for calling the scheduler,

window for selecting time and date (one-time recording, daily recording and recording by day of the week are supported, the sound can be muted), which somewhat contrasts with the general interface of the program.

The lack of a task completion setting can be explained simply - the choice between turning off the computer, going into standby or hibernation mode, exiting the program and the absence of any actions is for some reason made in the main menu of the scheduler.

The scheduled recording is carried out without displaying the video, the place of which in the program window is taken by the camera image with the inscription “Rec”.
In addition to the scheduler and channel scanning in the configuration section, called by the button with the image of a gear wheel,

There is a selection of the input signal source, capture settings (selecting a folder, changing the Timeshift buffer size, choosing a frame capture format from bmp or jpg) and display parameters (brightness, contrast, color and saturation), also called up in a separate window.

Care should be taken when choosing a signal source; in TVR, the list of sources includes missing at the hardware level analog bands and S-Video, the selection of which leads to a reset (!), DVBC TVR does not have such a feature.

Chapter additional settings, called by the button with the list image, allows you to turn on or off the delayed viewing mode, enable teletext (displayed correctly), switch the aspect ratio (auto-tuning worked correctly during testing, 4:3, 16:9), select an audio track and activate hardware acceleration(the inclusion of which causes visible artifacts on channels with interlaced images).

Recording is carried out only in mpg format, another strange feature of the standard software, context menu allows you to play or delete recorded files displayed in the list.

The result of a search for FM radio stations that included almost the entire range with minimal intervals between frequencies turned out to be of little use for practical use.

At this point one could criticize if not for one circumstance - the presence of an alternative (!) settings menu, called up by pressing the “E” button.

The channel search tab allows you to select the range, frequency, scanning step, and also delete or add found channels or radio stations to favorites depending on the mode, which allows you to get a much more adequate result, at the same time excluding from the found cable channels encoded.


During testing, artifacts in the rendering of settings were observed several times in the main program window; the cause could not be determined.

Additional features
The device supports software-defined radio (SDR), some programs, in particular, have native support.

Quality
The tuner provides good quality reception digital channels and FM stations, switching between channels takes about 2 seconds, between channels in different PLPs up to 3 seconds, despite the origin of the device, there were no comments regarding the implementation of M-PLP support.
The image quality when working with DVB-T, DVB-T2 and DVB-C is determined by the operator in the range from low resolutions with a small bitrate up to HDTV. DVB-T2 channels are currently only available in standard definition.


DVB-C broadcasting operators offer support for high-definition television (HDTV); there have been no complaints about the work of standard software with such channels.
The tuner demonstrated good sound quality in FM mode (download a 20-second fragment).
Remote control
The device is equipped with a compact 21-button remote control that supports only the basic functions of standard programs.

The remote control is powered by an installed CR2025 3V battery; it is recommended to remove the insulating gasket before use.
conclusions
pros
- support for DVB-T, DVB-T2 and DVB-C2, DAB and FM;
- SDR support;
- price;
- practical body;
- MPEG2 and H.264 HDTV support;
- EPG support;
- background recording;
- the ability to turn off the computer/switch to energy-saving mode after completing a task;
- TimeShift delayed viewing mode.
Minuses
- two different programs for DVB-T/DVBT2 and DVB-C;
- recording only in mpg format;
- unique implementation of standard software settings;
- absence in domestic retail sales.
The tested device is good example functionality without a discount on a low price. Additional features The standard software is inferior to that of first-tier brands, however, the AstroMeta Digital TV Dongle (the model can also be sold under other names) copes with the main tasks more than adequately and can be a good candidate for the role of a universal digital TV tuner with a USB interface, if there is no potential user Remote purchasing is confusing.
This is the simplest USB DVB-T2/T/C tuner that connects to a computer USB for viewing digital television. It has a USB output for communication with a computer, a familiar antenna input (IEC connector)…
The stray was purchased to while away the evenings during a business trip. Sometimes there is no TV. Sometimes there is only one TV, but there are more people wanting to watch than there are received channels. Now you can watch what you want, when you want, without infringing on anyone’s interests.
Attention traffic.
First, we look at how they pack (sometimes interesting).
A simple box with a window for a tuner. 
On the sides there are brief characteristics in the form of pictures and equipment. 
At the back are brief characteristics and capabilities. 
There is another box hidden under the outer packaging. The tuner itself lies in a special niche. Everything else is inside the box. 
Package Included:
- USB DVB-T2/T/C tuner,
- remote control,
- CD with drivers and user manual (in English),
- antenna. 
Let's look at what is written on the store page. 
Made an automatic translation. Not everyone understands English:
Product DescriptionI provided both options in order to eliminate the indignation of one of the “halves” of readers who also understand not very English :)
USB2.0 DVB - T2 FM DAB HDTV Stick TV Tuner Receiver (DVB-T/T2/DVB-C+FM+DAB+SDR) for Laptop PC Computer
Enjoy advanced DVB-T2/T/C technology in your computer. With this USB2.0 DVB-T2 FM DAB Tuner TV Receiver, you can enjoy original digital quality control and recording on your PC. You can watch TV in full screen mode or in the window. Shift pause and play in live using. Support VHF/UHF band and two-channel stereo sound performance.
Enjoy advanced DVB-T2/T/C technology on your computer
Watch and record in original digital quality on your computer
Watch TV in full screen or zoomable window
Use time to pause and rewind live TV shows
Record your favorite TV shows or plan future recordings
Can decode H.264 MPEG-4
Small and compact size, easy to carry
Note: Please make sure your region can receive DVB-T2 signal.
Specification:
The tuner supports television standards: DVB-T2, DVB-T, DVB-C, VHF / UHF range
Stereo / two-channel sound
Antenna input: IEC connector
PC Interface: USB 2.0 (Hi-Speed)
TV recording formats:
MPEG-2 transport stream,
MPEG-4, H.264 (AVC)
System requirements:
Microsoft, Windows 7 or Windows Vista with latest service pack, 1 GB RAM
Windows XP (32 bit) with latest service pack, 512 MB RAM
Intel Pentium 4 2.0 GHz, Pentium M 1.3 GHz or equivalent AMD Athlon XP
For HDTV: 2 GHz processor
Hard drive with min. 300MB free capacity (1 GB free capacity recommended)
USB 2.0 port
CD/DVD drive for installation software
Recommended: Internet connection for software updates and activations
Package included:
1 x USB2.0 DVB - T2 FM DAB HDTV Stick TV Tuner Receiver
1 x remote control (including battery)
1 x DVB-T and T2 antennas
1 x CD with application drivers and user manual
Accessory only, tablet PC not included
The remote control is the simplest.

These usually come with a battery included.
To prevent self-discharge (in case of accidental pressing during transportation) there is a plastic insert.

The included antenna is significantly different from the one shown on the store page (not for the better).

Active part of fixed length. The store page is slightly different - with a “variable thrust vector” :-)

Antenna plug of standard size. No comments here.

Complete antenna with magnetic stand. 
There is a small but powerful magnet inside. 
And here is the tuner. 
Not much larger than a flash drive. 
There are no control buttons, etc., nothing like that. 
On one side is USB. 
On the other side there is a standard antenna socket.
In case of emergency, you can use any other external antenna(for example, from a TV). 
I'll see what's inside the tuner.
The case is held on by latches. 
Everything is very compact (general view). 
Maybe closer. 
On one side there are Realtek RTL2832P, Panasonic MN88473 (demodulator), Rafael Micro R828D (tuner) chips. On the reverse side there is a memory module and an IR receiver.
The names of the chips are clearly visible (except for one). I took a photo of the tuner chip from different angles (for those who want to look at the letter). 
It's time to see what he (the tuner) can do.
But to do this, you first need to install the driver and software from the disk.
Installed (FSC DVBT2_Setup_160614.exe) and (FSC DVBT2_Setup_160614.exe).
Nothing complicated. The driver is multilingual. I select the Russian language and click next. 
When installing on an old work computer (at first I decided to test it on Windows XP), a small problem arose. 
The instructions say in black and white: Windows 2000/XP/Vista/Win7/Win8.
Clicked "Continue Anyway". Everything turned out fine.
There were no difficulties in installing the program itself (the multifunctional multimedia application AstroMetaTVRplayer). 
The program is also Russified. 
All procedures are standard; I see no point in describing them in detail.
Let me remind you. The stray was purchased to while away the evenings during a business trip. Sometimes there is no TV. Sometimes there is only one TV, but there are more people wanting to watch than there are received channels. Now you can watch what you want, when you want, without infringing on anyone’s interests.
I will conduct the main experiments on my travel netbook. The Samsung NC110-A07 netbook is quite old and perfect for business trips: it’s small and weighs just over a kilogram. I will conduct basic tests on it. 
After installation there was a problem with sound. I decided to install sound drivers from the free package (Advanced_Codecs).
The kit included a disk (Manual.docx). Detailed description and characteristics - everything is there.
When you first launch this is the picture. 
The toolbar (at the bottom of the screen) is equipped with standard means controls: audio/video playback (Play / Pause, Stop, Record), as well as volume controls and channel switching buttons. If necessary, you can call up special controls.
The tuner has already been configured. Setting up channels is almost at the very end of the described buttons. I'll get to it a little later. First, I’ll explain the purpose of the buttons in order (from left to right).
1. The “Guide” button on the panel opens a list of recorded channels. This section allows you to view/listen and select a specific channel. 
Double right arrows on the selected channel call up the TV guide (left arrows return to the previous menu), 
Clicking on a specific gear opens short description TV shows and a call button for the scheduler. 
When you click on the plus sign, a window for selecting the time and date of recording opens (one-time, daily and recording by day of the week are supported). 
2. By pressing this button 2 ( open folder), you can open saved images and recorded video files.
3. Click on this button (camera icon) to take a screenshot. The captured image will be recorded in the format “02 RUSSIA-1_2017_0615_1329_32.jpg”. No decoding of letters and numbers is required, everything is clear. The file is only about 80-82kB. 
Initially, the picture shows the signal level, channel number, date/time and control buttons... 
If the mouse is inactive, it goes into a mode convenient for viewing (picture above). You can view it both in a “window” and in full screen mode. These two photos are the original recordings. The rest of the photos in the review are screenshots from a netbook.
4. This button (red circle) must be pressed to start/stop recording a TV program. During recording, the channel switching buttons are locked. What we record is what we watch. An example of recording a video signal from a USB DVB-T2 tuner to a computer:
Characteristics of the recorded file:
Video: MPEG4 Video (H264) 720x576 (20:11) 25fpsRecords in the format “02 RUSSIA-1_2017_0615_1253_26.mpg”. Recording 26 seconds took 10.1MB of space.
Audio: MPEG Audio 48000Hz stereo 192kbps
5.6. Channel switching buttons.
7. Button to return a previously viewed channel.
8. MUTE button – mute/unmute sound.
9.10. Volume up/down buttons.
10. MAIN MENU.

Teletext works.

The number of the page being viewed can be selected using the keys on the computer.
You can select the aspect ratio of the picture:
Automatic→4:3→16:9.
This is the main thing. The remaining points are not for everyone.
11. Setup (configuration).

There are two multiplexes broadcasting in Tambov. Found all channels (20+3).

Scheduler.

You can change the input source.

Turned on the FM radio.
Scanned. I found more than thirty channels. I deleted the empty ones. I left 16. I didn’t know we had so many of them.

The names can be edited. Initially, a name is assigned according to the broadcast frequency. I edited one for example (right mouse button to help).
The next item is capture parameters. The location where the files are saved is specified.

The last point is display settings. 
You can adjust the brightness, contrast, and saturation of the picture.
12. LIVE. Quit all open tabs.
To record programs and operate the Timeshift delayed viewing mode, just press the button of the same name on the remote control. 
The remote control works from a maximum of three meters.
A kind of scroll bar with a red mark appears on the screen (top). This is the location where the story is currently being viewed. You can select (with the mouse) any viewing location. By clicking “LIVE”, we switch to standard viewing mode. 
Regarding the buttons on the remote control and keyboard shortcuts. There is an interesting sign in the instructions. 
Thanks to this picture, I found an alternative settings menu, called up by pressing the “E” button.
Here you can select the range, frequency, scanning step... You can delete or add found channels or radio stations to favorites...
In general, there is a whole field for creativity. 
At the end there is some information for extras.
The tuner does not heat up much during operation. At idle it consumes just over 0.1A. 
When watching TV, the current increases to 0.2A. Power is only 1W. The ventilation holes, the size of the device itself and the connected antenna do not allow the device to heat up above 40 degrees. 
In this regard, everything is wonderful.
It's time to move on to the final part. I'll highlight what I liked and didn't like. The point of view is subjective.
Pros:
support for DVB-T, DVB-T2 and DVB-C2, DAB and FM;
small sizes;
Availability of delayed viewing mode Timeshift;
availability of on and off timers;
recording TV programs;
Russified menu;
teletext support.
Minuses:
two different programs for DVB-T/DVBT2 and DVB-C;
delays when turning on and switching channels;
absence of any hints about the manufacturer.
And one more thing at the end.
I told you about the device I was holding in my hands. He pointed out all the pros and cons. Everything I noticed, I wrote about everything. The device is functionally rich. Perhaps I haven’t figured it all out yet.
If something is unclear, ask questions. I hope it helped at least someone. Perhaps someone will want to help me too.
That's it.
Good luck!
The product was provided for writing a review by the store. The review was published in accordance with clause 18 of the Site Rules.
I'm planning to buy +41 Add to favorites I liked the review +36 +78It is clear that today you can watch television programs online on your own PC. But sometimes they are not pleasing with the image quality, since they create some kind of interference or sound distortion. A more practical option is to choose devices with special antennas that can pick up a television signal.
You can give preference to such a modern device as a USB TV tuner. The fact is that it will allow you to enjoy high-quality images every day when you want to relax while watching a movie or your favorite TV show. This device is considered digital, so it will be provided to you. With such a device you will be able to stay glued to the TV.
How does the DVB T2 USB TV tuner work?
Since the device is equipped with a port, you can connect it to a computer. By the way, the device allows you not only to watch your favorite show, but also to record the broadcast.
If you used to often worry about not having time to finish things before your favorite TV series, now you can put all your worries aside. After all, a USB TV tuner will be a great opportunity to record a series and watch it after a while at a more convenient moment.
Features of the USB TV tuner
- The small size will allow you to take the device on the road if you are planning a trip somewhere, so you can enjoy TV even far from home;
- System requirements are not high, so the device can work successfully with almost every computer;
- It is possible to record your favorite programs to watch them again if necessary, and also when there is no time to watch TV.
System requirements
- Operating system: Microsoft, Windows 7/8/10, Windows Vista with 1 GB RAM, Windows XP (32 bit) with 512 MB RAM;
- Processor: Intel Pentium 4 2.0 GHz, Pentium M 1.3 GHz or equivalent AMD Athlon XP;
- For HDTV: 2 GHz processor;
- with at least 300MB of free memory (1 GB recommended);
- USB 2.0 port.
Characteristics
- Supported TV standards: DVB-T2, DVB-T, DVB-C; VHF-/UHF;
- Antenna input: IEC;
- High speed USB 2.0 port;
- Recording format: MPEG-2, MPEG-4 H.264 (AVC.
Equipment
- USB TV tuner x 1 pc.;
- Remote control x 1 piece;
- DVB-T, T2 antenna x 1 pc.;
- CD with software x 1 pc.
Digital television has firmly entered our lives, replacing analogue broadcasting and, it goes without saying, that various devices capable of receiving a digital signal are very popular. IN this review I’ll talk a little about one of these tuner devices, which is no longer a new product and has been on the market for quite some time, but, nevertheless, still remains very interesting and allows you to turn almost any computer or tablet into a TV.
Using a TV tuner, a digital television signal is received and processed on a computer, allowing you to view and, if desired, even record your favorite TV shows, and you can also listen to FM radio stations.
Full list of TV tuner characteristics:
- Digital TV support: yes
- Digital TV standards: DVB-C, DVB-T, DVB-T2
- HDTV support: yes
- FM tuner: yes
- Connection interface: USB
- Compatible OS: Windows 7, Windows Vista, Windows XP, Windows 8, Android
- Inputs: TV antenna
- Video recording: H.264
- Equipment: TV tuner, remote control, CD with software and drivers, DVB/FM antenna
- Features: TimeShift, touch screen support, DXVA2 hardware acceleration
The packaging looks quite attractive; it contains all the necessary information about the characteristics and capabilities of the device, and through a special hole you can see the TV tuner itself.
 |
Also included with TV tuner telescopic antenna, CD with necessary drivers and software, as well as a remote control with battery.

The telescopic antenna when unfolded has a length of about 30 cm and, if necessary, can be detached from the base. The base is equipped with a magnet to give greater stability on metal surfaces, the length of the antenna cable is about 1.3 meters.
 |  |
The control panel is quite simple, but, nevertheless, with the help of 21 buttons it allows you to control the basic functions of the TV tuner: turning on/off, selecting a signal source, adjusting the volume, switching channels, switching to full-screen/windowed display modes, recording a program, as well as TimeShift mode control.
The remote control is powered by one 3-volt CR2025 battery. During transport, the battery is separated from the contacts by a special film, which must be removed before use.

 |  |
The TV tuner itself looks very much like a USB TV box, or just a large flash drive. The body is made of plastic; there are ventilation holes in the upper and lower parts for heat removal, as well as voluminous transparent inserts for receiving the remote control signal. On the front there is a USB connector for connecting to a computer or other devices, on the back there is a standard “household” IEC connector for connecting an external antenna.
 |  |
 |  |
The halves of the case are connected to each other using latches, so if necessary, it can be disassembled without problems.
The entire design of the TV tuner is implemented on one printed circuit board, two chips are used here as demodulators: Realtek RTL2832P (DVB-T/FM/DAB/DAB+) and Panasonic MN88473 (DVB-T2, DVB-C), the signal receiver is a Rafael Micro R828D chip.

Depending on which standard channels you plan to view (DVB-C or DVB-T2), you must install the appropriate versions of drivers and software from the CD included in the package. After installation is complete, you must restart your computer.

Next, you need to launch the TVRplayer application and automatically scan and search for available digital TV and radio channels. In this case, it is necessary, if possible, to provide the best conditions for reception, because the number of detected channel packages (multiplexes) will depend on this. In my case, the device easily found all 20 TV channels and 3 radio stations included in the first and second multiplexes in Russia.
 |  |
TVRplayer has quite good functionality; you can watch TV programs in both windowed and full-screen modes. Switching channels, as well as adjusting the volume, can be done either using the remote control or using the buttons on the bottom panel of the application. All buttons and interface elements here are made large enough to allow use on devices with touch screens.

The Guide button displays a list available channels, the double arrow located on the right in the line with the current channel allows you to go to the program guide, as well as to a brief description of the current program. You can also schedule a turn-on here automatic recording during the broadcast of your favorite program.
 |  |
 |  |
The button with a gear icon opens the program configuration settings window. Here you can re-scan the air, manually schedule automatic recording of channels, select the signal source (this is where you can switch to the mode of searching and listening to FM radio stations), change the parameters for recording the air, and also adjust the color/contrast settings of the image.
 |  |
 |  |
 |  |
Using the list icon button located to the left of the gear, you can call up another menu. Here we are given the opportunity to enable such useful functions as TimeShift, display teletext, and change the aspect ratio of the picture.
 |  |
For example, after turning on the TimeShift mode, the program switches to parallel recording mode current program and if you need to go somewhere for a while, you can simply click on the Pause button, and upon returning, continue viewing from the moment you stopped. The offset (lag) of the pause moment from the real broadcast time is displayed using a red marker relative to the blue scale at the top of the picture. There is also the possibility of “rewinding” within the boundaries of the recording.

Also, as mentioned above, if desired, the program allows you to take screenshots and record live broadcasts. In order to take a screenshot, you need to click on the button with the image of a camera; to record, click on the button with the image of the red circle.

Using the button with a folder image, you can open a list of screenshots and videos taken. From here you can launch them for viewing.

Video recording is carried out in .MPG format with support for subtitles, screenshots in .JPG format.
The operation of the TV tuner from a PC can be seen in the video below.
If you pay attention to the description of this device on the pages of online stores, then in the list of supported operating systems you can only find the Windows family, but as it turned out, this is not entirely true and this TV tuner can work perfectly in tandem with Android devices if they have the ability to connect external USB devices via OTG. For example, I was able to run it on a tablet running Android 6.0 without any problems.

To do this you need to download from Google Play just a couple of applications: " DVB-T Driver" And " Aerial TV-DVB-T receiver» from the developer «Martin Marinov».

Unfortunately, this application not free and after installation the author gives only about half an hour to check the operation of the program, after which you will be offered to purchase it for about 6-7 $.

I also tried to connect this TV tuner to a car radio on Android, but after connecting the tuner, the application gives an error about the lack of power for the TV tuner and suggests connecting it through a special OTG adapter. Earlier on the forums I have already seen mention of such a problem, and to fix it it is really necessary to use an OTG cable with additional power.
Considering the low cost of such a cable, I think this problem can be completely solved. In general, this device very, very interesting and mostly because it turned out to be universal, allowing you to turn almost any computer, tablet or even smartphone into a digital TV.
At the time of writing the review, the cost of the USB TV tuner was about $26, but you can save a little and get % of your purchase back using
This is the simplest USB DVB-T2/T/C tuner that connects to a computer USB for watching digital television. It has a USB output for communication with a computer, a familiar antenna input (IEC connector)…
The stray was purchased to while away the evenings during a business trip. Sometimes there is no TV. Sometimes there is only one TV, but there are more people wanting to watch than there are received channels. Now you can watch what you want, when you want, without infringing on anyone’s interests.
Attention traffic.
First, we look at how they pack (sometimes interesting).
A simple box with a window for a tuner. 
On the sides there are brief characteristics in the form of pictures and equipment. 
At the back are brief characteristics and capabilities. 
There is another box hidden under the outer packaging. The tuner itself lies in a special niche. Everything else is inside the box. 
Package Included:
- USB DVB-T2/T/C tuner,
- remote control,
- CD with drivers and user manual (in English),
- antenna. 
Let's look at what is written on the store page. 
Made an automatic translation. Not everyone understands English:
Product DescriptionI provided both options in order to eliminate the indignation of one of the “halves” of readers who also understand not very English :)
USB2.0 DVB - T2 FM DAB HDTV Stick TV Tuner Receiver (DVB-T/T2/DVB-C+FM+DAB+SDR) for Laptop PC Computer
Enjoy advanced DVB-T2/T/C technology in your computer. With this USB2.0 DVB-T2 FM DAB Tuner TV Receiver, you can enjoy original digital quality control and recording on your PC. You can watch TV in full screen or in a window. Shift pause and play live when in use. Support VHF/UHF band and two-channel stereo sound performance.
Enjoy advanced DVB-T2/T/C technology on your computer
Watch and record in original digital quality on your computer
Watch TV in full screen or zoomable window
Use time to pause and rewind live TV shows
Record your favorite TV shows or plan future recordings
Can decode H.264 MPEG-4
Small and compact size, easy to carry
Note: Please make sure your region can receive DVB-T2 signal.
Specification:
The tuner supports television standards: DVB-T2, DVB-T, DVB-C, VHF / UHF range
Stereo / two-channel sound
Antenna input: IEC connector
PC Interface: USB 2.0 (Hi-Speed)
TV recording formats:
MPEG-2 transport stream,
MPEG-4, H.264 (AVC)
System requirements:
Microsoft, Windows 7 or Windows Vista with latest service pack, 1 GB RAM
Windows XP (32 bit) with latest service pack, 512 MB RAM
Intel Pentium 4 2.0 GHz, Pentium M 1.3 GHz or equivalent AMD Athlon XP
For HDTV: 2 GHz processor
Hard drive with min. 300MB free capacity (1 GB free capacity recommended)
USB 2.0 port
CD/DVD drive for software installation
Recommended: Internet connection for software updates and activations
Package included:
1 x USB2.0 DVB - T2 FM DAB HDTV Stick TV Tuner Receiver
1 x remote control (including battery)
1 x DVB-T and T2 antennas
1 x CD with application drivers and user manual
Accessory only, tablet PC not included
The remote control is the simplest.

These usually come with a battery included.
To prevent self-discharge (in case of accidental pressing during transportation) there is a plastic insert.

The included antenna is significantly different from the one shown on the store page (not for the better).

Active part of fixed length. The store page is slightly different - with a “variable thrust vector” :-)

Antenna plug of standard size. No comments here.

Complete antenna with magnetic stand. 
There is a small but powerful magnet inside. 
And here is the tuner. 
Not much larger than a flash drive. 
There are no control buttons, etc., nothing like that. 
On one side is USB. 
On the other side there is a standard antenna socket.
In case of emergency, you can use any other external antenna (for example, from a TV). 
I'll see what's inside the tuner.
The case is held on by latches. 
Everything is very compact (general view). 
Maybe closer. 
On one side there are Realtek RTL2832P, Panasonic MN88473 (demodulator), Rafael Micro R828D (tuner) chips. On the reverse side there is a memory module and an IR receiver.
The names of the chips are clearly visible (except for one). I took a photo of the tuner chip from different angles (for those who want to look at the letter). 
It's time to see what he (the tuner) can do.
But to do this, you first need to install the driver and software from the disk.
Installed (FSC DVBT2_Setup_160614.exe) and (FSC DVBT2_Setup_160614.exe).
Nothing complicated. The driver is multilingual. I select the Russian language and click next. 
When installing on an old work computer (at first I decided to test it on Windows XP), a small problem arose. 
The instructions say in black and white: Windows 2000/XP/Vista/Win7/Win8.
Clicked "Continue Anyway". Everything turned out fine.
There were no difficulties in installing the program itself (the multifunctional multimedia application AstroMetaTVRplayer). 
The program is also Russified. 
All procedures are standard; I see no point in describing them in detail.
Let me remind you. The stray was purchased to while away the evenings during a business trip. Sometimes there is no TV. Sometimes there is only one TV, but there are more people wanting to watch than there are received channels. Now you can watch what you want, when you want, without infringing on anyone’s interests.
I will conduct the main experiments on my travel netbook. The Samsung NC110-A07 netbook is quite old and perfect for business trips: it’s small and weighs just over a kilogram. I will conduct basic tests on it. 
After installation there was a problem with sound. I decided to install sound drivers from a free package (Advanced_Codecs).
The kit included a disk (Manual.docx). Detailed description and characteristics - everything is there.
When you first launch this is the picture. 
The toolbar (at the bottom of the screen) is equipped with standard controls: audio/video playback (Play / Pause, Stop, Record), as well as volume controls and channel switching buttons. If necessary, you can call up special controls.
The tuner has already been configured. Setting up channels is almost at the very end of the described buttons. I'll get to it a little later. First, I’ll explain the purpose of the buttons in order (from left to right).
1. The “Guide” button on the panel opens a list of recorded channels. This section allows you to view/listen and select a specific channel. 
Double right arrows on the selected channel call up the TV guide (left arrows return to the previous menu), 
Clicking on a specific program opens a brief description of the TV program and a button to call the scheduler. 
When you click on the plus sign, a window for selecting the time and date of recording opens (one-time, daily and recording by day of the week are supported). 
2. By clicking this button 2 (open folder), you can open saved images and recorded video files.
3. Click on this button (camera icon) to take a screenshot. The captured image will be recorded in the format “02 RUSSIA-1_2017_0615_1329_32.jpg”. No decoding of letters and numbers is required, everything is clear. The file is only about 80-82kB. 
Initially, the picture shows the signal level, channel number, date/time and control buttons... 
If the mouse is inactive, it goes into a mode convenient for viewing (picture above). You can view it both in a “window” and in full screen mode. These two photos are the original recordings. The rest of the photos in the review are screenshots from a netbook.
4. This button (red circle) must be pressed to start/stop recording a TV program. During recording, the channel switching buttons are locked. What we record is what we watch. An example of recording a video signal from a USB DVB-T2 tuner to a computer:
Characteristics of the recorded file:
Video: MPEG4 Video (H264) 720x576 (20:11) 25fpsRecords in the format “02 RUSSIA-1_2017_0615_1253_26.mpg”. Recording 26 seconds took 10.1MB of space.
Audio: MPEG Audio 48000Hz stereo 192kbps
5.6. Channel switching buttons.
7. Button to return a previously viewed channel.
8. MUTE button – mute/unmute sound.
9.10. Volume up/down buttons.
10. MAIN MENU.

Teletext works.

The number of the page being viewed can be selected using the keys on the computer.
You can select the aspect ratio of the picture:
Automatic→4:3→16:9.
This is the main thing. The remaining points are not for everyone.
11. Setup (configuration).

There are two multiplexes broadcasting in Tambov. Found all channels (20+3).

Scheduler.

You can change the input source.

Turned on the FM radio.
Scanned. I found more than thirty channels. I deleted the empty ones. I left 16. I didn’t know we had so many of them.

The names can be edited. Initially, a name is assigned according to the broadcast frequency. I edited one for example (right mouse button to help).
The next item is capture parameters. The location where the files are saved is specified.

The last point is display settings. 
You can adjust the brightness, contrast, and saturation of the picture.
12. LIVE. Quit all open tabs.
To record programs and operate the Timeshift delayed viewing mode, just press the button of the same name on the remote control. 
The remote control works from a maximum of three meters.
A kind of scroll bar with a red mark appears on the screen (top). This is the location where the story is currently being viewed. You can select (with the mouse) any viewing location. By clicking “LIVE”, we switch to standard viewing mode. 
Regarding the buttons on the remote control and keyboard shortcuts. There is an interesting sign in the instructions. 
Thanks to this picture, I found an alternative settings menu, called up by pressing the “E” button.
Here you can select the range, frequency, scanning step... You can delete or add found channels or radio stations to favorites...
In general, there is a whole field for creativity. 
At the end there is some information for extras.
The tuner does not heat up much during operation. At idle it consumes just over 0.1A. 
When watching TV, the current increases to 0.2A. Power is only 1W. The ventilation holes, the size of the device itself and the connected antenna do not allow the device to heat up above 40 degrees. 
In this regard, everything is wonderful.
It's time to move on to the final part. I'll highlight what I liked and didn't like. The point of view is subjective.
Pros:
support for DVB-T, DVB-T2 and DVB-C2, DAB and FM;
small sizes;
Availability of delayed viewing mode Timeshift;
availability of on and off timers;
recording TV programs;
Russified menu;
teletext support.
Minuses:
two different programs for DVB-T/DVBT2 and DVB-C;
delays when turning on and switching channels;
absence of any hints about the manufacturer.
And one more thing at the end.
I told you about the device I was holding in my hands. He pointed out all the pros and cons. Everything I noticed, I wrote about everything. The device is functionally rich. Perhaps I haven’t figured it all out yet.
If something is unclear, ask questions. I hope it helped at least someone. Perhaps someone will want to help me too.
That's it.
Good luck!
The product was provided for writing a review by the store. The review was published in accordance with clause 18 of the Site Rules.
Read also...
- How to check your phone's certification
- Installing CAB and MSU files for Windows updates manually
- Smartphone Samsung GT I8160 Galaxy Ace II: reviews and specifications The main camera of a mobile device is usually located on the back of the body and is used for photo and video shooting
- How to work in the Sony Vegas program (basics) How to work in the Sony Vegas program