How to connect and configure a Wi-Fi router? Step-by-step instructions for all models. Passwords and limited access when sharing the Internet
Each of us has encountered a situation when we need to connect a router in an apartment. A specialist is usually called in for this. We offer instructions on how to connect the router yourself.
1. Connect the wires
Insert the Internet cable into the WAN (or Internet) port of the router.
Then connect the router to the computer: one end of the cable to the LAN port of the router, and the other to the connector network card PC. You can use a wireless connection instead of a cable, but it is better not to do this at the setup stage.
Connect the router to a power outlet. If it also has a power button, then press it. Wait a few minutes for the router to boot up.
2. Check the Internet
If your router is already configured by your provider or received the settings automatically, then the Internet can start working within a few seconds after connecting the router to the PC.
To check this, launch your browser and open several sites. If they load without problems, you can skip the fourth step.
3. Router settings menu
In your browser's address bar, type 192.168.1.1 or 192.168.0.1 and press Enter. One of these IP addresses will be sent to the router's settings menu. If both options do not work, find the required IP address in the documentation for your router model and try entering it.
When the settings login page pops up in the browser window, the system may ask for a login and password. Most often, during the first connection, one word is suitable for both fields - admin. Sometimes router manufacturers use the combination 1234 for the standard password.
You can also find login information in your router instructions or on your provider's website.
4. Set up an Internet connection
If the Internet does not work, the router needs special settings. Exactly what settings you need depends on your device model and Internet service provider. Unfortunately, there is no universal configuration. To get instructions, check the provider's website or ask their support team for instructions.
Once you receive the manual for setting up your model, follow all the steps. If you set up an Internet connection and home Wi-Fi network, you can move on to the next – fifth point.
5. Set up your home Wi-Fi network
Select correct parameters security to protect your Wi-Fi network.
In the settings menu, select the section that is responsible for wireless network(See the documentation for your router model). Here, enter a strong password (it will be suitable for connecting your devices to the router via Wi-Fi) and select WPA2-PSK as a security measure.
Save your settings changes.
6. Change the password to enter the router settings
Just in case, it is worth restricting the access of strangers to the router settings menu. If the router is protected by a standard password, replace it with your own.
Find the settings section that controls the security (see the documentation for your router model) of the device, and enter a new strong password. Save your changes.
If your computer has Wi-Fi module, after completing the setup, you can remove the network cable from the PC and connect to the router via a wireless connection.
7. Optimal router location
It is best if the router is placed in the center of the area in which you use Wi-Fi. This way the signal will be equally available to all connected devices.
Based on Lifehacker
Internet access can be obtained via an Internet cable or Wi-Fi router. In the second case, the connection speed is much higher, and the amount of data transferred is not limited.
A router, also known as a router, works as follows. A cable is brought into the room, which is connected to the router, and then pulled to the computer. The router processes the signal and transmits it to all devices over the air. Most routers are pre-configured at the factory. The user can only connect the device to the PC and use the Internet.
The device memory contains a routing table. It contains paths to all devices. This is how a whole network is formed. Periodically, the router sends messages to each device to see if the signal reaches it. This is how the current state of the routing table is checked and dynamic routing works. To prevent the signal from going to someone else's device, specific addresses are specified. Static routing is more difficult to control if there are many devices connected, but it is more secure.

What you need to connect your router to your computer or laptop
To connect a Wi-Fi router to a computer you need:
- the router itself;
- network cable;
- PC, laptop with network card.
Modern devices are equipped 4 LAN connector. That is, you can connect 4 computers to one device or form a local network. The cable usually comes with the router, and the card is integrated into the motherboard.
How to connect a router yourself
Typically, the installation of the device is carried out by employees of the provider company. But beginners can also connect a Wi-Fi router to a computer on their own.

The equipment kit includes a router, cable and instructions. The first step is to connect the Wi-Fi router to your computer. Since the included cable is quite short, you need to install the router close to the computer. If necessary, you need to order a longer cable from the store and crimp it.
First you need to connect the power cable from the outlet to the device. Next, connect the provider cable and the cable from the computer.

The final step is to insert the network cable into the PC socket.
One end of the network cable must be connected to LAN connector(yellow) to the router, and the second to the computer or laptop.


One of the 4 indicators on the device should light up.

The connection should appear on the taskbar of your PC screen.

How to correctly configure a wifi router
Once the connection is established, you can start setting up.
For one PC
If you connect Wi-Fi router to the computer failed, then the toolbar will light up red cross.

The first step is to simply change the cable. If the connection status has changed. for example, on yellow cross, then that’s where the problem lies.
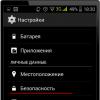
Most often, difficulties arise due to the fact that network card disabled. To fix this error you need to " Toolbars» select the item « Network and Internet", and then " Network connections" “” will be displayed among the icons. Right-click on the shortcut and select “ Turn on».

If there is no such shortcut at all, then on the PC driver not installed. It is best to download the driver from the disk that came with the equipment.
For PC and mobile gadgets
You can also set up a connection on a laptop through the toolbar. An Internet connection icon is displayed in the lower left corner. Click on it and go to the section “ Network and Internet settings" Available devices will appear in the list. You need to find the name of the router on the network, click on the shortcut and press the “ Connect" If the connection is secure, the system will ask for a login and password.
The connection on a smartphone is configured in the same way. In your phone settings you need to select a section WLAN, find the name of the wireless network in the list, and then enter login And password.
How to install a new router instead of an old one
First you need to connect the new router to the PC, as described earlier. If the device has already been configured by the provider, then the Internet will work immediately after connecting the cable. To check, just open the browser and load the site pages. But if you replace an old device with a new one, you most often have to change the settings.
After connecting the network cable, you need to open the browser and search bar drive " 192.168.1.1 " or " 192.168.0.1 » and press Enter. One of these IPs will open the settings. If none of them worked, then the instructions for the router should indicate the correct IP.
If everything is done correctly, a settings entry window will appear in the browser window. The system will ask for a login and password. When connecting for the first time, you should indicate “ Admin" Instead of password a combination may be used 1234 . Also, the login and password for the system can be specified in the instructions for the router.

If none of the suggested options worked, you couldn’t open the settings, then your connection needs additional settings. Only the provider company can understand this issue. Exact settings vary by device model and service provider. Universal instructions does not exist for such cases.
The settings menu contains several items. The fields should be filled out according to the instructions for your device. It is very important to come up with a strong password. Its length must exceed 7 characters. Strong password comprises Latin letters And numbers.

Passwords and limited access when sharing the Internet
The router itself does not provide access to the World Wide Web. It must be pre-configured and connected to the provider's network. At this point, the problem may arise due to limited access.
If the network cable is connected, but the adapter does not work, there may be several reasons:
- the router is not configured correctly;
- drivers have failed;
- The wireless network is not configured.
Another reason may be enabling economy mode on laptops with low battery power.
In the first case, you need to reconfigure the router according to the instructions. And in the second - reinstall the drivers.
If problems occur on the network, you should check the IP address settings. On the Toolbar in the Network Control Center, select wireless connection and open " Properties».

In the next menu you need to select “ Internet Protocol Version 4 (TCP/IPv4)».

In line " IP address» must be entered manually subnet address, which is indicated on the sticker at the bottom of the case.

Now let's look at how to remove restricted access to Windows 8 PC. To solve the problem you need to reboot network adapter.
To do this, in the "" command you need to enter the line ncpa.cpl.

A list of available connections will appear on the screen. We find the one we need and open the contextual RMB menu, In the drop-down menu, select “ Disable", wait until the adapter changes color to gray, and then connect the device again.
Another reason for an incorrect connection may be an incorrectly entered network login and password. To resolve this problem, you should contact your provider.
On modern Russian market electronics there is a wide selection of Wi-Fi routers from different manufacturers. However, immediately after purchasing a technical device, a number of unresolved issues may arise before the consumer. One of them is the order correct connection purchased router.
Some buyers seek to immediately save themselves from potential difficulties and turn to specialists, which entails additional material costs. This approach is not entirely justified, because connecting a Wi-Fi router yourself is real and simple.
Depending on the device model (TP-Link, Zyxel Keenetic, MikroTik, NETGEAR, etc.) the process of putting the router into operation may have minor differences.

Nevertheless, there is a universal algorithm, following which you can configure any router:
- Connecting wires and installing a wireless router. Unpack what you bought in store electronic device, decide where to install it, and also connect the power adapter and other cables necessary to maintain a wireless Internet connection.
- Login to the software and configure the network card. After making sure that all wires are properly connected, you should open the control panel of the router and set individual parameters for your network.
- Setting up the proper functioning of the network. At this step, you connect to the services of your Internet provider. To do this, you will need to remember your Internet access data.
- Wireless network configurations. The final step involves selecting the type of Internet connection, creating a wireless network access point, entering its name and setting a password.
Reference! Keep in mind that setting up a router does not differ depending on the Internet service provider (Domolink, Dom.ru, Beeline, etc.) They all work on the same principle and differ only in the tariff plan.

For the most complete coverage of the circuit self-connection For a Wi-Fi router, you will need to consider each of the above points separately and in more detail.
Determining the location of the device
It is advisable to place the router in the central part of the room or on one of the cabinets (closer to the center). An access point located at a high level transmits the signal in the best way and covers a larger area of the territory.

Important! note that Wi-Fi installation the router next to the mirrors entails negative consequences for its operation. Surfaces that reflect light will block wireless signals and radio waves will not be able to travel properly throughout the room. The same rule applies to electrical equipment that emits strong electromagnetic waves (microwave ovens, refrigerators, radio broadcasting devices, etc.).
If you have a large area, it is reasonable to set up two access points in bridge mode and cover the entire area with a wireless network. Each device has wall mounts, so determining their location should not be difficult.
Connecting router cables in the correct order
The package for the router usually contains a manual from the device manufacturer, which contains rules for setting it up. Remove all components from the Wi-Fi router box and follow the instructions below:

- Take the router's network adapter, plug it into one of the router's connectors and plug it into a power outlet. This is the main part of the device, which is designed to power equipment from the network. alternating current. After this step, the power indicator on the front of the router should turn on and blink.

- Connect the Ethernet vendor cable to the WAN port, which is usually highlighted in blue. Through this port the router will connect to an external global network.

- The included network cable connects to the LAN port, which is on technical device there should be several. Usually there are 4 or more of them and they are signed with the phrase “ home network».

- If you have a PC or laptop, then one side of the patch cord is connected to LAN port router, and the other side goes into the corresponding Ethernet connector of the device you are using.

If you do not have a PC, then the setup can still be done via a tablet or mobile phone. The main thing is that such devices are capable of connecting to wireless networks.

The process of setting up a router from a smartphone is almost no different from setting up from a computer, so you can understand all the nuances by studying the following points:

On this note, all the components will be ready to put the Wi-Fi router into operation. All that remains is to adjust some parameters in the web interface and the network card of your device.
Setting up a network card
There are known cases when correct setting wireless Internet connection, the user still encountered interruptions in its operation. One of the reasons for this phenomenon may be different network card settings from the standard ones. To resolve or avoid potential problems you will need:
- Open Control Panel through the Start menu.

- Enter the center that solves the current problems of network functioning - “Control Center...”.

- Expand the “Change parameters...” option.

- Open the properties of the network connection by right-clicking on the connection icon and selecting the appropriate line.
- Click on protocol 4 (TCP/IPv4) and expand its properties.

- In the “General” tab, set up receiving data automatically.

The parameters indicated above are suitable for routers in 99% of cases. Now yours Personal Computer or the laptop will receive a free IP address, which will save the wireless network from additional problems.
On a note! This method can also be used as a test if your Wi-Fi suddenly stops working. Third-party software or viruses may have changed the card settings.
Login to the router web interface
The blinking of the WLAN and LAN indicators on the device you purchased indicates that the router is working properly and is ready for further configuration.
The next step is to log into the site with settings. You can access it through a browser on your phone or computer by entering the appropriate combination of characters in the address bar. This information is located on the router itself.


Also for all router models there is a universal address where you can enter the settings: 192.168.1.1. or 192.168.0.1.
Thus, at this stage the following algorithm of actions is observed:

You will be taken to a page with detailed settings for your router, which indicates the transition to the next stage of putting the router into operation.

Getting started with router settings
On the page of a special web utility, the user will need to configure the Internet connection and Wi-Fi network.
In the list of categories of almost every router there is a so-called “Master quick setup" In English, a similar function is called “Quick Setup”. A number of manufacturers assign this option directly to the control panel. With its help, it is possible to configure the router without interruption, saving time.

You only need to indicate basic information about your network: country, city/region, Internet service provider, WAN connection type, etc.
On a note! All data will be specified in the contract with the provider supplying you with the Internet.

After this point, you should move on to detailed Internet setup, which will mark the last step for wireless broadcasting of the router.
Setting up a home Wi-Fi network
First of all, the user should inquire about what type of WAN connection his Internet service provider uses. Such information is usually specified in the contract for the provision of relevant services. If it is missing in official documents, you can contact the call center of your Internet service provider.
Today the following types of Internet connections are known:

With a dynamically assigned identifier network device(DHCP) Internet should work immediately after connecting to it. This is due to the fact that on all routers the type of such connection is set automatically.
Other types of WAN connections PPPoE, L2TP, PPTP or static IP will require the user to configure a number of additional parameters:

At this point, the wireless Internet connection is connected. All that remains is to set the identifying parameters for your Wi-Fi, and self-configuration of the router is complete.
To avoid hacking, all experts strongly recommend changing the network name and the standard password, which is attached to the device packaging.

Important! Don't forget to save the applied settings. Now your access point will be renamed and will have a different password, which is best written down somewhere. Don't forget about this the first time you connect to the network to ensure that the setup is successful.
Conclusion
Thus, self-configuration of routers seems quite feasible. To do this, you do not need to have any special knowledge in the field of computer technology. It is enough to adhere to the fundamental rules of computer literacy (logging into a web browser; entering a combination of characters in the address bar, etc.).
All router models differ in price segment and characteristics, but have similar operating principles and settings. Decide on the manufacturer you like and become the owner of a wireless Internet connection in any room.
Video - How to install and configure a Wi-Fi router
According to my observations, few people can CORRECTLY install and connect a wifi router on their own if they have wired Internet. That is, use it to set up a wireless network and integrate it into it different devices. As a result, they subsequently encounter difficulties that could have been solved at the design stage. local network.
How to connect a wifi router?
Before you start step by step description regarding connecting a Wi-Fi router, I want to draw your attention to one point.
To create a full-fledged local wireless network, you need to buy a device such as a ROUTER, or also called a ROUTER.
The fact is that there are a lot of devices similar in appearance and functionality for various purposes. For example, out of ignorance it is easy to confuse it with a wired router without WiFi, which also distributes the Internet signal to devices. But only with the help of cables - it does not have an antenna.
Another device similar in design appearance- access point. In general, her tasks are slightly different from ours. A characteristic difference between a router and an access point is the presence of several sockets for network cables. While at the point there is usually only one.

The point of connecting a router is that it is now it, and not your PC, that will connect to the Internet via cable. That's all for this required parameters, required to connect to the provider, which were once used in your desktop computer, will now be registered in the router settings. And all other devices will already receive Internet via wifi from it and according to the rules that will be specified in it.
In order to connect a router at home and set up a Wi-Fi network, I used a dozen models from completely different manufacturers. I can say with confidence that in terms of the actual configuration WiFi router and connecting to a provider, the difference between them is only in the details graphic design admin panel. Therefore, having mastered the principle once on one model, you can apply them to others. Today, as an example, I will illustrate with screenshots from two routers - TrendNet TEW-632BRP and ASUS WL-520GC.

How to connect a router to the Internet via DHCP?
The first setting we will look at is setting up a DHCP server.
If previously there was only one computer and it alone received an IP address from the provider, then we can connect many computers and gadgets to the router. This means that it is the router, instead of the computer, that will “communicate” with the provider’s equipment. And within the framework of our home network between these devices, it will itself assign an internal IP address to each computer, laptop, phone, TV and everything else.
Procedure:
- After connecting to the power supply, first of all you need to configure the router to communicate with the computer. To do this, insert the Internet cable into the WAN slot on the device. And we connect the other cable, with two plugs, which most likely came with the device, at one end to the computer’s network card. Where there used to be an internet cable. Others - in any of the LAN1, LAN2, LAN3 or LAN4 slots of the router.

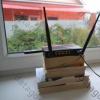
I also want to note that it is better to connect the router to the network through an uninterruptible power supply. I had an unpleasant experience when good device from Netgear faltered due to a power surge in the network. It simply began broadcasting wifi not at 100, but at 2 meters. Of course, I had to buy a new one.
- Next we take installation disk, included with the router. And we start installing the drivers and software.
- After this, we need to configure the computer to work with the router. Now our network card is configured to connect directly to the Internet through the provider. This means that perhaps the control panel contains some data that is important for us to save and use later when working with the router. To do this, go to the TCP/IP v.4 protocol settings as shown in the diagram: For Windows XP: “Start > Control Panel > Switch to classic view > Network connections.”
In Windows 7: Start > Control Panel > Network and Internet > Network and Sharing Center shared access> Management network connections>Changes adapter settings."
In the screenshot I go to settings " Wireless connection", but you don’t have it yet, and since we connected the computer to the router with a cable, you need to select the “Local Area Connection” item:

If you have something indicated here, then write down this data on a piece of paper. This is especially true for those who have lost their contract for the provision of services and do not know the data for connecting to the World Wide Web. For a certain type of connection, which will be discussed below, this may be useful. After this, here, in the network connection settings on your computer, you need to set the IP, gateway and DNS to automatic. We will already enter these parameters in the wireless router itself.
- After that, go to the address “http://192.168.1.1”. Typically, configurations with the router occur here, if they did not have to be done at the software installation stage. But look in the instructions for the device to see which way to go to the router’s control panel. Since the default preset IP on different models may vary. Also another popular placement brief instructions— sticker on the bottom of the device. Look there too. If there are no instructions in the instructions, or it is lost, then go to the Control Panel, as I already described above. Only after right-clicking on “Local Area Connection” in the window that appears, click the “Details” button. In the window that opens, look for IPv4 Default Gateway - this is the IP address of the router.

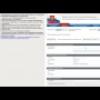
- Now, finally, go to the address indicated there through the browser (http://IP ADDRESS OF YOUR ROUTER). And we find the item in the menu DHCP Server(in Trendnet it is combined with WAN) and set a range of values for possible IP addresses of devices within your local network. For me it was like this: Start IP - 192.168.10.101, End IP 192.168.10.200. And of course, opposite the DHCP Server item there should be an Enabled parameter. Domain Name or Host Name is the name of the future home wifi network. Let me make a reservation right away that the screenshots below were taken from my devices, which are already working or have been working for several years. Their interface is in English, so it would be difficult for a domestic beginner to figure out what’s what without help - I hope these pictures will help you. Most modern firmware and software are already in Russified form, so it will be even easier to understand. This is how it looked on Trendnet (highlighted in red):

And here it is in ASUS:

Setting up a computer connection to the router via LAN
Now we will set the parameters for our wifi network at home - IP and router mask. For Trendnet this is the same item (see Figure 1, highlighted in green), for Asus - the WAN & LAN section - at the very bottom of the settings page. In the first case I set IP 192.168.10.1, in the second - 192.168.1.1. This is the address within the local network at which we can access the admin panel through a browser. And through which computers will access the Internet. Mask - default, 255.255.255.0
Connecting a WiFi router to the Internet via the WAN port
These were all flowers, now the most interesting part is the setup external connection router to the Internet.
There are several types depending on the provider settings. This happens in the WAN menu.

There are several other options for connecting to the provider’s equipment, but I didn’t come across them. Therefore, I will not talk about them for now.
How to encrypt the connection to the router's WiFi network?
If you did everything correctly and saved all the settings, then all devices that support wifi should now see new network with the name you specified. However, this is the question of how to connect wifi at home, not closed yet. Home wifi network It turned out to be open, that is, anyone can use your Internet access for free. In order to ruin everyone and make the wifi network at home accessible only to its owner, you need to protect the wireless network.
There are several methods, I have used two in my practice: WPE (or Shared Key) and WPA. The latter is more reliable, so I'll consider it. Go to security settings. In Trendnet this is the “Security” menu item, in Asus it is “Wireless > Interface”.
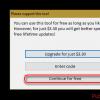
Select WPE or WPA Personal (PSK, TKIP) from the menu and set a password for authorization - from 7 to 64 characters. And we save. I show you how it was for me:


Well, now to access the Internet through your router, you need to enter a password. The final touch remains - so that there are no problems with connecting various devices to the router and with the operation of programs, we will manually set the DNS server. Setting this parameter is located in the same place where you entered the parameters for connecting to the Internet. We activate the function of manually assigning DNS servers and enter the IP from Google there:
- DNS-Primary (or DNS Server 1):8.8.8.8
- DNS-Secondary (or DNS Server 2): 8.8.4.4
You can also specify one of the Yandex servers (for example 77.88.8.8).

As you can see, connecting wifi through a router and making a wifi network at home is quite easy. I hope everything works out for you too!
Video on connecting the router to the Internet
Now for the traditional video for dessert on connecting a router, which will tell you even more clearly about the typical settings for working with the network.
Thank you! Did not help
As soon as a user, in addition to a computer, begins to use another gadget to use the World Wide Web, he immediately faces the problem of providing him with Internet access without incurring additional communication costs. But, more often than not, there are even more than a few home devices with the function of surfing the global network. For an optimal solution to the problem, as a rule, a device distributes the Internet, i.e., routes it to all computers and gadgets available at home.
However, simply purchasing this device in a store will not solve the problem, but you also need to know how to properly connect the router. Below in simple words with pictures provided detailed description all steps on how to connect a router to a computer with using Wi-Fi or a “patch cord” cable for a router, as well as how to connect correctly wireless router, so that everything would work well later, and as people say, it became Wi-Fi, making the Internet available where it is needed.
In order to eliminate frequently encountered difficulties, at the end there is a guide on how to correctly connect a router to a router and configure them. The instructions presented are equally applicable to any models of wireless and wired access points.
The essence of the device
Before proceeding directly to the issue of connecting the device, you need to know the basic principle of its operation. Advanced users can simply skip this section of the guide and go straight to the next one.
A router is a device that independently connects to the global network using the parameters entered into its interface; in fact, this small-sized device acts as a computer, but with a routing function, so the router can distribute the Internet to many devices via Wi-Fi or cables.
Only the router itself is physically connected to the worldwide network; the router is assigned a specific IP address. Therefore, you will not need to pay additionally for many computers or smartphones connected to it, of course, if no additional services have been purchased.
Connection procedure
Self WiFi connection Setting up a router is very simple, and it is not necessary to have a significant amount of knowledge for this. On the body of all routers there is a special “Internet” socket, where you need to connect a wire from your communication service provider (this connector is called “WAN”).
Next to it are the “LAN” connectors; it is to one of them that you need to connect a patch cord to the network card of your PC or laptop. And also through these ports wired communication with various set-top boxes, Smart TV, additional computers etc., which also play an important role for the home.
Now let’s look at the question posed step by step, how to connect the router. You only need to perform a few sequential steps:
- Insert the wire from the provider into the “WAN” connector;
- Using the supplied wire, establish a connection between any of the router’s “LAN” connectors and the same slot on the PC’s network card;
- Supply electricity to the device through the supplied adapter, connecting it to a 220 V network. Then, if available, press the “On” key. activate the device on the router case (special indicators on its case will light up);
- Ready! The router is connected. All that remains is to enter the necessary settings.
It is possible to connect the router for further configuration without having a cable connection to the PC, but by connecting to it via Wi-Fi. But this is a less reliable method. Especially when this is done by a beginner, after entering the parameters, having already connected again, malfunctions often appear.
Of course, they can be quickly eliminated, but if the owner of the device is insufficiently experienced, correcting them will require a significant investment of nerves and time. Therefore, it is strongly recommended to use a wired connection to enter settings.
Procedure for connecting an ADSL router 
The principle of operation is completely similar to the algorithm described in the previous section of this manual, but this router does not have a WAN port and is replaced by a connector called “Line”. After connecting, you can immediately begin entering the ADSL Wi-Fi router settings.
How to connect a router to a router?
If you need to cover a large area with a wireless signal, for example, in the case of a large apartment or house, then this can be effectively done by connecting router to router. This is guaranteed to increase the Wi-Fi coverage radius.
 This can be shown schematically as follows:
- In total, there are 2 main methods for achieving the task:
- Using cable;
Via Wi-Fi.
You will need a cable called twisted pair cable that is long enough to connect 2 routers to each other.
 To connect, you must perform the following steps:
- Install one end of the wire into the “LAN” socket of the router connected to the global network;
- Insert the other cable plug into the “WAN” connector of the 2nd router;
- Next, enter the settings in the 1st router to configure it for the Internet provider, and in the 2nd router for dynamic ip.
Method 2: via Wi-Fi
If it is not possible to stretch the wire between the devices (which is extremely common), then you will have to use the second method, which is characterized by the complexity of the settings, so we will pay more attention to it in this guide.
The user has access to a router with access to the global web (let’s call this router “1st”) and another device for use as a repeater – “2nd”.
At the first stage, you need to connect “1st” to the PC and configure the Internet on it. Then connect the “2nd” to the PC and configure the connection to the access point.
The action algorithm includes the following sequential steps (given for operating system Windows 7, but the algorithm is completely similar, with minor changes, for other versions of Windows):