How to make the last page landscape in Word. Portrait and landscape orientation. Make multiple pages landscape
Setting the sheet orientation to landscape is one of the most common tasks that users encounter when working with the Word text editor. In some cases, you need to change the orientation of sheets for the entire document, and in others only for one or a few pages. If you are also faced with a similar problem, then this article will be useful to you. Here you can learn how to make a landscape sheet in Word 2003, 2007, 2010, 2013 and 2016. We will also tell you how to make a landscape sheet for only one page of a document.
If you want to make a landscape sheet in Word 2003, then to do this you need to open the “File” menu and select “Page Setup” there.
This will open the Page Setup window. Here you need to select the “Landscape” sheet orientation and click on the “Ok” button.
This way you can make landscape sheets throughout your Word 2003 document.
How to make a landscape sheet in Word 2007, 2010, 2013 and 2016
In Word 2007, as well as more modern versions of this text editor, the so-called ribbon interface is used. This is an interface in which all the tools are distributed into several tabs.
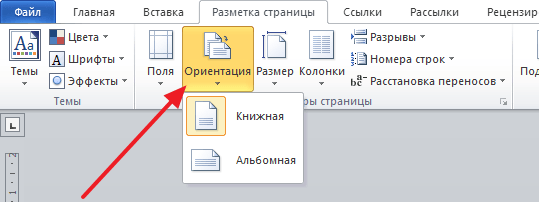
So if you are using a modern version of text Word editor, namely Word 2007, 2010, 2013 and 2016, then in order to make a landscape sheet you need to perform slightly different operations. To get started, you need to go to the “Page Layout” tab. All the main tools designed to control the appearance of the page are displayed here. Among other things, there is an “Orientation” button, by clicking on which you can choose one of two options: “Portrait” or “Landscape”.

By selecting the “Landscape” option, you will convert all sheets of the Word 2007 (or 2010, 2013, 2016) document to landscape orientation.
How to make a landscape sheet in Word only one page
If you want, it will be a little more complicated than converting the entire document to landscape orientation. After all, this will require dividing the document into sections. Below we will demonstrate how this is done using the ribbon interface of Word 2007, 2010, 2013 and 2016 as an example. But, these instructions will be useful even if you have Word 2003, since the same principle is used there.
So, first you need to enable the display of non-printable characters. This will make it much easier to work with sections.

The next step is to place section breaks. In order to make a landscape sheet in Word on only one page, you need to insert a so-called “Section Break” before this landscape page and after the landscape page.” To do this, place the cursor on the page that comes before the landscape one, go to the “Page Layout” tab, click on the “Breaks” button and select the “ Next page" Next, place the cursor at the end of the page that you want to make landscape, and again set the section break after the next page in the same way.

After that, place the cursor on the page that you want to make landscape and change its orientation to landscape.
If you did everything correctly, then you will receive a landscape sheet of only one page, and not the entire one Word document. After this, you can turn off the display of non-printable characters and continue to work with the document as usual.
Quite often in my work I have had to deal with a seemingly simple question. How to create a document in Microsoft Word rotate one of the pages horizontally, i.e. how to make one page of a document landscape? However, the remaining pages should remain in portrait orientation.
Usually, colleagues created a second document separately, made one landscape page, and after printing they inserted this page into the main document. But this is not very convenient.
In this article I will tell you how to make one page in Word landscape without leaving the document and without making unnecessary manipulations.
Let's say we create new document. Our first page should be portrait (vertical), the second should be landscape (horizontal), and the third and subsequent pages should be portrait again.
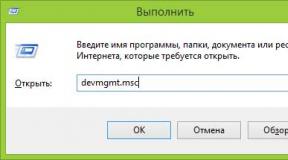
1. Open a new Microsoft Word document. The cursor must be on the first page. In the top toolbar, select the tab "Page Layout" - "Breaks" - "Next Page"

2. will appear new page while vertical orientation with a blinking cursor in the first line. Let's go to the point "Page Layout" - "Orientation" - "Landscape". Our second page has become landscape.


3. It remains to make the third and subsequent pages of vertical orientation. We already know the algorithm of actions. The cursor is on the second page. Click on the top menu tab "Page Layout" - "Breaks" - "Next Page".

4. Page 3 will appear, in landscape orientation for now. Let's go to the point "Page Layout" - "Orientation" - "Portrait".

Now all subsequent pages will be in vertical orientation.

In this way, you can rotate pages in a document as many times as you like. Thank you for your attention. I hope this article will help you.
Good time everyone! Today, continuing to study the Word text editor, we will look at how to make a landscape sheet in it. By default, all pages in the editor are in portrait format. Thus, they are oriented as if we were writing on a regular piece of paper, only not with a pen or pencil, but using a computer keyboard.
Sometimes situations arise when the volume and size of the text do not allow it to be placed on a sheet of portrait orientation. For this case, there is an option to turn pages into landscape view.
In this article we will talk about how to convert a book format into a landscape format, either for the entire Word document, or just for individual pages. As usual, let's look at several examples of creating a landscape sheet. And in the end it will be short video.
Making a landscape sheet among book sheets in Word 2003 for one page
Creating a landscape view in Word 2003 is not at all difficult, especially if you give this look to the entire document. To do this, open the “File” tab in the main menu and find the “Page Options” line there.

In the window that opens, select “Landscape” in the “Orientation” section. It is also shown with an icon in the form of a landscape leaf. And click “OK”.

As a result of this operation, all pages in the document became landscape. But this is if you need to turn over all the sheets. What if we only need one landscape sheet? For this purpose, we will use the “Page Break” operation. Place the cursor at the end of the page after which the landscape sheet will go. Next, in the “Insert” menu, find the line “Break”.

In the window that opens, select “From the next page” and click “OK”.

Now we go to the page we need and transfer it to landscape view using the already familiar operation: “File - Page Options - Landscape View”. As a result we get the following:

How to make landscape sheets in Word 2007 only one page?
Changing the portrait orientation to landscape orientation in Word version 2007 is done in a similar way, only the arrangement of the tabs and menus is slightly different than in 2003. Here we will only need the main panel and the “Page Layout” tab on it. Having opened this tab, we need to find an icon called “Orientation”, clicking on which will open a menu with the options “Portrait” and “Landscape”.

By clicking on the Landscape button, all pages will take this orientation. But, again, we only need one landscape-type sheet. Here, to carry out this operation, we will again use the page break function. In new versions of Word, unlike old ones, when working with breaks, you can display non-printable characters to make it more convenient to work. We enable this function in the feed:

Now let's move on to the breaks. In the “Page Layout” tab, find “Breaks” and select the line “Section Breaks” - “Next Page”.

Now we place the cursor on the page that needs to be oriented as landscape and do as described above. As a result, we get only one landscape page.
Making a landscape sheet in Word 2010 for several pages
Making a landscape sheet for several pages in Word 2010 is not difficult. As already mentioned, the general algorithm for solving this problem is as follows: Turn on the “Page Layout” – “Orientation” – “Landscape” mode.
However, this action results in landscape pages being generated for the entire document. If we need to make only one page, then we do it by creating breaks. Place the cursor at the end of the sheet, open “Page Layout” – “Breaks” again and select “Section Breaks” – “Next Page”. After this, we place the cursor on the page that needs to be made landscape and apply the algorithm described above. The page has become landscape.
However, if there are more pages after it, they have also become landscape. You can return them back to the book version using the same scheme, only instead of landscape, select “Portrait”. How to arrange landscape sheets between book sheets? Yes, everything follows the same pattern. You just have to work a little more.
Set up the landscape page as usual. We return all the pages following it back to book format. Next, we again make the next page landscape, again we return the pages that follow it and become landscape pages to portrait, etc., until we create the required number of landscape and book pages. As a result, we get a document like this from alternating landscape and book sheets.

Let's summarize:
- Place the cursor at the end of the sheet, open “Page Layout” – “Breaks” and there select section breaks – “Next Page”.
- Place the cursor on the page to be formatted. “Page Layout” – “Orientation” – “Landscape”.
- We remove all subsequent album pages. Place the cursor at the end of the sheet, open “Page Layout” – “Breaks” and there select section breaks – “Next Page”. And - “Page Layout” - “Orientation” - “Portrait”.
For fast switching In page layout mode in Word versions from 2007-2016, you can use the icons in the lower right corner of the screen:
For the next landscape page we do everything the same way. And we do this until we have established the required number of landscape and book pages.
We get one landscape sheet, and the rest portrait sheets in Word 2013-2016
Installation of pages in newer versions of Word is similar to previous ones, only the user interface will look slightly different. Here we will need a tab called “Layout”. Here we find “Page Settings”, then “Orientation” and here we select the “landscape” button.

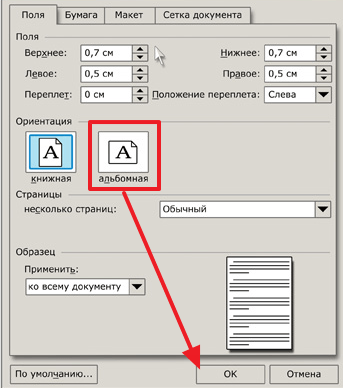
By clicking on it, we get ready-made landscape sheets for the entire document. If you need to make landscape only a few individual pages (or just one), then everything is much simpler here. First of all, select the text on those pages that will need to be expanded. Next, visit the “Layout” tab and the “Page Options” section again. A window will open in front of us where we need to select the “Fields” tab:

Here, first select the orientation – “Landscape”. Then go to the very bottom, to the “apply” line. In the drop-down menu, set “to selected text”. Click “OK”, you’re done. The program will automatically place breaks and rotate the necessary pages. Good luck in mastering the Word editor, and at the end there is a short video on how to mark up album sheets.
That's all. Good luck, if you have any questions, write in the comments! Bye!
People are accustomed to completing all office and work documents using Microsoft program Word. Beginner users often wonder how to flip a sheet horizontally in Word. By default, the program produces vertical, or book, pages - long but narrow. Find out how to turn a page in different versions of Word.
How to make a landscape page in Word for the entire document
To print a wide table, chart, or insert an image, it is best to use a horizontal page view. For plain text Standard book format will do. To change the paper orientation, you do not need to install additional editors or programs, you just need to follow the steps and steps from the instructions below. It is important to remember that when using different versions program, it is worth turning to different sequences and algorithms. Learn step by step how to create landscape orientation in Word.
In Word 2003
The oldest, but still no less popular version of the text editor does not differ in functionality from the newest ones. Additional options, new fonts and beautiful designs are added every year, but the base remains unchanged. The position of the document is one of the main criteria of the editor. How to make a landscape sheet in Word 2003? Making these changes is easy and simple; you just need to remember the algorithm once:
- Open the File tab. To find it, look to the left top corner.
- In the menu that opens, find and click “Page Options”.
- On the “Page Orientation” line, select the icon depicting the desired orientation.
- Using the same menu, you can return the classic page position.
For Word 2007
The algorithm is simple:
- Since you can make a landscape sheet in Word only using the menu, you need to expand the “Page Layout” column in top line menu.
- The word “Orientation” will be located on the bottom line; it should be the leftmost one. You have to click on it.
- Two items will open: “Portrait” and “Landscape”. Once selected, you can change the layout of the pages of the entire document.
In Word 2010
New and latest versions Word programs are not very different from 7: the design has changed a little, the color scheme has changed, but the functionality meets the highest requirements. Changing the position of the sheet using the tenth year version is as simple as in older ones. To do this you need:
- On the Navigation Panel, select “Page Layout”.
- Among all the functions: theme, color, effects, margins, size, background, border color, line numbers, breaks and others - you need to find “Orientation”. It will be closer to the left edge, but you shouldn't look for it by looking at the corner of the menu.
- After clicking on this button, you should choose from two options that appear: “Portrait” or “Landscape”. The first is vertical, and the second is horizontal. After these simple steps, the document will acquire the desired appearance, and place necessary information it will become much easier.
How to make one page in Word landscape

If you have figured out how to turn a vertical sheet into a landscape one, all that remains is to learn the last secret, how to delimit each page and give it its own arrangement. You can set a new sheet to have a different orientation than its neighbors. Here are the steps to take:
- We need to make it active. To do this, you just need to place the cursor on this sheet, highlighting any line or word.
- Open the familiar “Page Layout” tab.
- On the expanded window, among all the options, you need to click on the small “expanding” arrow - “Page Options”. It will be in the lower right corner.
- The characteristics window appears. Mark the desired location.
- For the bottom column “Apply” you need to select “until the end of the document”.
- Click "OK".
- After this, all pages, starting with the selected one, will change orientation.
- To make only one sheet horizontal, you must continue to follow these instructions.
- Make the next sheet from the document active. And do all steps two through six, only changing from landscape to portrait, and not vice versa, as you did from the very beginning.
- As a result, only one page stands out from the crowd.
To design a document professionally, you need not only to understand how to customize the appearance of the text, but also to know , How to make a landscape page in Word.
By using Word programs from the package Microsoft Office You can design any type of document by applying various styles and formatting objects to it.
Thanks to a word processor, you can significantly save time on editing large files and texts.
Creating landscape orientation in Word 2003
IN old version In Word, the process of changing some page parameters is significantly different from new editions. That is why you should consider how to change the position of the page in this case.
Follow the instructions to change the orientation to landscape:
- In a new document, open any page and select the menu item called “File” on the toolbar. Then open a window to change parameters in the drop-down list;
- In this window, you can manually adjust the margin size and determine the size of the paper used. To change the position, find the corresponding field and select landscape as shown in the image above.
Remember! In the old version of Word, after changing the page orientation from portrait to landscape, it is necessary to change the margins, because the text will move and go beyond the edges of the sheet.
Changing the orientation in a Word 2007 document
This version word processor Word is the first to receive an updated user interface.
Now the program menu items on the toolbar are divided into logical blocks: for formatting appearance text, markup conversion, working with tables, pictures and other tabs.
To change the orientation in this version of Word, follow these instructions:
- Open the desired Word file and find the page layout tab on the toolbar;

- Select orientation item. A drop-down list will appear. Select the required type. After completing this action, all pages will become landscape;
Also you may be useful reading these articles:
- Creating and Inserting a Formula in Word - Step-by-Step Guide
Landscape view in Word 2010 and 2013
Since all newer versions of Word have a similar interface, changing orientation occurs in the same way.
For greater clarity, we will give an example of replacing the page position in new versions of Word.
- Open the markup tab;
- From the orientation field drop-down menu, select landscape.

How to make only one page landscape
In Word it is also possible to change the orientation of only one page of a document, for example, the second:
- Open the page layout tab;
- Click on “fields” and in the window that appears, select custom fields. A separate window will open;

- In the window that appears, select landscape orientation;
- In the "apply" field, select to apply to the end of the entire document. This way you can make several pages landscape. To make a few more pages with a book view, select the necessary sheets and follow the steps indicated in steps 1-3.

Make multiple pages landscape
To set up several landscape pages in a document with portrait orientation, enter the required position in the page settings window, apply it to several selected pages and click OK.