USB modem settings for MTS. Connecting a modem to a computer or laptop. Make sure the modem is located in an area with good network reception
- in addition to the modem, they also contain a flash drive with drivers. This disk is detected in the system as a USB-CD drive: You need to open the modem disk through "My Computer" or " Windows Explorer
" and run the file "AutoRun.exe" on it. The picture shows the MTS modem disk. For Beeline and Megafon modems, the label and disk image will be different, but the principle of operation of the installer is the same. .
Note The installation file may not have the name AutoRun.exe, but for example setup.exe. Specify name installation file
You can look at the contents of the autorun.inf file.
Modems provided by the Skylink operator usually do not have an internal disk and drivers must be installed from a regular CD or downloaded via the Internet.
During installation, you do not need to disconnect (pull out) the modem. First, the program will be installed, then, after it, the modem drivers will be automatically installed. In total, the process will take a few minutes.

After installing the drivers, you can connect to the Internet. To do this, you need to launch the program (MTS Connect, Beeline Internet Home, Megafon Mobile Partner), wait until the program detects the modem and click the “Connect” button.
USB modem setup details If in the place where you are using a 3G USB modem mobile operator

But the opposite situation may also be true. There is no support for 3G standards, or in this mode the signal is very weak and the modem does not work well. In this case, you can try setting the "GSM Only" option:

You may encounter another problem. IN latest models modems support a virtual network card and, accordingly, when connecting to the Internet, the connection is established through this virtual network card. But on some computers this connection method may fail. The symptoms are as follows - when connecting, everything stops at the stage of the network card obtaining an IP address, it cannot receive it. You can get around this problem by setting the traditional connection method "RAS" in the settings (as a modem, not as LAN card):

Direct connection
" and run the file "AutoRun.exe" on it. The picture shows the MTS modem disk. For Beeline and Megafon modems, the label and disk image will be different, but the principle of operation of the installer is the same.
For Beeline modems, this method may not work. The fact is that Beeline modems have firmware installed that is modified to work only through the Beeline Internet Home program. At least that’s how it was in the beginning, when Beeline first introduced 3G modems.
You can connect to the Internet without using the programs MTS Connect, Beeline Internet Home, Megafon Mobile Partner, using Windows.
To do this, you need to create a new Dial-Up connection, when setting it up, specify the dial-up number *99# name and password (mts/mts, beeline/beeline, for a megaphone without a password name).

If there are several modems in the system, after creating this connection you need to make sure that it is connected specifically to the USB modem:

In addition, you need to specify the initialization string for the modem. Open "Device Manager" and find the modem in it:
Open the properties of the modem (right mouse button) and enter the initialization line there. Hello, dear readers of the site site. Today we will look current topic
for those who access the Internet using 3G modems. Sometimes this “thing” will exhaust so many nerves that after an hour of connections and attempts to “catch” the Internet, you no longer want anything. Therefore, for those who regret their nerves, setting up a 3G modem is relevant. 3G coverage is not ideal everywhere, especially in regional centers it can be very poor. Our task is to increase the quality of reception, because it is a bad signal basically prevents you from getting maximum throughput . There are many different ways
how to increase the speed of a 3G modem. Some "Kulibins" say that with a few manipulations you can strengthen the 3g signal by almost half. I didn't believe it at first, but I tried a few of them myself and you know... it really helped me.
Well, let's start... To strengthen the 3g modem, you first need to configure port speed through which, in fact, Internet data is received, and to do this, right-click on the shortcut "My computer" and open the tab "Equipment"(or "Control"), then "Device Manager".
After this we find the tab "Ports"(COM or LPT), press the plus sign and select "Serial port"(if there are several ports, manipulate each one for reliability), right-click on the port and select the option in the menu that appears "Properties".
 A separate window appears and then go to the tab "Port Settings" and after that "Speed"(bit/s). The default value is 9600 bps, which is equal to 1200 kbps (that is, the port will not allow more than this speed!!!). Set it to 115200 and click OK.
Setting up channel bandwidth
That's it, we have configured the port speed, after that, logically, the maximum possible speed of the 3G modem should increase. Further according to our plan setting channel bandwidth. Go to the menu "Start", then "Run", enter into command line and press OK.
 Next you need to select "Computer Configuration", "Administrative Templates", press the plus sign and in the expanded menu we select "Net" Click on the plus sign and select again from the expanded menu "QoS Packet Manager", double-click “limit bandwidth”.
Then you need to open the window on the tab "Parameter", put a tick "Included". In the window "Bandwidth limit capabilities"(%) set to 0. There the default is always 20. So, after that we click "Apply" and then click ok.
- For Windows 7
Start - Find programs and files - write. Open the file: Local Editor Group Policy . Policy Local Computer - Computer Configuration - Administrative Templates - Network - QoS Packet Scheduler. Select a tab "Limit reserved bandwidth", open, in the window that appears, select the “Enabled” tab, and just below set “0%”. Click Apply-OK.
Let's finish the computer settings here, there are, of course, other ways to improve 3g, from making changes to the registry to specifying parameters manually in files, which, frankly, I don't dare change.
Setting up a 3g modem directly
Let's take Megafon and the HUAWEI E352 modem as an example. Buying a 3g antenna (if the modem has a connector for external antenna) can boost 3g modem signal or solve the problem Low quality signal, but not everyone can afford it, and sometimes it’s simple and unnecessary.
In addition, if you have “all the bars” on the modem antenna, and the speed “jumps” or is generally low, then most likely no 3g modem amplifier will help you, because throughput your line (tower) is limited and divided among ALL users currently on the network.
If you surf the Internet at night and you have few “competitors,” then your Internet will simply “fly.” If there are a lot of people online in the evening, then your speed will be low, there’s nothing you can do about it, and no settings on the 3g modem will help.
Making a 3g modem amplifier with your own hands
But if you still have problems with the antenna strips, then you can make the “Kulibinskaya” amplifier for a 3g modem yourself.
- We take cheap Chinese speakers, plug them into a power outlet and place them next to the USB modem - this should enhance signal reception by 30%.
- We take copper wire and wrap it in 5-6 circles where the SIM card is located. We bring the wire out into the window.
- You can attach (or you can leave it like that) a 1 liter beer can to the end of the wire, after cutting off the lid with scissors.
- We place the jar with the cut side where the signal is best caught - a kind of locator.
Another way is to attach any DVD to the modem, which will also act as a signal concentrator. In this way, you can significantly strengthen the 3g modem signal.
Eliminating the reason for turning off (resetting) the modem
The reason for this is the lack of USB power supply to the ports. motherboard. This usually happens when a USB extension cable is used to connect a 3g modem. That is, part of the nutrition goes into USB cable, accordingly, the device turns off spontaneously at the most unexpected moments.
That's why It is advisable not to use a USB extension cable(although it improves the signal) or look for a socket with higher voltage, as well as a high-quality cable. The last two points actually work, and are not just a catchphrase. In my 2 slots the modem constantly crashed, but in the 3rd it worked properly. Cable quality REALLY affects performance - don't press on the expensive wire.
More interesting program for a 3G modem (chose from many) - MDMA. It shows where your modem receives best. Install a plugin for this program - Entropiy it shows the signal level in big numbers and dubs with voice if necessary. The smaller the negative number (-55 dBi), the better communication with a tower. Walk around the room with a laptop, or carry a modem on a cable and look for the place of best reception. 
Why does the Internet speed fluctuate in a 3g modem?
Surely everyone knows about unstable 3g network pings. They jump from 700 to 1000 and higher + on top of all this, the modem sometimes disconnects from the network (not because there is not enough USB power supply, but for a simple reason, which I will describe below).
Many people don’t know or even have no idea why this happens. Especially ordinary users of USB 3g modems.
So, what is really happening and why 3g works either slowly or very quickly. When connecting, everyone noticed that the modem was connected in 3g mode, but during operation it suddenly switched to EDGE (2g) or, what’s worse, it’s completely thrown out of the network.
It's all my fault automatic search mode for a stable signal- so the modem jumps either to WCDMA, then to HSPA, or even to EDGE.
Example: EDGE signal 96%, WCDMA signal 90%, HSPA signal 50%-60%. That is, the modem automatically selects the mode in which the signal is received NOT faster, but most stably and confidently. Naturally, of these three examples, the modem will operate in EDGE mode.
Operating a 3g modem at maximum speed ( HSPA Locker)
Next, I will tell you how to configure the 3g Megafon and make the modem work only in the most fast mode- HSPA.
Open our Megafon-Internet utility (let's look at the example of the Megafon operator). Click Settings, Further Net, we see:
- Network Type- here we select only WCDMA(or only 3G)
Range(if available) - set GSM900/GSM1800/WCDMA900/WCDMA2100
Registration mode- manual search, click update, wait, then select MegaFon (3G) - click on it and click register.
In general, in case of connection problems, use manual search more often - it will show whether there is 3g at the moment or not.
Close the settings window and connect to the Internet.
Now we need one small program to configure a 3g modem - it’s called HSPA Locker 1.3b (that's what I use). Let's download it. Unpack, install, launch, but do not press START. 
Where the slider is located, set the maximum to 3.0 kb. Now we begin to intensively download something or “pump” the Internet in another way (you can turn on online any video).
As soon as we see that the signal in the Megafon 3g modem has become not WCDMA, but HSPA (or HSDPA or 3G is the same thing) or the speed has accelerated to the maximum possible, press the START button in the HSPA Locker program.
Then we minimize it to tray and disable what we set for downloading. We admire the results: in the Megafon-Internet program, communication always shows HSPA, that is, high speed.
And finally, one more trick: for a reason unknown to me, when the modem speed drops, after removing the SIM card from the modem and then inserting the SIM card and connecting again, the speed will be much better! Maybe the provider gives priority to the user as soon as they log in, or for some other reason, I don’t know, but rebooting actually speeds up the Internet for a while - check it yourself.
See you! Keep up with everything and always on the pages of the blog site
Help the project - subscribe to our Yandex.Zen channel!
Mobile Internet via an MTS USB modem is an excellent alternative to wired and wireless router, allowing you to connect to the network without paying additional settings. However, despite the ease of use, the software for working with 3G and 4G modems provides a number of parameters that affect the convenience and technical specifications Internet.
In the course of this article, we will try to talk about all the parameters that can be changed when working with the MTS modem. They can be changed either using Windows OS system tools or using software, installed from a USB modem.
Note: Both setting options are not related to tariff plan, which you can change on the official MTS website or using USSD commands.
Option 1: Official software
In the vast majority of cases, there is no need to use Windows system tools, controlling the modem through special software. It is worth considering that depending on the device model, the software version often changes, along with the program interface and available parameters.
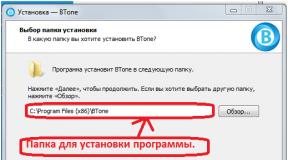
Installation
After connecting the MTS modem to the USB port of your computer, you need to install the program and drivers that come with the device. This procedure takes place automatically, allowing you to change only the installation folder.

Upon completion of the installation of the program, the installation of the main drivers will begin and then launch "Connect Manager". To access the available options, use the button "Settings" on the bottom panel of the software.

The next time you connect the modem to your computer, use the same port as the first time. Otherwise, driver installation will be repeated.
Launch parameters
On the page "Launch parameters" There are only two points that exclusively affect the behavior of the program when a USB modem is connected. Depending on your preferences, after launch the window can:
- Minimize to tray on the taskbar;
- Automatically establish a new connection.

These settings do not affect your Internet connection and depend solely on your convenience.
Interface
After going to the page "Interface Settings" in the block "Interface language" You can switch Russian text to English. During the change, the software may freeze briefly.

Check the box "Display statistics in separate window» to open a visual graph of traffic consumption.
Note: The graph will only be displayed when there is an active Internet connection.

You can customize the specified schedule using the slider "Transparency" And “Set statistics window color”.

You should activate an additional window only if necessary, since the program begins to consume large quantity resources.
Modem settings
In chapter "Modem settings" The most important parameters that allow you to manage your Internet connection profile are located. Usually required values are installed by default and look like this:
- Access point - "internet.mts.ru";
- Login – "mts";
- Password - "mts";
- Call number – "*99#".
If your Internet does not work and these values are somehow different, click the button «+» to add a new profile.

After filling in the fields provided, confirm the creation by clicking «+» .
Note: You cannot change an existing profile.

In the future, you can use the drop-down list to switch or delete Internet settings.

The specified parameters are universal and should be used on both 3G and 4G modems.
Net
On the tab "Net" you are given the opportunity to change the network and operating mode. Modern MTS USB modems support 2G, 3G and LTE (4G).

When disconnected "Automatic network selection" A drop down list will appear with additional options, including a network of others mobile operators, for example, Megafon. This can be useful when changing the modem firmware to support any SIM cards.

To change the presented values, you must close the active connection. In addition, sometimes options may disappear from the list due to coverage beyond the coverage area or technical problems.
PIN code operations
Like any USB modem, MTS works using a SIM card. You can change its security settings on the page "PIN Code Operations". Check the box "Request a PIN when connecting" to protect your SIM card.

These settings are stored in the SIM card memory and therefore should be changed only at your own risk.
SMS messages
Program "Connect Manager" is equipped with a function for sending messages from your phone number, which can be configured in the section "SMS". It is especially recommended to install a marker "Save messages locally", because standard memory SIM cards are highly limited and some of your new messages may be lost forever.


When new alerts occur, the program is displayed on top of all windows, which often minimizes full-screen applications. Because of this notification, it is best to disable and check manually through the section "SMS".
Regardless of the software version and device model in the section "Settings" there is always a point "About the program". By opening this section, you can view information about the device and go to the official MTS website.
Option 2: Setting up in Windows
As in the situation with any other network, you can connect and configure the MTS USB modem through the system settings operating system. This applies exclusively to the first connection, since subsequently the Internet can be turned on through the section "Net".
Connection
- Connect the MTS modem to the USB port of your computer.
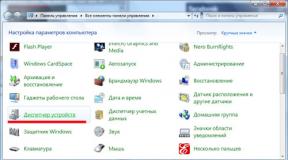
- Via the menu "Start" Open the window "Control Panel".
- From the list, select "Network and Sharing Center".
- Click on the link “Creating and setting up a new connection or network”.
- Select the option shown in the screenshot and click "Further".
- In the case of MTS modems, you must use "Switched" connection.
- Fill in the fields according to the information we provide in the screenshot.
- After pressing the button "To plug" The online registration procedure will begin.
- After waiting for it to complete, you can start using the Internet.


Settings
- While on the page "Network Control Center", click on the link "Change adapter settings".
- Right-click on the MTS connection and select "Properties".
- On home page can be changed "Phone number".
- Additional features, such as password prompting, are enabled on the tab "Options".
- In chapter "Safety" can be customized "Data Encryption" And "Authentication". Change values only if you know the consequences.
- On the page "Net" You can configure IP addresses and activate system components.
- Automatically generated "Mobile broadband MTS connection» can also be configured via "Properties". However, in this case, the parameters are different and do not affect the operation of the Internet connection in any way.


Typically, the settings described in this section do not need to be changed, since when proper creation connection parameters will be set automatically. Moreover, changing them can lead to incorrect operation MTS modem.
Conclusion
We hope that after reading this article you were able to properly configure the MTS USB modem on your PC. If we missed any parameters or you have questions about changing parameters, write to us in the comments.
Some time ago I described a problem when programs, toys or movies spontaneously collapse into the taskbar, the reason for this was the “background” activation of the Connect Manager program update. This program is included with the USB modem from MTS - and performs the functions of an Internet connection manager.
Why not abandon this program altogether? Create an Internet connection manually using Windows. What will this give us? Firstly, we will save memory and processing power of the computer because... Connect Manager will not load, and secondly, we will save nerves - programs will not be minimized to the system tray.
BUT there is one small obstacle - when installing Connect Manager, drivers are automatically installed on the modem. You can get around this obstacle by downloading drivers for your modem from the Internet in advance (there are universal drivers for certain manufacturers, suitable for most modem models) and later, after removing the connection manager, first install drivers for the modem, and then create an Internet connection. Or look for drivers on the modem itself, I had this file: DriverSetup.exe
Small note: In Windows 7, it is advisable to run driver installation in compatibility mode with XP sp3, or try as administrator. Drivers from Windows XP 64bit are suitable for Windows 7 64bit. Drivers for Vista - compatible with Windows 7.
If not automatic installation, you need to specify the path to the previously unpacked drivers (the path to the folder with the drivers).
So I’ll describe in pictures how it’s done.
First of all, open START -> Control Panel -> Network Connections

Open the New Connection Wizard, if your window view is not like this but with a panel, then select “New connection” in the information panel.

The New Connection Wizard starts with home page describing options for connecting to the Internet.
 The next window presents options for connecting to possible networks. Since we are connecting to the Internet, we select the appropriate item.
 We will create the connection manually by entering all required parameters connections
 Don’t let it scare you that we are creating a connection via a regular modem - we will use our native USB modem at the highest possible connection speed.
 It is at this stage that we indicate our modem as the connection source. I note that you can create several connections through different modems. If you only have one USB modem, then this window may not appear. The system itself will select it by default.
 Connection name – here we write for ourselves what our connection will be called so that we can understand it later. Can be called by any name.
 Phone number for connection – it must always be indicated. For different telecom operators providing Internet services, the dial-up number may be different.
 Enter your login and password to connect
MTS: Login: mts, password: mts
Megafon Login: gdata, password: gdata
Beeline Login: beline, password: beline
 The connection settings are completed - the final stage is to check the box to create a connection shortcut on the desktop. If not installed, the connection is created smoothly and can be seen in the control panel - network connections.
 This is what the connection window looks like - by clicking on the call button, a connection occurs. You can also view and, if necessary, change the connection properties.
 That's probably all - the connection has been created and you can use it.
The first setup of an MTS 4g modem is both simple and skill-requiring. This unit is designed so that you can access the network where you need it and when there is no access to wired Internet or Wi-Fi is not available. MTS 4 g network coverage covers a large area, so there should be no problems with communication. It is a small unit that is inserted into a USB connector like a flash card. Do you agree that it is very convenient to have it at hand? The device does not take up much space and easily fits into a laptop bag or just a pocket.
To get started, just perform a small setup that can activate the MTS 4g modem. The interface of most programs is designed in such a way that it is not at all necessary to have special knowledge in the field of computer science and programming. During installation, the program does everything autonomously; you only need to agree to the actions being performed and indicate the path to save the files.
Let's take a closer look at how to properly install a 4 g MTS modem on a computer. It is worth noting that the basic kit includes the device itself, instructions for it and a SIM card. To broaden your horizons and compare, you can also read about.
How to connect an MTS 4g modem to a computer
Initially, you should, as you already guessed, insert the SIM card into a special slot. The device will work in LTE networks only with the SIM card that comes with it. If you install another SIM card, it will work on the 3g network and the speed, accordingly, will be lower than declared. Here you can find out, maybe it will be more relevant for you.
How to set up a 4g MTS modem
After preparing for work, you need to insert the device into your computer or laptop. The operating system will automatically detect and recognize new hardware, and then activate the installation wizard itself. If this does not happen, then you need to go to the “Start” menu, then go to the “Computer” section. The USB modem will appear as a removable drive, since it is configured to have a Micro SD memory card slot. Installing a memory card allows us to use it as a removable drive.
- Open the drive and double click on the Autorun.exe file,

- Then follow the prompts that will appear on the screen from the installation wizard.


- Launch the program shortcut "Connect Manager", which will appear on the desktop after installation.
- When the modem registers on the Internet, click on the “Connect” button.

- First, in the device selection section, the message “MTS connection is not connected to the network” will appear. Don't worry, just wait for the connection. Immediately after establishing a connection to the Internet, the message “MTS connection is connected to the network” will appear in the device selection menu.
- In the “Connect” section, click the “Disconnect” button to pause your Internet connection.

Additionally, in the Connect Manager application you can also send SMS, activate a payment card, check the current balance and the balance of the megabyte package.
MTS settings for a 4g usb modem with wifi router function
All Wi-Fi equipment in the house, be it a smartphone, TV, tablet, refrigerator, and much more, can be connected to the World Wide Web using a flagship with the function wifi router. You can connect such a 4g MTS modem to a power adapter or PC and use it to launch no more than 10 devices at the same time.
The installation process will depend on the computer's operating system. Let's look at the installation for Windows XP as an example:
- Insert the device into the USB port;
- Follow the steps requested by the installation wizard;
- If difficulties arise with automatic tuning, manually run the AutoRun.exe file;

- Open the address of the router settings in your browser (they are on the device itself). Next, enter the standard username and password - admin;

- Check your access point settings- the checkbox is not used by default and must be cleared;
- Make sure that other devices do not work to distribute the signal, this may lead to a malfunction of all modules.
- If you still can’t access the Internet, try restarting your computer.
You can look at it in a separate article.
Additionally watch the video: