Offensive content. "Grey Songs" in Apple Music in iTunes and iCloud Download Symbol Meanings
Computer authorization is required to use content purchased from iTunes. That is, to play movies, music or TV shows, your computer must be authorized. However, according to Apple's plan, you cannot authorize more than 5 computers. In practice, this means that you can play content purchased using a specific Apple ID in the iTunes Store on only 5 computers. You do not need to authorize your iPhone or iPad.
How to authorize a computer in iTunes?
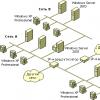
If you have several installed on your PC operating systems or you have several computers, then each (each) of them needs its own authorization using your Apple ID.Possible iTunes error: The “title” program was not installed on the “title” iPhone/iPad because you are not authorized for this operation on this computer.
You must follow the dialog box's recommendations. Select the iTunes Store tab from the iTunes menu and click on the “Authorize this computer” link. If authorization failed because the limit was exceeded, then you need to reset deauthorize other computers or reset all authorizations, but more on that below.
How to deauthorize a computer in iTunes?
Thus, in the end it may turn out that when you try to authorize your computer again, the system will refuse you due to exceeding the limit. What to do in this case?
How to reset authorization for all computers in iTunes?
If there is no access to previously authorized computers, then you can mass reset authorization for all 5 computers. However, this is possible no more than once a year. This is done this way:Go to the iTunes Store and log into your account. If you are already logged in, click on your account name and in the drop-down menu click on “Account” again, specify your Apple ID and password.

In the window that opens with account information, look for the line “Computer authorizations.” Here we see information about the number of authorized computers to play content and the “Deauthorize all” button.
Do not forget to re-authorize your computer from which you performed the deauthorization process.
If you haven’t found an answer to your question or something didn’t work out for you, and there is no suitable solution in the comments below, ask a question through ours. It's fast, simple, convenient and doesn't require registration. You will find answers to your and other questions in the section.
Like Internet-connected computers, iPhones can access a wealth of information that is inappropriate for children or inappropriate in work situations. You can restrict iPhone access to certain types content.
In particular, you can use parental control- for example, to prevent your child from making in-app purchases or watching adult films.
- Click the button "Home"(Home). The home screen will open.
- Click the icon "Settings"(Settings). The corresponding screen will open.
- Click "Basic"(General). The corresponding screen will open.
- Scroll down the screen and tap "Restrictions"(Restrictions). The corresponding screen will open.
- Click "Enable restrictions"(Enable Restrictions). A screen with text will open "Enter restrictions password"(Set Passcode). It's better to use a password that's different from the one used to lock your iPhone.
- Enter password. In case someone is spying on you, iPhone shows dots instead of your password. After entering iPhone password shows the same window again, this time with a message "Re-enter your restrictions password"(Re-enter your Restrictions Passcode).
- Enter your password again. Screen "Restrictions"(Restrictions) will open again, now with the ability to change the positions of the switches in the field "Allow"(Allow).
- If necessary, move each radio button to the field "Allow"(Allow) to position "On"(On) or "Off"(Off).
- Scroll down to the field "Allowed Content"(Allowed Content).
- If you need to change the country for which restrictions are set, click "Age Limit"(Ratings For). On the screen that appears, select your country and then tap "Restrictions"(Restrictions).
- Select settings for "Music, podcasts"(Music & Podcasts), "Movies"(Movies) "TV Show"(TV Shows) and "Programs"(Apps). For example, click Movies.
- On the screen "Movies"(Movies) select the maximum allowed rating.
- Click "Restrictions"(Restrictions).
- Flip the switch "In-App Purchases"(In-App Purchases) to position "Off"(Off) to prevent the user from purchasing content from apps.
- Set other settings in the field "Privacy"(Privacy).
- Select required values in the fields « Accounts» (Accounts) and "Volume Limit"(Volume Limit).
- Change the switches if necessary "Games with Others"(Multiplayer Games) and "Adding Friends"(Adding Friends) to position "On"(On) or "Off"(Off).


What are "in-app purchases"?
Some apps allow you to buy products directly without going through App Store. This is a popular and easy way to sell among developers. additional functions applications (especially inexpensive or free ones). Moreover, it is one of the most simple ways taking money from iPhone users.
What are the privacy settings in the “Restrictions” menu responsible for?
They let you control which apps access information about your iPhone's location, contacts, calendars, reminders, and photos.
Late last month Apple company released another version mobile platform iOS 8.4, with which users received the new music service Apple Music.
The utility, which everyone has been talking about since Tim Cook's acquisition of Beats, which became Apple's largest acquisition in its history, received not only a changed icon, but also completely new content.
After two years of rumors and corporate secrets, Apple Music appeared in the set of pre-installed applications on Apple firmware, which automatically replaced the previously existing Music application.
When launching the updated application for the first time, users are faced with the need to subscribe. You can choose an individual or family subscription, which differ not only in the number of users, but also in price. If you don't want to pay a tidy sum right away, you have the right to a trial use of the service, which lasts three months, during which you can listen to music absolutely free.
If you are intimidated by the transition to the purchase confirmation page, you can rest assured - the program does not withdraw money, but checks your solvency in order to automatically write off the required amount when the free use period ends.

A few minutes after the system determines whether there is music on the device, and having found it, processes it and adds it to the library, you can proceed to get acquainted with the proposed new products.
It would seem that everything is just perfect - the new application works like a clock, a huge amount of music for every taste and budget, just have time to browse and buy, but that’s not the case.
As it turned out during the study of the vastness of the Apple Music music library, the program does not even allow you to listen to some compositions and even entire albums. At first, you might think that Apple simply didn’t reach an agreement with the artists and didn’t add their music to the collection, but when it comes to popular groups and performers, this seems unlikely.
Then a lot of other unpleasant thoughts about this appear, and users go to technical support forums to share their grief with fellow sufferers.
In fact, everything is much simpler than the offended users of Apple technology thought, and Apple did not deny them the pleasure of listening to the music of their favorite artists.

The fact is that those users who tried to buy music from popular punk and rock bands, whose lyrics contain profanity, encountered problems when trying to download. Such content, according to Apple's rules, fell into the Explicit category, and the application blocked access to it. Moreover, the ban turned out to be so strict that the utility does not even pay attention to the user’s age.
Despite the seriousness of the restrictions, this is not a reason to be upset, since there is a very simple and easy way get around them.
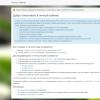
In order to disable blocking content with an Explicit rating, you need to go to settings - “General” and select “Restrictions”. Here we click “Enable restrictions”. To do this you will have to enter a password. If you have not used this section of the settings before, at this stage you will have to set a four-digit security code.
Image-slider__item" data-cycle-pause-on-hover="#slider_201 .image-slider__crop" data-cycle-pager="#slider_201 .image-slider__pager" data-cycle-prev="#slider_201 .image-slider__prev" data-cycle-next="#slider_201 .image-slider__next" data-cycle-swipe="true" data-cycle-loader="wait" data-cycle-allow-wrap="false">


Experienced users of Apple gadgets and services feel like fish in water when working with iCloud and iTunes. However, newbies may have some difficulty understanding the iCloud symbols in the service in the iTunes app. We will tell you below how to figure out why this or that icon is needed, as well as find out how this or that song was obtained.
In contact with
How to Enable Icon and Status Columns in iTunes on Mac or Windows
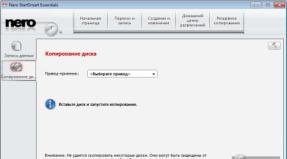
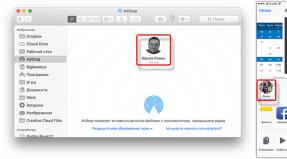
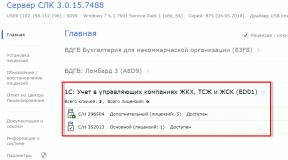
If you want to view icons and states, you need to enable the columns "" and " iCloud Status" To do this, open iTunes on your computer, select the “ My music" (icon " Music"top left) and on the right sidebar click on " Songs" Next you need to right click computer mouse(you can also use the left one, but in this case you still need to press the Control button) click on the top line (where the column names are) in the main iTunes window.
Please note that next to "" and " iCloud Status" there were flags. If they are not there, you need to select "" or " iCloud Status" and activate these columns.

"Available for download"– this symbol means that the song is in the iCloud library, but not saved on the computer.
"Duplicate"– this icon appears if the song you selected is already in iTunes. The symbol is usually next to duplicates that weren't included in your iCloud Photo Library.
"Expectation" or "Not sent"– the symbol means either that the current process of matching a musical composition is currently in progress, or that the music track was uploaded to the library from an iOS device, but is not matched and cannot be sent from an Apple computer or PC. In the latter case, delete the track and add it to the iCloud Music Library again.
"Deleted"– This symbol means that the audio file was deleted by the user from iCloud Music Library from another computer. If you delete a music track from your library, it is immediately deleted from all synced iOS devices, but at the same time it remains on others connected computers, and you can delete it manually.
"Inconsistency"– the icon appears next to elements that cannot be added to the library. This often happens if the track was not purchased from the iTunes Store or with a different Apple ID. Files larger than 200 MB, longer than two hours, or with a bitrate less than 96 Kbps are also not supported.
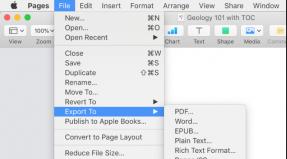
"Error"– symbol means that the file is damaged or an unexpected error occurred while loading it. You can try to fix the problem by updating your media library. To do this you need to go to " File", click on " Media library" and select " Refresh iCloud Library" If this doesn't help, re-import the track from your iTunes library.
"No longer available"– this icon indicates that the selected item is not available in Apple Music.
The iCloud icons found in the Search box area in the upper right corner of the iTunes window
Near " Search"in the right top corner iTunes may also display " Connection" And " Disabled».
Icon "Connection" Occurs when iTunes connects to iCloud Music Library or pushes updates.
Symbol "Disabled" indicates that your iCloud media library is unavailable. The problem may be due to a lack of connection (for example, no Internet access) between iTunes and iTunes service Store (Apple Music) or exceeding the limit on the number of objects in the iCloud library (limit of 100 thousand songs).