Basics. About the configuration as a development tool for this configuration
Why does the error occur?
Generally speaking, the often used concept “1C Information Base” is complex - it includes not only the database as such, but also configurations.
- If a database is, relatively speaking, “what” is stored. For example, user input, summary data;
- That configuration describes “how, in what form” this information is stored, its structure.
For a figurative and very close to the truth comparison, we present a simple table, for example, a directory of employees of an organization:
- The table columns (full name, telephone number, address) form the structure of information and are determined by the configuration created by 1C developers and programmers;
- The rows of the table and the values in them (Ivanov Ivan Ivanovich, 8-777-666-55-44, Razdolny region, Volny city, Svobodnaya street) constitute the data itself, that is, the information entered routinely by users:
Let’s complicate things a little: in the 1C information base there are at least two configurations:
- The main configuration (hereinafter referred to as OK) is what programmers work with, changing or creating new documents, reference books and reports for users.
- Database configuration (hereinafter referred to as K.D.D.) - this configuration affects what users “see” while working with the program. If it has changed, then users will also “see” these changes. Developers cannot directly modify it, changes are inherited by K.B.D. from the main configuration.
Let's return to our example: at the request of the user, the 1C programmer, using the configurator tools, edited the employee directory table, adding an additional column Date of Birth. To do this, he had to go through two stages:
- At the first stage, the necessary changes are made to the main configuration, that is, the Date of Birth column is added to the table;
- At the second stage, the database configuration is updated, that is, it is inherited from O.K. changes made at the previous stage.
Thus, the error “The database configuration does not match the saved configuration” discussed in this article occurs when the first stage has already been completed (changed O.K.), but the second (updating K.B.D.) has not yet been completed - two configurations differ and do not correspond to each other.
Finally, before moving on to solving the problem, let us once again draw attention to the fact that the second stage, that is, updating the C.B.D., may not be completed not only due to the programmer’s decision to postpone it, but also, for example, due to for abnormal premature completion of the configuration update.
Important: Before each modification of the infobase and other files related to 1C, do not forget to make backup copies. How to do backup bases in 1C 8.3 read Or watch in our video lesson:
What to do?
There are several possible action algorithms; the choice of any of them depends on various factors: the qualifications and authority of the user, the area of responsibility for 1C administration, etc.
Ignore changes
If you have not made any changes to the main configuration, but you need to continue working in the 1C Enterprise 8 program, including until the moment when the person responsible for the update completes his work, that is, completes the 2nd stage. Or, until the reasons for what happened are clarified and corrections are made, you can ignore this error message.
Just each time you start the information base, agree to the proposal to continue by clicking the “Yes” button. The functionality of the application will not change from this, it will remain the same:

You can forcefully remove this message altogether by registering the key /DisableStartupMessages in the infobase startup parameters:
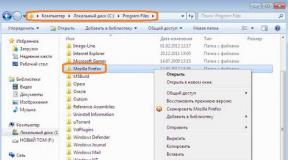
- In the launcher window (marked “A”), select our database and click the Edit button, after which the window for editing information security properties (marked “B”) will open:

- By clicking the Next button, we will scroll through the first properties page and go to next page, where you can specify the IS launch parameters. In property Extra options launch set the /DisableStartupMessages parameter:

- Click the Finish button and return to the launcher window, where we launch IS using the 1C:Enterprise button:

Now, when you start the 1C 8.3 database, you will not see the start message: “The database configuration does not match the saved configuration” and the 1C Enterprise program will start in the usual manner.
Note: In addition, this parameter suppresses the following startup messages:
- “Your computer does not have enough capabilities to edit the configuration help. To edit the help you must install Microsoft Internet Explorer versions 7.0 or higher”;
- “Your computer's capabilities are not sufficient to edit HTML documents, including help topics. To edit html documents you need to install Microsoft Internet Explorer version 7.0 or higher. In this launch, editing html documents will not be available.”
Accept changes
- Use the main menu command: Configuration – Update database configuration;
- Press the F7 key on the keyboard;
- Click on the special button on the toolbar (see image below);
- During the debugging process (for information; will not be discussed in the article):

Note: By default, the configuration window that opens on the left is the main configuration; iconin the window title indicates that it has already been changed and is different from the database configuration. The latter is opened by the main menu command: Configuration – Database configuration - Open database configuration.
Some time after the update command, the final Reorganize Information dialog box appears, serving as a final warning that the change to the database configuration is irreversible. The window lists the changes that will take effect after clicking the Accept button:

Reject changes
Under exactly the same conditions listed in the first paragraph of the previous chapter, you can decide to roll back the changes to the main configuration, that is, remove them, bring this configuration to a state corresponding to the state of the database configuration.
To do this, execute the main menu command: Configuration – Database Configuration – Return to Database Configuration:


So, having agreed to continue, we roll back O.K. to the database configuration.
On the website you can familiarize yourself with the configuration of 1C Accounting 8.3.
To learn how to work in the 1C program, study all the functionality and
This article does not describe techniques for using automatic and automated configuration updates using external components and/or software products. You can find information on them on this and other Internet resources.
You may have noticed that with each update, the number of objects requiring your attention only increases. At the same time, you know for sure that, for example, only one document has been changed, and when updating, a list of several dozen changed objects is given. Of course, you can use the technique described in the article “Technology for updating non-standard configurations of 1C: Enterprise 7.7” dated June 27, 2003. Yes, it will work. Many people perform updates this way. But I think this approach ineffective and labor-intensive when updating configurations on the 1C:Enterprise 8 platform. Unlike the 1C:Enterprise 7.7 platform, the 1C:Enterprise 8 platform allows you to open several configurations simultaneously (*.cf files) and perform several comparisons of configurations in one copy of the configurator. The only exception is, perhaps, configurations built on PPM (Manufacturing Enterprise Management) - they are too heavy, the platform falls.
The process of updating 1C:Enterprise 8 configurations is more automated compared to 1C:Enterprise 7.7. A fairly high level of automation can significantly reduce the labor intensity of updating atypical configurations. Unfortunately, most often the process of updating non-standard configurations cannot be performed completely automatically and requires the intervention of a specialist.
Is it possible that the update process will be completed completely automatically? Certainly. To do this, mutable objects must be added and must not use the functionality of the existing configuration. Those. these objects must solve completely different accounting problems that expand the functionality of the standard supplier configuration. Agree that the situation described is extremely rare. Changes almost always affect standard vendor configuration objects.
Please note that the database can contain up to three types of configurations:
- database configuration – this is the configuration with which users work;
- working configuration (main) is a configuration that we can make changes to and users can continue to work;
- vendor configuration – This is the initial configuration of the supplier, on the basis of which working configuration And database configuration. A database can have multiple configurations from different vendors. The configuration supplier can be not only 1C.
In case the configuration is removed from support, vendor configuration will not be. Which in turn significantly increases the complexity of the update.
Let's look at the update process and analyze possible mistakes using the example of updating the configuration of the soft starter (the supplier of the standard configuration is 1C, modifications by the Inform Service company). Initially, this configuration was updated not using the technology described in this article, so the errors discussed in this article are the most common in practice. The update will be from version 1.2.6.2 to version 1.2.14.1.
Stage 1. Preparation.
At the first stage, we will bring into correspondence working configuration To vendor configuration. This is a very important stage, which will significantly reduce the amount of work required to analyze the changes we have previously made.
You can skip this step if Last update passed through “support” (Menu “Configuration” U94; “Support” U94; “Update configuration”) or was performed according to the method described in this article.
Version mismatch working configuration And vendor configuration may occur when you use *.cf files for updating that are not from the supplier’s distribution or when using update methods different from those described in this article. For example, objects were added to the working configuration by copying via the clipboard or Drag&Drop.
1. Comparison of versions.
Let's check the version numbers working configuration And vendor configuration. Number working configuration look in the “Configuration” menu U94; “Open configuration” menu “Edit” U94; "Properties". In the “Development” block, select “Version”. (Picture 1).

Number vendor configuration look in the “Configuration” menu U94; "Support" U94; “Support Settings...” item “Version”. (Figure 2).

If the numbers match, then move on to the next step. Cm. .
IN in this example needs to be brought into line working configuration And provider configuration with support for objects removed from support or added without support. To do this, perform the following steps:
2. Saving the working (main) configuration.
Let's save working configuration to a file, for example work.cf. To do this, select the menu item “Configuration” U94; “Save configuration to file...”.
3. Obtain the update file for the provider configuration.
To match the configurations, we need a *.cf file from the supplier's distribution with the same version number as working configuration(Figures 3 and 4). This file can be obtained by installing the appropriate distribution. By default, the configuration distribution is installed in the C:\Program Files\1cv81\tmplts\ directory. For more information about installing configuration templates, see the documentation.


Let's check the template directory. If there is a *.cf file of the required version in the templates directory, then go to .
What can you do if there is no *.cf file of the required version? vendor configuration? In this case, you can use *.cfu files and, repeating the procedure described in Stage 1 several times, successively raise the version number to the required release, in this case to 1.2.6.2. It should be noted that using *.cfu files may not fix errors made earlier during the update. Which, you see, is quite strange, given the fact that first the supplier file is compiled based on the *.cfu file, and then the update is performed. This may be due to the fact that for some reason not all configuration objects are included in the comparison. Therefore, I suggest using a possibly longer path, but also a more reliable one.
You need to create an empty database with "old" vendor configuration. Update provider configuration to the required version and use it when performing work at stage 1. For getting "new" vendor configuration you need to do the following:
Creating the "old" supplier file for the current configuration. The 1cv8.cf file can be taken from the supplier's distribution or saved from the working database if the configuration is under support. To save the 1cv8.cf file from the working database, you need to go to the “Configuration” menu U94; "Support" U94; “Support setup...” click the “Save to file” button and specify the directory and file name. For example, on the desktop.
Create a database with the new provider configuration. The database can be created using the supplier's distribution from the ITS disk or using the 1cv8.cf obtained earlier from the desktop. In the first case, we follow the instructions included in the distribution kit. In the second case, to create a database from a file located on the desktop, create a new one information base without configuration and launch the configurator. In the "Configuration" menu U94; “Load configuration from file...” indicate the file previously saved on the desktop. Open the configuration through the “Configuration” menu U94; “Open configuration” and update to the desired release through the “Configuration” menu U94; "Support" U94; “Update configuration” using *.cfu files.
Create a "new" provider configuration file. To do this, select the item in the “Configuration” menu U94; “Save configuration to file...” We specify the location and name of the file 1cv8.cf. Click “Save”.
4. Matching the operating configuration and the supplier configuration through an update.
Using the resulting *.cf file vendor configuration Let's update. To do this, select the menu item “Configuration” U94; "Support" U94; “Update configuration”, “Select update file”, “Finish” (Figure 5), “Run” (Figure 6).


Solutions:
- unmark an object that is in the supplier configuration;
- remove the reference to the object that is in the provider configuration.
Based on the fact that the link in the added “Department Head” interface is made to the object vendor configuration, support for which has been withdrawn by the supplier (possibly due to a change in accounting methodology), then the correct solution in this situation would be to remove the link to this report from the “Department Head” interface. We do not close the configuration comparison window; we delete the link to the “Payment for Orders” report in the “Department Manager” interface. After removing the link, we will compare the configurations again. To do this, click the “Update” button in the update window (Figure 6).
5. Restoring settings partially lost at the previous stage.
To restore partially lost settings, merge with a previously saved file working configuration work.cf. To do this, select the menu item “Configuration” U94; “Compare, combine with the configuration from the file...”.
6. Saving the update results.
Let's save the changes working configuration and update database configuration. To do this, select the menu item “Configuration” U94; "Update database configuration."
Here another problem awaits us (Figure 8).

To solve this problem, let's look at the cause of its occurrence. There may be several reasons, but the most likely are the following. These objects have been copied to working configuration from vendor configuration or the supplier previously deleted these objects and later added new ones with the same names, but with different internal identifiers. As a result, objects with different internal identifiers, but with the same names, appear in the configuration.
We deal with roles simply - we delete them, because the roles have not changed (this can be verified by comparing and working configuration). We act differently with document details. The attribute must be renamed, for example OrderReserve1, and after updating, the values from the renamed attribute must be transferred to the new one. To do this, you can use the processing of UniversalSelectionAndProcessingObjects.epf from the ITS disk.
Let's consider another situation similar to the previous one, but which arose during the update of 1C: Enterprise Accounting 8.1. What to do with forms? (Figure 9)

In the picture we see that the ListForm was removed from the supplier and then added by the supplier new form with the same name. Accordingly, you need to mark both forms for updating and click the “Run” button.
If you receive a message that there are links to objects to be deleted, you must, without closing the update form, clear the links to the form to be deleted in the object properties. In this case, in the register properties. After this, you need to click the “Update” button in the update form, mark the register properties for updating and click the “Run” button again.
Let's save the changes working configuration and update database configuration"Configuration" U94; "Update database configuration."
If necessary, transfer the values of the OrderReserve1 attribute to OrderReserve using external processing in 1C:Enterprise mode.
Stage 2. Update.
After carrying out the preparatory work at Stage 1, we proceed to the update basic configuration and transfer of previously made modifications to the supplier’s standard configuration.
To update the configuration, we need a *.cfu file or a *.cf file from the supplier's distribution. You can read more about how to obtain them.
If the update is performed through several versions of the configuration, then you should pay attention to the situation described in the article. If the update is not performed on a working base, then after completing the preparation of each new stage, we save the *.cf files. They will be needed when updating the configuration of the customer's production database.
If the update is carried out through several versions, then during the update you should definitely pay attention to the objects that are deleted and to objects with changed names, as well as to the actions performed during the first launch after the update. If these objects are used in processing at the first start after the update, then they should not be deleted, and for objects with changed names, appropriate changes should be made to the text of the processing module. In this case, the objects left behind may be deleted during the next or next update.
If the update is performed through several versions, then to reduce the labor intensity of the update, you can use the method of calculating key releases, described in the article “Updating 1C:Enterprise 8 configurations. Jumping through 20 versions.”
1. Preparation of databases.
So, based on the results of the first stage, we prepare two identical databases. The first (main) is our future result. The second (auxiliary) is for performing comparisons, opening configurations and other preparatory actions. For the file version, this is simply copying the files of the main database to another directory and connecting this directory to the list of databases; for the client-server version, it is uploading/downloading.
2. Three-way comparison of configurations.
Let's open both databases in Configurator mode and perform a three-way comparison of configurations in both databases, using the existing supplier's new configuration file. To do this, in both databases, select the “Configuration” menu item U94; "Support" U94; “Update configuration”, “Select update file”, “Finish” (Figure 10).

As a result of comparing three configurations ( old vendor configuration, new vendor configuration And working configuration) we get a list of changed objects. Set the filter “Show only twice changed properties” (Figures 11 and 12).
It is these objects that need to be dealt with first, because... After the update, previously made settings may be lost.


At this point, we suspend work in the second (auxiliary) database and continue in the main one. There is no need to click the “Run” button in the auxiliary database. We need this database exactly in this form until the update process is completed.
So, as a result, we get a list of objects that were changed twice during revision typical configuration and in . If you agree to the update, then previously made improvements to these objects will be lost. Therefore, for each object it is necessary to make a decision on how it will be updated (Figure 13). At this stage, we perform a preliminary comparison solely in order to reduce the amount of work in the future. The assessment is not accurate and quick - “by eye”.
new supplier configuration, then we leave an instance of the supplier object. Leave a checkmark. Then we will transfer the changes from working configuration.
If there are more changes in the object in working configuration, then we leave an instance of the object working configuration. Uncheck the box. Then we will transfer the changes from vendor configuration.
We deal with modules a little differently, because... We have the opportunity to compare modules procedurally. Those. in case in our configuration and various module procedures have been changed in the supplier’s configuration, then by correctly checking the boxes we will save ourselves from manually transferring code changes. To get to this, press the button as shown in Figure 14.


After we have decided on the objects that will be updated immediately and on which there are still checkmarks, we duplicate the state by checkmarks in the auxiliary database, and in the main database we press the “Run” button. In the main database we get an almost ready-made configuration.
Next, we perform all comparisons in the auxiliary database. We already have one comparison - a three-way one. To determine previously made changes, run additional second comparison old vendor configuration With main configuration. To do this, select the item in the “Configuration” menu U94; “Compare configurations:”, select for comparison “ Provider Configuration" And " Basic configuration

In a similar way we compare old vendor configuration with new one. For comparison we need a file new supplier configuration. If there is no such file, now it can be obtained from the main database. To save to a file new supplier configuration in the main database in the “Configuration” menu U94; "Support" U94; “Support setup:” click the “Save to file” button. (Figure 2). Specify the file name, for example, new.cf. Next, we make a third comparison of configurations and when comparing, specify the new.cf file as the second configuration.
So we got in additional base list of twice modified objects. And two more comparisons that will help us more effectively transfer previously made settings from old version to a new one. In the main database we have an almost ready-made configuration, in which we need to deal with twice changed objects.
To reduce the time for analyzing changes to a standard configuration and, accordingly, for updating, it would be appropriate to comment on all changes made to the configuration, noting not only the changed text of the modules, but also the purpose of the changes made. For a number of reasons, this is very often not done. When performing an update, you are not interested in the reasons for making changes, but in their consequences. Namely, the need to preserve the functionality of the changed configuration. This may require not transferring the changed lines, but completely reworking the added (changed) code to fit the functionality of the new vendor configuration.
Comparison of forms, tables, and modules of objects in the configuration is performed with a sufficient degree of detail (Figure 17). This is quite enough for making decisions.

But in some cases, the data in comparison reports is presented in a way that makes it difficult to make a decision quickly. For example, in the case of changing the type of details that have a composite data type, the composition of those entered based on objects, etc. It is at this stage, due to its complexity, that improvements are lost during the update. Let's consider this situation using the example of details that have a composite data type. When generating a report on object comparison (Figure 17), the differing data in the compared configurations is presented in the form of lists containing the composition of data types, separated by commas. However, the report does not show at all what types of data were added or deleted. Of course, the report can be printed and “hidden” to identify differences. In the example under consideration, there are about 200 such objects. Obviously, the comparison process seems to be quite labor-intensive and will take about 50 hours.
To reduce the labor intensity of work when comparing objects, you can use the “Compare Cells” configuration developed by the Inform Service company. The labor intensity of work when comparing composite objects can be reduced by approximately 20 times.
The “Cell Comparison” configuration is launched in 1C:Enterprise mode and allows you to present information from the object comparison report in a visual form (Figures 18 and 19). For comparison, the capabilities of 1C:Enterprise 8 are used.


The configuration scheme is simple. In the configurator we create a report on comparison of objects (Figure 17) and save it to a file, for example Comparison Report.mxl. Open 1C:Enterprise and in the dialog (Figure 18) select the saved file and indicate the cells to be compared. To do this, double-click the right mouse button on the selected cell spreadsheet document. By clicking the “Compare” button, we get the result of the comparison, in which the different positions are highlighted in color (Figure 19).
Particular attention should be paid to RLS templates for changed user roles.
After completing the update and transfer of previously made changes to the standard configuration, we will perform syntactic control of the modules and check the operation of the changed objects. After successful testing, the configuration update process can be considered complete. Now all that remains is to update the external ones printed forms, reports and processing. For some configurations, it is necessary to check the reporting forms connected as external ones.
Stage 3. Delivery of work.
In the example given, the amount of work to correct errors made during previous updates, as well as updating to version 1.2.14.1 and transferring previously introduced typical configuration changes are about 100-150 hours. It is not possible to carry out such a volume of work by updating directly in the customer’s database. Respectively preparatory work must be performed on a copy of the database, and the result of the update transferred to the customer’s working database.
First, we carefully study the instructions from the distribution kit. We carry out necessary work before updating in the working database.
If no configuration changes were carried out in the customer’s working database during the preparation of the update, and the update was prepared on a current copy of the working database, then to transfer the settings, save the working configuration to a file, for example work_2.cf, by selecting the “Configuration” menu item U94; “Save configuration to file...”.
- Using the work_2.cf file, we transfer the changes. To do this, select the menu item “Configuration” U94; “Load configuration from file...”;
- When asked about updating the database configuration, we will answer yes.
If configuration changes were carried out in the customer's production database during the preparation of the update, then these changes must also be reflected during the update.
If the update was not prepared on a current copy of the working database, then to transfer the settings we will use the technique used in the first stage. To do this, we need a *.cf file of the standard configuration of the supplier (1.2.14.1) and the result of the update in the form of also a *.cf file. To do this, save the working configuration to a file, for example work_2.cf, by selecting the “Configuration” menu item U94; “Save configuration to file...”.
Further actions on the customer’s side will be as follows:
- create backup copy Database;
- Using the *.cf file of the standard configuration of the supplier, we will perform the update. To do this, select the menu item “Configuration” U94; "Support" U94; “Update configuration”, “Select update file”, “Finish” (Figure 10), “Run”;
- Using the work_2.cf file, we transfer the changes. To do this, select the menu item “Configuration” U94; “Compare, merge with configuration from file...”;
- Let's save the changes to the working configuration and update the database configuration. To do this, select the menu item “Configuration” U94; "Update database configuration."
Configuration, from the user’s point of view, this is a software solution tailored for specific business tasks. For example, there is a 1C: Trade Management configuration for automation trading operations. From the developer's point of view, the business logic of this software solution is implemented using specific configuration objects - electronic input forms, reports, directories, algorithms, etc. These objects are grouped as configuration tree:
Configuration objects purchased from a vendor are protected from modification by default. If the functionality of such a configuration does not cover some business tasks, then it can be modified - make changes to standard objects or add new ones. To do this, the standard configuration will have to be removed from support - through the menu Configuration -> Support -> Support Settings, Enable Editing:
Further improvements can be made. The modified configuration will differ from the standard one; both options ( basic configuration, modified, and vendor configuration, original typical) will be stored in the database; if necessary, they can be viewed and compared:
After making changes, they need to be “projected” onto the configuration in which the business data is directly stored - on database configuration. For example, after adding a new attribute to the main configuration, it will not be immediately available to the user, since the database configuration has not yet been changed. To update the database configuration, press F7; After the update, the database configuration becomes equal to the main configuration:
Summarizing. In each 1C database, there are three configurations at a time: supplier configuration, main configuration and database configuration. In a standard solution, without the change option enabled, all three are equal.
Each configuration consists of application objects grouped into a configuration tree based on the principle of similarity. For example, a tree of objects of type Document:
Each of the configuration objects can carry a certain logic specified algorithms; algorithms are written in program modules using built-in 1C language:
The number of configuration objects can be very large; For their arbitrary classification by purpose, the mechanism of subsystems is used. Each configuration object can be included in one or more subsystems. By selecting a subsystem, you can select the entire list of objects related to a given application task:
Question 01.02 of exam 1C: Platform Professional. Which object contains user-editable information?
- Configuration object
- Embedded language object
- Infobase object
- Answers 1 and 3 are correct
- All options are correct
Question 01.05 of exam 1C: Platform Professional. Select the correct set of associations "Object" - "file type":
- external processing - "epf", external report - "erf", configuration - "cf"
- external processing - "ert", external report - "mxl", configuration - "pfl"
- external processing - "ert", external report - "erf", configuration - "cfu"
- external processing - "epf", external report - "mxl", configuration - "cfu"
The correct answer is the first one. External processor file is an extension external treatments, External report file is an extension of external reports, Configuration file is an extension of a configuration file.
Question 01.21 of exam 1C: Platform Professional. What does the configuration consist of?
- Configuration Objects
- Embedded Language Objects
- Infobase objects
- Answers 1 and 3 are correct
- All options are correct
Question 01.27 of exam 1C: Platform Professional. What objects are used to describe the algorithm?
- Configuration Objects
- Embedded Language Objects
- Infobase objects
- Answers 1 and 3 are correct
- All options are correct
Question 01.34 of exam 1C: Platform Professional. Which configuration can be changed interactively in the configurator?
- Basic configuration
- Database configuration
- Provider Configuration
- External configurations
Question 01.57 of exam 1C: Platform Professional. Arbitrary classification of configuration objects is carried out using...
- properties Comment for the configuration object
- creating the "Classification" attribute
- using the Subsystem configuration object
- Options 1 and 2 are correct
- all options are correct
Question 01.63 of exam 1C: Platform Professional. How many infobases can there be with the same configuration?
- Only one
- Only two (working and demo)
- Unlimited
- Determined by the delivery package of the application solution
- Defined in configuration settings
Question 01.64 of exam 1C: Platform Professional. How many configurations must exist in an application solution?
- As much as you like
Question 03.13 of exam 1C: Platform Professional. In what case is it possible to change metadata in the configuration window?
- Always
- Basic configuration only
- For main and database configuration
- For provider configuration
- For a configuration opened from a file
From the user's point of view, the 1C program consists of a platform and configuration. We said that in each specific case one of many possible configurations is used. It's time to say that this is not entirely true.
Why Not So? Because in every infobase there are at least two configurations.
Why not at all So? Because the user really only ever works with one configuration. The second configuration is for the developer or the person who needs to make changes to the configuration (for example, a database administrator). It is “not visible” to the user.
The configuration intended for the developer is called Basic configuration(or simply Configuration– the one we edited in the Configurator). The configuration that users work with is called Database configuration.
The main configuration can be edited The database configuration cannot be edited, you can only update the database configuration based on the main configuration.
This internal organization allows you to make changes to the configuration without interrupting the work of users (since the changes are made to the main configuration). Then, once the developer is confident that all the changes he has made are correct, he can quickly update the database configuration using the master configuration. But to do this you will have to shut down all users.
The developer can always compare the main configuration and the database configuration, can return to original state main configuration using the database configuration (if, for example, you are completely confused about your changes).
Thus, the interaction of the two configurations can be represented as follows (Fig. 2.24):
Rice. 2.24. Interaction of two configurations
When a developer works with the main configuration, the system always tells him whether his version of the main configuration is different from the one that was saved, and whether the saved version of the main configuration is different from the database configuration.
If a developer edits the main configuration and the edited version of the main configuration differs from the one that was saved, a sign of modification of the configuration (*) appears in the header of the configuration tree window (*) - Fig. 2.25:
Rice. 2.25.
If the saved version of the main configuration differs from the database configuration, a configuration difference symbol appears in the header of the configuration tree window () - rice. 2.26:
Rice. 2.26. Configuration tree window title
To save the main configuration, use the Configuration à Save configuration command, and to update the database configuration, use the Configuration à Update database configuration command. When you execute the Debug à Start Debugging command, the system itself first saves the main configuration and then compares it with the database configuration. If the configurations are different, a request is issued to update the database configuration, which you saw in the previous examples.
When executing the Debugging à Continue command, the system, after the steps described above, also suggests restarting the application to terminate the current debugging session.
Thus, the system tries to make the developer’s life easier and automate frequently performed operations.
An important fact is that it is at the moment of updating the database configuration that the system creates (modifies) in the database those data storage structures that we described in the form of configuration objects.
Thus, the user adds ordinary directory elements to the database structure that the system created based on the Directory configuration object, and the system adds predefined elements of this directory to this structure itself, based on the same description of this structure, which is the Directory configuration object.
We will cover the basics of development application configurations using the example of automation of the activities of the Marina beauty salon. The salon employs a director, administrator, foremen and other employees. The main task of the craftsmen is to provide services to clients. The salon purchases materials from suppliers. Materials are consumed during the provision of services, and they can also be sold to clients - individuals or organizations.
We automate the salon's activities. In particular, it is necessary to automate the accounting of materials, accounting of the activities of craftsmen, and accounting of clients with the ability to assign special conditions of service for regular customers. It is necessary to automate payroll calculations for employees, create reports that will allow management to analyze the efficiency of the salon. In the course of solving the problem, we will encounter many other practical situations that require automation.
We will not strive to create a solution that can be used in practice. Our main task is to consider working with system objects, using a selected subject area to demonstrate the capabilities and features of the system. Although, on the other hand, our final configuration, after modification, can be used in practice.
Let's continue our acquaintance with the Configurator. Namely, let's start studying operations with objects.
1.3. Creating objects
The first operation with objects that we will master in the Configurator will be the creation of objects. There are several ways to create an object of the desired type. For example - by calling context menu group of objects and selecting the item Add(Fig. 1.9).
Rice. 1.9.
Pay attention to the icon that accompanies the menu item. The button has the same icon Add on the window toolbar configuration tree. The same command is duplicated in the menu Actions.
Please note that the same action in the Configurator can be performed in different ways.
We will not execute the described command for now. In the next lecture we will practice creating objects and other operations with them.
Above we used the concept of “object”, however, we did not explain it. If you are familiar with object-oriented programming methodology, the concept of "object" should be familiar to you. If not, let's look at a simple example that will help you understand the essence of objects. Imagine the configuration is a laptop. A laptop consists of separate parts connected together and interacting with each other. This is a monitor, keyboard, motherboard , CPU , RAM- the list can be continued for a very long time. Everything that our laptop consists of, its parts, are objects. Each object has a specific functionality.
It can communicate in some way with other objects, it has controls, it can communicate to other objects about its state. In a broader sense, a laptop is also an object. It can be controlled using the keyboard. It can display messages using a monitor. They make up the interface through which the user interacts with the laptop. configuration tree.
So, the object is a "detail" of the configuration. There are objects of various types - a list of them can be seen in the window
Now let's look at some other equally important actions that are performed in the Configurator.
1.4. Archived copy of the information base One of the most important service operations that you will constantly have to perform is creating an archive copy.
information base One of the most important service operations that you will constantly have to perform is creating an archive copy.
Archival copies of working databases should be made quite regularly in order to protect yourself from information loss. If you are going to perform any operation that may affect the normal operation of the configuration, for example - updating the configuration - before performing it, you must make a backup copy One of the most important service operations that you will constantly have to perform is creating an archive copy Please note that the archiving operation
is universal, like many other operations in the Configurator. That is, using the described commands you can make an archive copy of any configuration running on the 1C:Enterprise 8 platform. One of the most important service operations that you will constantly have to perform is creating an archive copy Make an archival copy
possible in several ways. The first one is to simply copy or archive the directory from.
information base The second way is to use the archiving tools built into the Configurator. Namely, if you execute the menu command Administration > Download infobase One of the most important service operations that you will constantly have to perform is creating an archive copy, a window will appear containing a standard request for specifying the name of the saved file. In our case, this is a file with the extension .DT. It contains an archived copy One of the most important service operations that you will constantly have to perform is creating an archive copy. In case of damage or loss you can restore it from an archive file with the command.
Administration > Load infobase remember, that information base
contains not only the configuration, but also a database that is formed when the user works with the system, that is, the data that he enters into the system in 1C:Enterprise mode. One of the most important service operations that you will constantly have to perform is creating an archive copy While loading information base and after that they created new object systems, entered some data in user mode. If after these steps you load the previously unloaded information base, it turns out that the changes made are lost.
1.5. Basic and Database Configuration
Information base stores two configurations. One of them is called main configuration or just the configuration. This is what we edit while working with the configurator and this is what we open with the command Configuration > Open Configuration. The second configuration is called database configuration. It is used during user work. Edit basic configuration possible while users are working with The first one is to simply copy or archive the directory from. database configuration To transfer changes to database configuration, you need users to finish working with the program. To open , run the command Configuration > Database Configuration > Open DB Configuration . Commands for changing objects in a window database configuration
locked down. configuration tree If, having opened the configuration, we make changes to it, for example, create a new object, in the window title

you will be able to see the icon: “*” (a sign of a modified configuration) (Fig. 1.10).
Rice. 1.10. basic configuration The "*" icon means that the changes made are not saved in
. That is, it signals that the changes we made at the configuration stage may be lost if, for example, there is a sudden power outage. "" After saving, the modified configuration icon disappears, but the configuration difference icon appears

(Fig. 1.11).
Rice. 1.11. basic configuration The configuration insignia indicates that changes made to database configuration.
, have not yet been included in basic configuration To transfer changes from database configuration V , you need to run the command Configuration > Update Database Configuration basic configuration. If changes made to . Commands for changing objects in a window were not saved before executing this command - system, before updating
, will prompt you to save your changes first. . Commands for changing objects in a window When updating database configuration the system displays a window with a list of changes that will be made to

(Fig. 1.12).
Rice. 1.12. If you agree with the list of changes, click on the button Accept , otherwise - to the button.
Cancel configuration tree Signs of differences in configurations and modifications can be displayed in the window title basic configuration simultaneously. If you made changes to the configuration, save database configuration without updating
, and then continued to make changes - both icons will appear in the window title. basic configuration If you have made changes to database configuration, saved them but haven't updated them yet . Commands for changing objects in a window, you can return to basic configuration, reversing the changes made in basic configuration database configuration. To do this you need to run the command Configuration > Database Configuration > Return to DB Configuration.
The configuration can be saved to a file and loaded from a file. To save basic configuration run the command into the file Configuration > Save configuration to file. To load the configuration from a file, run the command Configuration > Load configuration from file. The downloaded configuration is stored in a file with the .CF extension.