Transferring the boot environment to disk d. How to transfer the boot sector? Checking and editing BCD
They already have an operating system installed, and on the second you installed Windows 7.
There was a need to remove from hard system drive that doesn't have Windows 7
installed. But it turned out that without this disk your system will not boot
wants.
This happened because one of the three conditions for successful
downloads:
- the partition from which the boot is performed must be active;
- The partition's boot sector must be compatible with
bootmgr; - the active partition must contain download files operating system.
For Windows 7 this is the file bootmgr and data warehouse
boot configuration ( BCD), located in a hidden and
system folder Boot.
drawing
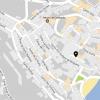
The screenshot of "Disk Management" shows that drive C:, on which the
Windows 7, not active. The active drive is D:. Windows 7 download files (they are
hidden and system) on drive C: will also not be detected. Task: transfer
bootloader from drive D: to drive C:, that is, ensure compliance with the above
conditions.
Using the installation disk or disk
Windows 7 recovery
With these disks, transferring boot files is easy. Physically disconnect the "unnecessary" hard drive, boot from the disk, installing in
BIOS CD-DVD drive first boot device, enter Wednesday
recovery After scanning and searching is completed
installed operating systems, perform "Startup Repair". Program
recovery will prepare the hard drive as necessary and copy it to it
necessary files. After rebooting, you will be able to download
restored.
If you don't have any installation disk, no recovery disk, you can
use the method described below.
Transferring download files using the utility
bcdboot.exe
Conventionally, the upcoming operation can be divided into three stages, corresponding three necessary conditions for successful loading.
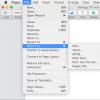
- Let's make the disk active. There are two ways to do required section
active. First: go to the "Disk Management" snap-in (Win + R, in the "Run" line type diskmgmt.msc and click OK) and see what letter is assigned to the first disk partition on the left that you plan to keep. We will make this partition bootable and active: right-click on the selected partition and select context menu"Make the section active." Please note that this section must have a "primary" attribute. Second: run command line with administrator rights. All commands discussed below will be executed sequentially without exiting the command line. DISKPART list disk sel disk X list partition sel part 1 active exit where X is the number of the disk that is supposed to be left in the list of disks (command list disk).
- We rewrite the boot sector (make it compatible with
bootmgr): To do this you will need a utility bootsect.exe, which, in the absence of an installation disk, can be taken. Download and unpack it in advance, for example, into the root directory of the C: partition. c:\bootsect /nt60 All /force note: experience shows that if there are 2 or more HDD keys in the configuration /force necessary. - We transfer the BCD and the bootmgr file to the new active partition: bcdboot %Windir% /l ru-Ru /s С: - key /l- selecting language settings for the download manager. If your system is not Russian-language, use other values for this key, for example, for in English- en-Us, for German - de-DE, etc. - key /s- specifies the volume letter assigned to the target system partition to which the boot environment files are copied. This is the section that we have made active. Because the command firmware defaults to the current system partition(before removing the hard drive - this is partition D:), using this key with the letter of the intended boot partition - Necessarily!
Checking and editing BCD
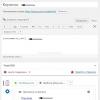
Run the commandbcdedit /store C:\boot\bcd

Based on the results of the command, check the parameters (underlined on
screenshot):
- in the "Windows Boot Manager" section the option device
must be equal to the letter of the new active partition, in our case -
And
osdevice must be equal to the letter of the partition you are currently on
Windows directories are located. In our case, this is also
WITH:. - in case of discrepancy, make the necessary changes using
commands:
The identifier (current) can be (default), or generally alphanumeric.
Then in commands you need to use the one that is used for loading.
Thus, transferring download files to another drive is not that difficult
task.
Instead of a conclusion, or "Russian-language menu
multiboot"
Due to the fact that the startup recovery program running from the environment recovery, uses default settings, boot manager language
becomes English. If you have one bootable system, this is not noticeable, but
If there is a multiboot menu, it catches your eye. If you are not happy with this,
run on the command line:
bcdboot %Windir% /l ru-Ru You need to run it after transferring the boot files to the new partition.
Step 1: Saving MBR
1. In Acronis Disk Director, right-click the disk whose MBR code
F2 to switch to mode
Shift, use
arrow keys to select the first 445 bytes of the sector. This will select
MBR code and disk signature.
Clue. The exact position of the cursor is displayed in the field Position in the status bar
(in the lower right corner of the window).
4. Select an item Write to file on the menu Edit.
5. In the window Write to file select Review and specify the path and file name.
6. Click the button OK to save the file.
Step 2. MBR recovery
1. Create bootable media based on WinPE to be able to recover
system in case of failure. Bootable media is created using the Create Wizard
Acronis bootable media according to the instructions in the How to create
bootable media.
2. Start the machine from bootable media and open Acronis Disk Director.
3. Right-click the disk whose MBR code you want to restore, and
select item Edit.
4. In Acronis Disk Editor, press the key F2 to switch to mode
hexadecimal representation.
5. Place the cursor at the very beginning of the first byte of the sector (absolute sector 0 or 0000 in
hexadecimal) and press Read from file.
6. In the window Reading from a file select Review and specify the file with the MBR code.
7. Click the button OK. The contents of the file will be inserted into the sector starting from the current one
cursor position.
8. Press the keyboard shortcut Ctrl+S to save changes.
9. Reboot the machine.
Copy MBR to another drive
This operation applies to basic disks with an MBR partition scheme.
When moving a system volume from one disk to another, you must copy
Disk MBR code to the target disk if it does not contain an MBR or contains another
downloader application.
How to copy MBR to another drive
1. in Acronis Disk Director, right-click the source disk whose MBR code
you need to copy and select Edit.
2. In Acronis Disk Editor, press the key F2 to switch to mode
hexadecimal representation.
3. Place the cursor at the very beginning of the first byte of the sector (absolute sector 0 or 0000 in
hexadecimal notation). Then, while holding down the key Shift, use
Copyright © Acronis International GmbH, 2002-2014
annotation
Let's consider a situation where your system has more than one hard drive. One of them already has an operating system installed, and on the second you installed Windows 7. There is a need to remove from the system a hard drive on which Windows 7 is not installed. But it turned out that without this disk your system does not want to boot.
This happened because one of the three conditions for a successful download was no longer met:
- MBR must be compatible with bootmgr;
- The active disk must contain operating system boot files. For Windows 7 this is the file bootmgr and boot configuration data store ( BCD), located in the hidden and system folder Boot.
Let's consider the solution to the problem using the example of the configuration shown in the figure.
The screenshot of Disk Management shows that the C: drive on which Windows 7 is installed is not active. The active drive is D:. Windows 7 download files (they are hidden and system files) will also not be found on drive C:. Task: transfer the bootloader from drive D: to drive C:, that is, ensure compliance with the above conditions.
Using a Windows 7 installation or recovery disc
With these disks, transferring boot files is easy. Physically disconnect the “unnecessary” hard drive, boot from the disk, setting the CD-DVD drive as the first boot device in the BIOS, enter . After scanning and searching for installed operating systems is completed, perform Startup Repair. The recovery program will prepare the hard drive as needed and copy the necessary files to it. After a reboot, downloading will be restored.
If you do not have either an installation disk or a recovery disk, you can use the method described below.
Transferring boot files using the bcdboot.exe utility
Conventionally, we can divide the upcoming operation into three stages, corresponding to the three necessary conditions for successful loading.
- Let's make the disk active. There are two ways to make the desired section active.
- We rewrite the bootloader (MBR) (make it compatible with bootmgr):
- We transfer the BCD and the bootmgr file to the new active partition: bcdboot %Windir% /l ru-Ru /s C:
First: go to the "Disk Management" snap-in (Win + R, in the "Run" line type diskmgmt.msc and click OK) and see what letter is assigned to the first disk partition on the left that you plan to keep. We will make this partition bootable and active: right-click on the selected partition and select the context menu item “Make partition active”. Please note that this section must have a "primary" attribute.
Second: Launch Command Prompt with administrator rights. All commands discussed below will be executed sequentially without exiting the command line.
DISKPART list disk sel disk X list partition sel part 1 active exitwhere X is the number of the disk that is supposed to be left in the list of disks (command list disk).
To do this you will need a utility bootsect.exe, which, in the absence of an installation disk, can be taken. Download and unpack it in advance, for example, into the root directory of the C: partition.
c:\bootsect /nt60 All /forcenote: experience shows that if there are 2 or more HDD keys in the configuration /force necessary.
Key /l- selecting language settings for the download manager. If your system is not Russian-language, use other values for this key, for example, for English - en-Us, for German - de-DE, etc.
Key /s- specifies the volume letter assigned to the target system partition to which the boot environment files are copied. This is the section that we have made active. Since the command firmware defaults to the current system partition (before removing the hard drive, this is the D: partition), applying this key with the letter of the intended boot partition is Necessarily!
Checking and editing BCD
Run the command
bcdedit /store C:\boot\bcd
Based on the results of the command, check the parameters (underlined in the screenshot):
- in the "Windows Boot Manager" section the option device must be equal to the letter of the new active partition, in our case - and osdevice must be equal to the letter of the partition on which the Windows directories are currently located. In our case, this is also WITH:.
- in case of discrepancy, make the necessary changes using the commands:
Usually there is no need to run commands, but it doesn't hurt to check.
So, moving download files to another drive is not such a difficult task.
Instead of a conclusion, or "Russian-language multiboot menu"
Due to the fact that the startup recovery program running from the recovery environment uses the default parameters, the boot manager language becomes English. If there is one bootable system, this is not noticeable, but if there is a multiboot menu, it is noticeable. If you are not satisfied with this, run on the command line:
bcdboot %Windir% /l ru-RuYou need to run it after transferring the download files to the new partition.
When using multiple operating systems or hard drives, boot sector mismatch problems sometimes occur. This is usually caused by the files needed to boot the OS being located on a different partition or drive.
You will need
- Windows installation disc.
Instructions
Hello friends! In today's article we will create anew Windows boot loader 7. In what cases can this be useful?For example, Windows 7 does not boot and displays errors associated with a faulty bootloader, for example: "An operating system was not found" BOOTMGR is missing. Press ctrl+alt+del, NTLDR is missing when loading Windows 7. Or maybe you transferred Windows 7 from hard drive on solid state drive, but the system does not start from the SSD and displays an error or shows a black screen.You are trying to restore the operating system boot, but you are unable to do so.In such cases, you need to delete and then create againhidden section - System Reserved (Reserved by the system, volume 100 MB), this partition contains the Windows 7 download files.
When installing Windows 7 on a laptop or computer with a regular BIOS ( HDD MBR), a hidden System Reserved partition is automatically created (Reserved by the system, volume 100 MB), the purpose of which is to store and protect operating system boot files.This partition always has the following attributes: (Active, System, Primary partition), and the operating system installed on your computer starts from it.
If you assign a drive letter to this partition and in the folder options (view) set the parameters "Show hidden files" and uncheck the "Hideprotected system files", then inside you will see a "Boot" folder (containing a boot configuration store file - BCD), and a boot manager file "bootmgr".

For the success of our business, let’s remember the Windows 7 boot mechanism and the program will help us BOOTICE.
First of all, after turning on the computer, control is received by the BIOS subroutine, which checks the functionality of all components system unit, then the BIOS looks in its settings for the boot priority device (hard drive, flash drive, DVD) and, having found one (for example, a hard drive), reads from it boot entry MBR (Windows 7 is usually installed on an MBR partitioned disk).
MBR is located in the first sector boot disk, has a size of 512 bytes, and contains program code NT 6.x,
Which searches for the active partition from which the operating system can be loaded, this active partition After this, control passes


The operating system (in our case, Windows 7) is a program, and in order for it to work (start loading), you need to run the OS executable file:winload.exe or winload.efi. ZThe bootloader releases these files. ZLoader is a small program. Filewinload.exe starts MBR- the loader, and the filewinload.efi starts the EFI boot loader. Windows 7 in most cases is installed on a disk with an MBR boot loader.

Booting Windows 7 occurs in the following order:download manager"bootmgr" file processes the available information in the boot store (BCD file), and this is the menu, display time, list of operating systems (if there are several), and so on, if the data is correct, then the operating system is loaded. But! If at least one of the files I mentioned (bootmgr or BCD) turns out to be incorrect or missing altogether, then we are guaranteed to have problems booting the system.It often happens that the integrity of these files is violated due to some reason (careless user actions, installation of third-party boot managers, viruses, etc.), in this case standard actions to restore the bootloader may not help and then it is best to delete this partition completely, then format and create the download files again. How can I do that.
We delete the hidden System Reserved partition (Reserved by the system, volume 100 MB) and create it again using the built-in systemdiskpart command line utilities
We boot from the Windows 7 installation flash drive. If you don’t find the ISO image of the seven, you can use the download. Windows flash drive 8.1 or Win 10.
In the initial system installation window, open the command line using the keyboard shortcut Shift+F10.

Enter the commands sequentially:
diskpart
lis vol (this command displays letters, numbers, marks, size and file system. BUkva partition 100 MB (C:). Volume 1. Bukva section with installed Windows 7 - (D:).
sel vol 1 ( selecting the volume with which we will work - 100 MB (C:). Volume 1)
del vol ( delete the 100 MB volume).
After deleting a volume, an unallocated area of 100 MB appeared on the disk.
creat par prim ( create the main partition in this unallocated area)
format fs=ntfs ( create an NTFS file system on the partition)
assign letter C ( assign the letter C to the created partition)
activ ( make the section active)
exit (exit diskpart)
bootsect /nt60 C: /mbr (this command writes to hard drive required codes PBR ( Bootmgr) and MBR (NT 6.x))
bcdboot D:\windows /s C: ( create a bootloader for Windows 7 located on (D:),bootloader location (C:))
The download files have been successfully created.


This method suitable for those who have several hard drives, and they have an OS with a bootloader installed.
On these diskswe don't usebootrec /fixmbr and bootrec /fixboot toolsto update MBR and PBR codes. These commands only work with hard drive 0.
The bootsect command works with the disk that we specify. T The same applies to bcdboot.Without the /s parameter, bcdboot works with the active partition on hard disk 0. ANDThe /s parameter we use indicates the active partition of the desired hard drive.
Read also...
- Cadaques in Spain. My review and photo. Cadaques, Catalonia Cadaques Spain how to get there from Barcelona
- Shopping cart for an online store at the front or Writing modular javascript
- Falling snow on jQuery or html New Year greeting card template
- Where to see what version of Android is installed on an Honor and Huawei phone How to find out the Huawei serial number