Download the top panel for Windows 10. Using the Start menu
When switching to a new operating system, users have to get used to the changed interface. Sometimes it’s not without difficulties: for example, after the release of “tens”, many did not figure out where the control panel is in Windows 10. It’s not in its usual place in the Start menu, but you need to configure the system.
Opening methods
In order to find the Control Panel in Windows 10, you can use one of the three methods presented below.
Using quick search
In the new Windows 10, you no longer need to remember the locations of applications and services; you just need to use the integrated search. For example, to call the “Control Panel” you need to:
- Launch the built-in search by clicking on the magnifying glass icon next to the Start button.
- In the search bar that appears, enter “Control Panel” and it will appear in the results.

Using the Start Menu
You can go another way:
- Click on the “Start” button and open the “All applications” list.
- Find and expand the “Service” section.
- Click on the “Control Panel” link.

Advice! There is another, faster way, which involves using the “Start” button - right-click on it and select “Control Panel” in the menu that appears.
Using the Run menu
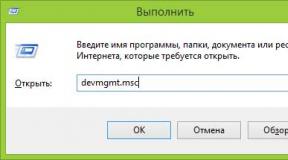
Also, the “Control Panel” is opened using the universal “Run” menu:
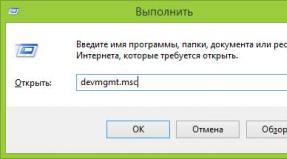
- Press the Win + R key combination.
- In the window that appears, enter “control” and click “OK.”

Pin an icon to the desktop or taskbar
If you use the Control Panel very often, then display its icon on the desktop or pin it to the taskbar. These operations are performed in different ways, but the effect is the same - you will get quick access to system settings.
Desktop
Displaying an icon on the desktop:
- Right-click on an empty space on your desktop and open the “Personalization” section.
- Go to the Themes tab and open Icon Options.
- Check the box next to “Control Panel” and click “Ok”.
 The icon for launching the management console will be pinned on the desktop along with the trash can and other necessary icons. You won’t be able to remove it; if you want to remove it, you need to go to the icon settings again and just uncheck it.
Task bar
Pinning an icon to the taskbar:
- Expand the Start menu.
- Find “Control Panel” among the utilities.
- Right-click on it and select the “Pin to taskbar” option.

Advice! You can add the Control Panel tile to your Start screen using the same method.
Video
The video shows 6 ways to open the control panel.
Conclusion
We figured out where the “Control Panel” is located in Windows 10, although Microsoft developers hid the necessary icon from users. If you often need to access management tools, then it is recommended to display the icon on the desktop - this is the most convenient way to have constant access to tools that allow you to customize the operation of the operating system.
It may not seem like it, but there are a wealth of docks available for Windows, that not only help with cleaning up the clutter of the desktop, but also make life easier if you deal with a lot of software.
These floating docks are basically graphical application launchers, that neatly organize your desktop and then run the installed programs on your system. All of them are highly customizable, allowing you to extend their usage according to your needs.
Apple may have made the dock popular, but these programs have taken the concept to the next level.
Organize Windows 10 Desktop with Docks
| S No. | App Name | Best for | Pros | Cons | Rating |
|---|---|---|---|---|---|
| 1 | Tons of features, plays nicely with other Stardock software | Premium product, only available as a trial | ★★★★★ | ||
| 2 | Users on older hardware | Snappy, high level of customizability | Limited display options, lacks support for 64-bit versions | ★★★★★ | |
| 3 | Novices, general use | Lightening fast, portable | Not updated for a while now | ★★★★★ | |
| 4 | Experienced users | Minimal, fast and stylish, support for plugins | Needs extra modules | ★★★★☆ | |
| 5 | Touch enable devices | Open source, intuitive circular design | Takes a little setup to get going | ★★★★☆ | |
| 6 | Regular and power users alike | Expert feature set, unmated tools, regular updates | Pricy premium version, free version lacks certain features | ★★★★☆ | |
| 7 | General use | Intuitive design, flexible and customizable | No longer updated | ★★★★☆ | |
| 8 | Power users | Several unique features, addons | Large footprint, rarely updated | ★★★☆☆ | |
| 9 | General use, older hardware | Open source, lightweight, works with portable apps | Lacks some advanced features | ★★★☆☆ | |
| 10 | General use | Simple, easy setup, low system requirements | No longer updated | ★★★☆☆ |
Here are 10 absolutely amazing docks that you can install on Windows 10.
1. ObjectDock
Stardock is one of the biggest names in customization on Windows, the company behind popular software products like WindowBlinds, Start10 and, well, ObjectDock. This dock sets up an animated launcher on your desktop, with app icons placed on a table.
You can neatly organize your shortcuts, programs, and running tasks on this dock, on any edge of the screen. Plus, it is also possible to add additional functionality to it, like widgets for weather, a clock or a calendar, and a handy little battery status.
Multiple docks can easily be set up, and initial set up is as easy as importing your Quick Launch shortcuts and pinned Taskbar items. Dockets can be configured that fly out and display folders and files.
A number of additional abilities are also available like creating as many docks as you want, adding tabs to them, and functionality like Aero Peek.
ObjectDock comes as a free 30-day trial, with the paid version priced at a very affordable $4.99. Well worth the price of admission.
2. RocketDock
RocketDock is simple, it’s popular, and it’s been around forever. This free application has been a fan favorite for ages, and people have been using it in several versions of Windows.
It is modeled after the launch toolbar on macOS and takes most of its cues from it. It sits along the edge of your desktop and allows you to pin shortcuts to your most accessed apps, files, and folders, with smooth zoom animations, and other transitions.

Although not as high in terms of unique features as ObjectDock, RocketDock still has all the basics covered like multi-monitor support, running application indicators, as well as a range of positioning and layering options.
You can also extend its functionality with add-ons, and it even has support for ObjectDock dockets, to go with some really nice skins.
If you’re going the free route, RocketDock is perhaps your best destination.
3. RK Launcher
Although not actively developed now, RK Launcher still remains is an excellent free dock utility for Windows that provides a way for you to add shortcuts to your most commonly used programs, files and folders.
And just like the other two docks listed above, this one comes with a simple and pleasing design. Along with the handy ability to minimize programs to the dock, making this a neat Taskbar replacement.

The dock can be placed in any corner of the screen, or on any edge, and a bunch of handy customization features allows you to change the appearance of RK Launcher with themes and custom icons. Additional functionality via dockets is also a possibility.
Ultimately, the fact is that the developer has abandoned this superb program weighs against it. What works now may not, with the next update that Microsoft releases for Windows 10. Until then, RK Launcher has well and truly earned its podium finish.
4.XWindows Dock
Another in the line of excellent docks for Windows that is no longer supported, this free program emulates the stylish macOS launcher to the tee. You get a complete rack of icons, placed in a simple and neat design that blends quite nicely with your working environment.
Although built for previous versions of the operating system, XWindows Dock is fully compatible with the latest versions of Windows 10, even as its name comes with a giveaway hint in its name that it has been designed for Windows XP.
Perhaps the most remarkable aspect of this dock is the level of customization it offers.

You get the ability to completely change its appearance, making it as fancy as you want. Your favorite apps and programs can be added, even links to certain Windows features look nice here.
XWindows Dock also comes with a plugin manager that although is a little complicated at first, can be used to add custom plugins. This is what is used to make most of the changes in this dock, which can make the program feel a little too basic and inflexible on the outside.
Yet, XWindows Dock is very customizable and richly filled with effects like reflections, transparency, shadow, and blur. It nevertheless remains one of the most stable and fast docks for the Windows platform, even if you will need to go looking for those additional modules to complete it.
5. Circle Dock
There are times when a name gives it all away, and this is one of those instances. Circle Dock does exactly what it says on the tin - and that is offering a unique and interesting look, circle-shaped obviously, for this fairly powerful dock.
But the visual look is not the only thing that’s different. For starters, it works in quite a unique way than regular docks.
That’s because it is not on the screen at all times, and you are required to initiate it first to use it.
This can be done by in a simple fashion with the mouse, which immediately makes Circle Dock appear next to your mouse cursor, wherever it is.

You will see all your pinned items as soon as the dock opens, with shortcuts to your apps and programs placed in a circular order. These can be accessed with a single click.
Not much customization options are part of what is, at the end of the day, a unique dock application, though the basic ones are here. The app also supports virtual desktops and plays nicely with multiple monitor configurations.
This free program is also available as a portable application, in case you don’t want to install it. But either way, Circle Dock is sure to add some new dimensions to your computer usage.
6. Nexus Dock
Why is that most products with the word Nexus in their name are usually all shiny and futuristic looking. Nexus Dock is no different and seems to have been designed to impress users with its stunning and stylish look.
Of course, it also helps that not only is this application one of the best designed in the, shall we say, docking business, but also very customizable.
It comes with 80 special commands, weather forecast, CPU and RAM usage monitoring, email notifications, and more. You can set custom icons for the items you place in your dock, which can go a long way to give your desktop a personal feel.
Speaking of the desktop, Nexus Dock can also double up as a replacement for the Taskbar, as it can show the minimized and running programs, as well as the System Tray right on the dock.

Other than that, you can expect top notch usability with this tidily designed application, ranging from the ability to pin your favorite apps and programs by moving them to the dock with your mouse, as well as support for files and folders.
Getting the hang of this program is easy, and performance, snappy.
Just like Stardock, Winstep is one of the more recognizable names in Windows customization. And while they have made Nexus Dock available for free, they also sell the pro version with more features for a somewhat substantial $24.95.
But you do get features like multiple docks, sub-docks, tabbed docks and more in the appropriately named Winstep Nexus Ultimate.
7. Slidedock
Just like Circle Dock, Sliderdock has a few neat tricks up its proverbial sleeves. It is different in that it allows you to easily add shortcuts to programs, files and folders to each circular dock by dragging and dropping them onto the rings.
Multiple rings of icons can be used, and it is possible to completely customize the appearance of the rings and icons, as well as the dock itself, in how it behaves.

Usage is simple enough - you can rotate the icons in each ring by using your mouse wheel, and you will have quick and easy access to all your icons this way.
The performance was smooth, and animations silky, in a dock that does bring something new to the ring. Pun and all.
8. Multibar
Quick possibly the most stylish dock in this list, Multibar has been designed with one goal in mind. And that is to get you to your files, folders, applications, and tools as fast as possible. Which is a noble enough quest, as far as goals go.
It helps that the developers have baked in the whole array of other features into this program, making it one packed solution for power users.
At first launch, Multibar will index your files and folders for use with the instant search feature. You can open the program with the simple press of a key on your keyboard (the default being the Windows key), and you will then be provided with a selection of quick launch commands.

Type in the name of the program or folder you want to open, and hovering over the icons to show the recently used files.
An important consideration for professionals and power users.
The settings panel comes with an ample set of options to customize the usage and look of Multibar, and it also houses the selection of skins to give the program a new themed look.
A weather forecast add-on is one of those that are available by default, and it shows a forecast for your location for the next 5 days.
With its souped-up feature set, tons of customizability, and support for added tools and add-on, Multibar is a sleek, intuitive, and more importantly, unobtrusive dock application for Windows 10. Take it for a spin to see if it's for you.
9. Appetizer
If you’re in the mood for a starter, then this free dock program is on the menu. Nothing fancy, just a simple and lightweight solution to organizing your shortcuts and folders into a convenient little dock.
You don’t get the flash and pizzazz of similar programs. Instead, Appetizer offers you elegance and grace in a frothy little package - pardon the puns.
What sets this program apart from some of the others is that it is open source.
It's free and will remain so.

Of course, open-source does not mean much if the program is not capable enough, and Appetizer checks all the right boxes when it comes to the basic features one would expect from a dock application for Windows 10.
Including things like the ability to resize it, support for custom icons, plugins and skins, and a convenient little wizard to automatically import shortcuts.
The organization of the icons is also simple, via dragging and dropping, and you can hide and show the dock with the press of a hotkey. It does miss out on some of the more elaborate features that are part of other docks, but that is to be expected.
Appetizer keeps things elegant and easy, and sometimes that is all you need.
10. Aqua Dock
Now, here’s an application that took macOS inspiration to heart. This docking bar is almost a carbon copy of the one available on computers that a certain fruity company makes. It even has the Aqua art style in its name, something that was popularized by Apple a decade or so back.
Regardless, this tiny program delivers in both looks and functionality.
You can hide the standard Windows 10 Taskbar, and rely on Aqua Dock completely if you want. It is even possible to make the actual dock transparent, in order to make the icons appear as if they are floating on the desktop.

Changing the dimensions of the dock is as easy as dragging the window margins to the desired size, and the program can also be configured to enlarge the icons when the mouse pointer hovers over them to bring some attractive animation to the mix.
Aqua Dock also offers an abundance of flexibility. You can drag and drop the executable file of any program, and its icon will be displayed instantly. And speaking of icons, any icon on the dock can be replaced with a custom one to keep things fresh and airy.

Good afternoon friends. We all want our computer desktop to look more beautiful. Users often use additional gadgets for this. This could be various clocks, temperature indicators, electronic voices, etc.
All these gadgets can be called additional visual effects. I already wrote that the extra ones slow down the system. But, now most users have fairly powerful computers with a decent processor, so most likely these visual effects will not affect the performance of your system.
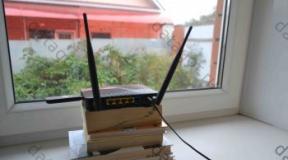
So, I want to introduce you to an additional panel for the RocketDock software. This panel is much more beautiful than the regular Windows panel. In my opinion, it resembles a panel. Many users find this panel more convenient.
It contains animation. When you select a specific program, it enlarges and moves. Nearby labels also enlarge and move slightly. It looks quite impressive. Many people use RocketDock for antlers, it’s nice to show off such a panel to your friends!
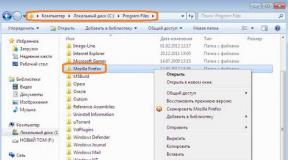
This panel quick launch free. We need to go to the official website and download RocketDock https://rocketdock.com/download. The program takes up only 6.20 MB. Which is quite small. Works from Windows 2000 to Windows 10. Please note that random access memory only 10 MB required. The processor for it is suitable from 500 MHz. In other words, any modern PC. So, let's install the program. During installation, select Russian language.
We launch the program from a shortcut on the desktop. We now have the panel itself.

Let's look through it. If you don’t like any of the shortcuts offered by the program, select it, right-click on it and click “Delete icon”.


For example, an icon with a black T-shirt takes us to a site with a non-existent page. Let's delete it. We insert into it those programs that you often use, and delete the rest. For example, my panel currently looks like this.


As you can see, I have updated most of the programs.
RocketDock panel settings
First of all, please note that the panel is located at the very top of the screen by default. This creates additional inconvenience. For example, if you have multiple tabs open in your browser, the panel overlaps them. These tabs become difficult to reach.
Therefore, I moved the panel down.
To do this, click on the TV panel with the right mouse button and select: Position on the screen - below. Now our panel is at the bottom. Looks much better. But, in my Windows 10, the regular panel overlaps ours. It doesn't look good.
What to do in this case? You need to raise it a little. Or make the regular Windows panel colorless. I'll lift it up a little. To do this, right-click on the empty RocketDock field and select context menu"Panel Settings".


If you forgot to set the Russian language when installing the program, you can do this in the top “General” tab. Select Language and look for “Russian” in the list provided. Next, if you want the panel to start along with the system (this may slow down the system startup), check the “Launch at startup” checkbox and OK.


If you need the settings to be saved in the Settings.ini file (the registry will be less overloaded), check the appropriate box. You can disable animation. Do you intend to remove any more shortcuts from the panel or add new ones? Set "Pin icons".
If you have a large monitor like I do, it will look better when we increase the icon size. To do this, go to “Icons” and use the slider to select the desired size. For example, I slightly enlarged the shortcuts in the panel.


Browse through all the other settings and choose the ones you like best. Also, I advise you to first set “Launch with the system” and see how quickly the system starts. If it is noticeably slower, it is better to uncheck this box and run the program yourself. To make it easier to understand the settings, I suggest watching a video where everything will be explained to you in detail about the program’s capabilities.
RocketDock setup video
I hope you this program will be useful. Good luck!
As you know, Windows XP had a convenient Quick Access Toolbar or Quick Launch. From the newer ones Windows versions it was removed for some unknown reason and some users may feel nostalgic for this tool.
For those who miss the Quick Access Toolbar, I will show you how to get it back in Windows 10. For Win7, this instruction is also suitable. So let's get started!
Right-click on the Taskbar, select Panels and then Create Toolbar...
But before that, copy the address to the clipboard, you will need it later:
You can, of course, manually follow the route:
\Users\[your username]\AppData\Roaming\Microsoft\Internet Explorer\Quick Launch,
but it's long and unsporting. In addition, the display must be turned on hidden folders and files.
Now you have to select a folder for Quick Launch. This is why we copied the address in the first step, so that we can now paste it into the field Folder below and press the button Folder selection.

When we clicked on Select Folder, the window will close and the Quick Access Toolbar will appear at the bottom right.

To make the Quick Access Toolbar more compact, you can remove headings and captions. Right-click on the Quick Launch panel and uncheck the items in the menu Show signatures And Show title.

The panel now has a familiar look. Now you can stretch it by holding the two vertical sticks to the left of the panel with your mouse. If they are not there, then check that the taskbar is not pinned (Right click on the taskbar -> Properties -> Pin taskbar). To drag Quick Launch closer to the Start button, hold down the mouse and drag it all the way to the left (see figure)

The Windows taskbar changed from version to version, but its purpose remained the same: launching programs and switching between them. This panel is used all the time, so it would be a good idea to customize it to suit your needs.
Choosing a location for the taskbar
Since the first versions of Windows, it has been the custom that the taskbar in the system is located at the bottom. Apparently, back then they could not predict the appearance of wide-format monitors. Nowadays, on huge screens, a wide taskbar takes up extra space. Therefore, it is better to place it vertically.
If your taskbar is undocked, you can drag it to the desired corner of the screen. Or simply specify the position of the taskbar by right-clicking on it and selecting Options.
Place icons in the center
By placing icons in the center, you will give the taskbar a Dock-like appearance. This is useful if you are used to working with a Mac. Besides, it's just beautiful.
To move icons to the center:
- Unpin the taskbar. To do this, right-click on it and uncheck “Pin the taskbar”. Then click on the taskbar again and select “Links” from the “Panels” menu item. Drag the icons to the center.
- Right-click on the "Links" menu and uncheck the boxes next to "Show captions" and "Show title."
To return the icons to their usual position, simply remove “Links” from the taskbar.
Disable the taskbar on additional monitors