Creating a Quick Launch Toolbar c. RocketDock is a quick launch pad for Windows. Adding a Quick Launch Tool
Classic panel quick access, the way we are used to seeing it in Windows XP, is absent in the “seven”. More precisely, in Windows 7 it merged with the taskbar and essentially became one with it. There is no longer a dedicated area to the right of the Start button where you could place shortcuts to frequently launched programs - now you can simply pin them to the taskbar, using its full width.
The design developers of Windows 7 OS clearly did not take into account users who were used to working with the old panel quick launch and considered it a useful and convenient tool. However, they still left a loophole - now the user can create it himself, and the taskbar will take its previous, familiar appearance. Let's see how to do this.
Adding a Quick Access Toolbar in Windows 7
- Expand context menu taskbar by right-clicking on free space on her. Click Toolbars >> Create Toolbar.
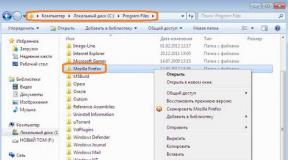
- Go through Explorer to the folder C:\Users\Account_Name\AppData\Roaming\Microsoft\Internet Explorer\Quick Launch and click the “Select Folder” button. But! The “AppData\Roaming” directory in Windows 7 is initially hidden. To get there, you can manually write a transition command in the address bar of Explorer. It should look like this: %appdata%\Microsoft\Internet Explorer\Quick Launch. There is no need to create new folders in other places if you do not intend to add shortcuts to them yourself. During installation of programs, when you check “Create a shortcut in Quick Launch”, it will be created in the Quick Launch folder.
- You will now see the Quick Launch folder appearing on the taskbar and located closer to the tray.
- To drag our future quick access panel to the Start button, that is, to where it should be, you need to right-click on the free space next to it and uncheck “Pin the taskbar” in the context menu.
- After this, “Quick Launch” can be moved to the left by grabbing the vertical dot separator with the mouse. Everything that gets in the way - language bar, running programs, will have to close temporarily.
- The next task is to remove text signatures from the quick launch panel - they were not there in Windows XP, and we don’t need them in the “seven”. Right-click on the dot separator and uncheck the “Show title” and “Show captions” items in the context menu. “Quick Launch” will then become more compact and neat - the way it should be.
- Next, to remove the separators, you need to enable taskbar docking again.
- If you change your mind about using the Quick Access Toolbar and want to return the Windows 7 working environment to its original appearance, as it was before all the manipulations, open the context menu of the taskbar and select “Properties” there.
- Open the “Toolbars” tab and uncheck the “Quick Launch” item. Confirm the action by clicking OK. As you can see, the quick access panel has disappeared.
It turns out that working Windows environment 7 is quite easy to set up in the “old style” if that’s more to your taste. It's also easy to return it to its previous form. Don't be afraid to experiment, and trust that everything will turn out just right.
Default in Windows 7 "Quick Launch Toolbar"" absent. For many users who worked on previous versions of the Windows line of operating systems, this tool was a good assistant for conveniently launching the most frequently used applications. Let's find out how you can activate it.
Adding a Quick Launch Tool
Don't look for it various ways adding the object we are describing to computers running Windows 7. There is only one activation option, and it is performed using the built-in tools of the system.
- Click on "Taskbars" right mouse button ( RMB). If in the list that opens opposite the position "Pin the taskbar" is checked, then uncheck it.
- Repeatedly RMB click on the same place. Move the cursor over the position "Panels" and in the additional list follow the inscription "Create a toolbar...".
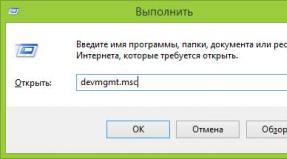
- A directory selection window appears. In area "Folder" enter the expression:
%AppData%\Microsoft\Internet Explorer\Quick Launch
Click "Select folder".
- Between the tray and the language bar there is an area called "Quick Launch". Click on it RMB. In the list that appears, remove the marks next to the items "Show title" And "Show signatures".
- We need to drag the object we formed to the left side "Taskbars", where he usually is. For convenient dragging, you should remove the element of changing languages. Click on it RMB and choose an option "Restore language bar".
- The object will be unpinned. Now move your cursor over the border to the left of "Quick Launch Toolbars". At the same time, it transforms into a bidirectional arrow. Clamp left button mouse and drag the border to the left side "Taskbars", stopping in front of the button "Start"(on her right side).
- After the object has been moved to its usual location, you can collapse the language bar back. To do this, click on the standard collapse icon in its upper right corner.
- Next, all that remains is to secure it. Click RMB By "Taskbars" and select a position in the list "Pin the taskbar".
- You can now add new applications to "Quick Launch", dragging the labels of the corresponding objects there.


As you can see, there is nothing complicated in the activation procedure "Quick Launch Toolbars" in Windows 7. But at the same time, it should be noted that the algorithm for its implementation cannot be called intuitive for most users, and therefore it is necessary step-by-step instruction implementation of the described task, which was outlined in this article.
Welcome everyone to my blog and today we will learn how to make a quick panel ourselves Windows startup 7, it can be done in the same way on Windows 8.
A little background on this issue.
The Quick Launch Toolbar, which is usually located at the bottom of our desktop, has existed regularly since Windows XP and those who used it operating system, know exactly its purpose and capabilities.
However, starting with Windows 7, this function was eliminated from the standard arsenal and it became possible only through its additional creation using some knowledge and experience.
Many, like me, have been abolished in vain, it is very useful and the right opportunity correctly and competently organize your desktop on your PC and all your work in general.
For those who have not used the Quick Launch panel in Windows 7 or Windows 8, I will briefly tell you about its capabilities, first of all, the convenience of access to launching any program or file without leaving the desktop and without accessing the “All Programs” or “Search” function »
This significantly speeds up and, most importantly, simplifies your work on the computer.
P.S. For those who want to use even more capabilities of their computer and become an advanced user -
where you can not only completely customize your computer, but also make it work safely and reliably.
Best regards, Victor Knyazev
We continue to work on improving the standard interface of Windows 7. For some reason the developers removed this handy tool, like a quick launch bar. Over the years of use previous versions Windows, I got so used to it that on new system felt left out.But in Windows 7 it remains possible to create your own “Toolbars”. And, as it turned out, with a little effort and configuration, they can easily replace the Quick Launch panel. Now I will tell you how this is done.

First, unpin all programs from the taskbar. Right click on the program icon - “Remove program from taskbar”.

Each toolbar is associated with a specific folder on the disk, so create an empty folder in a convenient place in advance and name it, for example, “Quick Launch”. Some sites recommend creating this folder at the location where Windows XP places it. I deliberately abandoned this because I prefer to fill out the Quick Launch panel only manually, and do not allow any crooked program installers to uncontrollably litter it with their shortcuts.

To create a new toolbar, right-click on the Taskbar and select "Panels" - "Create toolbar..." from the menu. In the window that opens, select the created folder.

Drag the created toolbar all the way to the left on the Taskbar, and then fill it with the necessary shortcuts.

To remove the title and labels from the icons, right-click on the panel name, and in the menu that opens, uncheck the “Show captions” and “Show title” checkboxes.

The final touch: stretch the Quick Launch Toolbar to the desired width, and then dock the Taskbar. New icons are added to the Quick Launch Toolbar by simply dragging and dropping shortcuts onto the toolbar itself or copying shortcuts to the folder associated with it.
That's all, the harmony of the Universe has been restored again, the Quick Launch Panel is in its rightful place. But I would still recommend that Microsoft fire their usability consultant.